Table of Contents
Advertisement
Available languages
Available languages
Quick Links
Advertisement
Chapters
Table of Contents

Related Manuals for Topcom Deskmaster 142


Summary of Contents for Topcom Deskmaster 142
- Page 1 Deskmaster 142 KÄYTTÖOHJE USER GUIDE...
- Page 3 Deskmaster 142 !!Tärkeää!! Tilaa teleoperaattorilta soittajan numeronäyttöpalvelu. Ilman tätä tilausta puhelimen numeronäyttö ei toimi. Pidätämme oikeuden muutoksiin. !! Important !! To use ‘Caller ID’ (display caller), this service has to be activated on your phone line.Normally you need a separate subscription from your telephone company to activate this function.
-
Page 4: Table Of Contents
Deskmaster 142 Asennus Näppäimet ja merkkivalot Näyttö ja merkkivalot Perusnäyttö Merkkivalot Käyttö Näyttötekstien kielen valinta Päivämäärän ja kellonajan asetus Etunumeron asetus Puhelimen nollaus Puhelun soittaminen Valinnan toisto Mikrofonin mykistys Soittoäänen voimakkuus Katkosnäppäin Kuuloke toiminnot(valinnainen Soittajan numeronäyttö Yleistä Numeronäyttömuisti 6.2.1 Numeroluettelon selaaminen 6.2.2 Numeroiden poistaminen numeronäyttömuistista... -
Page 5: Asennus
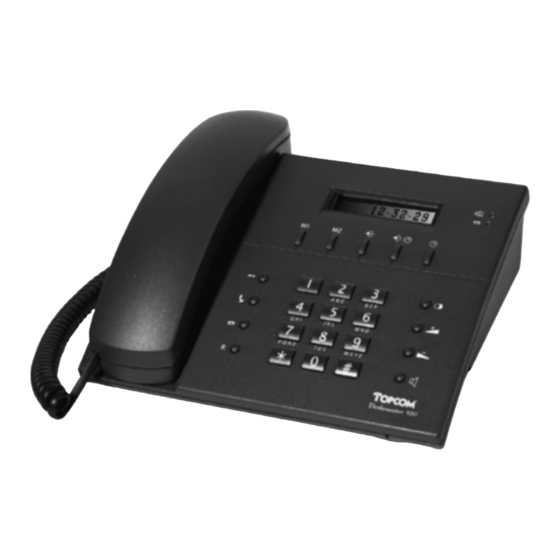
Deskmaster 142 1 ASENNUS • Liitä puhelinjohdon toinen pää seinässä olevaan puhelinpistorasiaan ja toinen pää puhelimen pohjassa olevaan liitäntään. • Asenna paristot, jolloin näyttö aktivoituu. - Avaa puhelimen pohjassa oleva paristolokero. - Aseta lokeroon 4 kpl 1,5 V AA-paristoja. - Sulje lokero. -
Page 6: Näyttö Ja Merkkivalot
Deskmaster 142 3 NÄYTTÖ JA MERKKIVALOT 3.1 Perusnäyttö Näyttö Merkitys 12:15 Kellonaika (24 tunnin muodossa). 09/12 Päivämäärä (päivä/kuukausi). Ilmoitus uudesta puheviestistä teleoperaattorin vastaajapalvelussa . 0123456789 Soittajan puhelinnumero. PIETER JANSSENS Soittajan nimi. Uusi puhelu soittoluettelossa. Soiton järjestysnumero, jos sen ohellä näkyy CALL#. -
Page 7: Käyttö
Deskmaster 142 4 KÄYTTÖ 4.1 Näyttötekstien kielen valinta Kieli valitaan seuraavalla tavalla: • Paina ALAS-näppäintä 6 sekuntia, jolloin järjestelmän symboli tulee näyttöön. • Etsi haluamasi kieli nuolinäppäimillä • Vahvista asetus ohjelmointinäppäimellä , jolloin siirryt seuraavaan asetukseen (4.2 Päivämäärän ja kellonajan asetus) tai sulje valikko painamalla puhelinmuistionäppäintä... -
Page 8: Puhelun Soittaminen
. Näppäile puhelinnumero. Huom! Näytön alarivillä näkyy puhelun pituus [h:mm:ss]. 5.1 Valinnan toisto Deskmaster 142 tallentaa 5 viimeksi valittua puhelinnumeroa ja niille puheluiden pituuden sekä kellonajan ja päivämäärän. Numeroita selataan uudelleenvalintanäppäimellä On kaksi tapaa soittaa uudelleen näytössä näkyvään numeroon: 1.Paina soittonäppäintä... -
Page 9: Soittajan Numeronäyttö
NR O ESTETTY 6.2 Numeronäyttömuisti Deskmaster 142 pystyy tallentamaan vähintään 199 viimeksi tulleen puhelun numeroa ja nimeä. Jos samasta numerosta on soitettu useampia kertoja, näyttö ilmoittaa soittokertojen lukumäärän (enintään 7). Jokaisesta soitosta tallentuu puhelinnumeron lisäksi päivämäärä ja kellonaika. -
Page 10: Numeroiden Poistaminen Numeronäyttömuistista
6.3 Ilmoitus puheviestistä !!! Tämä toiminto on mahdollinen vain, jos teleoperaattori lähettää ilmoituksia puhe- viesteistä numeronäyttöpalvelun ohella !!! Kun Deskmaster 142 ottaa vastaan ilmoituksen puheviestistä, sen näyttöön tulee kirjekuorisymboli . Symboli häviää, kun olet kuunnellut viestit. 6.4 Ilmoitus sähköpostiviestistä !!! Tämä toiminto on mahdollinen vain, jos sähköpostioperaattori ilmoittaa sähköpostiviesteistä... -
Page 11: Puhelinmuistio
• Paina ohjelmointinäppäintä Sähköpostista ilmoittavalle numerolle tallentuu puhelinmuistioon nimeksi ‘@’. 7 PUHELINMUISTIO Deskmaster 142:n elektroniseen puhelinmuistioon mahtuu 99 nimeä (15-merkkistä) ja puhelinnumeroa (22-numeroista). 7.1. Aakkosnumeerisen näppäimistön käyttö Kirjaimet asetetaan numeronäppäimillä. Kun esimerkiksi painat numeronäppäintä 5, saat näyttöön ensimmäisen sen alla olevan kirjaimen (J). Seuraavilla painalluksilla saat esiin muut tähän näppäimeen sisältyvät merkit. -
Page 12: Numeron Tallentaminen Puhelinmuistioon
Deskmaster 142 7.2 Numeron tallentaminen puhelinmuistioon • Paina ohjelmointinäppäintä , kun puhelin on lepotilassa. Näytössä näkyy TALLENNA NUMERO. • Näppäile puhelinnumero ja paina ohjelmointinäppäintä • Aseta nimi ja vahvista tallennus painamalla ohjelmointinäppäintä 7.3 Numeron siirtäminen numeronäyttömuistista puhelinmuistioon • Etsi puhelinnumero soittoluettelosta nuolinäppäimillä... -
Page 13: Pika- Ja Lyhytvalintamuistit
Deskmaster 142 8 PIKA- JA LYHYTVALINTAMUISTIT Voit tallentaa 3 pikavalintanumeroa (M1, M2 ja puheposti) ja 10 lyhytvalintanumeroa (0 - 9) puhelimen muistiin (puhelinnumeron enimmäispituus 22 numeroa, nimi 15 merkkiä). Nämä numerot valitaan painamalla M1-, M2- tai VM-näppäintä (yksi näppäin) tai muistinäppäintä... -
Page 14: Pika- Ja Lyhytvalintanumeron Poistaminen
Deskmaster 142 Huom! Puhepostinäppäimeen tallennettua numeroa ei ole mahdollista muuttaa. Sen tilalle voidaan vain asettaa toinen numero. 8.5 Pika- ja lyhytvalintanumeron poistaminen a) Pikavalinnat M1, M2 ja VM Paina ohjelmointinäppäintä ja sen jälkeen pikavalintanäppäintä. b)Lyhytvalinnat (0 - 9) Paina ohjelmointinäppäintä... - Page 15 Deskmaster 142 Installation Buttons/LED Display/LED Standard display information LED indicators Operation Setting the language of the display text Setting the Date and Time Setting the Dial Prefi x Telephone reset Making a phone call Last number redial Deactivating the microphone (mute)
-
Page 16: Installation
Deskmaster 142 1 INSTALLATION • Connect one end of the line cord to the telephone line wall socket and the other end to the bottom of the phone. • Put batteries in the battery compartment to activate the display : - Open the battery compartment at the bottom of the unit. -
Page 17: Display/Led
Deskmaster 142 3 DISPLAY/LED 3.1 Standard display information Display information Description 12:15 Time indication (24h format) 09/12 Date indication (day/month) You received new messages in the telephone network mailbox 0123456789 Caller’s telephone number PIETER JANSSENS Caller’s name You received a new call The number of the call in the Call list, when shown together with ‘CALL#’... -
Page 18: Operation
Deskmaster 142 4 OPERATION 4.1 Setting the language of the display text You can select the desired language as follows: • Press and hold the Down button for 6 seconds until the default language is shown on the display. • Press the Up and Down buttons to select the language. -
Page 19: Making A Phone Call
Note: The call duration timer is shown on the 3rd line of the display [h:mm:ss]. 5.1 Last number redial The Deskmaster 142 saves the 5 last dialled telephone numbers in the memory with indication of the call duration, the date and the time. Press the Redial button to scroll through the Redial memory. -
Page 20: Caller Id
N UM BER B LOCKED 6.2 Call list The Deskmaster 142 has a Call List in which you can save at least 199 incoming telephone numbers with name. The phone numbers you have received more than once, will also be saved with indication of the repeat call counter (max 7). -
Page 21: Erasing Numbers From The Call List
When you have received a new email message, your ISP will call your telephone using a special number. This call means you have received new email messages. If you program this number, with a special name, in the Phone Book, the Deskmaster 142 will recognize this number and will show the following symbol on the display:... -
Page 22: Phone Book
7 PHONE BOOK You can store up to 99 names (max. 15 characters) and numbers (max. 22 digits) in the Phone Book of the Deskmaster 142. 7.1. Use of the alphanumerical keypad Use the alphanumerical keypad to enter text. To select a letter, press the corresponding button. -
Page 23: Adding A Number To The Phone Book
Deskmaster 142 7.2 Adding a number to the Phone Book • Press the Set button when the unit is in standby mode. “ENTER NUMBER” appears on the display. • Enter the desired telephone number and press the Set button • Enter the name by means of the alphanumerical keypad and press the Set button c o n fir m . -
Page 24: Memory Numbers
Deskmaster 142 8 MEMORY NUMBERS You can program 3 Direct (M1-M2 and Voice Mail) and 10 Indirect (0-9) memory numbers (number: max 22 digits, name: max. 15 characters). These memory numbers can be dialled : by pressing M1, M2, or VM (one button) or the Memory button + 0…9 (two buttons). -
Page 25: Erasing A Number Or Name From The Direct/Indirect Memory
Deskmaster 142 8.5 Erasing a number or name from the Direct/Indirect Memory a) Erasing a direct memory number (M1-M2-VM) Press the Set button followed by the desired Memory button M1, M2 or VM. b)Erasing an indirect memory number (0-9) Press the Set button... - Page 26 www.topcom.be...