Sunrise Medical SEDEO PRO Instructions For Use Manual
Hide thumbs
Also See for SEDEO PRO:
- Assembly instructions manual (8 pages) ,
- Assembly instructions manual (8 pages)

Related Manuals for Sunrise Medical SEDEO PRO


Summary of Contents for Sunrise Medical SEDEO PRO
- Page 1 S e a t i n g S y s t e m P/N 248020 Rev. C Instructions For Use SEDEO ® S e at i n g m a n u a l...
- Page 2 Thank you for choosing a Quickie Power Chair. We want to We at Sunrise Medical want you to get the best out of hear your questions or comments about this manual, the your wheelchair. This Owner’s Manual will familiarize you safety and reliability of your system, and the service you with the chair and its features.
-
Page 3: Table Of Contents
10.0 Technical specifications ......... .. 39 5.1 Pre-set backrest frame depth ........... 13 10.1 Applicable norms / standards ........ 39 5.2 Pre-set armrests.............. 14 11.0 Guarantee / Warranty ........ .. 41 5.3 Pre-set backrest .............. 15 248020 Rev. C SEDEO PRO... -
Page 4: User Information
As a part of our ongoing product improvement initiative, Sunrise Medical reserves the right to change specifications and design without notice. Further, not all features and options offered are compatible with all configurations of the wheelchair. -
Page 5: Safety
This may cause burns or allergic reactions to the skin. Fig. 2.4 248020 Rev. C SEDEO PRO... -
Page 6: Safety: General Warnings
If damage is questionable or if there is To manually push the system you must release the concern regarding the condition of the chair, Sunrise Medical motor brakes. recommends replacement of the chair. -
Page 7: Safety: Moving Parts
Use of these items may cause your wheelchair to become unstable. • The vent tray must be installed and maintained by a Sunrise Medical authorized dealer. 2.6.2 Swing away tray DANGER! • The maximum load allowed for the tray is 5.5 lbs (2.5 Fig. -
Page 8: General Description
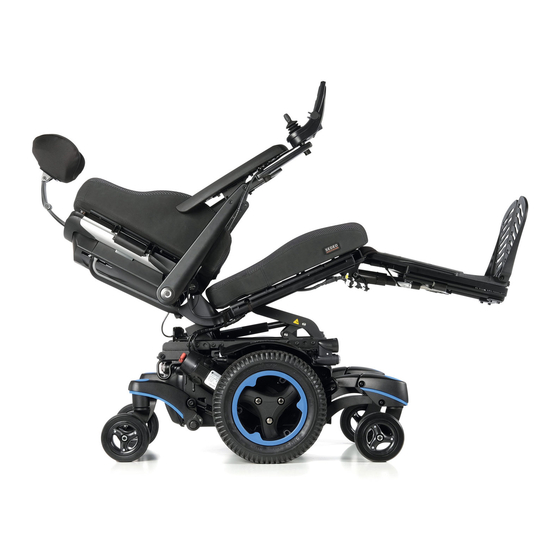
3.0 General description This wheelchair is equipped with the Sedeo Pro seating system. The Sedeo Pro seating system provides excellent support for the head, torso, arms, and legs. Optimal body support ensures maximum independence for the wheelchair user. The wheelchair must be adjusted by a qualified specialist. -
Page 9: Warnings For Components And Options
• If you use parts or make changes not authorized by The positioning belt is predominately used to support Sunrise Medical it may create a safety hazard and will your posture. It can also be used to limit slipping and/or void the warranty. -
Page 10: Seating Systems
Please contact your authorized dealer if you do not receive this information. Failure to do so may result in damage and/or injury. 248020 Rev. C SEDEO PRO... -
Page 11: Power Recline
Pinch Point Please stay clear of any powered actuator while Avoid putting hands, fingers, clothing items, or letting the component is in motion. Sunrise Medical children near the seating system when the Tilt/Lift power mechanisms move over large ranges of mechanism is in operation. -
Page 12: Transit
19. The upper torso restraint belt (A) must fit over the shoulder and across the chest (Fig. 4.3). 20. Restraint belts must be adjusted as tightly as possible consistent with user comfort, and should not constrict breathing (Fig. 4.4). 248020 Rev. C SEDEO PRO... -
Page 13: Setting Up The Seating System
• Mount extra seat depth mounting plate for seat depth 19-22 for more stability of the long seat rail (check with Sunrise Medical Customer Service for COG mounting location), Fig 5.4. DANGER! We strongly recommend that you contact your Sunrise Medical approved authorized dealer to adjust the seat depth, because Fig. -
Page 14: Pre-Set Armrests
1. Loosen (A) by one turn. 2. Adjust (B) to the desired position 3. Tighten (A). See page 38 for specified torque values. The seat width is indicated by the scale that runs alongside each slot (B). Fig. 5.7 248020 Rev. C SEDEO PRO... -
Page 15: Pre-Set Backrest
Backrest height with fixed back or reclining back (Fig 5.9 1. Loosen (A) by one turn. 2. Adjust (B) to the desired position. 3. Tighten (A). See page 38 for specified torque values. Fig. 5.8 Fig. 5.9 248020 Rev. C SEDEO PRO... -
Page 16: Pre-Set Flip Back Armrest
Armrest pad depth (Fig 5.12) 1. Loosen (A) by one turn. 2. Adjust (B) to the desired position. 3. Tighten (A). See page 38 for specified torque values. Fig. 5.11 Fig. 5.12 248020 Rev. C SEDEO PRO... - Page 17 6. Adjust the depth of (D) and tighten screws (C). Fig. 5.14 See page 38 for specified torque values. To reinstall: (Fig 5.13) 7. Reinstall the armpad (B) with screws (A). See page 38 for specified torque values. Fig. 5.15 Fig. 5.16 248020 Rev. C SEDEO PRO...
- Page 18 See page 38 for specified torque values. Fig. 5.17 Side guard height (Fig 5.18) 1. Loosen (A) by one turn. 2. Adjust (B) to the desired position. 3. Tighten (A). See page 38 for specified torque values. Fig. 5.18 248020 Rev. C SEDEO PRO...
-
Page 19: Pre-Set Reclining Flip Back Armrest
3. Tighten (A). See page 38 for specified torque values. WARNING! All screws should be checked periodically for tightness. A loose arm pad could slip down when pressed. See maintenance schedule on page 38. Fig. 5.20 Fig. 5.21 248020 Rev. C SEDEO PRO... -
Page 20: Pre-Set Fixed Center Mount Leg Rest (Short And Long)
1. Remove the two securing screws (C). (Use 5 mm hex key) 2. Move Calf Pads to desired height. 3. Tighten screws (C) through adjustment holes. See page 38 for specified torque values. Fig. 5.24 248020 Rev. C SEDEO PRO 248020 Rev. B SEDEO PRO... -
Page 21: Pre-Set Sedeo Seating Fixed Centermount Leg Rest
1. Loosen the two screws per calf pad (A) and adjust calf pads (C) to desired height. (Use 5 mm hex key) 2. When finished adjusting, tighten screws (A). (Use 5mm hex key). See page 38 for specified torque values. Fig. 5.26 248020 Rev. C SEDEO PRO... -
Page 22: Pre-Set Power Centermount Leg Rest
• As with all moving parts be careful not to trap your fingers. (Fig 5.27). Fig. 5.27 Removing the assembly. (5.28) 1. Remove the 3 screws(A) and lower the footrest assembly from the seat. (Use 5 mm hex key) *Neoprene cover not shown for clarity. Fig. 5.28 248020 Rev. C SEDEO PRO... - Page 23 3. Reinstall item A through items B, D, and E. 4. Torque item A to 120-132 IN-LBS (13.5-14.9 N-m). After the bolt torqued, the footplate should still rotate up and down but with 0.5-5 lbs of resistance. Fig. 5.31 248020 Rev. C SEDEO PRO...
-
Page 24: Pre-Set Swing Away Leg Rest
CAUTION! Check after setup and/or adjustment of wheelchair: After the initial setup by the Sunrise Medical authorized dealer or after making any adjustments to the wheelchair a check to confirm that no interferences exist needs must be completed. -
Page 25: Pre-Set Headrest
2. Adjust (B and C) to the desired positions. 3. Tighten (A). See page 38 for specified torque values. NOTE- Correct the headrest height and tilt the headrest Fig. 5.38 cushion as required. Fig. 5.39 248020 Rev. C SEDEO PRO... -
Page 26: Pre-Set Fixed/Swing Away Controller Bracket
Height of the controller (2) (Fig 5.43) 1. Loosen (C) by one turn. 2. Adjust (D) to the desired position. 3. Tighten (C). See page 38 for specified torque values. Fig. 5.41 Fig. 5.42 Fig. 5.43 248020 Rev. C SEDEO PRO... -
Page 27: Pre-Set Laterals
3. Tighten (A). See page 38 for specified torque values. 4. Loosen (C) by one turn 5. Adjust (B) to the desired position. 6. Tighten (C). See page 38 for specified torque values. Fig. 5.46 Fig. 5.47 248020 Rev. C SEDEO PRO... -
Page 28: Lap Seating Positioning Belt
• Check the belts regularly for correct fitting, to ensure the safety and comfort of the user. CAUTION! Standard Sling - Lap strap movement is restricted by upholstery. Contoured back - Use universal bo. t tom bracket as per recline back method. Fig. 5.51 248020 Rev. C SEDEO PRO... -
Page 29: Using The Seating System
6.0 Using the seating system 6.1 Getting in and out of the wheelchair (Transferring) Sunrise Medical recommend that you consult your healthcare professional for assistance in developing your personal front or side transfer technique to best suit your needs and avoid any personal injury. -
Page 30: Preparing For Side Transfer
1. Flip (A) to the rear. Fig. 6.5 6.4 Headrest Removing / positioning the headrest (Fig 6.7) 1. Loosen knob (A). 2. Slide (B) out of or into bracket (C). 3. Tighten (A). Fig. 6.6 Fig. 6.7 248020 Rev. C SEDEO PRO... -
Page 31: Swing Away Controller
DANGER! Do not use the push handles to tip the whole chair to the rear (in order to go up a sidewalk, for example). The push handle is not suitable for such use. Fig. 6.11 248020 Rev. C SEDEO PRO... -
Page 32: Manual And Powerd Seating Options
The angle of the comfort leg rests can be adjusted independently of each other. 1. Push handle (A) forwards. 2. While sitting in the chair lift your leg. 3. Release the handle when in the desired position. Fig. 7.2 248020 Rev. C SEDEO PRO... -
Page 33: Power Seating Options
• Please stay clear of any powered actuator while the component is in motion. Sunrise Medical power mechanisms move over large ranges of travel. Users should be aware of their surroundings while components are in motion. -
Page 34: Reducing The Seating System Size For Transportation
NOTE- If necessary, first remove the back cushion and/or the armrest assemblies. Folding the backrest fully forward with reclin (Fig 8. ) 1. Remove bolt and pin (A) to fold seat back forward. Do not discard the bolt and pin. Fig. 8. 248020 Rev. C SEDEO PRO... -
Page 35: Swing Away Leg Rests
8.3 Single post removable armrest Removing the armrest assembly (Fig 8.4) 1. Tip (A) downwards. 2. Remove (B). Fig. 8.3 Positioning the armrest assembly (8.5) 1. Slide (A) onto (B). 2. Push (C) upwards. Fig. 8.4 Fig. 8.5 248020 Rev. C SEDEO PRO... -
Page 36: Maintenance And Cleaning
Perform the daily check routine before driving as described wear, or other indicators of excessive wear. Discontinue below. use if damage is found and contact a Sunrise Medical Checking seating authorized dealer. • Ensure that all the cushions are in place. -
Page 37: Cleaning Your Seating System
• A complete inspection, safety check and service devices. should be made by a Sunrise Medical authorized Please take into account the manufacturer’s instructions or dealer at least once per year. the disinfectant you are using. -
Page 38: Cleaning Accessories
* Daily = Before each use of the wheelchair. Quarterly = Every three (3) months. If fasteners are found to be loose a Sunrise Medical authorized aealer should tighten the fastener to the torque setting per size detailed below, unless stated otherwise in all appropriate owner’s manuals or installation instructions (if applicable). -
Page 39: Technical Specifications
The Q-series meet the crash test requirements as described in ISO 7176-19 ISO 7176-4:2008 Wheelchair Energy Consumption Theoretical Range 450 lbs / 204 kg ANSI/RESNA WC-1:2009 Requirements and test methods for wheelchairs (including scooters) 2009 248020 Rev. C SEDEO PRO... - Page 40 248020 Rev. C SEDEO PRO...
-
Page 41: Guarantee / Warranty
5. WHAT AUTHORIZED DEALER MUST DO - 1. Obtain from Sunrise Medical, while this warranty is in effect, prior approval for return or repair of covered parts. Contact Customer Service for a Returned Material Authorization (RMA) number and information as to where to return the product. - Page 42 248020 Rev. C SEDEO PRO...
- Page 43 248020 Rev. C SEDEO PRO...
- Page 44 Website Addresses: = www.SunriseMedical.com = www.SunriseMedical.fr = www.SunriseMedical.es Customer Service 800.333.4000 In Canada 800.263.3390 Sunrise Medical 2842 N. Business Park Ave. Fresno, CA 93727 • USA ©2020 Sunrise Medical (US) LLC 07.2020 248020 Rev. C...