
Related Manuals for Astro Machine ASTROJET 1000P


Summary of Contents for Astro Machine ASTROJET 1000P
- Page 1 ASTROJET 1000P PRINTER OPERATOR MANUAL Astro Machine Corp. 630 Lively Blvd. Elk Grove Village, IL 60007 Phone: (847) 364-6363 Fax: (847) 364-9898 www.astromachine.com...
- Page 2 In addition, follow any specific occupational safety and health standards for your workplace or area. This manual is intended solely for the use and information of Astro Machine Corp., its designated agents, customers, and their employees. The information in this guide was obtained from several different sources that are deemed reliable by all industry standards.
-
Page 3: Table Of Contents
TABLE OF CONTENTS Table of Contents SECTION 1 – Getting Acquainted Operator View Rear View Control Panel SECTION 2 – Installing the Printer Choose a Location Connecting Printer Connecting to Computer Install Inkjet Cartridges Setting up Feed Installing Printer Driver SECTION 3 –... - Page 4 TABLE OF CONTENTS NOTES...
-
Page 5: Section 1 - Getting Acquainted
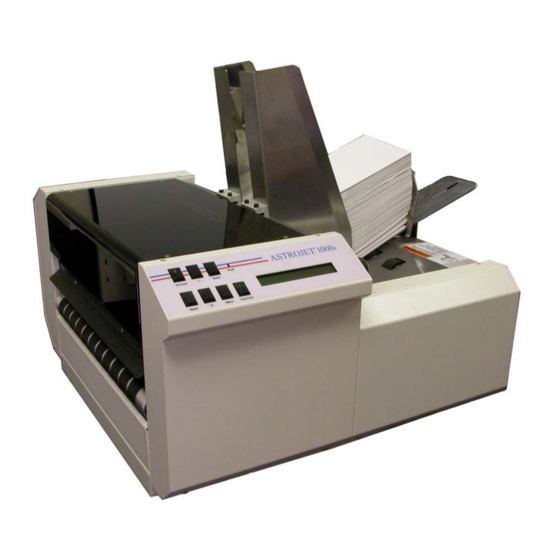
SECTION 1 GETTING ACQUAINTED SECTION 1 – Getting Acquainted Operator View Safety Cover – Encloses Printheads. When raised, it interrupts feeding of media and stops Printer. Media Side Guides – Help guide media to Printheads. Rear Media Guide – Holds media against Front Plate. Rear Media Support –... -
Page 6: Rear View
SECTION 1 GETTING ACQUAINTED Rear View Media Thickness Control Knob – Adjusts height of Printheads. Sheet Separator Locking Lever – Locks Separators in place after it is adjusted. Sheet Separator – Separates each piece of media as it is feed. USB Port –... -
Page 7: Control Panel
OPERATOR DISPLAY – Shows Printer’s status including menus and error messages. MEDIA THICKNESS ADJUSTMENT KNOB – Adjusts height of Printheads to compensate for different media thicknesses. NOTE: A complete description of the functions and operation of the Printer Keys can be found in Section 3 – Operating the ASTROJET 1000P. - Page 8 SECTION 1 GETTING ACQUAINTED NOTES...
-
Page 9: Section 2 - Installing The Printer
Install Inkjet Cartridges Set up feed on Printer Install Astrojet 1000P Printer Driver and BIOS Manager software on the computer Choose a Location Printer should be placed on a sturdy worktable or cabinet at least 12 inches from any walls. Protect Printer from excessive heat, dust, and moisture –... -
Page 10: Install Inkjet Cartridges
SECTION 2 INSTALLING THE PRINTER Install Inkjet Cartridges Printer can be configured with 5 Inkjet Cartridges. To install the Cartridges: 1. Remove Inkjet Cartridge from packaging, taking care not to touch copper contacts, metal plate, or gold printhead. Remove protective tape from Printhead. 2. -
Page 11: Installing Printer Driver
3. “Add Printer Wizard (n.nn)” window opens. Click Next>. 4. Type in your Name and Company. Click Next>. 5. Select printer port LPT1. Click Next>. “Add Printer Wizard” appears. Select your Printer from the table below, then click Next> Printer Driver AstroJet 1000p Address Printer 5... - Page 12 SECTION 2 INSTALLING THE PRINTER 6. Next screen allows you to “Name Your Printer”. Unless another Printer has the same name on your system or network ignore this step and click Next>. 7. Click Finish to complete the installation.
-
Page 13: Section 3 - Operating The Printer
Microsoft Word. Other types of applications and database management software will work in a similar manner using the Address Printer 5 Driver. This Section further assumes that you set up the feed and connected the Astrojet 1000P to your computer. Printer Operation When you first turn the Printer ON, the ON LINE key light blinks. - Page 14 SECTION 3 OPERATING THE PRINTER Press Enter to Purge – Purging is useful for clearing Printhead Nozzles when Printer has been sitting idle for a time. To activate Purge, press ENTER to feed one piece of media. To purge the Printheads additional times, press ENTER for each additional purge.
-
Page 15: Purge While Printing
SECTION 3 OPERATING THE PRINTER A second set of menus is available in the display. To activate, press and hold MENU until “Setup Menu” appears. Step through these items with “+” or “-” keys. Total Count – Displays total number of prints that have passed through the Printer. Non-resettable. BIOS Version –... - Page 16 SECTION 3 OPERATING THE PRINTER To start printing, click File, then Print. The Print window opens. To print the job, click OK. To use the special features built into the Address Printer 5 drivers, click the Properties button to open the Properties Window in Windows 95, 98, NT, or ME.
- Page 17 SECTION 3 OPERATING THE PRINTER You can change the speeds to a lower speed as follows: Resolution Speeds available 150 DPI Low, Medium, Medium High, and High 200 DPI Low, Medium, and Medium High 300 DPI Low, and Medium 600 DPI Feed Delay is used to put more space between pieces as they are printed.
- Page 18 Inverse Printing The Paper tab contains one element that is used to reverse or invert the printing on the AstroJet 1000P. In normal operation, the printing is read from the operator side of the Printer. It is sometimes necessary to turn the printing direction 180 degrees from the normal direction.
-
Page 19: Printing From Microsoft Word
Microsoft Word. This section covers how to layout a piece and to print from Microsoft Word. To begin, open a new page and turn on the toolbar for “Mail Merge”. Under “Print” select the Astrojet 1000P as the default Printer. Go to Page Setup in the File menu. - Page 20 SECTION 3 OPERATING THE PRINTER NOTE: When setting up a layout for the Astrojet 1000P, be aware that the Printheads are aligned in two banks and these banks face each other. Minimum distance between Printheads 1, 2, and 3 and Printheads 4 and 5 is 1-5/16".
-
Page 21: Printing From Desktop Mailer
SECTION 3 OPERATING THE PRINTER Next selection is “Records to be merged”. Select All or From: Last selection is “When merging records”. Default is “Don’t print blank lines when data fields are empty.” This should be left checked. Clicking Merge starts the process of merging the documents. If you chose to send the merge directly to the Printer and the Printer is connected to the computer and turned ON, the Printer will start. - Page 22 SECTION 3 OPERATING THE PRINTER g. Height of label = is equal to the number of Printheads on the AstroJet Printer used, times 1/2". This example uses a 5-head printer, therefore the height is 2-1/2". h. Form Top & Bottom Margins = should be set at 0.100 to insure that none of the data is lost. Height between labels = 0.000 Form Height = the height of the Printhead area or slightly larger.
- Page 23 SECTION 3 OPERATING THE PRINTER Printing To make the AstroJet Printer the default printer for this application, click Print, then select Printing Options. When the “Printing Options” window opens, select the Printers tab and highlight “Labels: Non-Presorted Labels” or “Labels: Presorted Labels”, then click the Change Printer button. Select the AstroJet Printer from your printer menu.
- Page 24 SECTION 3 OPERATING THE PRINTER NOTES...
-
Page 25: Section 4 - Maintenance
SECTION 4 MAINTENANCE SECTION 4 - Maintenance This section covers how to care for the Ink Cartridges, clear paper jams, replace the Sheet Separators, and perform routine maintenance on the Printer. Inkjet Cartridge Inkjet Cartridges must be replaced when out of ink, when print quality is poor, or when purging and cleaning have not helped the image quality. - Page 26 SECTION 4 MAINTENANCE Storage Short-term Storage (less than 2 days or less than 1 day in a hot and dry environment) Leave Cartridge in Printer for short periods of time, 1 day or less. Next time that Printer is used, Printhead may have to be cleaned and purged. Long-term Storage (more than 2 days or more than 1 day in a hot and dry environment) Keep Printhead in an area that is relatively free of dust and paper particles that is not too dry.
-
Page 27: Jams In Printer
SECTION 4 MAINTENANCE Purging the Nozzles If the Printhead sits inactive for a period of time, ink may dry in the nozzles. Printing may not remove these “ink plugs” from the nozzles. White streaks will then show up in the printed text or graphic. In order to obtain better print quality, these ink plugs need to be forced out or purged. -
Page 28: Replacing Feed Rollers
SECTION 4 MAINTENANCE Replacing Feed Rollers 1. Before removing Feed Roller Access Plate, unplug Printer. 2. Use a Phillips screwdriver to remove four screws from Feed Roller Access Plate. Remove Access Plate. 3. Determine which type of Roller (A or B) is installed on Printer. -
Page 29: Cleaning
SECTION 4 MAINTENANCE Cleaning WARNING! PRINTER IS A PRECISION MACHINE THAT SHOULD BE CLEANED REGULARLY TO INSURE MANY YEARS OF SERVICE. BEFORE PERFORMING ANY MAINTENANCE, DISCONNECT PRINTER FROM ITS POWER SOURCE! Printer must be cleaned regularly of accumulated paper dust and ink. Depending on the types of media that are run, paper dust may accumulate within the Printer and on the Transport. - Page 30 SECTION 4 MAINTENANCE NOTES...
-
Page 31: Section 5 - Troubleshooting Guide
SECTION 5 TROUBLESHOOTING SECTION 5 – Troubleshooting Guide Troubleshooting Guides are provided to assist you in solving any problems that might occur with the Printer or its software. We tried to make them as complete as possible. The best advice we can offer is to make sure that the system is setup properly, plugged in, that it has an adequate supply of ink before attempting to troubleshoot any problem. -
Page 32: Printer
SECTION 5 TROUBLESHOOTING Printer CONDITION PROBLEM SOLUTION Database problem Check data in database program Extra lines; losing data Improper output (address Wrong Interface settings Check software and/or database information out of order, on PC. miss-feeding, etc.) Static electricity Close AstroJet Control Panel Software, turn Printer OFF/ON. -
Page 33: Appendix A - Specifications
APPENDIX A APPENDIX A – Specifications PRINT TECHNOLOGY Inkjet, Five HP 45 High Capacity Inkjet Cartridges ADDRESS SPEED 22,000/hr - #10 Envelopes High Quality 600 x 600 DPI PRINT QUALITY Standard Quality 600 x 300 DPI (Dots Per Inch) Letter Quality 600 x 200 DPI Draft Quality 600 x 150 DPI... -
Page 34: Appendix B - Supplies And Optional Hardware
APPENDIX B APPENDIX B – Supplies and Optional Hardware The following supply items and optional hardware are available from your Astro Machine Dealer: Supplies Red Inkjet Cartridge HPC6168A Green Inkjet Cartridge HPC6169A Blue Inkjet Cartridge HPC6170A Yellow Inkjet Cartridge HPC6173A Versatile Black HPC8842A General Black (works on high gloss... -
Page 35: Index
INDEX INDEX - Key 3, 11 + Key 3, 11 Guides Rear Media Adjustment Knob, Media Thickness 1, 3 Side Media Barcode Font, Install Hardware, Optional Circuit Breaker, Motor Inkjet Cartridges Disposal Cleaning Feed Rollers Install Forwarding Rollers Maintenance Media Sensor Replace Printer Storage... - Page 36 INDEX Printer Choose Location Cleaning Connecting Control Panel 1, 3 Install Jams Maintenance Operating Purge Specifications Supplies & Hardware Troubleshooting 27, 28 Printer Driver Features Tab Install Paper Tab Print Heads Tab Properties Printhead Cleaning Printing, DeskTop Mailer Printing, Microsoft Word Purge Rear Media Guide Rear Media Support...
- Page 38 Copyright © 2015 ASTRO MACHINE CORP. Elk Grove Village, IL 60007 04/02/2015 Part Number: 200-AJ1000PUS Rev. F...