
Related Manuals for Invacare Captain's Seat


Summary of Contents for Invacare Captain's Seat
- Page 1 Invacare® Captain's Seat Power Wheelchair Seat User Manual This manual MUST be given to the user of the product. BEFORE using this product, this manual MUST be read and saved for future reference.
- Page 2 All rights reserved. Republication, duplication or modification in whole or in part is prohibited without prior written permission from Invacare. Trademarks are identified by ™ and ®. All trademarks are owned by or licensed to Invacare Corporation or its subsidiaries unless otherwise noted.
-
Page 3: Table Of Contents
4.3.4 Swivelling the Remote to the Side Contents About the Quad Link Swivel Remote to the Side Return Remote to Extended Position 1 General 4.4 Manual Center Mount Footrests 1.1 Introduction 4.4.1 Removing/Installing the Manual Center Mount Footrest 26 1.2 Symbols in This Manual 4.4.2 Adjusting the Height of the Manual Center Mount 1.3 Type of Use Footrest... - Page 4 6.6 About Transport Ready Packages 9.2 Service Inspection 6.7 Wheelchair Transport Brackets (TRBKTS) 9.2.1 Six Month Inspection 6.8 Transport Ready Option (TRRO) 9.3 Troubleshooting 6.9 Compliance Information 9.4 Installing/Removing 70NHD Footrest 6.10 Positioning the Wheelchair in the Vehicle 9.5 Adjusting/Replacing Telescoping Front Rigging Supports 6.11 Securement Points 9.6 Footrest Height Adjustment 6.12 Securing the Wheelchair...
-
Page 5: General
You can find the latest version as a pdf on the -Danger indicates a imminently hazardous Invacare website (see back page of this manual). If you find situation which, if not avoided, could result in that the font size in the print version of the user manual is death or serious injury. -
Page 6: Type Of Use
Invacare® Captain's Seat Identifies required tools, components and items which are needed to carry out certain work. Manufacturer 1.3 Type of Use 1.3.1 Prescription Statement Per 21 CFR 801.109(b)(1) the device is labeled for prescription use. CAUTION! Federal Law (USA) restricts this device to sale by or on the order of a licensed physician. -
Page 7: Safety
Invacare accessories. Unapproved instructional material such as user manual, service accessories have not been tested by Invacare manuals or instruction sheets supplied with this for use with Invacare products. product or optional equipment. - Page 8 Invacare® Captain's Seat DANGER! DANGER! Risk of Death, Serious Injury, or Damage Risk of Death, Serious Injury, or Damage Use of incorrect or improper replacement (service) Lighted cigarettes dropped onto an upholstered parts may cause death, serious injury, or damage.
- Page 9 -If Sip-n-Puff does not function properly, inspect system for blockages, clogged saliva trap or air leaks. As necessary, replace mouthpiece, breath tube and saliva trap. Contact your Invacare provider for more information about maintaining and troubleshooting the Sip-n-Puff system. 60101876-C...
-
Page 10: Usb Charger
Invacare® Captain's Seat As a manufacturer of wheelchairs, Invacare endeavors CAUTION! Risk of Damage to supply a wide variety of wheelchairs to meet many Operating the wheelchair in rain or dampness may needs of the end user. However, final selection of the... -
Page 11: Safety Information On Using The Seating System
2 Safety WARNING! WARNING! Risk of Injury or Damage Erratic or unintended movement of the wheelchair -This seating system has been custom designed and may occur if wireless transmitters are connected to will be assembled to the wheelchair base before the wheelchair. - Page 12 Invacare® Captain's Seat WARNING! WARNING! Risk of Tipping Risk of Tipping (Continued) The power wheelchair may tip over when you The power wheelchair may tip over when you change its stability characteristics by changing change its stability characteristics by changing your seating position.
-
Page 13: Pinch Points
If the drive lock-out does not property damage. If such devices are used, Invacare stop the wheelchair from operating or the seat from shall not be liable and the limited warranty is void. - Page 14 Invacare® Captain's Seat WARNING! Risk of Injury Pinch points can cause injury. -Be aware that a pinch point A exists between the head tube cap and walking beam/rear swingarm. -Be aware that a pinch point B exists between the walking beam/head tube cap and telescoping tube when the wheelchair is at the lowest seat to floor height.
-
Page 15: Footplates And Front Rigging
2 Safety Fig. 2-3 Pinch Points — Head Tube Cap/Walking Beam and Telescoping Tube WARNING! Risk of Injury Fig. 2-4 Pinch Points — Head Tube Cap/Walking Beam and Pinch points may occur when lowering the elevating seat. Telescoping Tube Pinch points can cause injury. 2.3 Footplates and Front Rigging -Make sure the hands and body of the occupant, attendants and bystanders are clear of all pinch... -
Page 16: Storage
Invacare® Captain's Seat motion, please contact your provider for an inspection and avoid use of the wheelchair if possible. CAUTION! Risk of Damage Interference between footrests and front casters may cause damage. -When determining the depth of the telescoping front frame tubes, make sure the rear of the footrests do not interfere with the movement of the front casters. -
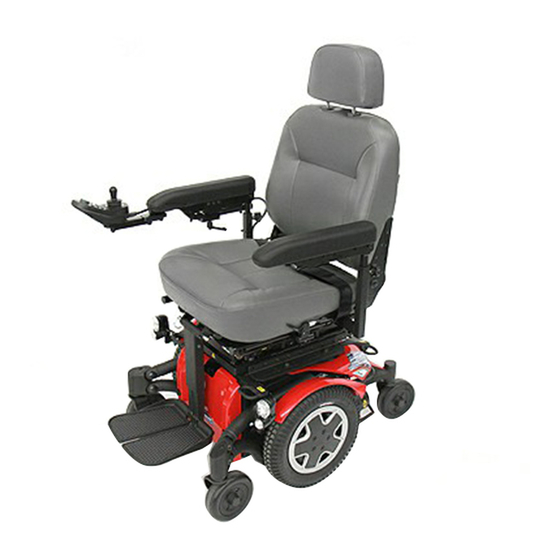
Page 17: Components
3 Components 3 Components ITEM DESCRIPTION 3.1 Component Overview Back Cushion Armrest Remote (Joystick) Seat Cushion Drive Wheel Fork Caster Fig. 3-1 AVIVA FX with Captain's Seat Front Rigging Headrest Anti-tipper 60101876-C... -
Page 18: Remotes
0 °C Remotes include joysticks and other devices used to drive the power wheelchair, operate the powered seating system or Invacare mobility devices are equipped with operate other functions. Your power wheelchair may be safety mechanisms that prevent capacity overload equipped with one of several different remotes. -
Page 19: Labels On The Product
-If you find that the drive slow-down function is not 60101879 working when the elevating seat is raised, do not drive with the elevating seat raised and immediately contact an Invacare provider. Fig. 3-2 WC19 Compliance Label 3.4 Labels on the Product 60101876-C... -
Page 20: Symbols On The Labels
Invacare® Captain's Seat ITEM PART NUMBER DESCRIPTION 1134811 ITEM PART NUMBER DESCRIPTION 1195716 3.4.1 Symbols on the Labels Fig. 3-3 TRRO Belt Label Refer to the following table for an explanation of the symbols on the labels. Wheelchairs with Transport Brackets (TRBKTS) - Page 21 3 Components WC19 Compliance Label ISO 7176 — 19 Compliance Refer to 7.2 Transport Ready Option (TRRO), page 49. ISO 7176 — 19 Non-Compliance Refer to 7.1 Wheelchair Transport Brackets (TRBKTS), page 49. 60101876-C...
-
Page 22: Setup
Invacare® Captain's Seat CAUTION! 4 Setup Risk of injury or damage If screws are not completely tightened during 4.1 Setup/Delivery Inspection Information adjustments, there is a risk of the remote being Setup/delivery inspection should be performed by pushed backwards during an accidental collision with provider at time of delivery/set up. -
Page 23: Adjusting Remote Width
4 Setup 4.2.1 Adjusting Remote Width 4.3.1 Adjusting Remote Height 1. Loosen the two set screws A on the remote mount. 1. Loosen the screws A. 2. Push or pull the remote mounting tube up or down to the 2. Adjust remote B to desired width. desired height. -
Page 24: Adjusting Lock Tension
Invacare® Captain's Seat CAUTION! Risk of Injury or Damage to Wheelchair Removing both magnets leaves Quad Link without lock. Quad link could retract unintentionally. -Always leave at least one magnet. Small pointed tool such as paper clip 1. Loosen screws B securing the remote C to the Quad Link D. -
Page 25: About The Quad Link
4 Setup The Quad Link works the best when the remote is pushed outward on the inside surface of the remote, near the armrest pad. 2. Push the remote outward and rearward until the Quad About the Quad Link Link moves through its complete range into its fully retracted position. -
Page 26: Removing/Installing The Manual Center Mount Footrest
Invacare® Captain's Seat Fig. 4-1 Pinch Points—Center Mount Footrest Risk of Serious Injury or Damage Operating the wheelchair with a clearance of less than 75 mm (3 inches) between the footplates and the ground/floor may cause serious injury or property damage. -
Page 27: Adjusting The Height Of The Manual Center Mount Footrest
4 Setup Removing 1. Remove the rigging pivot pin A that secures the footrest B to the mounting bracket C of the seat frame. 2. Hold the footrest with one hand and engage the release lever with the other while simultaneously pulling the center mount footrest out of the mounting bracket of the seat frame. -
Page 28: Adjusting The Footplate Width Of The Center Mount Footrest
Invacare® Captain's Seat Release lever located towards the front or center of Narrow configuration shown (No Spacers) seat frame. 1. Flip footplate I down 1. Review the safety information in 4.4 Manual Center Mount Footrests, page 25. 2. Remove the mounting screw J, nylon washer K, washer L and wave washer M securing the footplate to the 2. -
Page 29: Adjusting The Footplate Angle
4 Setup 4.4.6 Adjusting the Tension of the Flip Up Footplate Fig. 4-4 Medium Wide (Three Spacers) Fig. 4-5 Wide (Four Spacers) 4.4.5 Adjusting the Footplate Angle The tension can be adjusted to increase or decrease the rotation effort of the flip up footplates I. Manual Center Mount Footrest is shown for 1. -
Page 30: Accessories
Invacare® Captain's Seat 5.2 Using the Walker Holder 5 Accessories 5.1 Using the Crutch and Cane Holder 1. Fold the walker. Refer to the walker user manual. 2. Hang the top of the walker (not shown) on the hooks of the walker holder A. - Page 31 -The oxygen holder is designed to be used in conjunction with oxygen cylinder models MD15 and ME24 ONLY. -To maintain safety, use ONLY Invacare oxygen cylinder accessories (i.e. regulator, oxygen demand devices). -DO NOT use the oxygen holder for anything other than the intended purpose of supporting an oxygen cylinder—otherwise, injury or damage may occur.
-
Page 32: Usage
Drive Speed limit. The limit utilizes a microswitch to trigger the -Invacare will not be liable for any injuries or damage seating system into reduced speed drive as soon as: sustained when adjustments are made beyond the factory recommended settings. -
Page 33: Safety And Handling
6 Usage positioning system up to 12 in (300 mm) above the lowest seat- DANGER! Risk of Death or Serious Injury to-floor height of their system. The elevating seat is combined Not wearing your seat positioning strap could result in with a tilt function. - Page 34 Invacare® Captain's Seat WARNING! WARNING! Risk of Injury, Damage or Death Risk of Injury or Damage Misuse of wheelchair may result in injury, Improper operation may change the normal balance, damage or death. center of gravity or weight distribution of the -Use care when operating the wheelchair on roads, wheelchair causing injury or damage.
-
Page 35: Stability And Balance
Turn power off. different from other wheelchairs previously used. This power WARNING! wheelchair has Invacare’s SureStep® technology, a feature that Risk of Injury, Damage or Death provides the wheelchair with optimum traction and stability Damaged parts due to collision or impact may result in when driving forward over transitions and thresholds. -
Page 36: Reaching, Leaning And Bending - Forward
Invacare® Captain's Seat WARNING! WARNING! Risk of Injury, Damage or Death Risk of Injury or Damage Improper use of wheelchair may cause instability and Improper position and activity, such as reaching, may result in injury, damage or death. The stability of... -
Page 37: Reaching, Leaning And Bending - Backward
6 Usage establish your particular safety limits, practice bending, reaching 6.4.2 Reaching, Leaning and Bending - Backward and transferring activities in several combinations in the presence of a qualified healthcare professional before attempting active use of the wheelchair 1. Position wheelchair as close as possible to the desired object. - Page 38 4. ALWAYS engage both motor locks and wheel hubs (if equipped) to prevent the wheels from moving before transferring into or from the wheelchair. 5. Align casters parallel to the drive wheels to improve stability during transfer. 6. Invacare strongly recommends ordering the optional 60101876-C...
-
Page 39: Weight Training And Other Activities
6.5 Weight Training and Other Activities WARNING! Risk of Injury or Damage Invacare DOES NOT recommend the use of its wheelchairs as a weight training apparatus. Invacare wheelchairs have NOT been designed or tested as a seat for any kind of weight training. Using said... -
Page 40: Transport - Ansi/Resna Wc-4 Section
IV poles, trays, respiratory equipment, backpacks, and other personal items should be removed and secured separately. -Spill proof batteries, such as “gel cells”, should be installed on wheelchair to be used during travel in a motor vehicle. -Contact Invacare Corporation with any questions 60101876-C... -
Page 41: Wheelchair Transport Brackets (Trbkts)
It is available by the auto industry. Invacare cannot and does not Invacare’s position that users of wheelchairs should be recommend any wheelchair transportation system. -
Page 42: Compliance Information
Invacare® Captain's Seat available by the auto industry. Invacare cannot and does not ANSI = American National Standards Institute, RESNA= recommend any wheelchair transportation system. Rehabilitation Engineering and Assistive Technology Society of North America. WARNING! Risk of Injury, Damage or Death... -
Page 43: Positioning The Wheelchair In The Vehicle
6 Transport - ANSI/RESNA WC-4 Section 19 ANSI = American National Standards Institute, RESNA = WARNING! Risk of Injury Rehabilitation Engineering and Assistive Technology -Vehicle interior components that cannot be removed Society of North America. from the clear zones or that are near the wheelchair occupant may contact the wheelchair occupant's This wheelchair has been dynamically tested in a forward-facing head during side-impact collision or vehicle rollover. -
Page 44: Securement Points
Invacare® Captain's Seat 8 inches TIE DOWN BRACKETS (200mm) 8 inches (200mm) 20 inches (500mm) 20 inches (500mm) 6.12 Securing the Wheelchair This wheelchair is to be used only with Wheelchair Tie- down and Occupant Restraint Systems (WTORS) that have been installed in accordance with the manufacturer's instructions and SAE J2249. -
Page 45: Securing The Occupant
ANSI/RESNA WC/19. a different style pelvic belt. The pelvic belt provided by Invacare has been designed to accommodate use on either side of the vehicle. 1. Install the pelvic belt pin A into large end of slot B in the belt mounting bracket C. -
Page 46: Vehicle-Anchored Belts
Invacare® Captain's Seat 6.13.2 Vehicle-Anchored Belts RATING DESCRIPTION Fair Poor The test for Lateral Stability Displacement for Point P is shown in: TDXSP2V with Two GP24 Batteries - 0.54 in (13.7 mm) TDXSP2V-HD with Two GP24 Batteries - 0.75 in (19.2 mm) 6.13.3 Seating System... - Page 47 6 Transport - ANSI/RESNA WC-4 Section 19 DO NOT position belts OUTSIDE of armrest, wheels, etc. DO position belts INSIDE of armrests, wheels, etc. The angle of the pelvic belt should be within the preferred zone of 30 to 75 degrees to the horizontal OR within the optional zone of 45 to 75 degrees to the horizontal.
- Page 48 Invacare® Captain's Seat the shoulder over which the diagonal belt crosses and not near the midline of the occupant. 4. The belt(s) should not be held away from the body by wheelchair components or parts, including but not limited to wheelchair armrests or wheels.
-
Page 49: Transport - Iso 7176-19
Invacare cannot and does not 7.2 Transport Ready Option (TRRO) recommend any wheelchair transportation system. -
Page 50: Transport-General Information
Invacare® Captain's Seat Transport Ready Options have been crash-tested in WARNING! Risk of Injury, Damage or Death accordance with ISO 7176–19. Failure to observe and follow transport warnings and The wheelchair is identified by the following label: instructions may result in injury, damage or death. -
Page 51: Transferring Mobility Device To Vehicle
7 Transport - ISO 7176-19 7.4 Transferring Mobility Device to Vehicle WARNING! The mobility device is at risk of tipping over if it is WARNING! transferred to a vehicle while the user is still seated The mobility device is at risk of tipping over if it is in the mobility device transferred to a vehicle while the user is still seated -Alternatively, a platform lift may be used. -
Page 52: Use Of The Mobility Device As A Seat In A Vehicle
Invacare® Captain's Seat 7.5 Use of the Mobility Device as a Seat in WARNING! Risk of injury a Vehicle Safety restraint devices must only be used when the The following section does not apply to models or wheelchair user's weight is 14 lb (22kg) or more. -
Page 53: How The Mobility Device Is Anchored In A Vehicle
It is imperative that the mobility device is inspected by an CAUTION! Risk of injury exists if a mobility device that Invacare provider before being used again after being involved is not equipped with leak-proof batteries is in a crash. Alterations to the mobility device anchoring points transported in a vehicle. -
Page 54: How The User Is Secured Within The Mobility Device
-A headrest must be installed. The headrest optionally manufacturer's user manual. supplied for this mobility device by Invacare is 7.5.2 How The User is Secured Within the Mobility Device perfectly suitable for use during transport. -The headrest must be adjusted to the user's CAUTION! ear height. -
Page 55: Transporting The Mobility Device Without Occupant
30° and 75°. The angle should never be less than 30°! 2) Center of the sternum 7.6 Transporting the Mobility Device Without Occupant CAUTION! Risk of injury -If you are unable to fasten your mobility device securely in a transport vehicle, Invacare recommends that you do not transport it. 60101876-C... - Page 56 Before transporting your mobility device, make sure the motors are engaged and that the remote is switched off. Invacare strongly recommends that you disconnect or remove the batteries. Invacare strongly recommends securing the mobility device to the floor of the transporting vehicle.
-
Page 57: Maintenance
Pneumatic Tires and Tubes rubberized protective boots. Arm pads, Seat Cushion Invacare reserves the right to ask for any item back that has an Foam, Seat Cushion Covers, alleged defect in workmanship. Refer to the Warranty section in Back Cushion Foam, Back this manual for specific warranty information. -
Page 58: User/Attendant Inspection Checklists
Invacare® Captain's Seat Ensure seat and/or back upholstery have no rips and do 8.2 User/Attendant Inspection Checklists not sag. Replace if necessary. Initial adjustments should be made to suit your personal body structure needs and preferences. Ensure arm pivot points are not worn and/or loose. -
Page 59: Service Inspection Information
8 Maintenance them replaced by a qualified technician. CAUTION! Risk of Damage Check center mount front riggings for loose fasteners. Cleaning or maintenance may cause damage to Replace /tighten if necessary. carpeting or flooring. -Place the wheelchair in a well ventilated area where Check that all labels are present and legible. - Page 60 For upholstery that is severely stained or surface finish that is badly damaged, contact Invacare for further information. 1. Use the following instructions to clean this product unless otherwise specified.
-
Page 61: Service
9 Service Check that cables are routed and secured properly to 9 Service ensure that cables do NOT become entangled and 9.1 Setup/Delivery Inspection damaged during normal operation of seating system. Setup/delivery inspection should be performed by Ensure proper operation of powered functions (Example: provider at time of delivery/set up. -
Page 62: Six Month Inspection
Invacare® Captain's Seat Inspect seat positioning strap for any signs of wear. Ensure WARNING! Risk of Serious Injury or Damage buckle latches. Verify hardware that attaches strap to Hardware that is loosely secured could cause loss of frame is secure and undamaged. Replace if necessary. -
Page 63: Troubleshooting
9 Service Inspect all fasteners including the back pan, back cane and Illustration reflects right side footrest. angle adjustment fasteners, and the arm support, flip back and height adjustment fasteners. Ensure fasteners are securely tightened. Refer to the seating system service manual for torque specifications and tightening instructions. -
Page 64: Adjusting/Replacing Telescoping Front Rigging Supports
Invacare® Captain's Seat 2. Perform one of the following: 9.5 Adjusting/Replacing Telescoping Front Rigging Supports Adjusting - Align the appropriate mounting hole F of the telescoping front rigging support with the front mounting hole G in the seat frame tubes to achieve the desired depth as shown in the illustration. -
Page 65: Footrest Height Adjustment
9 Service telescoping front rigging support to the seat frame as footplate height to achieve proper clearance. After footplate height adjustment, if the wheelchair dips shown in the figure. forward and the footplates touch the ground while in 4. If necessary, repeat steps 1-3 on remaining telescoping motion, please contact your provider for an front rigging support. -
Page 66: Removing/Installing/Adjusting The Adjustable Heel Loop
Invacare® Captain's Seat secure the footrest assembly D to the footrest support E. 4. Reposition the lower footrest to the desired height. 5. Reinstall the hex bolt, washers and locknut that secure the lower footrest to the footrest support and tighten securely. -
Page 67: Adjusting The Adjustable Heel Loop
9 Service 1. Using the mounting screw A, spacer B, washer (not used 9.8 Adjusting Armrests on deluxe flip up footplate) C and cap nut D secure the adjustable heel loop E to the footplate F. WARNING! 2. Secure the hook G and loop H strips around the Risk of Minor to Serious Injury Pinch points can cause minor to serious injury. -
Page 68: Adjusting The Height
Invacare® Captain's Seat tightened. 9.9 Adjusting the Back Angle 6. Repeat STEPS 1-4 for opposite armrest, if necessary. 9.8.2 Adjusting the Height 1. Lift up on the release handle A and adjust seat to desired angle. 1. Remove the lock knob A that secures the armrest B to 2. -
Page 69: Adjusting The Headrest
9 Service 9.10 Adjusting the Headrest 1. To raise headrest A, lift headrest Up to desired position. Headrest is locked in position when an audible “click” is heard. 2. To lower headrest, push release tab B towards the inside of the wheelchair. Lower headrest to desired position. 60101876-C... -
Page 70: Technical Data
Invacare® Captain's Seat 10 Technical Data 10.1 Specifications Seat Width/Depth Compatibility Seat Depth 16 in 17 in 18 in 19 in 20 in 21 in** 22 in** 16 in* 18 in Seat Width 20 in 22 in 24 in** * Not available with HD base models. -
Page 71: Warranty
(excluding batteries), motors, powered one (1) year from the date Invacare ships the product to the seating actuators, gearboxes. Invacare warrants that the original purchaser or provider: base frame, electronics and... -
Page 72: Limitations And Exclusions
In the event you do not receive satisfactory Warranty service, limited to, modification through the use of unauthorized parts please write directly to Invacare at the address on the bottom or attachments), products damaged by reason of repairs made of the back cover. Provide provider's name address, date of... - Page 73 LIABLE FOR ANY DIRECT, INDIRECT, SPECIAL, INCIDENTAL OR CONSEQUENTIAL DAMAGES RESULTING FROM OR ARISING OUT OF OR RELATED TO A DEFECT IN ANY PRODUCT, OR INVACARE’S PERFORMANCE OR FAILURE TO PERFORM ANY OF ITS OBLIGATIONS UNDER THIS WARRANTY, WHETHER OR NOT...
- Page 74 Notes...
- Page 75 Notes...
- Page 76 Invacare Corporation One Invacare Way, Elyria, OH 44074, USA • 800-333-6900 • www.invacare.com Canada 570 Matheson Blvd E Unit 8, Mississauga, Ontario, L4Z 4G4 Canada • 800-668-5324 • www.invacare.ca Manufacturer Invacare Corporation • 1200 Taylor Street • Elyria, OH 44074, USA 60101876-C 2020-01-13 Making Life's Experiences Possible®...