Table of Contents
Advertisement
Advertisement
Table of Contents

Related Manuals for X10 IconRemote IR10A


Summary of Contents for X10 IconRemote IR10A
- Page 1 IconRemote ™ Owner’s Manual Model IR10A...
-
Page 2: Table Of Contents
Punchthrough ... 35 KidSafe ... 37 Introduction Congratulations on your purchase of this IR10A Universal Remote Control. Universal Remotes let you replace a broken or lost remote or combine more than one remote into one. But this remote is really unique, having a high quality color screen, like the kind you see on cell phones. -
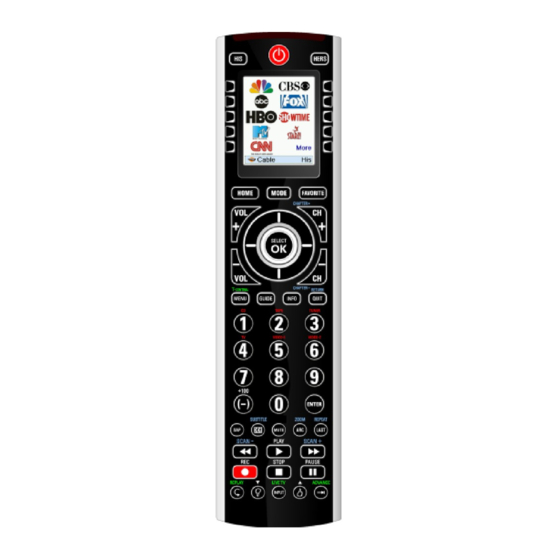
Page 3: Hard Key Functions
Hard Key Functions Hard Key Functions, cont. HIS/HERS - Quick access keys for favorites stored under His/ Hers groups. SIDE KEYS - Used to access on-screen features. LCD - (Liquid Crystal Display). MODE - Selects mode (TV, VCR, etc.) for the remote. HOME - The starting screen on the LCD for most operations. -
Page 4: Setup
Setup Battery Installation 1. On the back of the remote, push down on the tab and lift the cover off. 2. Match the batteries to the + and - marks inside the battery case, then insert 3 AA Alkaline batteries. Make sure you use new batteries. -
Page 5: Setting Up Your Devices
Setting Up Your Devices How to set up a TV After you’ve been through the Wizard for the first time, the screen (1) shown to the right appears. This is the start of the Wizard to set up your devices (TV being the first one). -
Page 6: Setting Up Your Favorites
Setting Up Your Favorites Once you’ve gone through the Wizard and set up at least a TV, and set up more devices, or skipped the rest of them, you arrive at screen (1) to the right. Press any digit key, say digit 4, to enter a channel number. -
Page 7: Using The Remote
Setting Up Your Favorites, cont. Note: “Triple tap” name entry works in a similar fashion to text entry on a cell phone. Tap each numeric key to cycle through ALL caps, numbers, and lower case letters. E.G., repeatedly pressing the number 2 key cycles through A, B, C, 2, a, b, c. -
Page 8: Quickpower
QuickPower QuickPower is a way of quickly turning all your devices on or off from one easy to use screen. Press the HOME Key to go to the Home screen. Then press the Side Key next to QuickPower. Only Devices you’ve previously set up are displayed. -
Page 9: Learning
If you press a right Side Key (to select Main Keys) you are going to learn, say, the Chan Up key from an existing remote and store it under the Chan Up key on the IR10A remote. Or learn the Power key from an existing remote and store it under the Power key on the IR10A remote, etc. -
Page 10: Learning Main Keys
You are then instructed to line up the remotes, and press the key on the IR10A remote that you want to learn. You then point the remote you want to... -
Page 11: Learning Side Keys
In this case let’s set a 1 second delay between commands. Then point your existing remote at the bottom of the IR10A remote and press OK when you’re ready. You then press the second key on your original remote that you want to add to the Macro. - Page 12 Learning Side Keys, cont. Next point the remote you want to learn commands from at the bottom of the IR10A remote, and press OK when you’re ready. (See Tips on Learning on page 16). Next press the key (on the other remote) for the function you want to learn.
-
Page 13: Learning Macros - Side Keys
Learning Macros (Side Keys) A Macro could include the Power key for your TV, followed by the Power key for your Cable box, followed (after a 2 second delay), by digit 4 from your cable remote. Then when you later activate this Macro it will turn on your TV, turn on your cable box, wait 2 seconds then set the cable box to channel 4. -
Page 14: Setting Up More
Learning Macros, cont. Point your existing remote at the bottom of the IR10A remote and press OK when you’re ready. Then press your next key. After adding more keys you can keep the label for the key (in this case L1) or select Change Label, by pressing Side Key K9. -
Page 15: Setting Up More Favorites
Setting up more, cont. Setting up more Favorites When you first inserted the batteries in the remote you likely went through the Wizard and set up a few favorites. You could only set up 10 favorites at that time. Here’s how to set up more favorites. Press the HOME key to display the Home screen. -
Page 16: Reordering Favorites
Setting up more, cont. Reordering Favorites This lets you move the favorites that you previously set up in a group, to different locations on the screen, i.e., reorder them. Press the HOME key, select Setup, and then select Favorites. Then at the screen to the right select Reorder. -
Page 17: Renaming Favorite Groups
Setting up more, cont. Renaming Favorite Groups This lets you Rename the groups that you save your favorites in. For example you might want to rename His to Dave, or Hers to Isabel. Press the HOME key, select Setup, and then select Favorites. -
Page 18: Advanced Settings
Advanced Settings Press the HOME key, then select Setup, then select Advanced. The screen to the right lets you change the backlight delay; enter codes for devices directly from the printed code list that came with the remote; set up punchthrough for various devices;... -
Page 19: Kidsafe
Advanced Settings, cont. Punchthrough, cont. At this screen you set how you want the Volume Up/Down and Mute keys to operate when the remote is in TV mode. Then you select how you want the Channel Up/Down keys to operate when the remote is in TV mode. -
Page 20: X10 Home Control
IR543 and X10 Lamp, Appliance, and Wall Switch Modules you’ll be able to control lights and appliances from your IR10A iconRemote. You point the iconRemote at the IR543, it receives IR commands and converts them to X10 commands. Refer to page 34 and set up code 0401 under AUX (or any other mode you prefer). - Page 21 X10.com, a Division of X10 Wireless Technology, Inc. 3824 North 5th St., Suite C, North Las Vegas, NV 89032 Web Site: http://www.x10.com IR10A-3/07...