Rational iCombi Pro Original User Manual
Hide thumbs
Also See for iCombi Pro:
- Original instructions for use (188 pages) ,
- Original installation manual (108 pages) ,
- Original installation instructions (100 pages)
Table of Contents
Advertisement
Quick Links
Advertisement
Table of Contents

Related Manuals for Rational iCombi Pro


Summary of Contents for Rational iCombi Pro
- Page 1 ® iCombi Pro. Original user’s manual...
-
Page 3: Table Of Contents
Technical changes......................2 General safety information ....................10 Safety information for units with gas line connections ..........12 Personal protective equipment..................13 3 The iCombi Pro ......................... 14 Type XS............................14 Tabletop units.......................... 14 Floor units..........................15 4 Working with the unit......................16 Initial start-up .......................... - Page 4 4.7.2 Loading Combi-Duos using the mobile oven rack or mobile plate rack..22 Inserting core temperature probes ................... 23 Using the hand shower......................27 4.10 Removing hinging racks ....................... 28 5 Intelligent cooking - iCookingSuite..................30 Cooking food intelligently ....................30 5.1.1 Accessing intelligent cooking paths...............
- Page 5 13.1.2 Downloading HACCP data ..................52 13.1.3 Transmitting HACCP data to ConnectedCooking automatically ....52 14 Automatic cleaning - iCareSystem ..................54 14.1 General safety information....................54 14.2 Cleaning modes ........................55 14.3 Cleaning programs......................... 55 14.4 Starting automatic cleaning....................56 14.5 Canceling automatic cleaning .....................
- Page 6 18 Transport............................ 76 18.1 Transporting the unit ......................76 19 Decommissioning and disposal .................... 78 19.1 Decommissioning ........................78 19.2 Disposal............................. 78 20 Technical data..........................79 20.1 Units with electrical connections..................79 20.2 Units with gas connections ....................79 20.3 Conformity ..........................
-
Page 7: Introduction
Introduction Dear customer, Congratulations on the purchase of your new iCombi Pro! Please read this user’s manual through carefully before powering up your appliance for the first time. This manual contains important information on how to operate the system safely. -
Page 8: Intended Use
Intended use The iCombi Pro is designed for purposes of thermic food preparation. This unit is only intended for commercial use, such as in restaurant kitchens or catering operations for schools, hospitals, or delis. Do not use this unit outdoors. -
Page 9: Illustrations
1 | Introduction DANGER The word DANGER indicates a situation that will result in severe injuries or death. WARNING The word WARNING indicates a situation that could result in severe injuries or death. CAUTION The word CAUTION indicates a situation that could result in injuries. NOTE The word NOTE indicates a situation that could result in damage to the unit. -
Page 10: General Safety Information
All maintenance on this unit should be performed by your RATIONAL Service Partner. Do not modify the unit or the way your RATIONAL Service Partner has installed it. Do not use the unit if it is damaged. Damaged units are unsafe and could cause burns or other injuries. - Page 11 2 | General safety information If the unit has been inactive for a longer period of time, rinse out the hand shower with at least 10 liters of water before using the unit again. Safety instructions during use To avoid scalding and burn injuries: –...
-
Page 12: Safety Information For Units With Gas Line Connections
Otherwise, hot food could splash out. To prevent equipment damage due to improper use of accessories: – Only use original RATIONAL accessories. – Only smoke food using the VarioSmoker. Safety instructions after use Clean the unit after each use. -
Page 13: Personal Protective Equipment
2 | General safety information – Do not switch any lights or equipment on or off. Do not unplug anything. Do not use any landlines or mobile phones. Any of these could create sparks and increase the risk of explosion. –... -
Page 14: The Icombi Pro
3 | The iCombi Pro The iCombi Pro Type XS Cooking cabinet Control panel Display Cooking cabinet door Door handle Central selection knob USB port Care drawer Air filter Hand shower Tabletop units Control panel Cooking cabinet Display Cooking cabinet door... -
Page 15: Floor Units
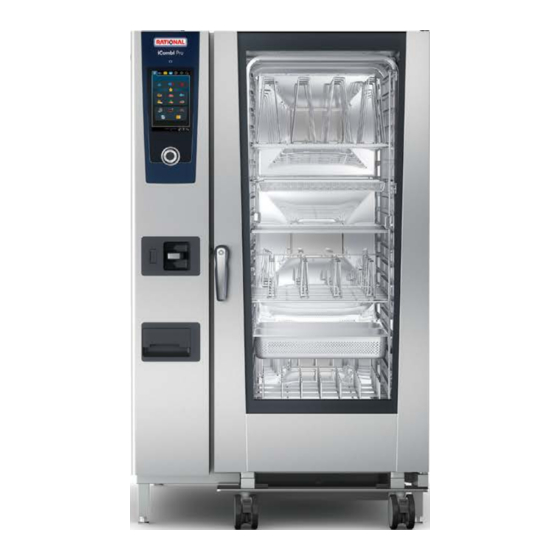
3 | The iCombi Pro Floor units Control panel Display Cooking cabinet Central selection knob Hand shower Cooking cabinet door USB port Door handle Care drawer Air filter Type 20-1/1 Type 20-2/1 Original user’s manual 15 / 84... -
Page 16: Working With The Unit
When you start your unit for the first time, it will have already been properly installed by a RATIONAL Service Partner. The self-test will have been completed, so the unit will be ready for use. Information related to installation is available in the installation manual included in delivery. -
Page 17: Home Screen
4 | Working with the unit Home screen iProductionManager iCookingSuite Programming mode Search assistant Home iCareSystem Manual operating modes Favorites Intelligent operating modes Date, time, status Cooking methods Settings Help Back / Cancel iProductionManager [} 45] Intelligent cooking - iCookingSuite [} 30] Home Pressing this button will take you to the home screen. -
Page 18: Date, Time, Status
4 | Working with the unit Unit help function [} 66] Back / Cancel Pressing this button will take you back to the previous screen. Press and hold this button in order to cancel the cooking process. 4.3.1 Date, time, status The footer bar always shows the current date and time, as well as the status of the following ports and connections: USB stick connected... -
Page 19: Interacting With The Unit
4 | Working with the unit Interacting with the unit NOTE Improper display operation Using a sharp object to operate the display could damage the display. 1. Only operate the unit using your hands. 4.4.1 Gestures You can operate the display using a few simple gestures. Pressing Swiping Scrolling... -
Page 20: Opening And Shutting The Cooking Cabinet Door
4 | Working with the unit Model Max. load capacity [lb] Max. load per tray 6-1/1 66 lb (30 kg) 33 lb (15 kg) 6-2/1 132 lb (60 kg) 66 lb (30 kg) 10-1/1 99 lb (45 kg) 33 lb (15 kg) 10-2/1 198 lb (90 kg) 66 lb (30 kg) -
Page 21: Load Unit
4 | Working with the unit 1. Close the cooking cabinet door, and then turn the handle to the left, into the vertical position. Load unit 1. Open the cooking cabinet door. > The fan brake is activated, stopping the fan. 2. -
Page 22: Loading Combi-Duos Using The Mobile Oven Rack Or Mobile Plate Rack
4 | Working with the unit 1. Remove the hinging rack [} 28]. 2. Place the run-in rails for the mobile oven rack on the floor of the cooking cabinet such that the two anchoring pins at the back of the cooking cabinet are within the corresponding recesses. -
Page 23: Inserting Core Temperature Probes
4 | Working with the unit 4. After that, slide the transport cart into the unit until it reaches the stop position. 5. To load the upper unit of the Combi-Duo, press the lever on the transport cart and pull the handle towards you. >... - Page 24 4 | Working with the unit CAUTION Hot core temperature probe Touching the hot core temperature probe without protective gloves could result in burns. 1. Always wear gloves when working with hot core temperature probes. 2. If necessary, use the hand shower to cool the core temperature probe down.
- Page 25 4 | Working with the unit Meat, e.g., steak Whole chicken Small products, e.g., stew meat Fish fillets Whole fish Vegetables, e.g., potatoes Meat, e.g., steak 1. Insert the core temperature probe into the food at an angle, all the way to the handle, so that the core temperature probe is as far down into the food as possible.
- Page 26 4 | Working with the unit Large pieces of meat, e.g., roasts 1. Insert the core temperature probe into the thickest part of the meat, all the way to the handle. Small products, e.g., stew meat 1. Thread the core temperature probe through pieces of the food until the temperature probe is fully covered from tip to handle.
-
Page 27: Using The Hand Shower
4 | Working with the unit Use the optionally available positioning aid. Finishing with the mobile plate rack 1. Insert the core temperature probe into the white ceramic tube on the mobile plate rack. Core temperature probe not detected The display will show this symbol: 1. -
Page 28: Removing Hinging Racks
4 | Working with the unit NOTE Improper hand shower operation Yanking the hand shower hose or extending it past the maximum available hose length can damage the hand shower’s automatic return mechanism, after which the hand shower will no longer retract into the housing automatically. 1. - Page 29 4 | Working with the unit Type 6-1/1, 6-2/1, 10-1/1, 10-2/1 1. Grasp the hinging rack in the middle of the upper level. 2. Push the hinging rack upward. 3. Tilt the hinging rack into the cooking cabinet. 4. Unhook the hinging rack and remove it from the cooking cabinet. Original user’s manual 29 / 84...
-
Page 30: Intelligent Cooking - Icookingsuite
5 | Intelligent cooking - iCookingSuite Intelligent cooking - iCookingSuite The iCookingSuite is your iCombi Pro‘s cooking intelligence. You specify which type of food you want to prepare using which cooking method, and then you’ll be taken to a list of cooking paths to choose from in order to get the results you want. -
Page 31: Starting An Intelligent Cooking Path
5 | Intelligent cooking - iCookingSuite by choosing an operating mode, e.g., vegetables and side dishes. by choosing a cooking method, e.g., braising. by choosing an operating mode as well as a cooking method. After making your selection, any matching intelligent cooking paths will be shown on the display. -
Page 32: Fine-Tuning Your Results
5 | Intelligent cooking - iCookingSuite > The intelligent cooking path will start, and the cooking cabinet will be preheated to the set climate. 4. Use the cooking parameters to specify the results you want [} 32]. > After a few moments, the display will switch to Cockpit view. >... - Page 33 5 | Intelligent cooking - iCookingSuite Searing is done at a very high temperature, which reliably kills any bacteria on the outside of the product, so you can use a lower core temperature without worrying about hygiene issues. Browning Use this cooking parameter to indicate how brown you want the outside of the food.
- Page 34 5 | Intelligent cooking - iCookingSuite To view the current cooking cabinet temperature and humidity level: 1. Press and hold > After 10 seconds, the current cooking cabinet temperature will be displayed. 2. Release the button to return to the set parameters. Cooking time Use this cooking parameter to set a time within which you want your desired results (e.g., a certain degree of doneness).
-
Page 35: Additional Functions
5 | Intelligent cooking - iCookingSuite The smaller the difference between the cooking cabinet temperature and the core temperature, the more slowly and gently the food will cook. The greater the difference between the cooking cabinet temperature and the core temperature, the quicker the food will cook. -
Page 36: Prompts
5 | Intelligent cooking - iCookingSuite 5.2.3 Prompts Cancel All cooking paths in progress will be canceled. Load Load the food into the unit. Confirm The unit is prompting you to confirm an action. Brush Brush something onto the food now (for example, brush egg wash onto baked goods). -
Page 37: Options
5 | Intelligent cooking - iCookingSuite Time remaining This is how much longer the intelligent cooking path will take to complete. End of cooking path The cooking path is finished. 5.2.5 Options Hold Use this option either to hold the cooking cabinet climate for a period of time, or to maintain the food’s core temperature. - Page 38 5 | Intelligent cooking - iCookingSuite Time continued Use this option to continue the cooking path for a specific amount of time. Crisp Use this option to brown the outside of the food, creating a crisp, delicious crust. When preparing mixed loads, remove the food you do not want crisped from the cooking cabinet before starting the Crisp option.
-
Page 39: Manual Cooking
6 | Manual cooking Manual cooking In manual operating modes, your iCombi Pro assists you in practicing your own culinary artistry. After choosing this operating mode, adjust your climate settings, and then select whether you want to cook with steam, hot air, or a combination of both. Then set the cooking cabinet temperature, the air speed, and the cooking time, and make any remaining decisions yourself. -
Page 40: Additional Functions
6 | Manual cooking In Combi Steam mode, the steam generator supplements the food’s natural moisture. If the humidity exceeds the set humidity level, the cooking cabinet is dehumidified. In Hot Air mode, the steam generator does not supply additional moisture - all moisture comes from the food itself. -
Page 41: Prompts And Information
6 | Manual cooking Air speed This additional function is used to set fan speed. The higher the level, the higher the fan speed. Choose a low level for small, delicate products. Steam injection With this additional function, water is sprayed from the steam nozzle onto the heating element during cooking. -
Page 42: Sous-Vide Cooking
7 | Sous-vide cooking Sous-vide cooking In sous-vide cooking, food is prepared, seasoned, marinated and/or seared before being placed into a vacuum bag and cooked at a low temperature. The method results in very flavorful food which retains its natural color, vitamins and minerals, and the gentle cooking process minimizes cooking losses. -
Page 43: Low Temperature Cooking
It also takes up space in your appliances for hours on end. With the iCombi Pro, on the other hand, challenges like these are no problem at all: you can roast, boil, or braise food slowly at low temperatures during off-peak hours, such as during the afternoon or outside of service periods, so you can make optimum use of your unit up to 24 hours a day. -
Page 44: Finishing
9 | Finishing Finishing Finishing allows you to separate food production and service, giving you more flexibility to spend time on important things like planning, menu design, or creative plating. Finishing minimizes loss of quality caused by long holding periods, so your food always comes out tasting great. Fluctuating traffic in the dining room? No problem! Finish only as much food as you currently need. -
Page 45: Iproductionmanager
10 | iProductionManager iProductionManager iProductionManager organizes the entire production process intelligently and flexibly. It identifies which foods can be prepared together, determines the perfect order to prepare them in, and monitors each cooking path separately. iProductionManager lets you know when each dish needs to be put in or taken out. -
Page 46: Programming Mode
11 | Programming mode Programming mode Programming mode allows you to create, save, and manage your own cooking paths and shopping carts. You can choose from among any of the available manual operating modes [} 39], intelligent cooking paths [} 30] and pre- programmed shopping carts. - Page 47 11 | Programming mode 5. To edit the cooking step, press this button: > The cooking parameters and additional functions available for that operating mode will be displayed. Cooking step Cooking parameter Additional functions Preheat Cooking cabinet Air speed temperature Five levels are available to choose from.
-
Page 48: Programming Intelligent Cooking Paths
11 | Programming mode 1. Adjust the cooking step as desired. 2. To save your changes, press 3. Drag-and-drop additional cooking steps into the bottom section. 4. To give the cooking path a name, press 5. Enter a name. 6. To save the cooking path, press >>... - Page 49 11 | Programming mode After making your selection, any matching intelligent cooking paths will be shown on the display. 1. Select an intelligent cooking path. > The individual cooking steps will be displayed. Now you are ready to adjust the cooking parameters to fit your needs. The first cooking step will be highlighted in red.
-
Page 50: Settings
12 | Settings Settings You can permanently adjust your unit’s factory default settings to fit your needs. 1. Press this button: > You will see a list of all available settings options: Favorites Display Light Sound Unit Cooking Clean Data Management Network Settings MyEnergy Messenger... -
Page 51: Kitchen Management
ConnectedCooking ConnectedCooking is RATIONAL’s state-of-the-art networking solution. Whether you own one RATIONAL unit or several, ConnectedCooking opens up a wealth of new and convenient possibilities. All you have to do is connect your RATIONAL unit to a network and then visit connectedcooking.com to register. -
Page 52: Downloading Haccp Data
13 | Kitchen management Date and time Cleaning program Cooking cabinet temperature Target core temperature Measured core temperature Time (hh.mm.ss) Temperature unit Connection to energy-optimization system Half energy Cooking path name Opening / shutting of cooking cabinet door Change in operating mode Automatic cleaning 13.1.2 Downloading HACCP data... - Page 53 13 | Kitchen management >> Now HACCP data will be transmitted automatically upon completion of each cooking path. You can view that data on connectedcooking.com or through the ConnectedCooking app. Original user’s manual 53 / 84...
-
Page 54: Automatic Cleaning - Icaresystem
14 | Automatic cleaning - iCareSystem Automatic cleaning - iCareSystem The iCareSystem is your iCombi Pro‘s intelligent cleaning and descaling system. It detects how much cleaning your unit currently needs and suggests a cleaning program in response, including the ideal quantity of cleaning agent. -
Page 55: Cleaning Modes
14 | Automatic cleaning - iCareSystem Do not clean the externally attached core temperature probes using automatic cleaning. Before preheating the unit for cooking, remove all cleaning products and cleaning product residues. How to respond if you come into contact with cleaning chemicals: If you touch cleaning agents when not wearing gloves or your skin otherwise comes into contact with Active Green cleaner tabs, rinse your skin with running water for 10 minutes. -
Page 56: Starting Automatic Cleaning
14 | Automatic cleaning - iCareSystem Program Mode Description Care product when using the unit at temperatures of up to 400°F. medium Eco / Suitable for removing Active Green Normal stains and limescale cleaner tabs that have accumulated Care tabs during cooking paths involving grilling or frying. - Page 57 14 | Automatic cleaning - iCareSystem 1. In the menu bar, press > If the temperature inside the cooking cabinet is above 120°F, a message will appear reading: Cooking cabinet too hot 2. Start the Cool Down function [} 40] to lower the cooking cabinet temperature.
-
Page 58: Canceling Automatic Cleaning
If foam builds up in the cooking cabinet even though you have used the recommended number of Active Green cleaner tabs, use fewer tabs the next time you run automatic cleaning. If foam continues to build up, please contact your RATIONAL Service Partner. 14.5 Canceling automatic cleaning Except for quick clean, you can cancel any automatic cleaning programs within 30 seconds of starting them. - Page 59 14 | Automatic cleaning - iCareSystem WARNING! Risk of chemical burns! Wear close-fitting protective goggles and chemical-resistant gloves to protect yourself reliably when working with Active Green cleaner tabs. Remove the Active Green cleaner tabs from the cooking cabinet and dispose of them. 4.
-
Page 60: Care
15 | Care Care WARNING Accumulated grease or food residue in the cooking cabinet Failure to clean the cooking cabinet sufficiently could result in food residue or accumulated grease creating a fire hazard. 1. Clean the unit daily. 2. If a fire breaks out, leave the cooking cabinet door closed in order to cut off the fire’s oxygen supply. -
Page 61: Care Products
15 | Care Care interval Functional components LED cover Control panel Plastic parts Monthly Steam nozzle Clean functional components as follows. The specified cleaning interval is a minimum - they may be cleaned more frequently if needed. 15.3 Care products Suitable care products Clean the following functional components using lukewarm water, a mild cleaning agent, and a soft cloth:... -
Page 62: Cleaning The Cooking Cabinet Door
15 | Care 15.4 Cleaning the cooking cabinet door Glass pane locks LED covers Cooking cabinet door seal Glass pane locks Cleaning the glass panes 1. Open the cooking cabinet door all the way, until it reaches the stop position. 2. -
Page 63: Descaling The Steam Nozzle
15 | Care 15.5 Descaling the steam nozzle Tools required Hex wrench 1. Switch the unit off. 2. Swing the hinging racks and the air baffle into the center of the cooking cabinet. 3. Use the hex wrench to loosen the nut on the steam nozzle. 4. -
Page 64: Cleaning The Hand Shower
15 | Care 2. Remove the cover on the air filter. 3. Pull the air filter out. 4. Clean the air filter in the dishwasher and then allow it to dry completely. > If the air filter is not clean after going through the dishwasher, it will need to be replaced. -
Page 65: Cleaning Accessories
15 | Care 6. Reattach the central selection knob. 15.9 Cleaning accessories 1. Allow accessories to cool before cleaning them. 2. Use a soft cloth to remove any traces of food and grease, starch, or protein residues. 3. If the stains do not come up easily, soak the accessory in lukewarm water and then use a soft cloth to wipe them clean. -
Page 66: Inspiration And Help
Inspiration and help 16.1 Search assistant The search assistant is your iCombi Pro‘s search engine. It searches intelligent cooking paths, settings, example applications, and the user’s manual for your unit. 1. In the menu bar, press 2. Tap the search field and enter a search term. -
Page 67: Service-Related Help
16 | Inspiration and help 16.4 Service-related help 16.4.1 Transmitting service data to ConnectedCooking automatically If your unit is connected to ConnectedCooking, you can set it to transmit service data to ConnectedCooking automatically at regular intervals. Start by connecting your unit to ConnectedCooking. 1. -
Page 68: Troubleshooting
Tapping that symbol will display the error message in original size again. 16.5.1 Error messages Please contact your RATIONAL Service Partner regarding all error messages. Always have the serial number for your unit at the ready. You can find the serial number on the identification label. Error message... - Page 69 16 | Inspiration and help Error message Cause Cooking possible Service 20.2 Temperature probe defective. Service 20.4 Temperature probe defective. Service 20.8 Temperature probe Only hot air mode is defective. available. Service 25 The quantity of water – required by the iCareSystem is too low.
- Page 70 16 | Inspiration and help Error message Cause Cooking possible Service 34.16 Internal data communication malfunctioning. Service 34.32 Internal data communication malfunctioning. Service 34.64 Internal data communication malfunctioning. Service 34,400 Internal data communication malfunctioning. Service 36 Differential pressure sensor defective. Service 37 Differential pressure sensor defective.
- Page 71 16 | Inspiration and help Error message Cause Cooking possible Service 46.1 The water supply is malfunctioning. Service 46.2 The water supply is malfunctioning. Service 47.1 The wastewater pump is defective. Service 47.2 The wastewater pump is defective. Service 48.1 The circulating pump is defective.
-
Page 72: Error Messages For Gas Units
Error messages for gas units If your unit is equipped with a gas connection, the following additional error messages may occur. Please contact your RATIONAL Service Partner [} 66] regarding all error messages. Always have the serial number for your unit at the ready. -
Page 73: Error Messages When Operating The Ultravent
Error messages when operating the UltraVent The following error messages may occur when operating your unit with an UltraVent. Please contact your RATIONAL Service Partner [} 66] regarding all error messages. Always have the serial number for your unit at the ready. -
Page 74: Maintenance
Type XS 6-2/3, 6-1/1, 6-2/1, 10-1/1, 10-2/1 You can perform the following maintenance yourself: Replacing air filters [} 74] Replacing the cooking cabinet door seal [} 75] Contact your RATIONAL Service Partner to have the following maintenance performed: Replacing LED covers Type 20-1/1, 20-2/1 You can replace the cooking cabinet door seal yourself. -
Page 75: Replacing The Cooking Cabinet Door Seal
17 | Maintenance 3. Pull the air filter out. 4. Slide the new air filter into the unit so that it snaps into place. 5. Re-insert the air filter cover into the unit. NOTE Spraying water may penetrate into the unit if the air filter is not inserted correctly Correct attachment of the air filter is the only way of protecting the unit from water spraying in any direction. -
Page 76: Transport
18 | Transport Transport 18.1 Transporting the unit WARNING Moving the unit or the Combi-Duo with the locking brake on can damage the castors Damaged castors can result in the unit or Combi-Duo tipping over and injuring you severely. 1. Always release the locking brake on the castors before transporting or shifting the unit or Combi-Duo. - Page 77 18 | Transport CAUTION Units and Combi-Duos on castors can tip over when being transported or moved If your unit or Combi-Duo is on castors or a stand with castors, failing to release the locking brake before transporting or shifting the unit or Combi- Duo can cause it to tip over and injure you.
-
Page 78: Decommissioning And Disposal
19 | Decommissioning and disposal Decommissioning and disposal 19.1 Decommissioning If you want to take your unit out of operation, please contact your RATIONAL Service Partner. 19.2 Disposal Old units contain recyclable materials. Dispose of old units in an environmentally safe way, using appropriate collection systems. -
Page 79: Technical Data
20 | Technical data Technical data Please also note the technical information on the identification plate, which is to the left of the control panel. 20.1 Units with electrical connections Value Weight (without packaging) Type XS 6-2/3 Weight (without packaging) Type 6-1/1 Weight (without packaging) Type 6-2/1 Weight (without packaging) Type 10-1/1 Weight (without packaging) Type 10-2/1... -
Page 80: Units With Gas Connections
20 | Technical data Directive 2006/42/EU on machines Directive 2014/30/EU on the harmonisation of the laws of the Member States relating to electromagnetic compatibility Directive 2011/65/EU on the restriction of the use of certain hazardous substances in electrical and electronic equipment, including 2015/863/EU This unit conforms to the following European standards: EN 60335-1:2012 + A11:2014 + A13:2017 EN 60335-2-42:2002 + A1:2008 + A11:2012... - Page 81 Regulatory information 20.4 This device complies with part 15 of the FCC Rules. Operation is subject to the following two conditions: (1) This device may not cause harmful interference, and (2) this device must accept any interference received, including interference that may cause undesired operation.
-
Page 82: Directory Of Keywords
Directory of keywords Cleaning 62 Cleaning the LED covers 62 Air filter Cleaning the seal 62 Clean 63 Cooking cabinet humidity 33, 35 Air speed 35, 41 Cooking cabinet temperature 33, 39 Automatic cleaning Cooking time 34 Cleaning programs 55 Cool down function 41 Core temperature... - Page 83 Areas of use 42 Cook and Chill 42 Hand shower 27 Room service 42 Spray modes 27 Special diets 42 Hold 37 Special accessories 66 Hold core temperature 37 Steam injection 35, 41 Steam nozzle Descaling 63 Load capacities 66 Switching the unit off 16 Load unit...
- Page 84 RATIONAL AG Siegfried-Meister-Straße 1 86899 Landsberg am Lech Tel. +49 (0)8191 3270 Fax +49 (0)8191 21735 info@rational-online.com rational-online.com...