Table of Contents
Advertisement
Available languages
Available languages
IMPORTANT:
Read Before Using
Operating/Safety Instructions
Consignes de fonctionnement/sécurité
Instrucciones de funcionamiento
y seguridad
1194VSR
1194AVSR
Renseignement des consommateurs
Información para el consumidor
Toll Free Number:
1-877-BOSCH99 (1-877-267-2499) http://www.boschtools.com
For English
See page 2
IMPORTANT :
Lire avant usage
Consumer Information
Appel gratuit :
Número de teléfono gratuito:
Parlez-vous français?
Voir page 11
IMPORTANTE:
Leer antes de usar
¿Habla español?
Ver página 20
Advertisement
Table of Contents

Related Manuals for Bosch 1194AVSR


Summary of Contents for Bosch 1194AVSR
- Page 1 IMPORTANT : Read Before Using Lire avant usage Operating/Safety Instructions Consignes de fonctionnement/sécurité Instrucciones de funcionamiento y seguridad 1194VSR 1194AVSR Consumer Information Renseignement des consommateurs Información para el consumidor Toll Free Number: Appel gratuit : 1-877-BOSCH99 (1-877-267-2499) http://www.boschtools.com For English Parlez-vous français?
-
Page 2: Power Tool Safety Rules
Power Tool Safety Rules Read and understand all instructions. Failure to follow all instructions listed WARNING below, may result in electric shock, fire and/or serious personal injury. SAVE THESE INSTRUCTIONS Work Area Keep your work area clean and well lit. Cluttered benches and dark areas invite accidents. - Page 3 Do not force tool. Use the correct tool for your application. The correct tool will do the job better and safer at the rate for which it is designed. Do not use tool if switch does not turn it “ON” or “OFF”. Any tool that cannot be controlled with the switch is dangerous and must be repaired.
- Page 4 If the bit becomes bound in the workpiece, release trigger immediately, reverse the direction of rotation and slowly squeeze the trigger to back out the bit. Be ready for a strong reaction torque. The drill body will tend to twist in the opposite direction as the drill bit is rotating.
- Page 5 MPORTANT: Some of the following symbols may be used on your tool. Please study them and learn their meaning. Proper interpretation of these symbols will allow you to operate the tool better and safer. Symbol Name Volts Amperes Hertz Watt Kilograms Minutes Seconds...
-
Page 6: Functional Description And Specifications
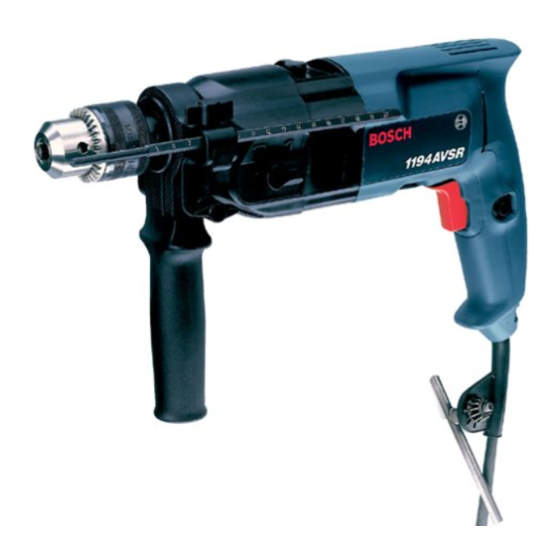
NOTE: For tool specifications refer to the nameplate on your tool. FIG. 1 VENTS “LOCK-ON” BUTTON GEAR CHANGE SELECTION LEVER TRIGGER REVERSING SWITCH LEVER 1194AVSR 0-1,000/min 0-2,600/min 1/2" 2 high 1 low 2 high 3/8" 3/4" 3/8" 3/8" 5/8" 3/8"... -
Page 7: Operating Instructions
Operating Instructions TRIGGER CONTROLLED VARIABLE SPEED Your tool is equipped with a variable speed trigger switch. The tool speed can be controlled from minimum to maximum nameplate rated RPM by the pressure you apply to the trigger. Apply more pressure to increase the speed and release pressure to decrease speed (Fig. - Page 8 Operating Tips You will extend the life of your bits and do neater work if you always put the bit in contact with the work before pulling the trigger. During the operation, hold the tool firmly and exert light, steady pressure. Too much pressure at low speed will stall the tool.
-
Page 9: Drilling Metal
Use a “back-up” block of wood for work that is likely to splinter, such as thin materials. You will drill a cleaner hole if you ease up on the pressure just before the bit breaks through the wood. Then complete the hole from the back side. -
Page 10: Tool Lubrication
Maintenance Service Preventive maintenance WARNING performed by unauthorized personnel may result in misplacing of internal wires and components which could cause serious hazard. recommend that all tool service be performed by a Bosch Factory Service Center or Autho- rized Bosch Service Station. TOOL LUBRICATION Your Bosch tool has been properly lubricated and is ready to use. -
Page 11: Règles De Sécurité Générales
Règles de Sécurité Générales Vous devez lire et comprendre toutes les instructions. Lenon-respect, même partiel, AVERTISSEMENT des instructions ci-après entraîne un risque de choc életrique, d'incendie et/ou de blessures graves. CONSERVEZ CES INSTRUCTIONS Aire de travail Veillez à ce que l'aire de travail soit propre et bien éclairée. - Page 12 N'utilisez pas un outil si son interrupteur est bloqué. Un outil que vous ne pouvez pas commander par son interrupteur est dangereux et doit être réparé. Débranchez la fiche de l'outil avant d'effectuer un réglage, de changer d'accessoire oude ranger l'outil. De telles mesures préventives de sécurité...
- Page 13 N'utilisez pas le dispositif de blocage en position de marche de l'interrupteur dans des situations où le foret est susceptible de gripper. (Par exemple : immédiatement avant que le foret ne soit prêt à rentrer à travers le matériau, chaque fois que vous utilisez une «...
- Page 14 Important : Certains des symboles suivants peuvent être utilisés sur votre outil. Veuillez les étudier et apprendre leur signification. Une interprétation appropriée de ces symboles vous permettra d'utiliser l'outil de façon plus efficace et plus sûre. Symbole Volts Ampères Hertz Watt Kilogrammes Minutes...
-
Page 15: Description Fonctionnelle Et Spécifications
REMARQUE : Pour spécifications de l'outil, reportez-vous à la plaque signalétique de votre outil. FIG. 1 ÉVENTS BOUTON DE BLOCAGE EN MARCHE SÉLECTEUR DE RAPPORT GÂCHETTE LEVIER INVERSEUR DE MARCHE 1194AVSR 0-1,000/min 0-2,600/min 13 mm 1 basse 2 haute 19 mm 10 mm 16 mm 10 mm 13 mm 6 mm -15-... -
Page 16: Consignes De Fonctionnement
Consignes de fonctionnement VITESSE VARIABLE COMMANDÉE PAR GÂCHETTE Votre perceuse est équipée d’une gâchette à vitesse variable. La vitesse de la perceuse peut être réglée de zéro au régime maximum spécifié sur la plaque signalétique. La vitesse s’ajuste par la pression que vous exercez sur la gâchette. - Page 17 Consignes de fonctionnement Vous prolongerez la durée de vos forets et accomplirez un travail plus net si vous mettez toujours le foret en contact avec le matériau avant d’appuyer sur la gâchette. Durant le fonctionnement, tenez l’outil fermement et exercez une pression légère et constante. Une trop grande pression à...
- Page 18 fréquemment pour enlever les copeaux sur les cannelures. Utilisez un bloc d’appui en bois pour les matériaux sus- ceptibles de voler en éclats tels que les matériaux minces. Vous percerez un trou plus net si vous relâchez la pression immédiatement avant que le foret ne traverse le bois.
- Page 19 Maintenance Entretien L’entretien préventif AVERTISSEMENT effectué par des employés non autorisés peut entraîner un positionnement erroné des composants et des fils internes, et ainsi causer des dangers sévères. Il est recommandé que l’entretien et la réparation de nos outils soient confiés à...
- Page 20 Normas de seguridad para herramientas mecánicas Lea y entienda todas las instrucciones. El incumplimiento de todas las instrucciones ADVERTENCIA indicadas a continuación puede dar lugar a sacudidas eléctricas, incendios y/o lesiones personales graves. CONSERVE ESTAS INSTRUCCIONES Area de trabajo Mantenga el área de trabajo limpia y bien iluminada. Las mesas desordenadas y las áreas oscuras invitan a que se produzcan accidentes.
- Page 21 el cuerpo resulta inestable y puede ocasionar pérdida de control. No fuerce la herramienta. Use la herramienta correcta para la aplicación que desea. La herramienta correcta hará el trabajo mejor y con más seguridad a la capacidad nominal para la que está diseñada. No utilice la herramienta si el interruptor no la enciende o apaga.
- Page 22 compruebe que el cierre del gatillo esté en la posición "OFF" (apagado). Un arranque accidental podría causar lesiones. Posicione el cordón de modo que esté alejado de la broca que gira. No enrolle el cordón alrededor del brazo o de la muñeca. Si pierde el control y tiene el cordón enrollado en el brazo o en la muñeca, el cordón puede atraparle y causarle lesiones.
- Page 23 Importante: Es posible que algunos de los símbolos siguientes se usen en su herramienta. Por favor, estúdielos y aprenda su significado. La interpretación adecuada de estos símbolos le permitirá utilizar la herramienta mejor y con más seguridad. Símbolo Nombre Volt Ampere Hertz Watt...
-
Page 24: Descripción Funcional Y Especificaciones
DE VENTILACION “BOTON DE “FIJACION EN ON” SELECCION DE CAMBIO DE ENGRANAJES GATILLO PALANCA DEL INTERRUPTOR DE INVERSION 1194AVSR 0-1 000/min 0-2 600/min 13 mm 2 alta 1 baja 2 alta 19 m 10 mm 16 mm 10 mm 13 mm 6 mm... -
Page 25: Instrucciones De Funcionamiento
Instrucciones de funcionamiento VELOCIDAD VARIABLE CONTROLADA POR GATILLO La herramienta está equipada con un interruptor gatillo de velocidad variable. La velocidad de la herramienta se puede controlar desde las RPM mínimas hasta las RPM máximas indicadas en la placa del fabricante por medio de la presión que usted ejerce sobre el gatillo. - Page 26 Consejos de funcionamiento Usted prolongará la vida de las brocas y realizará un trabajo mejor ejecutado si siempre pone la broca en contacto con la pieza de trabajo antes de apretar el gatillo. Durante el funcionamiento, sujete firmemente la herramienta y ejerza una presión ligera y uniforme. Una presión excesiva a baja velocidad hará...
- Page 27 broca. Mantenga una presión suficiente para que la broca continúe penetrando. Al taladrar agujeros en madera, se pueden utilizar brocas de espiral. Las brocas de espiral pueden recalentarse a menos que se saquen con frecuencia para quitar las virutas de las estrías. Utilice un bloque de madera de “refuerzo”...
-
Page 28: Mantenimiento
Mantenimiento Servicio El mantenimiento preventivo ADVERTENCIA realizado por personal no autorizado pude dar lugar a la colocación incorrecta de cables y componentes internos que podría constituir un peligro serio. Recomendamos que todo el servicio de las herramientas sea realizado por un Centro de servicio de fábrica Bosch o por una Estación de servicio Bosch autorizada. - Page 29 Notes: -29-...
- Page 30 Remarques : -30-...
- Page 31 Notas: -31-...
- Page 32 LIMITED WARRANTY OF BOSCH PORTABLE AND BENCHTOP POWER TOOLS Robert Bosch Tool Corporation (“Seller”) warrants to the original purchaser only, that all BOSCH portable and benchtop power tools will be free from defects in material or workmanship for a period of one year from date of purchase. SELLER’S SOLE OBLIGATION AND YOUR EXCLUSIVE REMEDY under this Limited Warranty and, to the extent permitted by law, any warranty or condition implied by law, shall be the repair or replacement of parts, without charge, which are defective in material or workmanship and which have not been misused, carelessly handled, or misrepaired by persons other than Seller or Authorized Service Station.