Fluke TiX-640 Quick Start
Hide thumbs
Also See for TiX-640:
- User manual (108 pages) ,
- User manual (97 pages) ,
- User manual (99 pages)
Advertisement
Quick Links
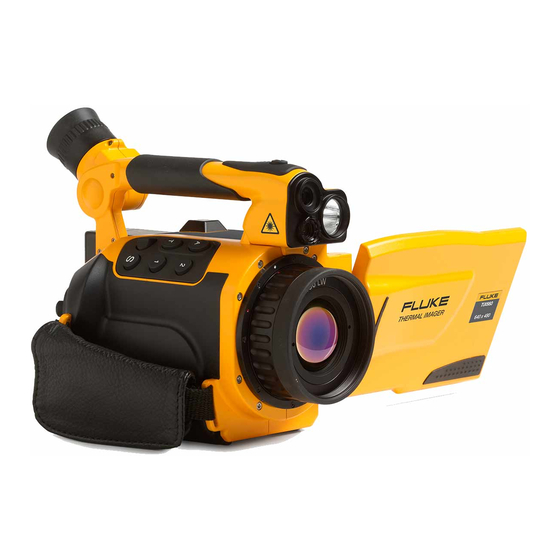
Multifunction
button
Temperature
Focus rocker
switch
(autofocus)
RS-232
Power supply
NOTE: Menu is on the left side of the viewing screens. Depressing the C button cancels or backs out of a menu.
MEMORY:
1.
Insert SD memory card into the slot on the fold out LCD screen side of the camera.
POWER:
2.
Insert a fully charged battery into the back of the camera by snapping it down securely. The battery life is
indicated in the lower right corner of the LCD display. You can also press and hold the battery symbol on the side of
the battery.
START:
3.
Press the red power button on the back right side and you will see the screen light up.
Take the lens cap off and look into the viewfinder or swing the LCD screen out on the left side. Note: The
viewfinder will only work when the LCD monitor screen is closed against the camera.
To turn the camera off, press the power button and select "yes" when prompted.
FOCUS:
4.
Focus is performed by using the rocker switch on the top right of the camera. When pushing it left, you are
focusing farther away; when pushing it to the right you are focusing closer. Pressing the rocker straight down will
activate auto focus. There are several other ways to focus (details in your camera instruction manual)
Push the joystick in to activate the menu. Under the
modes: LaserSharp Auto and LaserSharp Permanent Auto. NOTE: The laser is on when using these two
methods.
AUTO ADJUST (Level and Span):
5.
menu to highlight either Automatic (one time) or Automatic (continue). NOTE: Holding joystick in for 1 second will put
the camera in continuous adjust mode; depressing it again for 1 second will put it in manual mode. You can also
© 2013 The Snell Group / 322 N. Main St. / Suite 8 / Barre, VT 05641 / 800.636.9820
QuickStart:
Fluke TiX-640, TiX-660, TiX-1000
S peaker
Auto
Multifunction 2
Multifunction 1
Save
Joystick
(press for Enter)
Escape
(cancel)
Power
Push and hold the C button, then use the joystick according to the side
SD card slot
icon, select the "laser" designation for two additional
Fluke Ti-400, Ti-300, Ti-200
Battery
HDMI, DVI
/
www.thesnellgroup.com
Advertisement

Related Manuals for Fluke TiX-640


Summary of Contents for Fluke TiX-640
- Page 1 QuickStart: Fluke TiX-640, TiX-660, TiX-1000 Multifunction button S peaker Auto Multifunction 2 Temperature Battery Focus rocker Multifunction 1 switch (autofocus) Save SD card slot HDMI, DVI Joystick (press for Enter) Escape (cancel) Power RS-232 Power supply NOTE: Menu is on the left side of the viewing screens. Depressing the C button cancels or backs out of a menu.
- Page 2 QuickStart: Fluke TiX-640, TiX-660, TiX-1000 access the two Automatic adjustments by selecting the icon and then choosing Level/Range and pushing enter and use the joystick according to the side menu to highlight either Automatic (one time) or Automatic (continue). MANUAL ADJUST (Level and Span): Push and hold the C button, then use the joystick according to the side menu to adjust span (left/right) or level (up/down).