Table of Contents
Advertisement
Quick Links
Before attempting to connect, operate or adjust this product, please read
these instructions thoroughly.
For USA assistance, please call: 1-800-272-7033 or send e-mail to: digitalstillcam@panasonic.com
For Canadian assistance, please call: 1-800-561-5505 or visit us at www.panasonic.ca
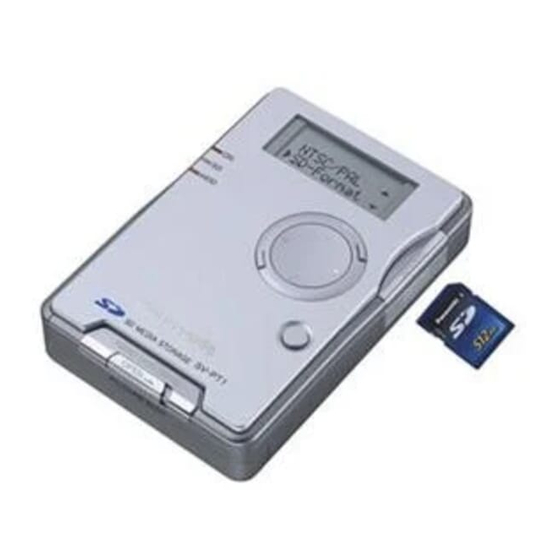
SD Media Storage
Operating Instructions
Model No.
SV-PT1PP
LSQT0622A
Advertisement
Table of Contents

Related Manuals for Panasonic SV-PT1


Summary of Contents for Panasonic SV-PT1
-
Page 1: Operating Instructions
Before attempting to connect, operate or adjust this product, please read these instructions thoroughly. For USA assistance, please call: 1-800-272-7033 or send e-mail to: digitalstillcam@panasonic.com For Canadian assistance, please call: 1-800-561-5505 or visit us at www.panasonic.ca SD Media Storage Operating Instructions SV-PT1PP Model No. -
Page 2: Information For Your Safety
Information For Your Safety Dear Customer, We would like to take this opportunity to thank you for purchasing this Panasonic SD Media Storage. Please read these Operating Instructions carefully and keep them handy for future reference. Information for Your Safety... - Page 3 Responsible party: Matsushita Electric Corporation of America One Panasonic Way, Secaucus, NJ 07094 Support Contact: Panasonic Consumer Electronics Company 1-800- 272-7033 This device complies with Part 15 of the FCC Rules. Operation is subject to the following two conditions: (1) This device...
-
Page 4: End User License Agreement
End User License Agreement Before opening the CD-ROM package, please read the following. End User License Agreement You (“licensee”) are granted a license for the Software defined in this End User License Agreement (“Agreement”) on condition that you agree to the terms and conditions of this Agreement. -
Page 5: Table Of Contents
Information For Your Safety ... 2 End User License Agreement ... 4 Things You Should Know ... 7 Operating Precautions ... 8 • Main Unit and Battery ... 8 • Data Protection and PC Card HDD ... 9 • ScanDisk/CheckDisk ... 9 Before Using •... - Page 6 Table of Contents Slide Show Settings • Selecting Images ... 30 • Setting Screen Transition Effects/Speed ... 31 Presentation • Performing Presentation ... 32 • Selecting Presentation Content ... 33 Editing • Deleting Images (DELETE) ... 34 • Copying Images (COPY) ... 35 •...
-
Page 7: Things You Should Know
Things You Should Know Main Features G G G G G This unit is a compact, lightweight portable media storage unit. G G G G G The generous 5 GB HDD allows ample storage for your still images. G G G G G Stored images can be viewed and edited (delete, copy, etc.) on a TV at home or elsewhere. -
Page 8: Operating Precautions
Operating Precautions Carefully read these precautions prior to use and strictly observe them during unit operation. Failure to do so may result in product malfunction or damage. Also, disregarding these precautions could cause damage to, or loss of, data stored within the media. •... -
Page 9: Data Protection And Pc Card Hdd
Card Data Protection (Refer to page 10 for details on compatible cards.) • Do not unplug the AC adaptor or disconnect the USB cable connecting a PC while this unit is in operation. • Do not remove the card while it is being accessed. •... -
Page 10: Before Using
Before Using • Photographs and printed materials may not be used except for personal and private applications without authorization from the copyright owner. • : SD logo is a trademark. ® ® • Microsoft , Windows and PowerPoint States and other countries. •... -
Page 11: Copying And Backup
Copying and Backup Copying: Memory Card -> PC Card HDD When copying from a Memory Card to the PC Card HDD, create a folder entitled “CARD****” for each copy and save Memory Card data into this folder. When BACKUP is ON, the “CARD****” folder mentioned above is created in the “BACKUP” folder of the PC Card HDD, and Memory Card data is copied into this folder. - Page 12 Before Using Copying and Backup (Continued) Copying: PC Card HDD -> Memory Card The folder entitled “CARD****” will disappear and data will be copied according to the file structure rules. PC Card HDD ROOT CARDA001 MISC DCIM CARDA002 PHOTO CARDA003 MISC DCIM AAA.
-
Page 13: Selecting Modes [Copy/Tv/Pc]
Copy Mode (pp. 19~23) Copy mode is used to copy data from the inserted card to another card. In addition, you can press MENU to carry out operations such as checking the card storage capacity, making backup and TV format settings and formatting cards. Memory Card TV Mode (pp. -
Page 14: Index Of Controls
Index Of Controls Front View Hand Strap Attachment Pin Attach hand strap here. (p. 15) POWER Lamp Lights when power is ON. Flashes during battery recharge. SD Lamp Lights when SD Memory Card or MultiMediaCard is accessed. HDD Lamp Lights when PC Card HDD or PC Card is accessed. -
Page 15: Carrying The Unit
Attaching the Hand Strap Insert strap end loop into gap of Attachment Pin. Thread opposite end through the end loop and pull strap tight in the direction of arrow. Caution • This unit is a precision device. When carrying this unit, ensure that it does not swing excessively. -
Page 16: Recharging The Battery Pack
Recharging the Battery Pack The battery pack can be recharged right inside this unit using the supplied AC adaptor. Unit power must be turned OFF before recharging. Charging will stop if unit power is turned on. Slide the battery cover slightly to the right and swing open. -
Page 17: Inserting The Card
Set STANDBY to OFF when inserting or removing a Card. SD Memory Card Slot Push up slightly on card door to swing open. Insert the Memory Card (labeled side up, cropped corner right) and hold in place until you hear a click. Close the lid. -
Page 18: Turning The Power On
Turning the Power On In case of a power outage, the unit utilizes the supplied battery as a backup in order to protect the unit and the card data. If you are using the AC adaptor, insert a sufficiently charged battery before turning on the power. The unit cannot be used if only the AC adaptor is used. -
Page 19: Copy Mode
Copy Mode (Display Indicator) POWER Lamp Liquid Crystal Display COPY/TV MODE Displaying Menu (Indicator Flowchart) Follow these steps to display menus in COPY mode. Set COPY/TV MODE to “COPY”. Insert a Card. (p. 17) Turn on this unit. (p. 18) When using battery Press SET If a button is not pressed... - Page 20 Copy Mode (Menus) COPY/TV MODE PC Card HDD (PC Card) Slot • Card Storage Capacity Check (MEDIA CAPACITY) This lets you confirm card storage capacity. • PC Card HDD available space is approx. 4.6 GB. • BACKUP (BACKUP ON/OFF) Set to ON, a backup folder containing your data is automatically created when copying. Useful where data may become accidentally deleted or corrupt.
-
Page 21: Copying
All the data can be copied from a Memory Card to the PC Card HDD (PC Card) in a single operation. Also, data within specific folders can be copied from the PC Card HDD (PC Card) to a Memory Card by selecting the desired folders to be copied. Be sure both a PC Card HDD (PC Card) and a Memory Card are inserted. -
Page 22: Formatting Cards
Formatting Cards Normally you need not format (initialize) the SD Memory Card and PC Card HDD. An SD Memory Card that has been formatted to FAT32* specifications cannot be used, so transfer any important data to a PC, then format the card on this unit. Format the SD Memory Card Display the menu. -
Page 23: Format The Pc Card Hdd
Format the PC Card HDD The product numbers for cards that can be formatted using the unit are given below. Card product numbers not listed cannot be formatted (as of Oct. 1, 2002). Matsushita Toshiba •RP-PH005A •PAMHD002 •PAMHD005 Display the menu. (p. 19) •... -
Page 24: Tv Mode Setup
TV Mode (Setup) You can view DSC photos and PC presentation files on a TV when it is connected to this unit. Refer to next page for available functions in TV Mode. Setup (Connections) Connect the Video Cable. • Connect this unit to either the S-Video or the video input terminal of your TV. -
Page 25: Tv Mode Functions (Initial Screen)
TV Mode (TV Mode Functions) Initial Screen The screen below is displayed when a card is inserted. If “NO CARD” appears, confirm that a card is correctly inserted. Menu Area Card Selection Choose card type, HDD/PC Card • SD Memory Card. Press card for display, then press SET. -
Page 26: Displayable Image Formats
TV Mode (Display Information) Displayable Image Formats Images of the following formats can be displayed. • DCF format 1.1 compliant • Baseline JPEG format Y Cb Cr (compressed format) (Sampling ratios 4:4:4, 4:2:0, 4:2:2, 4:1:1) (80 x 60 ~ 5120 x 3840 pixels) •... -
Page 27: Viewing Images In The Index
TV Mode (Image Display) Viewing Images in the Index Press to select the card used, then press SET. Select “IMAGE DISPLAY”, then press SET. • Index Area is displayed with cursor at first position. Press to scroll to other index pages if necessary. -
Page 28: Album
TV Mode (Album) Images in the index can be displayed on a TV screen in groups of 6 or 9 at a time, like a photo album. Press to select “ALBUM”, then press SET. • Only images in the Index Area can be displayed as an album. -
Page 29: Slide Show
You can display selected images as a Slide Show in a variety of transition effects and speeds. Performing Slide Show Press to select “SLIDE SHOW”, then press SET. • Only images in the Index Area are displayed as a Slide Show. Images in a folder must first be displayed in the index. -
Page 30: Selecting Images
TV Mode (Slide Show Settings) The SLIDE SETUP setting allows you to specify which images to display in a Slide Show. (p. 29) Selecting Images Specify the images in the index to be included in the Slide Show. If you wish to include all images in the index, this procedure is not necessary. -
Page 31: Setting Screen Transition Effects/Speed
TV Mode (Slide Show Settings) Setting Screen Transition Effects Do Steps 1~3 on page 29. In Step 3, press to select “SELECT”. Press to select “EFFECT”, then press SET. Press for desired transition effect, then press SET. • NORMAL : images change one by one. •... -
Page 32: Performing Presentation
TV Mode (Presentation) Microsoft PowerPoint data created on a PC can be converted into JPEG files using the supplied JPEG Addin Software and then presented on the TV. See pages 46 and 47 on how to create presentation files. Performing Presentation Press to select “PRESENTATION”, then press SET. -
Page 33: Selecting Presentation Content
Selecting Presentation Content You can select specific slides from the index to be displayed. If you wish to include all images in the index, this procedure is not necessary. Do Steps 1~3 on page 32. In Step 3, select “SET CONTENTS”, then press SET. -
Page 34: Deleting Images (Delete)
TV Mode (Editing) You can delete images from a card, copy data from one card to another, and protect data from being deleted accidentally. Deleting Images (DELETE) Press to select “EDIT”, then press SET. Press MENU. • The Menu screen will be displayed. Press to move the cursor to the right. -
Page 35: Copying Images (Copy)
Copying Images (COPY) Copy data from one card to another. A card to receive copied data must be inserted. Press to select “EDIT”, then press SET. Press MENU. • The Menu screen will be displayed. Press to select “COPY”, then press to move the cursor to the right. -
Page 36: Protecting Images (Protect)
TV Mode (Editing) Protecting Images (PROTECT) Important file data can be protected from accidental deletion. Press to select “EDIT”, then press SET. Press MENU. • The Menu screen will be displayed. Press to select “PROTECT”, then press to move the cursor to the right. -
Page 37: How To Select Images
Select image files for the DELETE, COPY, and PROTECT functions. The example screens below depict deleting an image. Press to select an image, then press SET. • Pressing SET again cancels selection. • “ ” appears in the bottom, right corner of the selected image. -
Page 38: Selecting Images
TV Mode (Full Screen Playback) When in image display or album mode, you can view an image full screen. Also, you can use zoom, rotate, add color effects, display image information, and delete the image. Selecting Images Display an Image (from the index) Display the index. -
Page 39: Displaying The Sub Menu
TV Mode (Full Screen Playback) With a full screen index or album image displayed, you can zoom, rotate, add color effects, and display image information. Press MENU to display the sub menu for function selection. • Selecting “RETURN”, then pressing SET redisplays the index or album. -
Page 40: Rotating An Image (Rotate)
TV Mode (Full Screen Playback) Rotating an Image (ROTATE) Press to select “ROTATE” from the sub menu, then press SET. (p. 39) Press to select “LEFT” or “RIGHT”, then press SET. • LEFT : image is rotated 90° counterclockwise. • RIGHT : image is rotated 90° clockwise. To save rotated images: Select “SAVE”... -
Page 41: Processing Image Color (Color Effect)
TV Mode (Full Screen Playback) Processing Image Color (COLOR EFFECT) You can change the image color. Press to select “COLOR EFFECT” from the sub menu, then press SET. (p. 39) Press to select “B/W” or “SEPIA”, then press SET. • The image color will change. •... -
Page 42: Pc Mode Setup
PC Mode (Setup) By connecting this unit to a PC via the supplied USB cable, it can be utilized as an external drive. System Requirements System requirements are shown below. Compatible PC Models • PC / AT compatible (PCs with USB port) OS Compatibility •... -
Page 43: Installing The Usb Driver
Installing the USB Driver Make connections following “Setup (Connections)” steps on page 42. • The “Add New Hardware Wizard” screen is displayed. Insert the supplied CD-ROM into the PC’s CD-ROM drive. In the “This wizard searches for new drivers for:” dialog box, click on [Next]. -
Page 44: File Operations
PC Mode (Operation with the PC) When this unit is connected to a PC using the USB Cable provided (p. 42), it will be recognized as a Removable Disk. You can then copy, move, delete, and display files on this unit the same as with a normal disk drive. SD Lamp HDD Lamp File Operations... -
Page 45: Disconnecting Unit From Pc
PC Mode (Operation with the PC) Disconnecting Unit from PC Confirm SD and HDD Lamps are out and card is not being accessed. Click on [Safety Remove Hardware] icon in the desktop task tray. Select [USB Mass Storage Device] and click [Stop]. •... -
Page 46: Installation
PC Mode (Using the Applications) The included CD-ROM contains a “JPEG Addin Software” application which converts Microsoft PowerPoint data created on a PC into JPEG files and creates a presentation folder (p. 47) for TV screen presentation (pp. 32, 33). •... -
Page 47: Presentation File Creation
PC Mode (Using the Applications) Presentation File Creation Install JPEG Addin Software (p. 46), then start PowerPoint on the PC. Select [Open] from [File] menu to open a PowerPoint file for JPEG conversion. Connect PC using supplied USB cable. (p. 42) Click in the upper, left corner. -
Page 48: Uninstalling Jpeg Addin Software
Right-click the My Computer icon, and then select “Properties”. • The “System Properties” screen will be displayed. Click the “Device Manager” tab. Select “Panasonic SD Media Storage USB”, then click [Remove]. Click on [OK]. Click on [Refresh]. • The Add New Hardware Wizard will start. -
Page 49: Hdd Safety Switch Operation
HDD SAFETY Switch Operation When using a USB connection, place the unit device on a flat, level surface. If the HDD SAFETY switch is activated, carry out the following remedies. G G G G G For Windows 98SE/Me If the HDD SAFETY Detection Switch is activated while a PC Card HDD is being accessed, the PC screen goes blue and the following message appears. -
Page 50: Warning And Instruction Displays
Warning and Instruction Displays Copy Mode (Liquid Crystal Display) Indications PLEASE INSERT BATT. NO CARD NO DATA INIT ERROR FORMAT ERROR NO CAPACITY CARD PROTECT COPY ERROR HIT ANY KEY SAFETY MODE PUT IT DOWN CAN’T USE FAT32 SDCARD CAN’T COPY SECURE FILES BATTERY LOW COPY CANCEL... - Page 51 Warning and Instruction Displays PC Mode (Liquid Crystal Display) Indications CONNECT AC CANNOT CHANGE SLOT INSERT BATT. DISCONNECT USB PULL OUT USB CABLE MODE CHANGE PLEASE WAIT POWER OFF PLEASE WAIT SAFETY MODE PUT IT DOWN TV Mode (TV Screen Display) Indications NO CARD NO DATA...
-
Page 52: Reset Function
Warning and Instruction Displays TV Mode (TV Screen Display) Indications COPY ERROR DELETE ERROR PROTECT ERROR CAN’T READ SETTING FILE CAN’T DISPLAY FOR HDD SAFETY PUT UNIT DOWN THIS FILE ISN’T EXIF CAN’T SAVE THIS FILE NO SUPPORT FAT32 SD CARD CANNOT SELECT BATTERY LOW COPY CANCEL... -
Page 53: Before Requesting Service
Before Requesting Service If a problem should arise, you may be able to correct it yourself using the corrections listed below. If the problem persists, contact your nearest Servicenter. Symptom Unit does not power up... Power is on, but unit turns off after a short period... - Page 54 Before Requesting Service Symptom No images are displayed, even though this unit is connected to a TV... Images cannot be displayed... Video images cannot be played back... Data cannot be read or written using USB connection... PC Card HDD data cannot be read or written...
-
Page 55: Specifications
Power Supply: DC 4.8 V (AC Adaptor) / DC 3.7 V (Battery) Power Consumption: 2.2 W (AC Adaptor) (peak 3.4 W) 2.2 W (Battery) (peak 2.9 W) Compatible Memory Cards SD Card Slot: SD Memory Card, MultiMediaCard PC Card Slot: PC Card HDD (2 GB, 5 GB) SD Memory Card * MultiMediaCard *... - Page 56 Specifications Video Output: Composite Output : NTSC format / PAL format, 1 V p-p, 75 ohm S-Output : Y and C signals, NTSC format / PAL format, 1 V p-p, 75 ohm Dimensions: 73 (W) x 25.8 (H) x 107.5 (D) mm 2-14/16 (W) x 1 (H) x 4-4/16 (D) inch Weight: 5.63 oz / 160 g (Not including PC Card HDD and battery...
-
Page 57: Accessory Order Form
Check or Money Order enclosed (NO C.O.D.SHIPMENTS) VISA Credit Card # MasterCard Expiration Date Discover Customer Signature Make Check or Money Order to: PANASONIC ACCESSORIES (Please do not send cash) 4. Shipping information (UPS delivery requires complete street address) Ship To: Mrs. First Street Address... -
Page 58: Request For Service Notice
(Failure to due so will delay your repair.) • To further speed your repair, please provide an explanation of what is wrong with the unit and any symptom it is exhibiting. Panasonic Services Company 1705 N. Randall Road Elgin, IL. 60123-7847 Attn: SD Media Storage Repair... -
Page 59: Customer Services Directory
Customer’s in Puerto Rico, please ship or carry in to location below (“Service in Puerto Rico”). Matsushita Electric of Puerto Rico, Inc. Panasonic Sales Company/ Factory Servicenter: Ave. 65 de Infanteria, Km. 9.5, San Gabriel Industrial Park, Carolina, Puerto Rico 00985... -
Page 60: Limited Warranty (U.s.a. Only)
Limited Warranty Coverage If your product does not work properly because of a defect in materials or workmanship, Panasonic Consumer Electronics Company or Panasonic Sales Company (collectively referred to as “the warrantor”) will, for the length of the period indicated on the chart below, which starts with the date of original purchase (“warranty period”), at its option either (a) repair your product with... - Page 61 Carry-In or Mail-In Service For Carry-In or Mail-In Service in the United States call 1-800-272-7033. For assistance in Puerto Rico call Panasonic Sales Company (787)-750-4300 or fax (787)-768-2910. Limited Warranty Limits And Exclusions This warranty ONLY COVERS failures due to defects in materials or workmanship, and DOES NOT COVER normal wear and tear or cosmetic damage.
- Page 62 Panasonic Consumer Electronics Company, Division of Matsushita Electric Corporation of America One Panasonic Way Secaucus, New Jersey 07094 Panasonic Sales Company (“PSC”), Division of Matsushita Electric of Puerto Rico, Inc. Ave. 65 de Infanteria, Km. 9.5 San Gabriel Industrial Park Carolina,...