Hardy Diagnostics QuickSlide HemaPro User's Operation Manual
Hide thumbs
Also See for QuickSlide HemaPro:
- User's operation manual (23 pages) ,
- Quick start manual (2 pages) ,
- User's operation manual (9 pages)
Table of Contents
Advertisement
Advertisement
Table of Contents

Related Manuals for Hardy Diagnostics QuickSlide HemaPro


Summary of Contents for Hardy Diagnostics QuickSlide HemaPro
- Page 1 IFU-10891[C] HemaPRO User Manual Page 1 of 33...
-
Page 2: Table Of Contents
12.3 Tubing Kit Replacement ....................23 12.4 Setting Fill Levels ......................27 12.5 Purging the Unit ....................... 29 12.6 Hardy Diagnostics QuickSlide™ Service Request ............29 13.0 Safety Data Sheets ......................30 14.0 References ......................... 30 15.0 HemaPRO Warranty ......................31 16.0 HemaPRO Training Checklist .................. - Page 3 Congratulations! You have made an excellent choice for your Lab. Hardy Diagnostics thanks you for the trust you have placed in our products and services. This operating manual has been designed to help you gain an understanding of the operation and application of our HemaPRO Automated Hematology stainer.
-
Page 4: Instrument Specifications
1.0 Instrument Specifications Width 30.48 cm (12 in.) Height 26.67 cm (10.5 in.) Dimensions/Weight Depth 27.94 cm (11 in.) Weight 4.5 kg (10.00 lbs.) Input 100-240V, 50-60 Hz, 0.8 A Power Requirements Standard power cord is supplied to meet local standards. Output 12V, 2.0A Temperature, Ambient 16-32 Degrees C (60-90 Degrees F) -
Page 5: Work Area Requirements
2.0 Work Area Requirements The Reagent Supply Kit (Cat. No. HP1SK) should be positioned at the same level as the instrument on the counter immediately behind the instrument. The HemaPRO has a flat base in the rear on which the reagents may be positioned. NOTE: Do not place reagents above or below the instrument. -
Page 6: Introduction
3.0 Introduction This User Manual is provided to guide the user in all aspects of unit set-up, operational use, and user-level maintenance of the QuickSlide HemaPRO Automated Hematology stainer unit. The HemaPRO microscope slide stainer is capable of automatically performing a hematology stain (Wright’s-Giemsa) sequence on a slide containing a biological specimen for in vitro diagnostic use. -
Page 7: Materials Required But Not Provided
Microscope (MRP5000) 5.0 Ordering Information If additional supplies are needed, Reagent Stain Kits and Tubing Kits can be ordered through Hardy Diagnostics Customer Service. Call (800) 266-2222 (option 1), or go to www.HardyDiagnostics.com. Alternatively, you may contact your preferred distributor. IFU-10891[C]... -
Page 8: Hemapro Stain Kit
The HemaPRO accomplishes automatic hematology staining by systematically staining, buffering, and rinsing the provided biological specimen. It is critical for the success of this automated process that these unique reagents are obtained from Hardy Diagnostics QuickSlide™. Every reagent kit includes a Stain Activation Module that is required to be installed in the HemaPRO before use. -
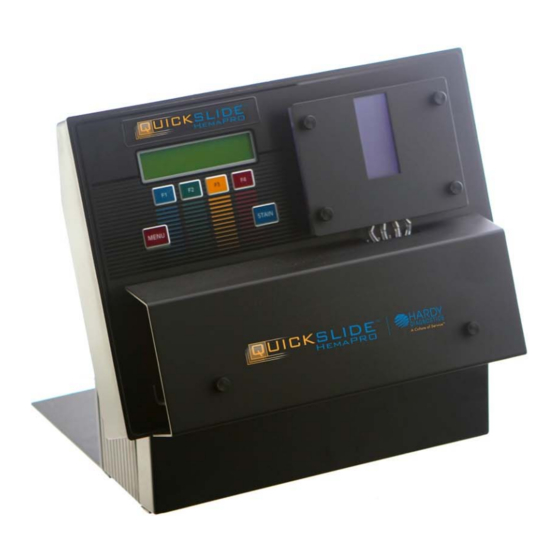
Page 9: Instrument Diagram
7.0 Instrument Diagram Display Cuvette Keypad Reagent and Waste line(s) Pump Cover Power Cord Stain Activation Input Module Input The basic anatomy of the HemaPRO is identified in the diagram above. Please use this diagram to familiarize yourself with the common areas of the HemaPRO unit. Display –... -
Page 10: Specimen Slide Preparation
8.0 Specimen Slide Preparation Blood Specimen and Bone Marrow Specimen Specimen smears shall be prepared based on the classical recommendations and following institutional procedures. Methanol Fixation Specimen fixation causes the cells to adhere to the glass slide to make possible the subsequent rinsing of the smear with water without the significant loss of cells. This can be accomplished by methanol fixation. -
Page 11: Unit Installation
9.0 Unit Installation If you are installing your instrument for the first time, please use the following guide to ensure proper set-up. For this setup, the unit will need to be powered off, and you will need to have a HemaPRO Reagent Kit on hand. Remove the two thumb screws to open the front panel that is covering the pump tube rollers. - Page 12 Make sure the power is turned off and then plug the wall transformer into the wall. Power the instrument on. The instrument will boot with a Hardy Diagnostics splash screen showing the unit’s software revision, and immediately perform a self-test.
- Page 13 Hardy Diagnostics Rev 2.m COPYRIGHT'16 SYSTEM SELF TEST -in process- SYSTEM SELF TEST -pass- Once the Self-Test is finished, the cuvette will perform a precautionary drain cycle, and boot into the Main Menu. Draining Cuvette Evaluation RPM B GG&B in house burnin...
-
Page 14: User Operation
10.0 User Operation General Guidelines Do not place HemaPRO Reagent kit above or below the instrument. Do not place the slide in the cuvette unless the display instructs you to do so. Use high quality, clean slides (Cat. No. PF72P). Slides with different thickness may show variable staining results. - Page 15 To Prepare Cuvette: (F1=back) Press F4 The unit will now prompt you to prepare the cuvette before inserting the slide. Continue to prepare the cuvette by pressing <F4>. WAIT !!! Preparing Cuvette NOTE: “Preparing” will fill the cuvette about half way with stain. Once filled, the below screen will show.
- Page 16 Wipe the back side of the slide and let it completely air dry before viewing the slide under the microscope. Alternatively, you can use bibulous paper for blotting (Cat. No. 28511007). IFU-10891[C] HemaPRO User Manual Page 16 of 33...
-
Page 17: Menu Navigation
11.0 Menu Navigation The HemaPRO has five (5) menu options from the Main Menu, each of which will be explained below. Each Menu screen follows a linear path; to proceed through the different Menu screens, you will need press the <Menu> button consecutively. To “go back” a screen will require you to cycle through the five (5) menu options until you locate your desired Menu option. -
Page 18: Sound Settings
Stain and buffer times are changed in five second intervals. Press the blue <F1> to decrease staining times and press the green <F2> key to increase staining times. Press <F4> to save the custom stain and buffer times. Blood: Time Marrow: Time F1=-... -
Page 19: Exiting The Menu Options
Exiting the Menu Options If you would like to proceed back to the Main Menu, you will need to cycle through the Menu screen until you arrive at the final Exit Menu screen (below). <Menu> #5 Exit MENU? F1=No F4=Yes Pressing <F4>Yes will direct you back to the Main Menu by first showing the following screen: Evaluation RPM B... -
Page 20: User Maintenance
The HemaPRO will only accept stain packs with the Stain Activation Module sold by Hardy Diagnostics to ensure optimal results. The instrument is calibrated only for these reagents. The use of other stain reagents or solutions will produce unreliable results and will void the warranty. -
Page 21: Stain Activation Module
12.1.3.1 Place the “Stain” line that has a blue tag into the Wright-Giemsa Stain bottle. 12.1.3.2 Place the “Buffer” line that has a green tag into the Wright-Giemsa Buffer bottle. 12.1.3.3 Place the “Rinse” line that has a white tag into the Wright-Giemsa Rinse bottle. - Page 22 Reattach the Stain Activation Module and power the unit on. If you continue to receive the Self-Test Failure screen, please contact Hardy Diagnostics Technical Support via phone at (800) 266-2222 (ext. 2), or TechService@hardydiagnostics.com, and a Technical Support Representative will assist you.
-
Page 23: Tubing Kit Replacement
(6) months to ensure the HemaPRO is operating under optimal conditions. The following steps will guide you through replacing the tubing on your HemaPRO unit. You may also view our video available on Hardy Diagnostics’s YouTube page for additional assistance: HemaPRO Tube Replacement - https://www.youtube.com/watch?v=ntmFMWqefqI... - Page 24 Unscrew the two (2) thumbscrews holding the front panel pump cover in place. This will expose the four pump tube rollers, the orange pump tubes, and the reagent/waste lines. Pump #1 Pump #2 Pump #3 Pump #4 Rinse Buffer Waste Stain Bracket Shorter...
- Page 25 Starting from the left side of the unit, (Pump #1, Rinse) pull the inverted orange “T” from the orange pump tube so that it is free from the black metal bracket. Using a hemostat or forceps (tweezers), place them underneath the base end of the clear tubing where they connect to the cuvette.
- Page 26 Replace the tube sets one at a time, starting from left to right. The longest lines for each reagent are to be positioned on the left side of the orange pump tubes, and the shorter lines on the right side of the pump tubes (as demonstrated in the diagram).
-
Page 27: Setting Fill Levels
The following steps will guide you through recalibrating the fill level on your HemaPRO unit after a tubing change. You may also view our video available on Hardy Diagnostics’s YouTube page for additional assistance: HemaPRO Set Fill Levels - https://www.youtube.com/watch?v=90IUWF10Jhs. - Page 28 Press: F1=Drain F4=Fill You will now see the above screen, instructing to either <F1>Drain or <F4>Fill the cuvette. If the cuvette has any residual fluid remaining, press and hold the <F1>Drain button until it has emptied completely. When cuvette is completely empty, press the <F4>Fill button, this will set the “empty”...
-
Page 29: Purging The Unit
Doing so will initiate the unit’s Self-Test, which will run the Waste pump (Pump #3) followed by the purging the Stain line (Pump #4). Hardy Diagnostics QuickSlide™ Service Request If a problem is encountered that is beyond the scope of this manual or additional... -
Page 30: Safety Data Sheets
13.0 Safety Data Sheets Safety Data Sheets (SDS) for any associated reagents kits can be found at www.HardyDiagnostics.com/SDS/. 14.0 References Samples for Hematology. 2014. Cornell University College of Veterinary Medicine, Ithaca, NY. 2. Lee, S.H., et al. 2008. ICSH Guidelines for the standardization of bone marrow specimens and reports. -
Page 31: Hemapro Warranty
15.0 HemaPRO Warranty Hardy Diagnostics will repair or replace the instrument under the terms and conditions of this warranty. The liability of Hardy Diagnostics under this warranty, whether in contract, tort, or otherwise, shall not, except as expressly provided herein, exceed Buyer’s purchase price on which such liability is based. - Page 32 How to Get Service: In order to be eligible for service under this warranty, the problem must be reported to Hardy Diagnostics in writing within five business days after it becomes apparent while the warranty is in effect, provided an opportunity is afforded for examination by Hardy Diagnostics.
-
Page 33: Hemapro Training Checklist
16.0 HemaPRO Training Checklist Trainee Name: Refer to the user manual for each item on this checklist. Enter trainee’s initials for each item trained. Trainee’s Initials ______ Unit Installation (Section 9.0) ______ HemaPRO Reagent Kit installation with Stain Activation Module (Section 12.1 - Section 12.2) ______ Specimen Slide Preparation...