Advertisement
Model No. 831.15707.0
Serial No.
Write the serial number in the
space above for reference.
Serial Number Decal (under seat)
• Assembly
• Adjustment
• Troubleshooting
• Part List and Drawing
CAUTION
Read all precautions and instruc-
tions in this manual before using
this equipment. Save this manu-
al for future reference.
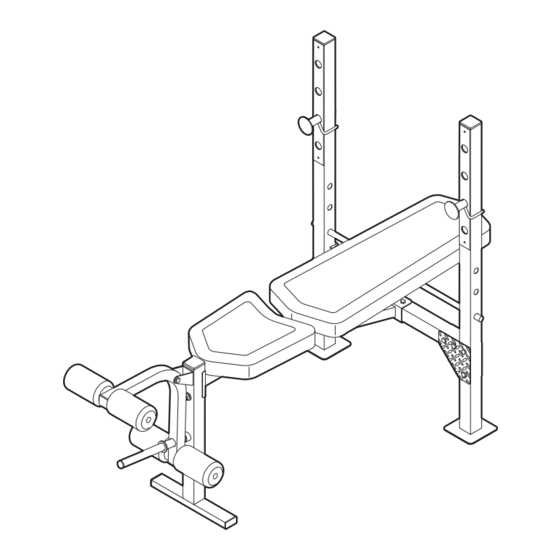
WEIGHT BENCH EXERCISER
Sears, Roebuck and Co., Hoffman Estates, IL 60179
User's Manual
Advertisement
Table of Contents

Related Manuals for Weider PRO 250 831.15707.0


Summary of Contents for Weider PRO 250 831.15707.0
- Page 1 Model No. 831.15707.0 Serial No. Write the serial number in the space above for reference. Serial Number Decal (under seat) • Assembly • Adjustment • Troubleshooting • Part List and Drawing CAUTION Read all precautions and instruc- tions in this manual before using this equipment.
-
Page 2: Table Of Contents
TABLE OF CONTENTS WARNING DECAL PLACEMENT ............. .2 IMPORTANT PRECAUTIONS . -
Page 3: Important Precautions
IMPORTANT PRECAUTIONS WARNING: To reduce the risk of serious injury, read the following important precau- tions before using the weight bench. 1. Read all instructions in this manual and all warnings on the weight bench before using the weight bench. Use the weight bench only as described in this manual. -
Page 4: Before You Begin
BEFORE YOU BEGIN Thank you for selecting the versatile WEIDER 250 weight bench. The weight bench offers an impres- sive array of weight stations designed to develop every major muscle group of the body. Whether your goal is to tone your body, build dramatic muscle size... -
Page 5: Part Identification Chart
PART IDENTIFICATION CHART This chart is provided to help you identify the small parts used in assembly. The number in parenthesis below each part refers to the key number of the part, from the PART LIST on page 14. Important: Some parts may have been pre-assembled for shipping purposes. -
Page 6: Assembly
ASSEMBLY Make Assembly Easier Everything in this manual is designed to ensure that the weight bench can be assembled suc- cessfully by anyone. However, it is important to realize that the versatile weight bench has many parts and that the assembly process will take time. - Page 7 2. Attach one end of the Crossbar (2) to two Joint Plates (11, 35) with two M10 x 66mm Bolts (28) and two M10 Nylon Locknuts (31). Do not tight- en the Nylon Locknuts yet. Attach the other end of the Crossbar (2) in the same way.
- Page 8 5. Insert the Support Rod (14) into a set of holes in the Uprights (1). Turn the Support Rod so the locking pin is wrapped around the Upright. Tighten the M10 Nylon Locknuts (31) and M10 x 19mm Screw (5) used in steps 1–4. 6.
- Page 9 9. Orient the Backrest Tubes (7) with the indicated holes in the position shown. Attach the Backrest Tubes to the Backrest (8) with four M6 x 38mm Screws (32) and four M6 Washers (22). Do not tighten the Screws yet. 10.
-
Page 10: Adjustment
ADJUSTMENT The weight bench is designed to be used with your own weight set (not included). The steps below explain how the weight bench can be adjusted. See EXERCISE GUIDELINES on page 11 for important exercise information and refer to the accompanying exercise guide to see the correct form for each exercise. Refer also to the exercise information accompanying your weight set for additional exercises. -
Page 11: Exercise Guidelines
EXERCISE GUIDELINES THE FOUR BASIC TYPES OF WORKOUTS Muscle Building To increase the size and strength of your muscles, push them close to their maximum capacity. Your mus- cles will continually adapt and grow as you progres- sively increase the intensity of your exercise. You can adjust the intensity level of an individual exercise in two ways: •... - Page 12 Rest for a short period of time after each set. The ideal resting periods are: • Rest for three minutes after each set for a muscle building workout. • Rest for one minute after each set for a toning work- out.
- Page 13 NOTES...
-
Page 14: Part List
PART LIST—Model No. 831.15707.0 Key No. Qty. Description Upright Crossbar Bench Frame Front Leg M10 x 19mm Screw Leg Lever Backrest Tube Backrest Seat Upright Cover Right Joint Plate Pad Tube Foam Pad Support Rod Weight Rest 50mm Square Inner Cap 25mm Round Angled Cap 38mm Square Inner Cap 25mm Square Inner Cap... -
Page 15: Exploded Drawing
EXPLODED DRAWING—Model No. 831.15707.0 R0407A... -
Page 16: 90-Day Full Warranty
Get it fixed, at your home or ours! For repair—in your home—of all major brand appliances, lawn and garden equipment, or heating and cooling systems, no matter who made it, no matter who sold it! For the replacement parts, accessories, and user’s manuals that you need to do-it-yourself. For Sears professional installation of home appliances and items like garage door openers and water heaters.