Table of Contents
Advertisement
Quick Links
Advertisement
Table of Contents

Related Manuals for Vivitar ViviCam 3340


Summary of Contents for Vivitar ViviCam 3340
- Page 1 ViviCam 3340 Digital Camera User's Mannual...
-
Page 2: Table Of Contents
Table of Contents 1. INTRODUCTION...2 SPECIFICATIONS...6 3. GETTING TO KNOW YOUR CAMERA...8 4. GETTING STARTED ...12 5. INSTALLING DRIVERS AND SOFTWARE ...19 6. TRANSFERRING IMAGES TO A COMPUTER ...22 7. USING YOUR CAMERA AS A PC CAMERA ...27 Rev 030409... -
Page 3: Introduction
Please read through this manual carefully before using the camera and follow the instructions to derive full benefit from your camera. 1-1 Safety Precautions The software CD-ROM disc packaged with the camera is designed for PC use only. This product is a highly intricate device. Any attempt to disassemble it may cause electric shock from the internal components. - Page 4 Copyright Restrictions Please observe copyright law and restrictions, as your new camera is a recording device. LCD (Liquid Crystal Display) status display Your new camera includes an LCD information/status display that contains a small amount of liquid. If the LCD monitor is damaged, please observe the following precautions: 1.
- Page 5 1-3 Operational Cautions Your camera consists of intricate electrical and mechanical components. Avoid exposing the camera to the following conditions: Extremely damp and dusty places. Sealed vehicles or places exposed to direct sunlight Extreme high temperatures or heat. Mechanical shock or vibration. Smoke, fumes or steam.
- Page 6 1-4 Common Accessories The following items are normally included with the Vivicam 3340 camera. (Note that accessories may vary by retailer.) 1. AA Batteries (2) 2. Wrist Strap 3. Software CD ROM (Driver and PC Applications) 4. USB Cable 5. Pouch 6.
-
Page 7: Camera Specifications
2.1 Camera Specifications Image resolution: Still images: Fine = 1280 x 1024 (1.3M), Mid = 640 x 480 (VGA); Video = 320 x 240 Range of Focus: Internal Memory: 8M SDRAM. Note that 4 MB of memory is allocated to image processing (buffering), and 4 MB is available for image storage Image File Formats: JPEG (still images), AVI (movies) Flash modes: Automatic, Off... -
Page 8: System Requirements
2-2 System Requirements To operate your camera with your computer the following minimum requirements are suggested. For MAC users, only the USB Mass Storage Device function is available. PC users may use the PC/web cam feature. System Requirements (Windows) CD-ROM USB port Lycoris Desktop LX: same as PC requirements except OS System Requirements (Macintosh) -
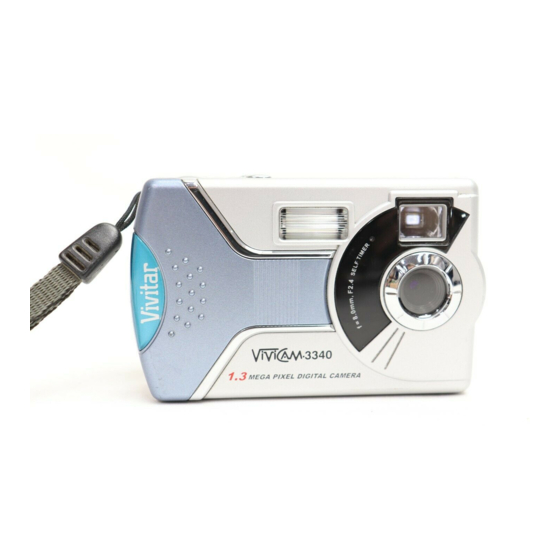
Page 9: Getting To Know Your Camera
3. GETTING TO KNOW YOUR CAMERA 3.1 Identifying the Features: Front View (1) Shutter button (2) Power button (3) Mode button (4) Select button (5) LCD information display (6) Viewfinder window (7) Macro switch (8) USB connector cover (9) Lens (10) Self-timer LED (11) Flash Back View... - Page 10 3.2 Information and Status LCD Flash: : Off : Auto Image Resolution: : 640x480 : 1280x1024 White Balance: : Tungsten : Fluorescent : Auto : Self-timer : Memory Card Indicator : Sunny : Cloudy...
-
Page 11: Led Indicators
Battery status: : Full battery power : Medium battery power : No/low battery power : Images Number / Function Display 3.3 LED Indicators There are two LEDs on the backside of the camera, below the viewfinder window. Their functions are described in the following table: Indicator/Status RED LED –... - Page 12 3.4 Using an SD or MMC Memory Card (Optional card) Your camera supports Secure Digital (SD) or Multi-media Memory Cards (MMC). Using a memory card allows you to take more images. When a memory card is inserted into the camera memory card slot, the camera will automatically use the card in preference to the memory built-in to the camera itself.
-
Page 13: Getting Started
4. GETTING STARTED Before using your camera insert two AA batteries into the battery compartment. Note the proper orientation. During operation, if the battery power gets very low, a warning message “LOW” message will appear on the Status LCD. Please replace the new batteries immediately to ensure normal operation. -
Page 14: Taking Images
4.2 Taking Images Power up the camera, locate a subject in the viewfinder and you are ready to take images (pictures). Press the Shutter button to take an image. “CAP.” (short for Capture) will appear on the Status LCD and the image will be stored in memory. - Page 15 4.3 Operational Functions and Modes Photo (FOTO) Function Delete Function Movie Mode Setup Mode...
- Page 16 4.4 Functions and Modes Your camera has two functions and two modes. Functions include: 1) Taking images, 2) Deleting images. Modes include: 1) Movie Mode, 2) Setup Mode. Modes & functions are described in the following paragraphs. The Photo (FOTO) Function – Taking Images 1.
- Page 17 5. RESOLUTION (RES) submenu. Use the Select button to set the still-image resolution to either Mid: 640x480 or Fine: 1280x1024. Press the Shutter button to confirm your selection. Note: Fine resolution will result in much better images, whereas Mid resolution will allow you to store more images in available memory space.
- Page 18 Movie Mode – Capturing Silent Movies 1. Press the Mode button three times and “MOV” will appear on the Status LCD. Press the Shutter button to set the camera to the Movie Mode. 2. When the camera is in the Movie Mode, “MOV” will be displayed continuously on the Status LCD.
- Page 19 Setup Mode 1. Press the Mode button four times and “SET.” will appear on the Status LCD. Press the Shutter button to enter the setup submenus. 2. Scroll through the Setup submenus by pressing the Select button. There are three Setup submenus: SELF-TIMER (TMR), FREQUENCY (FRQ), and USB (USB).
-
Page 20: Installing Drivers And Software
5.1 Driver Installation – for PC users Your camera will operate with your computer as a HARD DISK DRIVE (HDD). PC users can enjoy the additional feature of a PC CAMERA (CAM) for a direct (live) video feed to your PC. Make sure to install the camera driver before connecting the camera to your PC. - Page 21 3. Click “Next” to continue. Follow the instructions to complete the camera driver installation. After the installation is completed, the following message will appear on the screen. 4. Click Finish to restart your PC and complete installation.
- Page 22 Note: Mac OS and Lycoris Desktop LX users will not be using the PC/web camera feature. Therefore, no driver is required. Your Mac OS or Lycoris Desktop LX computer will automatically recognize the camera and load its own USB mass-storage device driver. Mac and Lycoris users: Make sure the camera is set to HDD (see section on Setup mode.) Use the included USB cable to connect your camera to...
-
Page 23: Transferring Images To A Computer
6. TRANSFERRING IMAGES TO A COMPUTER 6.1 Connecting Your Computer Method 1: USB Mass Storage Device (all users) - Your digital camera functions with your computer as if it were a storage device (like a card reader, CD, or floppy disk) device. - Page 24 Mass Storage (HDD) mode, the USB cable is connected, and Camera Twain DS or V3340 is selected from the list of sources. Details of the Vivicam 3340 TWAIN User Interface are explained in the following section:...
- Page 25 (1) Display TWAIN program information, version number and copyright. (2) Quit TWAIN program and return to the imaging application. (3) Save the selected images into a directory (4) Select all images (5) Unselect all images (6) Delete the selected images (7) Transfer the selected images to the application (8) Next page...
- Page 26 13. You may select one or more images. Then, press the transfer button (7) to transfer the selected images to a the imaging application. You can transfer the images in either “Standard” or “Large” file size, as shown below:...
- Page 27 14. Standard and Large files sizes for images: Original Size 640x480(VGA) 1280X1024(1.3M) 15. You may select one or more images. Then, press the Save button (3) to save the selected images into a specific directory. 16. Using this dialog box, you can specify the Directory, Filename, Format...
-
Page 28: Using Your Camera As A Pc Camera
7.1 Live Camera Video for PC Users - In addition to capturing movies and images, your camera can also act as a video camera for your PC. To use your camera as a PC Camera: 1. Install the PC camera driver as described the previous chapter “Driver Installation”...