Table of Contents
Advertisement
Advertisement
Table of Contents

Related Manuals for Ryobi EXPAND-IT ALT05


Summary of Contents for Ryobi EXPAND-IT ALT05
- Page 1 ORIGINAL INSTRUCTIONS Line Trimmer Attachment ALT05...
- Page 2 Important! It is essential that you read the instructions in this manual before assembling, operating and maintaining the product. Subject to technical modification.
-
Page 3: Intended Use
Safety, performance, and dependability have been given WARNING top priority in the design of your line trimmer attachment. When the throttle trigger is released and the engine is running at idle speed, the cutting attachment must not INTENDED USE move. If it does continue to move, there is risk of severe The line trimmer attachment is approved for use with injury to the operator. -
Page 4: Transportation And Storage
corrosive agents such as garden chemicals and de- WARNING icing salts. If the product is dropped, suffers heavy impact or begins ■ Do not store outdoors. to vibrate abnormally, immediately stop the product and ■ When transporting the product in a vehicle, secure it inspect for damage or identify the cause of the vibration. -
Page 5: Residual Risks
RESIDUAL RISKS Wear eye, ear, and head protection. Even when the product is used as prescribed, it is still impossible to completely eliminate certain residual risk factors. The following hazards may arise during use, and Wear non-slip safety footwear when the operator should pay special attention to avoid the using the product. - Page 6 Without safety alert symbol and remove the end cap from the attachment. Indicates a situation that may result in property damage. ■ Push in the button located on the attachment shaft. ■ Align the button with the guide recess on the power ASSEMBLY head coupler and slide the two shafts together.
- Page 7 UNPACKING...
-
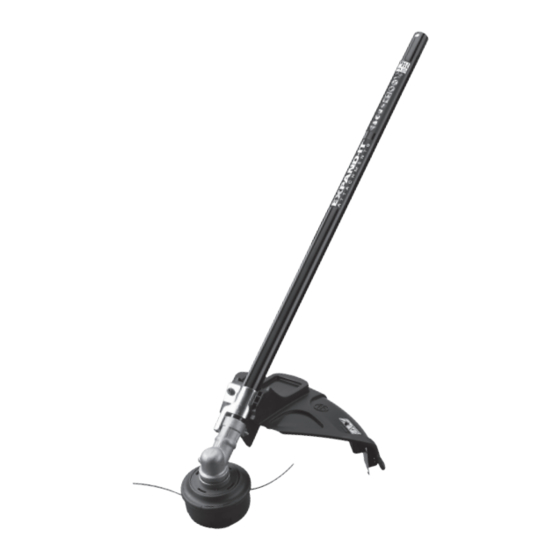
Page 8: Know Your Product
KNOW YOUR PRODUCT 1. Trimmer guard 5. Bump knob 2. Cut-off blade 6. Lower housing 3. Upper housing 7. Cutting line 4. Spool... -
Page 9: Getting Started
GETTING STARTED Always wear safety goggles or safety glasses with side Attach the grass deflector. shields when operating the product. Failure to do so could result in objects being thrown into your eyes resulting in possible serious injury. When handling the trimmer assembly, wear non-slip, heavy-duty protective gloves. - Page 10 OVERVIEW p.11 p.12 p.13 p.14...
-
Page 11: Operation
OPERATION OPERATING THE TRIMMER NOTE: Hold the product with the right hand on the rear handle and the left hand on the front handle. WARNING: Do not cut in a dangerous cut- ting area. Avoid trees and shrubs. Tree bark, wood mouldings, cladding, and fence posts can easily be damaged by the line. - Page 12 OPERATION NOTE: The line trimming cut-off blade on the grass deflector will cut the line to the correct length. NOTE: The small blade fitted to the cutting attachment guard is designed to trim the new extended line to the correct length for safe and optimum performance.
- Page 13 MAINTENANCE REPLACING THE LINE 1. Rotate the bump knob on the trimmer head until the line on the centre of the bump knob aligns with arrows on top of trimmer head. 2. Use a 2.4 mm diameter monofilament string. Cut one piece of string approximately 5.4 m in length.
- Page 14 MAINTENANCE REPLACING THE STRING HEAD 1. Insert the wrench through the hole in the upper flange washer and the hole in the gear head, then turn clockwise to remove the old string head. 2. Install the new string head, align the nut in the string head to the connector shaft of the gear box and turn the string head counterclockwise by hand to tighten.
- Page 15 MAINTENANCE CLEANING THE PRODUCT 1. Clean all foreign material from the product. WARNING: Keep away from corrosive agents such as garden chemicals and de- icing salts. WARNING:The small blade fitted to the cutting attachment guard is designed to trim the new extended line to the correct length for safe and optimum performance.
- Page 16 STORAGE STORING THE PRODUCT NOTE: Make sure to clean the product before storing. 1. Remove the attachment from the upper boom of the power head, and then attach the hanger cap. NOTE: If a cutting blade is fitted, cover it with the blade protector.
-
Page 17: Product Specifications
PRODUCT SPECIFICATIONS Noise emission level (in accordance with ISO 22868) A-weighted emission sound pressure level at the operator’s position Line trimmer attachment ALT05 72.3 dB (A) Model - Idling 1.45 kg Weight 98.4 dB(A) - Racing 457 mm Cutting swath - Equivalent A-weighted sound 95.4 dB (A) pressure level... - Page 20 Techtronic Industries (Australia) Pty. Ltd. 31 Gilby Road, Mount Waverley, VIC, 3149, Australia Techtronic Industries New Zealand Ltd. Unit C, 70 Business Parade South, RYOBI is a trademark of Ryobi Limited, and Highbrook, Auckland 2013, New Zealand is used under license. 961480051-01...