Advertisement
Quick Links
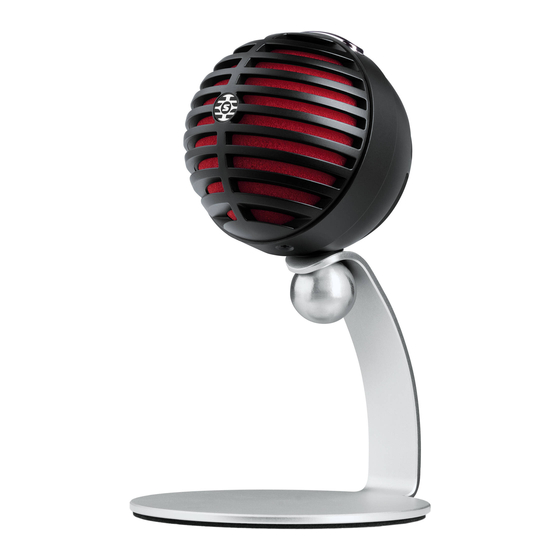
General Description
The Shure MV5 microphone connects directly to a computer or mobile device
®
over a USB or Lightning
connection. Ideal for home recording or podcasting,
the MV5 features preset voice and instrument record modes for fast, easy
configuration.
Features
•
Convenient, Compact Design: This sleek and durable microphone
mounts on the Shure MV5 desktop stand or any stand with a 1/4"
threaded adapter.
Quick Setup
1. Connect the microphone to a computer or mobile device. Use the
appropriate cable (USB or Lightning).
The Green status LED indicates a successful connection.
Note: When using apps like Voice Memo, the LED will not light until
Record is engaged.
2. Confirm that the MV5 is the selected audio device.
Most computers and mobile devices automatically detect the MV5 and
assign it as the primary audio device. If your computer settings default
to another device, open the sound control panel and select the MV5. To
quickly verify that the device is recognized, plug headphones into the
MV5 audio output and play an audio track. If you can hear sound, the
microphone is functioning properly.
Connections and Controls
① Mode Selection Button
Press to switch between preset modes
② Mute Button
Press to mute the microphone input
③ Headphone Volume Control
Adjusts the headphone volume
④ Headphone Output
Plug in any headphones with a 3.5 mm (1/8 inch) connector
⑤ Micro USB Port
Use the appropriate cable (USB or Lightning) to connect the MV5 to a com-
puter or mobile device
⑥ Voice Mode
The LED indicator illuminates when this mode is selected
⑦ Status Indicator
LED Behavior
Green
Flashing Red (all 3 LEDs)
©2017 Shure Incorporated
Status
Active USB or Lightning connection
Muted
•
Plug and Play: The MV5 automatically becomes the active audio device
when plugged into a USB or Lightning compatible device.
•
Preset Modes: Minimize setup time with preset DSP modes designed
to adjust your gain, equalization and compression for a variety of appli-
cations.
Note: When the MV5 is assigned as the audio device, all monitoring and
playback from the recording software goes to the headphone output of
the MV5.
3. Use the MODE button to select the preset mode that fits your appli-
cation.
If the audio is too quiet or causes distortion, gain can be manually con-
figured. However, the modes typically do not require additional gain ad-
justments. Refer to the "Adjusting Microphone Level" topic in this guide
for details.
4. In your recording application, select the MV5 as the input source.
See your software user guide for information on assigning input sources.
5. Record.
The microphone is ready to use!
⑧ Instrument Mode
The LED indicator illuminates when this mode is selected
Note: Flat Mode is engaged when both mode LEDs are off.
Preset Modes
Three selectable modes adjust settings for gain, equalization, and dynamics
to bring out the best sound characteristics for your recording needs.
Mode
Application
Use for speech
Equalization to emphasize clarity and fullness, and
or vocals in
gentle compression to keep levels consistent. A
podcasting or
de-esser reduces sibilance (the harsh sound that
musical
occurs when words with an "S" are spoken).
Voice
applications
Best for
Transparent compression to smooth out volume
acoustic
spikes and bring quiet passages forward.
instruments
Equalization emphasizes detail and gives an overall
In-
and live music
stru-
applications
ment
A completely unprocessed signal (no equalization
Suited for any
or compression settings used). Adds flexibility when
application
Flat
processing the audio after recording.
MV5
Digital Condenser Microphone
Characteristics
natural sound.
1/6
Advertisement

Related Manuals for Shure MV5


Summary of Contents for Shure MV5
- Page 1 4. In your recording application, select the MV5 as the input source. quickly verify that the device is recognized, plug headphones into the MV5 audio output and play an audio track. If you can hear sound, the See your software user guide for information on assigning input sources.
- Page 2 Placing the microphone farther away results in more ambient room sound. Make additional gain adjustments if necessary. Additional Tips Shure offers additional educational publications on recording techniques for specific instruments and applications. Visit www.shure.com for more informa- tion. Adjusting Microphone Level...
-
Page 3: Troubleshooting
Then adjust headphone level for comfortable monitoring. MV5. To adjust the amount of playback audio relative to the direct microphone signal, use the computer or DAW mixer settings. - Page 4 Digital Condenser Microphone Shure Incorporated Cartridge Type Electret Condenser (16 mm) Polar Pattern Unidirectional (Cardioid) Bit Depth 16-bit/24-bit Sampling Rate 44.1/48 kHz Frequency Response 20 Hz to 20,000 Hz Adjustable Gain Range 0 to +36 dB Sensitivity -40 dBFS/Pa at 1 kHz[1][2}...
- Page 5 Shure Incorporated 1,000 Hz Polar Pattern 0,61 m (2 ft.) from sound source Frequency Response Accessories Furnished Accessories MV5 Desktop Stand AMV5-DS 1 m USB cable AMV-USB 1 m Lightning cable AMV-LTG Certifications and on, the user is encouraged to try to correct the interference by one or...
- Page 6 Apple Inc. The trademark "iPhone" is used with a license from Aiphone K.K. ® ® and Lightning are registered trademarks of Apple Inc. Shure Incorporated 5800 West Touhy Avenue Niles, IL 60714-4608 USA Phone: +1-847-600-2000 Email: info@shure.com...