
Related Manuals for TEC TEC SL-9000-ESB-X SERIES


Summary of Contents for TEC TEC SL-9000-ESB-X SERIES
- Page 1 TEC Electronic Computing Scale SL-9000-ESB-X SERIES Owner’s Manual ESBX Features Table of Contents...
-
Page 3: Table Of Contents
TOC 2 INTRODUCTION 1.1 APPLICABLE MODEL ACCESSORIES... SPECIFICATION... SCALE OPTION APPEARANCE... DISPLAY... TYPE... TYPE... 5. KEY LAYOUT PROGRAMMING OPERATION KEYBOARD AND SPEED KEYBOARD PROCEDURE BEFORE 7. INSTALLATION PROCEDURE... 8. LEVEL ADJUSTMENT... 9. REMOVAL AND REPLACEMENT OF 10. OUTLINE OF OPERATION... 10-1 11. - Page 4 TOC 1 12. PROGRAMMED DATA VERIFICATION REPORTS 13. PASSWORD SECURITY 13.1 SETTING PASSWORD AND PROTECT MENU 13.2 CALLING MENU BY ENTERING 14. OPERATING PROCEDURES 14.1 WEIGHING OPERATION... 14-2 14.2 FIX PRICE OPERATION (FOR US TYPE ONLY) 14.3 BY COUNT OPERATION... 14-4 14.4 PRINT COUNT 14.5...
- Page 6 Do not attempt to effect repairs or modifications to this equipment. If a fault occurs that cannot be rectified using the procedures described in this manual, turn off the power, unplug the machine, then contact your authorized TOSHIBA TEC representative for assistance. Meanings of Each Symbol This symbol indicates warning items (including cautions).
- Page 7 • Utilize our maintenance services. After purchasing the machine, contact your authorized TOSHIBA TEC representative for assistance once a year to have the inside of the machine cleaned. Otherwise, dust will build up inside the machines and may cause a fire or a malfunction. Cleaning is particularly effective before humid rainy seasons.
-
Page 8: Introduction
INTRODUCTION Thank you for purchasing the TEC SL-9000-ESB-X Series electronic computing scale. As you will discover, the TEC SL-9000-ESB-X series has many features and functions designed for user friendliness as well as complete customer satisfaction. The 7-segment fluorescent display which indicates transaction information such as weights, unit prices, total prices, etc. -
Page 9: Applicable Model
1. INTRODUCTION 1.1 APPLICABLE MODEL SL-9000-30M-ESB-US SL-9000-15M-ESB-CA SL-9000-15M-ESB-QR The description of the model number is as follows. S L - 9 0 0 0 - 3 0 M - E S B - U S Max. Capacity 30M: 30 lbs (decimal pound/multi-interval) 15M: 15 Kg (multi-interval) 1.2 ACCESSORIES... -
Page 10: Specification
Dimensions (approx.) Weight 2.2 OPTION Option Name OP-9000- Label Cassette CASSETTE NOTE: Contact TOSHIBA TEC H.Q. or your nearest TOSHIBA TEC representative. 30 lb 0.005 lb (0~15 lb) 0.01 lb (15~30 lb) 2.000 lb 0 ~ 30.05 lb $0.01 ~ 99.99 $0.01... -
Page 11: Appearance
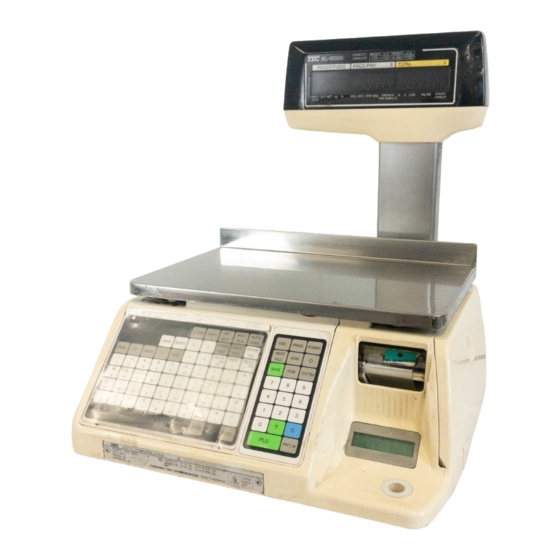
3. APPEARANCE 3. APPEARANCE APPEARANCE Main Power Switch Drawer I/F Remote Display CMT/PL-3 I/F Meat Platter Power Cord Right Cover Adjustable Legs Speed Keyboard and Programming Keyboard Operation Keyboard Print Head Level Gauge Liquid Crystal Display... -
Page 12: Display
4. DISPLAY DISPLAY 4.1 US TYPE US (UNITED STATES) SL-9000 WEIGHT %/T NET 4.2 CA TYPE Since the following two remote display sheets are enclosed with the CA machine, select one and affix it to the remote display. (Refer to Section 7 How to affix the remote display sheet.) CA (CANADA) SL-9000 WEIGHT/POIDS... - Page 13 4. DISPLAY 4.3 QR TYPE SL-9000 For the QR machine, the following multi-linqual display stickers are provided to adapt machines to use in various countries. Select one of them and affix it to positions A and B on the remote dis- play.
-
Page 14: Key Layout
5. KEY LAYOUT KEY LAYOUT 5.1 PROGRAMMING KEYBOARD SEND PROG. ENTER " È É Â NOTE: Blank keys have no function. Programming Keyboard Function Name of Key 1. Clears preceding numeric data. CLEAR 2. Releases the scale from the error mode. Toggles between the upper characters or lower characters. - Page 15 5. KEY LAYOUT Name of Key 1. Displays the preceding PLU data. 2. Used to set an auto code. 3. Calls the preceding label format # when setting the print position. 4. Selects a prgramming item. Moves the cursor to the left. Moves the cursor to the right.
-
Page 16: Operation Keyboard And Speed Keyboard
5. KEY LAYOUT 5.2 OPERATION KEYBOARD AND SPEED KEY BOARD Primary function Secondary function NOTES: 1. The numbers 1~70 indicate the speed key layout, but the actual keys have no number. 2. The functions of the 3 and 4 keys can be changed according to the initial settings as follows. Initial Setting # 12-8 Operation Keyboard Function... - Page 17 5. KEY LAYOUT Name of Key Prints the customer label. PRT/* Saves tare and unit price after taking off the commodity from a platter. SAVE Sets the quantity of commodity in "BY COUNT" mode. Displays the date. DT/TM 1. Selects the item for change Print/OFF. NEXT 2.
- Page 18 5. KEY LAYOUT Name of Key Displays a total amount. This key is used for item or subtotal discount by entering a percentage. (Optional key by initial setting) Feeds the label. FEED Issues a test label. TEST Adjusts the zero point. ZERO Changes the label issue mode between Automatic issue and manual AUTO/...
-
Page 19: Procedure Before Operation
6. PROCEDURE BEFORE OPERATION PROCEDURE BEFORE OPERATION 1. Unpack the accessories and scale from the carton. 2. Install the remote display on the scale. (See Page 7-1.) 3. Refer to safety Precautions in this manual and set up the scale in a proper location. 4. -
Page 20: Installation Procedure
7. INSTALLATION PROCEDURE INSTALLATION PROCEDURE Remote Display Be sure to cover the connectors with the connector cover because of high voltage and current. If the connectors are exposed to water, a leakage may result. CAUTION: Never place the scale upside down. Doing so will cause a malfusction. 1. - Page 21 7. INSTALLATION PROCEDURE 4. For the CA type, affix the remote display sheets to the remote display. Be sure to wipe the remote display surface clean before affixing the sheet or sticker. CA Type Remote Display Sheet Affix the remote display sheets to the depressed area of the remote display on both sides. (Operator side and customer side) QR Type Remote Display Sticker...
-
Page 22: Level Adjustment
8. LEVEL ADJUSTMENT LEVEL ADJUSTMENT 1. Level Gauge Set the scale on a stable and level surface. Level the scale by turning the adjustable legs so that the air bubble is inside the center circle. 2. Adjustment Procedure When the air bubble moves toward the left side, turn the right adjustable legs clockwise. When the air bubble moves toward rear, turn the front adjustable legs clockwise. -
Page 23: Removal And Replacement Of Media
9. REMOVAL AND REPLACEMENT OF MEDIA REMOVAL AND REPLACEMENT OF MEDIA Since there is a cutter at the paper outlet, be careful not to injure your fingers when replacing media. CAUTION: Do not hold the label cassette by the portion causing damage when setting it in position. - Page 24 9. REMOVAL AND REPLACEMENT OF MEDIA 9. REMOVAL AND REPLACEMENT OF MEDIA 4. Loosen the P-2.6x6 screw and move the label guide plate according to the media width. 5. Secure the label guide plate with the P-2.6x6 screw. Screw (P-2.6x6) 48-mm label dowel 57-mm label dowel Label Guide Plate...
-
Page 25: Outline Of Operation
10. OUTLINE OF OPERATION 10. OUTLINE OF OPERATION Since there is a cutter at the paper outlet, be careful not to injure your fingers when issuing labels. Main Power Switch ON Display OFF Press the Press the POWER key POWER key Scanning Display Menu No. -
Page 26: Programming Procedures
11. PROGRAMMING PROCEDURES 11. PROGRAMMING PROCEDURES How to access the Programming Menu Enter a menu number Password ESC. Programming starts NOTES: 1. When the selected menu ( 0 ) is protected from an access, refer to Section 13.2 and enter the password. - Page 27 11. PROGRAMMING PROCEDURES Table 1: Title and Contents of Programming Menu TITLE PLU DATA EDIT PLU DATA ADDRESS SETTING PRT LOCATION DATE/TIME SETTING CMT/PL-3 INITIAL SET BAR CODE FORMAT SPEED KEY SETTING INGREDIENT MESSAGE CONFIRMATION LABEL MENU ITEM GROUP CHANGE UNIT PRICE PROGRAM/CHANGE/DELETE PLU PROGRAM ADDRESS SELECT LABEL FORMAT AND ADJUST...
- Page 28 11. PROGRAMMING PROCEDURES How to enter characters Use the following procedure to enter a commodity name, address and ingredient message. Example) 1st line: 2nd line: (TEL) 0123-45-6789 SPACE 1st line content SHIFT SHIFT NOTES: 1. keys are the cursor keys. 2.
-
Page 29: Unit Price Change
11. PROGRAMMING PROCEDURES 11.1 UNIT PRICE CHANGE Menu Group: 1 Item No.: Unit prices stored in PLU can be changed under this menu. In this procedure, use the operation keys (except when calling a PLU by using a speed key). PROG. -
Page 30: Plu Data Setting
11. PROGRAMMING PROCEDURES 11.2 PLU DATA SETTING Menu Group: 1 Item No.: Setting or changing the contents of PLU (PLU#, UPC#, Commodity Name, etc.). AUTO PROG. CODE NEXT NEXT Enter PLU# ENTER (max. 6 dig.) Is status In what of initial set mode is PLU #1-6? used? - Page 31 11. PROGRAMMING PROCEDURES Pressing the key instead of the ENTER key proceeds to the next menu. Pressing the returns to the preceding menu. Verification label of PLU data Preset Tare T1.000 Quantity PLU# NET WT. NOTES: 1. A UPC code is made up of a combination of an entered code and an AUTO CODE. Be sure to add some - characters to the end of the AUTO CODE, or all entered codes will be ignored and an AUTO CODE will become an UPC code (see ex.
-
Page 32: Address Setting
11. PROGRAMMING PROCEDURES 11.3 ADDRESS SETTING Menu Group: 1 Item No.: Store addresses and receipt header printed on label can be set within the following character limits. Address: 32 characters x 2 lines Receipt Header: 24 characters on the 1st/2nd line and 48 characters in the 3rd line PROG. -
Page 33: Print Format
11. PROGRAMMING PROCEDURES 11.4 PRINT FORMAT Menu Group: 1 Item No.: The SL-9000 can memorize 5 different print formats. After print formats are set, you can call them by entering the print format number. PROG. CHANGE Issue method Select "SENSIBILITY ADJUST" Batch by pressing the When Batch Printing with backing paper is... - Page 34 11. PROGRAMMING PROCEDURES Table 2: Label Format Number Table Select the format # for the label to be used by referring to the table below. Item Label length (mm) Ingredient Line 48 mm Label width Format # 00 (50) 30.0 10 (60) 40.0 11 (61)
-
Page 35: Date/Time
11. PROGRAMMING PROCEDURES 11.5 DATE/TIME SETTING Menu Group: 1 Item No.: Date, time, machine number, and store code are set in this procedure. PROG. Set the machine No. (max. 6 dig.) NOTES: 1. Express the time in a 24-hour military format. 2. - Page 36 11. PROGRAMMING PROCEDURES PL-3 Operation Connect the PL-3 to the SL-9000 by using RS-232C Cable, then turn on the power of the SL-9000 and the PL-3. Insert a data disc into the PL-3 and adjust the transmission rate to the SL-9000 ( 7 2 : 4800 BPS or 7 3 : 2400 BPS) by using the rotary switch.
- Page 37 11. PROGRAMMING PROCEDURES Table4 : Transmission Item List Title on the Display ITEM # Liquid Crystal Display VERIFY PLU & ING READ PLU & ING WRITE PLU TO CMT VERIFY PLU = CMT READ PLU FM CMT WRITE ING TO CMT VERIFY ING = CMT READ ING FM CMT WRITE NUTRITION...
-
Page 38: Bar Code Format
11. PROGRAMMING PROCEDURES 11.7 BAR CODE FORMAT Menu Group: 1 Item No.: With the SL-9000 scale, four kinds of bar code formats are available. These formats can be changed freely. Example) Current format Flag Changed format Flag When changing the above example format into the weigh format described in NOTE 1, use the following procedure. - Page 39 11. PROGRAMMING PROCEDURES 2. When the ENTER key is passed, bar code format is checked. An error occurs in the following cases. Check digit (C/D) is at other than digit-13. Price check digit (PC/D) cannot be calculated. (Price is other than 4 or 5 digits.) Price is not set serially beginning from P1 to P4, or P1 to P5).
-
Page 40: Speed Key Setting
11. PROGRAMMING PROCEDURES 11.8 SPEED KEY SETTING Menu Group: 1 Item No.: The SL-9000-ESB-X has a maximum of 70 speed keys which are very convenient to call PLUs quickly. (Refer to page 5-3 regarding the Key Layout.) PROG. Enter the PLU#. (max. -
Page 41: Ingredient Message
11. PROGRAMMING PROCEDURES 11.9 INGREDIENT MESSAGE Menu Group: 1 Item No.: Ingredient messages can be printed on a label with a maximum of 54 characters per line in small letters or 32 characters per line in boldfaced small letters, by up to 38 lines. PROG. -
Page 42: Plu Verifying Label
11. PROGRAMMING PROCEDURES 11.10 PLU VERIFYING LABEL Menu Group: 1 Item No.: PLU data stored in the scale are verified in the following procedure. PROG. CLEAR ENTER To interrupt To resume label issue label issue. which has been interrupted. NOTES: 1. -
Page 43: Programmed Data Verification Reports
12. PROGRAMMED DATA VERIFICATION REPORTS 12. PROGRAMMED DATA VERIFICATION REPORTS The programmed data can be printed on journal paper. Before issuing these reports, load the journal paper. The programmed data verification reports cannot be issued with any label. The keys to be used in the following procedures are those on the numeric key pad, which is framed in black in the figure on page 5-1, but not on the programming keyboard. - Page 44 12. PROGRAMMED DATA VERIFICATION REPORTS Table 7 Report Name Menu # PLU programmed data report Commodity description report Speed key programmed data report Commodity and ingredient description report • Set the data range of each programmed data verification report All the preset PLU data are listed in the PLU # order (from small to large #).
-
Page 45: Password Security
13. PASSWORD SECURITY 13. PASSWORD SECURITY You can protect all menus (except REG. menu) and set two step passwords for access to protected menus. 13.1 SETTING PASSWORD AND PROTECT MENU Liquid Crystal Display PROG. REG. MARK DOWN REWRAP SECURITY READ RESET Select menus to be protected. - Page 46 13. PASSWORD SECURITY Enter password B as 4 digits. Exclude menus the password B cannot access. Remote display WEIGHT UNIT PRICE TOTAL PRICE 1 1 0 1 -1 P M R S X Z : Valid 1: Invalid : Unnecessary NOTES: 1.
-
Page 47: Calling Menu By Entering Password
13. PASSWORD SECURITY 13.2 CALLING MENU BY ENTERING PASSWORD Liquid Crystal Display PROG. REG. MARK DOWN REWRAP SECURITY READ RESET ESC. Enter a menu No. 0 ~ 6 Accessible without the password Non protect menu Accessible menu with the password Operation Accessible with the password (REG.) -
Page 48: Operating Procedures
14. OPERATING PROCEDURES 14. OPERATING PROCEDURES NOTES BEFORE STARTING OPERATION (1) Insert the power plug into the AC outlet and turn the power ON. (2) A sixteen-second scanning will be performed after pressing the POWER key. (3) Do not move the scale while it is in operation. Should it become necessary to move it at any time, turn the power switch to the OFF position and be sure to reajust the level indicator after relocating the scale. -
Page 49: Weighing Operation
14. OPERATING PROCEDURES 14.1 WEIGHING OPERATION Menu: REG., M. DOWN, or REWRAP Mode: WEIGH The weigh mode is used to weigh a commodity and to issue the label. The label contains data such as a weigh, unit price (price per weight) and total price (calculated as a result of the weighing operation). The following is a basic operation seen at the sales floor of a store or at a back room where different kinds and weights of commodities are repacked. -
Page 50: Fix Price Operation (For Us Type Only)
14. OPERATING PROCEDURES 14.2 FIX PRICE OPERATION (FOR US TYPE ONLY) The FIX mode (Fix Price Mode ) is used to issue a label for a commodity of a fixed price PLU (i.e. the price determined by the store), the weight of which may vary from commodity to commodity. In this mode, the Unit Price of the commodity looked up from the PLU file will be printed as the Total Price regardless of its actual weight, and the weight is also printed on the label. -
Page 51: By Count Operation
14. OPERATING PROCEDURES 14.3 BY COUNT OPERATION The BY-COUNT mode is used to issue the label of commodities of the same kind in a package (or may not be packed). The whole package quantity (or a certain quantity) and the whole package price (or the price per the quantity) are usually preset. - Page 52 14. OPERATING PROCEDURES Example) An open price item can be sold as below: 1 piece at 15 dollars 15 pieces at 10 dollars 15 pieces sold at 0.5 dollars per 10 pieces Enter the PLU #. Press: Enter quantity Press: Enter quantity Press: Enter total price...
-
Page 53: Print Count Operation
14. OPERATING PROCEDURES 14.4 PRINT COUNT OPERATION With this procedure, a specified number of the same labels can be issued. Menu: REG., M.DOWN, or REWRAP Mode: WEIGH, FIX or BY-COUNT When operating in Weigh mode. Example A) Set the number of labels. (Max. - Page 54 14. OPERATING PROCEDURES When operating in Fix or By Count mode. Example B) Press: Set the number of labels. (Max. 99) Press: Enter the PLU #. Press: Press, to save the PLU data: Place a commodity on the platter. (Ex. 1.320 lb.) MANUAL : Batch The labels are issued with...
- Page 55 14. OPERATING PROCEDURES Example C) When issuing only the nutrition information label. Note that nutrition information can be printed only on several types of label. Refer to page 11-19. Select basic data and nutrition information labels or a nutrition information label by pressing this key.
- Page 56 14. OPERATING PROCEDURES 14.5 ISSUING LABELS WITH NET WEIGHT STATEMENT (FOR US TYPE ONLY) Menu: REG., M.DOWN, or REWRAP Mode: FIX When the initial settings #1-7 and #1-8 are set to 1, a Net Weight Statement is printed on the label. A unit price and a tare registered in each PLU are printed as a price and a net weight.
- Page 57 14. OPERATING PROCEDURES NOTES: 1. To print NET WT. data. from the FIX mode, load a label which has an area to print a NET WT Statement. 2. The quantity sold number and price data in NET WT. statement operation will be accumulated in the memory.
-
Page 58: Tare/Save/Void Function Procedures
14. OPERATING PROCEDURES 14.6 TARE/SAVE FUNCTION PROCEDURES Menu: REG., M.DOWN, or REWRAP Mode: WEIGH or FIX (Tare % function is available in WEIGH mode only.) There are two kinds of tare subtraction procedures, one is “Direct tare”, the other is “Preset tare”. The SAVE key is used to save the tare, unit price, and PLU data after taking a commodity from the platter. -
Page 59: Selecting Print Item And Adjusting The Lcd Brightness
14. OPERATING PROCEDURES 14.7 SELECTING PRINT ITEM AND ADJUSTING THE LCD BRIGHTNESS Menu: REG, M.DOWN, or REWRAP Mode: WEIGH, FIX, or BY COUNT Press: Select an item. (Refer to Table. 9) Print Non print 1: Print 0: Non print Press: Table 9 Entry Packed on date... -
Page 60: Date Change
14. OPERATING PROCEDURES NOTES: 1. A store code can be printed in place of a ‘packed on date’ and ‘sell by date’ by changing the initial settings #6-5 and #6-6. To print a store code, select ‘packed on date’ or ‘sell by date’ as a print item using the above procedure. -
Page 61: Batch Print Mode (With 30 Items Run Assignment)
14. OPERATING PROCEDURES 14.9 BATCH PRINT MODE (with 30 Items Run Assignment) Menu: REG., M.DOWN, or REWRAP Mode: FIX, or BY COUNT Up to 99 label per PLU can be issued in non-scale mode. Up to 30 items can be preset. (However, 0 is preset, issuing will be canceled.) Enter the PLU #. - Page 62 14. OPERATING PROCEDURES Stopping or Canceling Label Issue Clear an error or stop label issuing. Cancel output Press: Stop issuing the labels and cancel PLUs which have not been output NOTES: 1. Programmed items are reset when: the power is off. changing the menu.
-
Page 63: Total Operation
15. TOTAL OPERATION 15. TOTAL OPERATION In Read or Reset mode you can issue a sales report or reset report with either label or journal paper. Menu: READ or RESET READ The totals will not be cleared after they are printed on labels or journal paper. RESET The totals will be cleared after they are printed on labels or journal paper. -
Page 64: Hourly Total Report
15. TOTAL OPERATION 15.1 HOURLY TOTAL REPORT Ex.) REPORT Menu NOTES: 1. When issuing an hourly report, hours with no sales are not printed. 2. An hourly report is printed as follows: 1) Label: Issued sequentially in on-demand mode. 2) Journal paper: Issued with journal paper. 3) Label with backing paper: Issued sequentially in batch mode. - Page 65 15. TOTAL OPERATION A Individual Total Ex.) Individual PLU Total (PLU #100) B Block Total Ex.) UPC Block Total (UPC #100100~100199) NOTE: The key represents 0 through 9. The most significant digit in the starting number is followed by an appropriate number of C Zone Total Ex.) PLU Zone Total (PLU #100~107) D Entire PLU Total...
-
Page 66: Error Message Table
If you cannot solve the problem with the following solution instruction, do not attempt further trouble shooting, by yourself. Turn the power off, unplug the printer, then contact TOSHIBA TEC Authorized Service representative for assistance. Do not attempt to repair or adjust alone, because electrical equipment is dangerous... - Page 67 16. ERROR MESSAGE TABLE Label Issue Mode Message DATA ENTRY ERROR PLU NOT FOUND TOTALS OVERFLOW MEMORY WILL FULL PLU DATA ERROR PRT FAILURE LABEL OVER RUN Read and Reset Mode Message PLU NOT FOUND PRT FAILURE LABEL OVER RUN Cause Error in key input.
- Page 68 16. ERROR MESSAGE TABLE CMT Operation Mode Message MISMATCH SPEC. BAD TAPE OR CMT TIME OUT ERROR Cause Mismatch of the model type. Mismatch of the base unit. Mismatch of the VERSION. Mismatch of the TRANS- MITTING DATA. Mismatch of the scale capacity.
-
Page 69: Cleaning The Print Head
17. CLEANING THE PRINT HEAD 17. CLEANING THE PRINT HEAD Since there is a cutter at the paper outlet, be careful not to injure your fingers when cleaning the print head and cutter. If the print head is dirty, printing will not be clear. The print head should be cleaned with a print head cleaner everyday before use, according to the following procedure: 1. -
Page 70: Troubleshooting
1. Check that the media is loaded correctly. 2. Check whether the print head is set correctly or not. Dirty print head. Clean the print head. Call the TOSHIBA TEC Authorized Service representative if necessary. 1. Dirty print head. Clean the print head. 2. Poor media quality.