Advertisement
Quick Links
INSTALLATION
INSTRUCTIONS
PARTS LIST
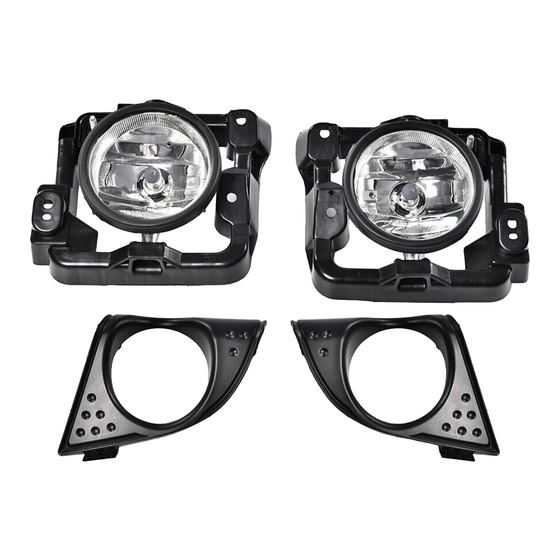
Left fog light
Right fog light
Fog light harness
Fog light subharness
Left housing
Right housing
Left fog light cover
© 2016 American Honda Motor Co., Inc. – All Rights Reserved.
Accessory
FOG LIGHTS
P/N 08V31-TZ3-200
Right fog light cover
2
Clips
8
Self-tapping screws
Relay
2
Wire ties
2
Wire ties with holder
Combination light switch
BII03788-09 (1605)
Application
2017 TLX
08V31-TZ3-2000-90
Publications No.
VERSION 1
Issue Date
MAY 2016
1 of 14
Advertisement

Related Manuals for Acura 08V31-TZ3-200


Summary of Contents for Acura 08V31-TZ3-200
- Page 1 Accessory Application Publications No. INSTALLATION VERSION 1 FOG LIGHTS 2017 TLX Issue Date INSTRUCTIONS P/N 08V31-TZ3-200 MAY 2016 PARTS LIST Right fog light cover Left fog light Clips Right fog light Self-tapping screws Fog light harness Relay Fog light subharness...
-
Page 2: Tools And Supplies Required
Blanket Lower the tilt lever. Pull the steering wheel all the way The following tool is available through the Acura Tool and toward you, and push it all the way down. Apply tape Equipment Program. On the iN, click on: Service >... - Page 3 Press the engine switch to ON. Turn the steering Turn the steering wheel 180° clockwise. Using a wheel 90° counterclockwise. Using a plastic trim plastic trim tool, release the upper column cover. tool, release the upper column cover. UPPER COLUMN STEERING WHEEL COVER...
- Page 4 Remove the self-tapping screw from the lower Remove the lower column cover. column cover. QCN0608AB LOWER COLUMN SELF-TAPPING COVER SCREW LOWER COLUMN SELF-TAPPING QCN0606AB COVER SCREW Press the engine switch to OFF, then disconnect the negative cable from the battery. Turn the steering wheel 180°...
- Page 5 11. Install the new combination light switch to the 13. Attach masking tape to the front bumper, headlights, steering column. Make sure both retaining tabs are and front fenders as shown. locked in place. Do not push on the lever. MASKING FRONT TAPE...
- Page 6 15. Remove the front grille cover. 17. Remove the left strake from the front bumper and air dam. FRONT STRAKE 9 CLIPS BUMPER HOOK AIR DAM FRONT GRILLE QCN0705AB 2 HOOKS COVER 16. Remove the two bolts from the front grille. RIGHT STRAKE 2 BOLTS...
- Page 7 19. Remove the front bumper. • Release the five retaining tabs on each side. • Remove the two self-tapping screws, eight clips, and six bolts. 5 RETAINING TABS 2 SELF-TAPPING SCREWS 6 BOLTS FRONT BUMPER QCN0709AB FRONT BUMPER 8 CLIPS QCN0707AB •...
- Page 8 20. Remove the ambient temperature sensor. 22. Remove the left chrome cross bar. FRONT BUMPER FRONT (inside) BUMPER LEFT CHROME CROSS BAR 10 RETAINING TABS CLIP QCN0712AB RIGHT AMBIENT COVER QD32701AB TEMPERATURE 23. Remove the left cover. SENSOR 5 RETAINING 21.
- Page 9 24. Secure the left fog light cover to the front bumper 26. Install the left fog light into the left housing. with eleven retaining tabs and the self-tapping screw removed in step 23. FRONT LEFT BUMPER HOUSING (inside) 5 RETAINING TABS FRONT BUMPER...
- Page 10 30. Install the wire tie with holder on the fog light harness 33. Plug the two fog light harness 3-pin connectors into 2-pin connector, and secure it to the fog light the left and right fog lights. harness. FOG LIGHT HARNESS WIRE TIE FRONT WITH HOLDER...
- Page 11 35. Locate the vehicle 2-pin connector taped to the 36. Install the wire tie with holder on the fog light vehicle harness. Remove the blue tape, and remove subharness 2-pin connector. the dummy connector from the vehicle 2-pin connector. WIRE TIE WITH HOLDER FOG LIGHT LEFT...
- Page 12 39. Remove the vehicle ground bolt, and secure the fog 42. Remove the relay box upper cover. light subharness ground terminal to the vehicle ground terminal. 2 RETAINING RELAY TABS FOG LIGHT SUBHARNESS VEHICLE GROUND GROUND TERMINAL TERMINAL RELAY BOX VEHICLE UPPER COVER GROUND...
- Page 13 44. Cut off the clip from the vehicle harness. 48. Make sure that all wire harnesses are routed properly and all connectors are plugged in. 49. Install all other removed parts. VEHICLE HARNESS 50. Connect the negative cable to the battery. CLIP (Cut off.) 51.
-
Page 14: Led Replacement
How to Aim the Fog Lights 57. Release the front inner fender. FRONT INNER FENDER QCN0805BB 58. Adjust the fog light aim by turning the adjustment screw in or out until the correct aim is obtained. Adjust the aim according to local laws and regulations.