
Related Manuals for Westinghouse 5300 Running Watts


Summary of Contents for Westinghouse 5300 Running Watts
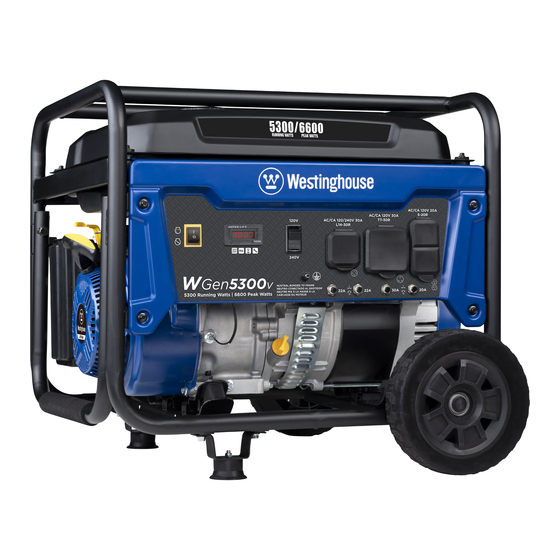
- Page 1 USER MANUAL Gen5300v Portable Generator 5300 Running Watts | 6600 Peak Watts 121396Rev01...
-
Page 2: Wgen5300V Technical Specifications
Contact our service team to order altitude kits. FOR YOUR RECORDS: Date of Purchase: Generator Model Number: Purchased from Store/Dealer: Generator Serial Number: HAVE QUESTIONS? Email us at service@wpowereq.com or call 1-855-944-3571 2 | Westinghouse Outdoor Power Equipment, LLC... -
Page 3: Product Registration
IMPORTANT: KEEP YOUR PURCHASE RECEIPT TO ENSURE TROUBLE-FREE WARRANTY COVERAGE. PRODUCT REGISTRATION To ensure trouble-free warranty coverage, it is important you register your Westinghouse generator. You can register your generator by either: 1. Filling in the product registration form below and mailing to:... -
Page 4: Table Of Contents
Using Extension Cords ....15 Using Westinghouse Power Cord ... 15 Transfer Switch Connections ....16 How to Float the Neutral Ground . -
Page 5: Safety
NOTE: Indicates a procedure, practice or condition that should be followed in order for the generator to function in the manner intended. Read Manufacturer’s Instructions Read Safety Messages Before Proceeding Wear Personal Protective Equipment (PPE) Westinghouse Outdoor Power Equipment, LLC | 5... -
Page 6: General Safety Rules
Never use the generator to power medical support equipment. engine misfires often. Always disconnect tools or Always remove any tools or other service equipment used during appliances from the generator maintenance from the generator before operating. before starting. 6 | Westinghouse Outdoor Power Equipment, LLC... -
Page 7: Safety Labels And Decals
SAFETY SAFETY LABELS AND DECALS 5503Rev01 Westinghouse Outdoor Power Equipment, LLC ON = COLD START OFF = RUN/WARM START Westinghouse Outdoor Power Equipment, LLC | 7... - Page 8 SAFETY SAFETY LABELS AND DECALS 8 | Westinghouse Outdoor Power Equipment, LLC...
-
Page 9: Unpacking
WHEEL KIT ACCESSORIES BOX Open the Wheel Kit Accessories box and verify the contents against the list right. If any parts are missing, please locate an authorized Westinghouse Generator dealer at service@wpowereq.com or call 1-855-944-3571. Westinghouse Outdoor Power Equipment, LLC | 9... -
Page 10: Assembly
Tip the generator onto the side. 3. Install the mounting foot (5) to the frame using M8 flange bolts (2). Figure 1 - Assemble Mounting Feet to Frame 10 | Westinghouse Outdoor Power Equipment, LLC... -
Page 11: Features
Single Piece Handle: Includes rubber grip. Allows you Oil Fill Plug/Dipstick: Must be removed to add to easily push or pull unit with one hand. and check oil. Oil Drain Bolt: Must be removed to drain engine oil. Westinghouse Outdoor Power Equipment, LLC | 11... - Page 12 CARB Canister: Required for models sold into and used in California. Muffler and Spark Arrester: Avoid contact until engine is cooled down. Spark arrestor prevents sparks from exiting the muffler. It must be removed for servicing. Alternator Cover: Gain access to alternator wiring. 12 | Westinghouse Outdoor Power Equipment, LLC...
-
Page 13: Control Panel Features
Run time for each use 20-Amp Circuit Breaker: Each circuit breaker limits the current that can be delivered through Maintenance Reminders the 120 Volt duplex outlets to 20amps. Voltage Selector Switch: Select 120 Volts or 240 Volts. Westinghouse Outdoor Power Equipment, LLC | 13... -
Page 14: Operation
Other issues include hard starting, increased fuel • Block air intake system consumption and spark plug fouling. Contact our service team 1-855-944-3571 for altitude part kits. High Altitude Carburetor Kit Part Number: 518965 14 | Westinghouse Outdoor Power Equipment, LLC... -
Page 15: Power Cord
Using Extension Cords Westinghouse Outdoor Power Equipment, LLC assumes no responsibility for the content within this table. The use of this table is the responsibility of the user only. This table is intended for reference only. The results produced by using this table are not guaranteed to be correct or applicable in all situations as the type and construction of cords are highly variable. -
Page 16: Transfer Switch Connections
Before starting the generator, always check the level of: • Engine oil The Westinghouse generator is wired with the neutral • Gasoline in the fuel tank bonded to ground. If you are connecting your generator to a panel board transfer switch, a licensed electrician... -
Page 17: Adding Gasoline To The Fuel Tank
3-phase loads to the generator. DO NOT connect 50Hz gasoline. Avoid prolonged breathing of loads to the generator. Let engine stabilize and warm up for a gasoline vapors. few minutes before adding load. Westinghouse Outdoor Power Equipment, LLC | 17... -
Page 18: Power Output And Demand
3,700 W, whichever is the lesser. BREAKING IN THE ENGINE In order to break in the engine properly, run the generator with no load for the first hour. Then after 25 hours of normal operation change the oil. 18 | Westinghouse Outdoor Power Equipment, LLC... -
Page 19: Stopping The Generator
This is to remind you to change the oil after the initial 25 hours of run time. It is time to clean the air filter. It is time change/clean the fuel filter, clean the air filter, and change the oil. Westinghouse Outdoor Power Equipment, LLC | 19... -
Page 20: Maintenance Schedule
Use or Every Year Engine Oil Check Level Change Change Cooling Features Check/Clean Air Filter Check Clean* Replace Spark Plug Check/Clean Replace Spark Arrestor Check/Clean *Service more frequently if operating in dry and dusty conditions 20 | Westinghouse Outdoor Power Equipment, LLC... -
Page 21: Inspecting And Cleaning The Spark Arrestor
MAINTENANCE TABLE 2: MAINTENANCE SCHEDULE - AUTHORIZED WESTINGHOUSE SERVICE DEALER PERFORMED After First 25 After 50 Hours After 100 Hour After 300 Hours Before Every Hours or First of Use or Every of Use or Every of Use or Every... -
Page 22: Engine Oil Maintenance
5. Remove oil fill plug/dipstick (see Figure 18 below). 8. Continue to add oil until the oil is at the correct level. See Figure 19. 9. Replace the oil fill plug/dipstick. Figure 18 - Oil Fill Plug/Dipstick 22 | Westinghouse Outdoor Power Equipment, LLC... -
Page 23: Changing Engine Oil
Always be environmentally responsible. Follow the guidelines of the EPA or other governmental agencies for proper disposal of hazardous materials. Consult local authorities or reclamation facility. Westinghouse Outdoor Power Equipment, LLC | 23... -
Page 24: Spark Plug Maintenance
Never apply any side load or move the spark plug laterally when removing the spark plug. Applying a side load or Westinghouse Part Number: 180526 moving the spark plug laterally may crack and damage the spark plug boot. 24 | Westinghouse Outdoor Power Equipment, LLC... -
Page 25: Checking And Adjusting Valve Lash
(0.09 ± 0.11 mm) (0.11 ± 0.13 mm) the cooling air inlets and exhaust ports. Bolt Torque 8-12N.m 8-12N.m General Cleaning of the Generator – Use a damp rag to clean all remaining surfaces. Westinghouse Outdoor Power Equipment, LLC | 25... -
Page 26: Storage
5. If trying 1-5 above does not solve the 5. Take the generator to your nearest problem, the cause might be the generator authorized service dealer. has a fault. 26 | Westinghouse Outdoor Power Equipment, LLC... - Page 27 RPM. 3. If trying 1-3 above does not solve 3. Take the generator to your nearest the problem, the cause might be a authorized service dealer. fault in the generator Westinghouse Outdoor Power Equipment, LLC | 27...
-
Page 28: Exploded And Engine Views
GENERATOR PLUG ADAPTER: 30A 120V 5-20P TO TT-30R 30196A GENERATOR PLUG ADAPTER: 30A 120V 5-20P TO L5-30R 50158A GENERATOR PLUG ADAPTER: 30A 120V L5-30P TO 14-50R 50138A GENERATOR PLUG ADAPTER: 30A 120V TT-30P TO 14-50R 28 | Westinghouse Outdoor Power Equipment, LLC... - Page 29 BOLT M5X12 534309 VOLTAGE REGULATOR 533302-221 ALTERNATOR END CAP 96252 EXHAUST GASKET 94206 LOCK WASHER Ф8 705532 MUFFLER ASSEMBLY 26.1 5946 SPARK ARRESTER 700271-116 FUEL TANK ASSEMBLY 27.1 518801 FUEL TANK STAINER BASKET Westinghouse Outdoor Power Equipment, LLC | 29...
-
Page 30: Wgen5300V Engine View
93520 SWING ROD OIL SEAL 403901 RACKING BAR 96804 SWINGING ROD GASKET 383902 RETAINING CLIP 91816 OIL DRAIN BOLT 94007 OIL DRAIN BOLT WASHER 245106 OIL SENSOR ASSEMBLY 91329 BOLT M6X16 401201 PISTON 30 | Westinghouse Outdoor Power Equipment, LLC... - Page 31 HEAD COVER SEAL WASHER 401102 INNER COVER OF CYLINDER HEAD COVER 96226 INNER COVER GASKET OF CYLINDER HEAD COVER 401101 CYLINDER HEAD COVER 92036 PAN HEAD SCREWS WITH CROSS RECESSED 244508 STARTER PULLEY Westinghouse Outdoor Power Equipment, LLC | 31...
-
Page 32: Schematics
WGen5300v SCHEMATIC 32 | Westinghouse Outdoor Power Equipment, LLC... - Page 33 WestinghouseOutdoorPower.com Service Hotline: (855) 944-3571 777 Manor Park Drive Columbus, OH 43228 & © 2020 Westinghouse Electric Corporation © 2019 Westinghouse Outdoor Power Equipment,LLC. All Rights Reserved. 09.26.19KD...