
Related Manuals for Westinghouse iPro4200


Summary of Contents for Westinghouse iPro4200
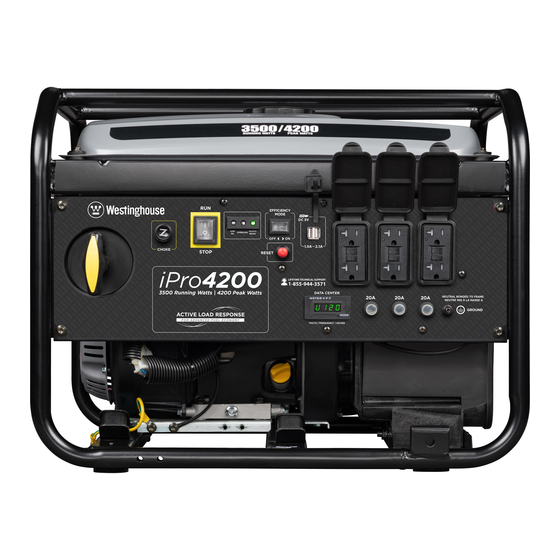
- Page 1 USER MANUAL FOR MODELS: iPro4200 Open Frame Digital Inverter Generator 3500 Running Watts | 4200 Peak Watts...
-
Page 2: Ipro Technical Specifications
A decrease in engine horsepower will decrease the power output of the generator. Contact our service team to order altitude kits. See page 11 for altitude kit number. HAVE QUESTIONS? Email us at service@wpowereq.com or call 1-855-944-3571 2 | Westinghouse Portable Power... -
Page 3: Product Registration
IMPORTANT: KEEP YOUR PURCHASE RECEIPT TO ENSURE TROUBLE-FREE WARRANTY COVERAGE. PRODUCT REGISTRATION To ensure trouble-free warranty coverage, it is important you register your Westinghouse inverter. You can register your generator by either: 1. Filling in the product registration form below and mailing to:... -
Page 4: Table Of Contents
Using Efficiency Mode ..... . . 15 Resetting the Reset Breaker ....15 4 | Westinghouse Portable Power... -
Page 5: Safety
NOTE: Indicates a procedure, practice or condition that should be followed in order for the generator to function in the manner intended. Westinghouse Portable Power | 5... -
Page 6: General Safety Rules
Never use the inverter to power medical support equipment. engine misfires often. Always disconnect tools or Always remove any tools or other service equipment used appliances from the during maintenance from the inverter before operating. inverter before starting. 6 | Westinghouse Portable Power... -
Page 7: Safety Labels And Decals
SAFETY SAFETY LABELS AND DECALS Westinghouse Portable Power | 7... - Page 8 SAFETY SAFETY LABELS AND DECALS 8 | Westinghouse Portable Power...
-
Page 9: Unpacking
It must be removed for servicing. Oil Fill Plug/Dipstick: Must be removed to add and check oil. Air-filter Access Cover: Gain access to air- filter for maintenance. Fuel Gauge: Indicates fuel level. Westinghouse Portable Power | 9... -
Page 10: Control Panel Features
The engine will continue to run, but there will be no electrical power output from the inverter. Unplug the devices and reduce the load. Push in the reset breaker to reset it. 10 | Westinghouse Portable Power... -
Page 11: Operation
Other issues include hard • Block air intake system starting, increased fuel consumption and spark plug fouling. Contact our service team 1-855-944-3571 for altitude part kits. High Altitude Carburetor Kit Part Number: 140540 Westinghouse Portable Power | 11... -
Page 12: Powercord
Using Extension Cords Westinghouse Portable Power assumes no responsibility for the content within this table. The use of this table is the responsibility of the user only. This table is intended for reference only. The results produced by using this table are not guaranteed to be correct or applicable in all situations as the type and construction of cords are highly variable. -
Page 13: Adding/Checking Engine Fluids And Fuel
The owner of the inverter is responsible to ensure the proper oil level is maintained during the operation of the generator. Failure to maintain the proper oil level can result in engine damage. Figure 1: Maximum gasoline fill level Westinghouse Portable Power | 13... -
Page 14: Starting
4. Make sure the circuit breakers are properly set (see Figure 2 below). Push in: Choke Off 120V Breaker Operating Position Figure 6: Push in choke lever 120V Breaker Tripped Position Figure 2: Breaker position 14 | Westinghouse Portable Power... -
Page 15: Stopping The Inverter
3. As a load is applied, the inverter will sense the load and engine RPM will increase according to the load applied. 4. To run the inverter at maximum power and RPM, press the efficiency mode switch to the OFF position. Westinghouse Portable Power | 15... -
Page 16: Maintenance
6 Months 6 Months Year Engine Oil Check Level Change Change Cooling Features Check/Clean Air Filter Check Clean* Replace Spark Plug Check/Clean Replace Spark Arrestor Check/Clean *Service more frequently if operating in dry and dusty conditions 16 | Westinghouse Portable Power... -
Page 17: Engine Oil Maintenance
Stop frequently to check the oil level and avoid overfilling. 8. Continue to add oil until the oil is at the correct level then replace oil fill plug/dipstick. Westinghouse Portable Power | 17 Figure 10: Oil fill plug/dipstick location... -
Page 18: Changing Engine Oil
Follow the guidelines of the EPA or action (see Figure 14). other governmental agencies for proper disposal of hazardous materials. Consult local authorities or reclamation facility. Figure 14 18 | Westinghouse Portable Power... -
Page 19: Draining The Float Bowl
Figure 16: Carburetor float bowl 2. Locate the clear plastic hose from the float that is exiting out the bottom of the inverter, and place a suitable container under it to catch the drained fuel (see Figure 17). Westinghouse Portable Power | 19... -
Page 20: Spark Plug Maintenance
Only use the recommended spark plug. See chart 5. Loosen the clamp holding the spark arrestor onto below. Using a non- recommended spark plug could the muffler (see Figure 22). result in damage to the engine. 20 | Westinghouse Portable Power... -
Page 21: Checking And Adjusting Valve Lash
4. 8. Recheck the valve lash after tightening the jam nut. 9. Perform this procedure for both the intake and exhaust valves. 10. Install the rocker arm cover, gasket and spark plug. Westinghouse Portable Power | 21... -
Page 22: Testing Gfci Outlets
Gasoline stored for as little as 60 days can go bad, causing gum, varnish and corrosive buildup in fuel lines, fuel passages and the engine. This corrosive buildup restricts the flow of fuel, preventing an engine from starting after a prolonged storage period. 22 | Westinghouse Portable Power... -
Page 23: Troubleshooting
2. Clean the air filter (see page 18). erratic; does not hold a 3. Applied loads maybe cycling on and off. 3. As applied loads cycle, changes in steady RPM. engine speed may occur; this is a normal condition. Westinghouse Portable Power | 23... -
Page 24: Exploded And Engine Views
EXPLODED VIEW 24 | Westinghouse Portable Power... - Page 25 EXPLODED VIEW PART NO. Part. Description 100625 Isolator 180601 Engine Assy 100626 Bracket 150557 Fuel Tank Assy 100627 Bracket 150556 Fuel Vale 100628 Rubber Hose 150558 Fuel Cap 150520 Carbon Canister 150529 Fuel Strainer 100629 Bracket 100614 Frame 100630...
-
Page 26: Engine View
ENGINE VIEW 26 | Westinghouse Portable Power... - Page 27 ENGINE VIEW 2 Westinghouse Portable Power | 27...
- Page 28 ENGINE VIEW PART NO. Part. Description 180628 Intake Valve 160512 Link 110503 M8X30 180629 Exhaust Valve 110525 Muffler 180602 Seal 180630 Valve Spring 180524 M8 Nut 180600 Dip Stick 180631 Exhaust Valve 110502 Spring Washer Spring Washer 180603 Crankcase Cover...
-
Page 29: Schematic
SCHEMATIC Westinghouse Portable Power | 29... - Page 30 Maintenance Notes 30 | Westinghouse Portable Power...
- Page 31 Maintenance Notes Westinghouse Portable Power | 31...
- Page 32 Version 10.26.17KD 32 | Westinghouse Portable Power...