
Related Manuals for Nasco CPARLENE 3000 Series


Summary of Contents for Nasco CPARLENE 3000 Series
- Page 1 HEALTHCARE CPARLENE ® 3000 SERIES INSTRUCTION MANUAL WARNING: Products may contain dry natural rubber. 5-Year Warranty...
-
Page 2: Table Of Contents
TABLE OF CONTENTS PAGE Identifying Your Model 3-10 Procedure A: Setting Up Your Simulator 11-14 Maintenance 14, 15 Head Skin Replacement 15, 16 Procedure B: Light Controller Setup Procedure C: Electronic Monitoring, Memory, and Printer Unit Setup 18-22 Troubleshooting 23, 24 Replacement Parts List 25, 26... -
Page 3: Identifying Your Model
IDENTIFYING YOUR MODEL Pages 3-10 display the family of simulators. Identify your model and refer to the CPARLENE ® Operation Section pertaining to your model. This guide has been carefully written to guide you in the operation of your unit. Depending on your model, please read the procedure(s) indicated. - Page 4 CPARLENE ® TORSO WITH ELECTRONIC CONNECTIONS LF03715U – Light LF03815U – Dark FEATURES: • Adult/Child Modes • Constricted and Dilated Pupils • Obstructed Airway Capabilities • Carotid Pulse • Non-Rebreathing Airway System • Ready for Use with External Electronic Monitors Life/form ®...
- Page 5 CPARLENE TORSO WITH LIGHT CONTROLLER ® LF03714U – Light LF03814U – Dark FEATURES: • Adult/Child Modes • Constricted and Dilated Pupils • Obstructed Airway Capabilities • Carotid Pulse • Non-Rebreathing Airway System • Ready for Use with External Electronic Monitors •...
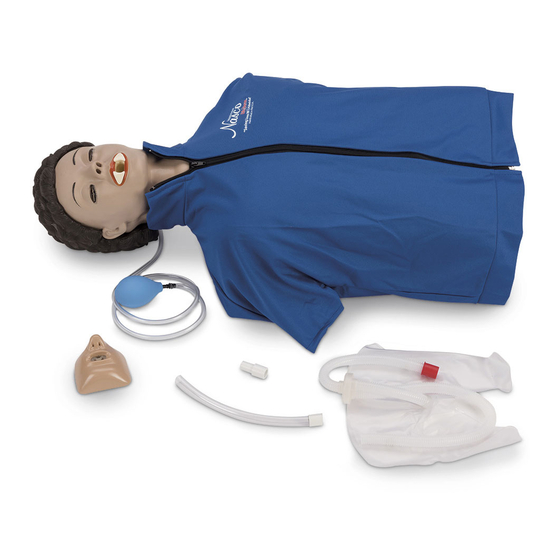
- Page 6 CPARLENE ® BASIC FULL MANIKIN LF03943U FEATURES: • Adult CPR Trainer • Constricted and Dilated Pupils • Obstructed Airway Capabilities • Carotid Pulse • Non-Rebreathing Airway System • Life-Sized for Victim Positioning COMPONENTS • Basic Adult Full-Body Manikin • Long Sleeve Jacket •...
- Page 7 CPARLENE ® FULL MANIKIN WITH LIGHT CONTROLLER LF03933U FEATURES: • Adult/Child Modes • Constricted and Dilated Pupils • Obstructed Airway Capabilities • Carotid Pulse • Non-Rebreathing Airway System • Life-Sized for Victim Positioning • Light Controller that Indicates Hand Placement, Ventilation Volume, and Compression Depth COMPONENTS •...
- Page 8 CPARLENE ® FULL MANIKIN WITH ELECTRONIC CONNECTIONS LF03713U – Light LF03813U – Dark FEATURES: • Adult/Child Modes • Constricted and Dilated Pupils • Obstructed Airway Capabilities • Carotid Pulse • Non-Rebreathing Airway System • Life-Sized for Victim Positioning • Ready for Use with External Electronic Monitors Life/form ®...
- Page 9 CPARLENE FULL MANIKIN WITH ® MEMORY UNIT AND PRINTER LF03711U – Light LF03811U – Dark FEATURES: • Adult/Child Modes • Constricted and Dilated Pupils • Obstructed Airway Capabilities • Carotid Pulse • Non-Rebreathing Airway System • Electronic Monitoring, Memory, and Printer Unit with: Adult and Child Settings °...
- Page 10 COMPONENTS • Adult Full Body Manikin with Electronic Connection • Long Sleeve Jacket • Pants • Sanitary Face Mask (5) • Disposable Lower Airway (10) • Disposable Tracheal Airway (10) • Hard Carrying Case with Wheels • Electronic Monitoring, Memory, and Printer Unit •...
-
Page 11: Procedure A: Setting Up Your Simulator
PROCEDURE A: SETTING UP YOUR SIMULATOR Your simulator has been packed securely for safe shipment. Please CPARLENE ® follow these simple setup procedures. Packing 1. Remove product from packaging. 2. Keep packaging materials for storage. Figure 1 A. Chest Skin Lower Compression Plate B. - Page 12 Figure 4 Figure 5 Figure 3 Figure 6 CPARLENE’S 6. Tilt back head to open airway. Insert trachea into mouth until the ® smaller white fitting is flush with the lips. (See figure 3.) Reinsert longer white fitting into disposable trachea tubing at the end of neck. (See figure 4.) Lower Airway The airway and lung system (installed) are equipped with a non-rebreathing valve to ensure that air ventilated into the unit cannot exhaust back through the mouth.
- Page 13 Figure 7 10. Re-secure the lung bag to the corrugated tubing and lay flat atop the upper compression plate. (See figure 7.) 11. The longer length of corrugated exhaust tubing should be vented out the right side of the torso. 12.
-
Page 14: Maintenance
Electronics Option Guide the electronic connection wire through the hole on either the left or right side of the manikin. (See figure 9.) Sanitary Face Mask Use of the sanitary face mask with non- rebreathing valve provided with your manikin is recommended when performing mouth-to- mouth resuscitation. -
Page 15: Head Skin Replacement
Nasco Cleaner. Note: Do not use Nasco Cleaner around the mouth and nostrils of the manikin, as the residue of the cleaner could be toxic. - Page 16 Removing Head Skin 1. Disconnect the tracheal air- way from the lower airway by pulling the tubing apart at the base of the head. 2. Rotate the head 180° until facing backward, align keyways in the neck, and pull toward you to remove head. (See figure 12.) 3.
-
Page 17: Procedure B: Light Controller Setup
Hand Placement (Red Light) Adult/Child Switch on All Monitors Monitors The red placement light will illuminate every time the chest is compressed 1.00 inch and the proper hand placement has not been accomplished. LF03403U Light Controller Light Controller Ventilations (Green Light) Three-color light controller indicates acceptable Three-color light controller indicates acceptable levels. -
Page 18: Procedure C: Electronic Monitoring, Memory, And Printer Unit Setup
Figure 15 PROCEDURE C: Electronic Monitoring, Memory, and Printer Unit Setup LF03401U Remove the cover using the key provided and Electronic Monitoring, Memory, and inserting it in the four open slots on the sides Printer Unit of the unit (two on each side). (See figure 15.) Simple and accurate feedback! Select one of Press inward while gently applying upward the four modes (compression rate, compres-... - Page 19 Paper Installation 1. Remove the cover. (See battery installation on page 18.) 2. Remove platen from bracket by gently pulling up on one end. (See figure 16.) Figure 19 Figure 16 3. Remove the plastic paper holder rod from Figure 20 the paper holder bracket by applying a 5.
- Page 20 PRACTICE MODES SESSIONS Ventilation Duration Select one of the four modes you wish to In the ventilation duration mode, the unit will display the duration in seconds of the last practice by pushing the mode button until the ventilation. The unit will continue this display red light corresponding to the proper mode mode until the mode is changed or the stop illuminates.
- Page 21 Auto Power Down Ventilation Duration In the ventilation duration mode, the unit will To increase battery life, the unit will automat- display the duration in seconds of the last ically shut off the display and go to a standby ventilation. The unit will continue this display mode if no activity is sensed for approximately mode until the mode is changed or the stop 30 seconds.
- Page 22 Printer On Waveform Printout If a printout of the compression and ventilation All compression and ventilation wave- waveforms and defibrillation is desired, switch the forms are plotted. On completion of printer switch to the “on” position and press the a test, press the stop button. The final start button.
-
Page 23: Troubleshooting
TROUBLESHOOTING Occasionally slight adjustments need to be made to your CPARLENE equipment to restore ® optimum performance. Here are four common concerns. The lungs will not fill with air. 1. Reposition head to open airway. 2. Check airway to see if it is twisted or “kinked.” The air enters body easily, but lungs do not fill. - Page 24 Printout is of poor quality or not printing complete lines. 1. Turn power off. 2. Check battery installation and change batteries if necessary. 3. Turn power on. Actual product may vary slightly from photo. Nasco reserves the right to change product color, materials, supplies, or function as needed.
-
Page 25: Replacement Parts List
REPLACEMENT PARTS CPARLENE ® LF03403U LF03154U LF03162U LF03201U LF03213U LF03345U LF03346U LF03120U LF03343U LF03203U LF03190U LF03341U LF03299U LF03530U LF03122U LF03282U LF03191U LF03401U LF03223U, Lower Body with Pants Lower Body with Pants LF03520U LF03520U LF03451U LF03380U LF03525U LF03370U LF03342U... - Page 26 Syringe with tubing LF03484U Brushes/cotton swabs LF03180U Complete pulse simulation kit LF03485U Gloves (2 pair) LF03190U Torso shell LF09919U Nasco Cleaner LF03191U Outer chest skin – Light LF03520U Short-sleeve jacket LF03201U Foam shoulder rings (set of 2) LF03525U Long-sleeve jacket LF03203U...
- Page 27 LF06012U CPR Prompt ® Infant Manikin LF03693U Basic Buddy CPR Manikin ® LF03699U “Airway Larry” Airway Management Trainer LF03966U LF03617U ONLINE: NascoHealthcare.com E-MAIL: lifeform@enasco.com PHONE: 1.800.431.4310 HEALTHCARE ADDRESS: 901 Janesville Ave. Fort Atkinson, WI 53538 Copyright © Nasco 2014 HC18000028INM3...