
Related Manuals for Nasco CRiSis LF03616U


Summary of Contents for Nasco CRiSis LF03616U
- Page 1 HEALTHCARE Child Manikin CRiSis ™ Simulator LF03616U INSTRUCTION MANUAL 5-Year Warranty WARNING: Products may contain dry natural rubber.
-
Page 2: Table Of Contents
TABLE OF CONTENTS Introduction ..............3 Airway Management Trainer ..........4 IV Arm ................5 Blood Pressure Arm ............9 Defibrillation Chest Skin ..........14 Intraosseous Infusion/Femoral Access Leg ......16... -
Page 3: Introduction
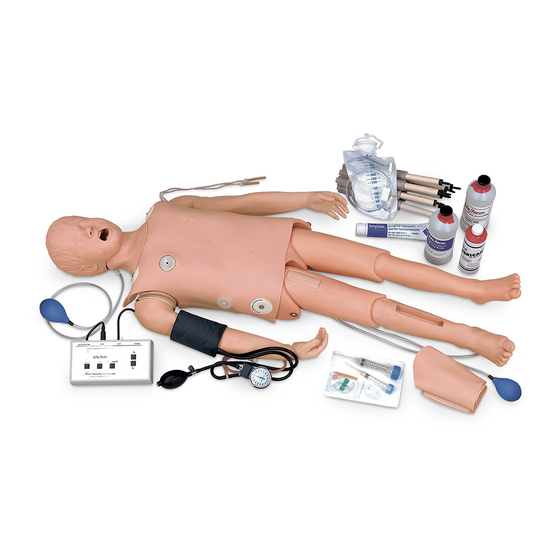
Figure 1 Figure 2 The Child Manikin is a completely modular system that lets you create a manikin to suit your CRiSis™ needs. It is ideal for ACLS, nursing, paramedic, and EMT training. This system features a completely functional CPR manikin of a five-year-old child with Airway Management Trainer, IV Arm, Life/form ®... -
Page 4: Airway Management Trainer
Life/form ® the training of intubation and resuscitation skills. Nasco has taken great care to create a trainer that is anatomically correct in respect to both size and detail. Landmarks include nostrils, teeth, tongue, oral and nasal pharynx, larynx, epiglottis, arytenoids, false and true vocal cords, cricoid ring, tracheal rings, trachea, esophagus, lungs, and stomach. -
Page 5: Arm
(22-gauge or smaller). However, if instruction with larger needle sizes is required, this can be done; the skin and veins will merely need replacing sooner. The Skin and Vein Replacement Kits are available through Nasco (see list of supplies). LIST OF COMPONENTS •... - Page 6 Figure 2 GENERAL INSTRUCTIONS FOR USE The Injectable Training Arm comes with all of the supplies necessary to perform most procedures. A. Preparing and Drawing “Blood” from the Arm 1. Fill pint bottle containing synthetic blood concentrate with distilled water. 2.
- Page 7 Figure 3 4. Attach fitting end of tubing from bag A to the shoulder tubing that has the pinch clamp. Attach the fitting end of bag B to the remaining shoulder tube. 5. With bag A hanging and bag B laying on the surface, open clamps on both bags and the arm tube clamp.
- Page 8 Ordinary stains can be removed by washing with soap and warm water. Newsprint, similar printed paper, plastic, and ballpoint pen will permanently stain the simulator if prolonged contact occurs. Stubborn stains may be removed with Nasco Cleaner (LF09919U) simply by dispensing it on the area and wiping with a soft cloth or paper towel.
-
Page 9: Blood Pressure Arm
THE BLOOD PRESSURE ARM On/Off Switch Figure 2 Figure 1 GENERAL INSTRUCTIONS FOR USE INSTALLING THE BATTERIES Take the Blood Pressure Electronic Control Unit from the box and turn it over, placing it face down onto a padded work surface. Locate the “Open” compartment on the back of the panel where the batteries are to be installed. - Page 10 Familiarizing Yourself with the Nasco Life/form ® Child Blood Pressure Simulator Control Panel Under the display window are three buttons: Menu, Gap, and Calibrate. (See figure 5.) The systolic pressure is set by pressing the Menu key once. The pressure is adjusted up or down using the up and down arrow keys.
- Page 11 The volume levels can be adjusted from level 1 (the lowest volume) to level 7 (the highest volume). Life/form USING THE NASCO CHILD BLOOD PRESSURE SIMULATOR ®...
- Page 12 20 mmHg. At this point, the batteries should be replaced as soon as possible in order to insure proper operation of the unit. Refer to the section titled “Installing the Batteries.” CALIBRATION PROCEDURES To calibrate the simulator, set the unit up as described in the section titled “Using The Nasco Life/form ®...
- Page 13 To adapt your sphygmomanometer for use with the simulator, it is first necessary to obtain the luer fitting and the T-fitting included with the simulator, which is also available through your Nasco catalog sales office. Using a scissors, carefully cut the pressure line of the sphygmomanometer about 2" from the gauge.
-
Page 14: Defibrillation Chest Skin
— thus voiding Nasco’s warranty and endangering your equipment. Nasco assumes no liability for damage or injury that may be caused by the use and/or misuse of this equipment. All normal safety precautions for defibrillation training should be followed, and energy levels should be minimized. - Page 15 It is possible to use AED gel pads with the cable connectors built into the gel — the same ones you use on patients. In an effort to help you save money, Nasco offers a set of training buttons that will correspond to your particular AED unit.
-
Page 16: Intraosseous Infusion/Femoral Access Leg
THE INTRAOSSEOUS INFUSION/FEMORAL ACCESS LEG ABOUT THE SIMULATOR Child Intraosseous Infusion/Femoral Access Leg is a dramatic and exciting training aid Life/form ® designed to demonstrate and simulate intraosseous infusion and femoral access procedures. It enables students to learn and practice, with incredible accuracy and realism, a procedure that in the past has been very difficult to simulate. - Page 17 4.) A thin layer of wax left on the bone surface over the holes will help in sealing. Finish by applying a thin film of Nasco lubricant over the whole bone. Turn the bone 90° and reinsert into the leg.
- Page 18 CLEAN UP PROCEDURES 1. Remove and discard any bones that have been charged with blood mixture. 2. Remove leg skins and use paper towels to completely wipe the simulator and remove any “blood” or lubricating agent. 3. Drain the syringe and discard any of the unused blood mixture. 4.
- Page 19 Auscultation Manikin CRiSis™ LF03966U Adult Auscultation Manikin with ECG Simulator CRiSis™ LF03709U LF03965U Actual product may vary slightly from photo. Nasco reserves the right to change product color, materials, supplies, or function as needed. ONLINE: NascoHealthcare.com EMAIL: lifeform@enasco.com PHONE: 1.800.431.4310...