Table of Contents
Advertisement
Quick Links
Advertisement
Table of Contents

Related Manuals for Datavideo TLM-170V


Summary of Contents for Datavideo TLM-170V
- Page 1 HD 12-Channel OB VAN Studio OBV-3200 Instruction Manual...
-
Page 2: Table Of Contents
Datavideo Technologies will try to give correct, complete and suitable information. However, Datavideo Technologies cannot exclude that some information in this manual, from time to time, may not be correct or may be incomplete. This manual may contain typing errors, omissions or incorrect information. -
Page 3: Fcc Compliance Statement
AC adapter. If you are not sure of the type of power available, consult your Datavideo dealer or your local power company. 8. Do not allow anything to rest on the power cord. Do not locate this unit where the power cord will be walked on, rolled over, or otherwise stressed. -
Page 4: Warranty
The product warranty period beings on the purchase date. If the purchase date is unknown, the product warranty period begins on the thirtieth day after shipment from a Datavideo office. All non-Datavideo manufactured products (product without Datavideo logo) have only one year warranty from the date of purchase. -
Page 5: Disposal
Disposal For EU Customers only - WEEE Marking This symbol on the product or on its packaging indicates that this product must not be disposed of with your other household waste. Instead, it is your responsibility to dispose of your waste equipment by handing it over to a designated collection point for the recycling of waste electrical and electronic equipment. -
Page 6: Introduction
1. Introduction Datavideo OBV-3200 is designed to fit into the back of a small van to provide complete mobile production facilities. It’s a transportable solution for broadcasters and video professionals for both in-studio and on-location productions. Built around the latest Full HD switcher, it supports up to 12 channels of 1080p Full HD-SDI and HDMI video signals. -
Page 7: System Diagram
2. System Diagram... -
Page 8: Outdoor Broadcast Van Assembly
3. Outdoor Broadcast Van Assembly I. Securing the screws II. Left Support Stand... -
Page 9: Affixing The Left Support Stand
III. Affixing the Left Support Stand IV. Right Support Stand... -
Page 10: Affixing The Right Support Stand
V. Affixing the Right Support Stand VI. Mounting the Desktop... -
Page 11: Inserting The Control Keyboard
VII. Inserting the Control Keyboard VIII. Into the Van... -
Page 12: Front View
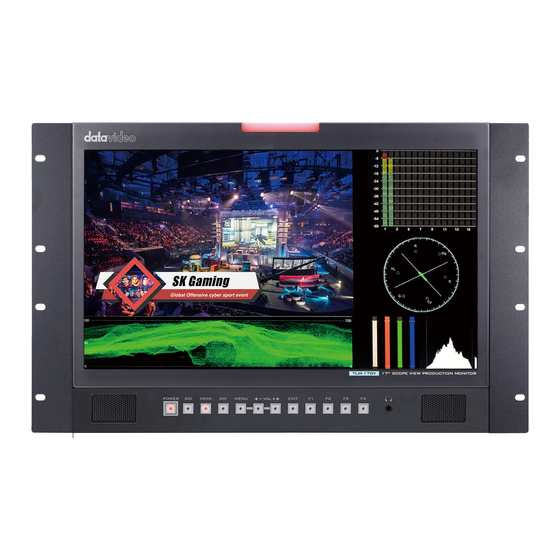
Please see manuals of individual devices for instructions on how to operate. Device Model and Name Product Descriptions The TLM-170V is a 17.3” monitor featuring 1920 x 1080 full HD resolutions. TLM-170V 17”ScopeView The TLM-170V integrates various built-in functions such as waveform, vector Production Monitor (2 Units) scope and SDI/HDMI cross converter. -
Page 13: Rear View
5. Rear View Device Model and Name Product Descriptions CCU-200 Camera Control Unit For connecting camera videos and control signals PD-5 AC Power Distributor Supplies the CCU-200 power AD-200 Audio Delay Box with Level RCA and XLR Balanced audio I/O ports Adjustment –... -
Page 14: Desktop
SE-3200 HD 12 Channel Digital Video Switcher – The control keyboard allows video switching and video effect application. Control Keyboard Multi-Camera IP Controller Multi-camera IP controller (tablet) runs on Android or iOS thus capable of (Optional) maneuvering up to 24 Datavideo cameras. -
Page 15: Cable Reel
7. Cable Reel 1. Place an empty cable reel on a flat surface. Pull the lever to the brake position in order to immobilize the cable reel. 2. Straighten out the cable which is approximately 3 meters long as shown in the diagram below: Approx. - Page 16 5. Coil another end of the 3-meter cable around the internal cable drum accordingly; make sure the coiling is firm and avoid overlapping. 6. After the cable is fully coiled, the two ends are wrapped with air bubble bags then insert velcros through the corresponding cable drum holes in order to attach the cable ends to either side of the cable reel.
-
Page 17: Service And Support
G082060874E1 Jan-03.2019 Version E1...