Advertisement
Available languages
Available languages
Quick Links
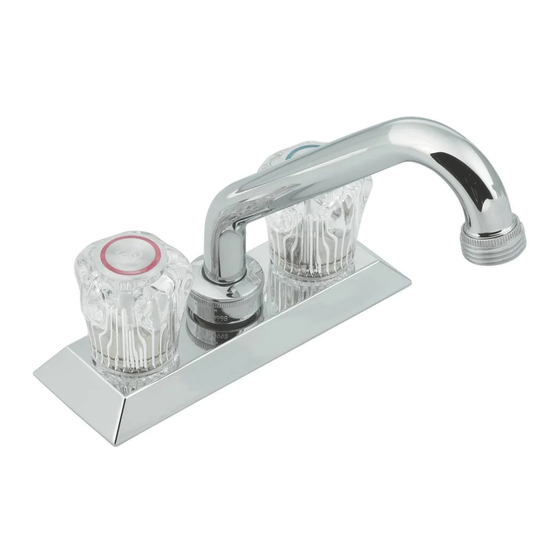
TWO HANDLE LAUNDRY FAUCET
4871E, 4872, 4873 Series
These instructions must be left with the homeowner
MEZCLADORA PARA LAVANDERíA DE DOS MANIJAS
Series 4871E, 4872, 4873
Estas instrucciones deben dejarse con el propietario de la casa
ROBINET À DEUX POIGNÉES POUR CUVE DE LESSIVAGE
Séries 4871E, 4872, 4873
Ces directives doivent être remises au propriétaire.
HELPFUL TOOLS
CHANNEL LOCKS
PINZAS DE EXTENSION
PLIERS
PINCES MULTIPRISES
PINZAS
PINCES
5/8" DEEP WELL SOCKET
FLEXIBLE SUPPLIES
LLAVE A COPA DE 5/8"
LINEAS DE ALIMENTACION FLEXIBLES
CLÉ À DOUILLE
CONDUITES D'ALIMENTATION SOUPLES
PROFONDE DE 5/8 PO
ENGLISH
KEEP INSTRUCTIONS FOR
FUTURE REFERENCE
Thank you for purchasing a quality MOEN faucet.
With simple care and maintenance, it will provide
you with many years of reliable performance.
Please read all instructions before installation.
Questions During Installation?
1-800-BUY-MOEN
(1-800-289-6636)
Toronto 905-829-3400
Rest of Canada 1-800-465-6130
TIPS FOR REMOVAL OF OLD FAUCET:
CAUTION:
Always turn water OFF before
removing existing faucet or disassembling the
faucet. Open faucet handles to relieve water
pressure and insure that complete water shut-off
has been accomplished.
Before installing new faucet make
sure that the cartridge retainer clip is
in place. The cartridge and retainer
clip were properly installed and
tested before leaving the factory.
This should be carefully checked at
time of installation. If the retainer clip
is not properly installed, water
pressure could force the cartridge
out of the casting. Personal injury or
water damage to the premises could
result.
HERRAMIENTAS UTILES
SAFETY GLASSES
GAFAS DE SEGURIDAD
PENETRATING OIL
LUNETTES DE SÉCURITÉ
ACEITE PENETRANTE
HUILE DE DÉGRIPPAGE
(2)
ADJUSTABLE WRENCH
LLAVE AJUSTABLE
CLÉ ANGLAISE
FRANÇAIS
GARDER CES DIRECTIVES POUR
RÉFÉRENCE ULTÉRIEURE
Merci d'avoir acheté un robinet de qualité MOEN.
Avec un peu de soin et d'entretien, le rendement
fiable de ce produit durera plusieurs années. Lire
attentivement toutes les directives avant de
débuter l'installation.
Des questions lors de l'installation?
Toronto : (905) 829-3400
Ailleurs au Canada 1 800 465-6130
SUGGESTIONS POUR ENLEVER L'ANCIEN
ROBINET :
ATTENTION:
eau avant d'enlever l'ancien robinet ou de le
démonter. Ouvrir les poignées du robinet pour libérer
la pression d'eau et pour s'assurer que l'alimentation
en eau a bien été coupée.
Avant d'installer un nouveau robinet,
s'assurer que l'étrier est bien fixé. La
CLIP
cartouche
et
l'étrier
correctement installés et testés avant
de quitter l'usine. Bien vérifier ceci
avant l'installation. Si l'étrier n'est pas
bien installé, la pression d'eau peut
expulser la cartouche de la pièce
moulée et ainsi causer blessures et
EAR
dommages d'eau sur les lieux de
travail.
For safety and ease of faucet replacement,
Moen recommends the use of these helpful tools
Para la seguridad y facilidad de repuesto de la
FLASHLIGHT
LINTERNA
mezcladora, Moen recomienda las siguientes
LAMPE DE POCHE
herramientas
Par mesure de sécurité et pour faciliter
BASIN WRENCH
l'installation, Moen suggère l'utilisation des outils
LLAVE DE FREGADERO
CLÉ DE LAVABO
suivants.
Toujours COUPER l'alimentation en
ÉTRIER
ont
été
OREILLE
OUTILS UTILES
ESPAÑOL
GUARDE ESTAS INSTRUCCIONES
PARA REFERENCIA FUTURA
Gracias por haber comprado una mezcladora de
alta calidad de MOEN. Con un cuidado y
mantenimiento sencillos, le brindará muchos años
de servicio fiable. Por favor lea todas las
instrucciones antes de instalar.
¿Preguntas durante la instalación?
1-800-BUY-MOEN
(1-800-289-6636)
Toronto 905-829-3400
Resto del Canadá 1-800-465-6130
SUGERENCIAS PARA QUITAR LA VIEJA
MEZCLADORA:
ADVERTENCIA:
Desconecte siempre el agua antes
de retirar la mezcladora existente o desarmar la
válvula. Abra los manerales de la mezcladora
para desahogar la presión del agua y asegurarse
de que se ha logrado un cierre completo del agua.
Antes de instalar la nueva mezcladora asegúrese que la
presilla retenedora del cartucho esté
en su lugar. El cartucho y la presilla
retenedora del cartucho fueron
correctamente instalados y
comprobados en la fábrica. Esto
debe revisarse cuidadosamente en
el momento de instalación. Si la
presilla retenedora no está
correctamente instalada, la presión
del agua podría forzar al cartucho
fuera del fundido, causando lesiones
personales o daño por
agua al lugar.
INS137
PRESILLA
OREJA
Advertisement

Related Manuals for Moen 4871E Series


Summary of Contents for Moen 4871E Series
- Page 1 Ces directives doivent être remises au propriétaire. HELPFUL TOOLS HERRAMIENTAS UTILES OUTILS UTILES For safety and ease of faucet replacement, Moen recommends the use of these helpful tools CHANNEL LOCKS SAFETY GLASSES Para la seguridad y facilidad de repuesto de la PINZAS DE EXTENSION...
- Page 2 ENGLISH ENGLISH ESPAÑOL FRANÇAIS INS137...
-
Page 3: Installation Instructions
INSTALLATION INSTRUCTIONS 1. To install Seal Trap Primer, 2. Be sure mounting surface is 3. Place faucet in position on remove set plug with standard clean and dry. Holding faucet the sink, being careful not to Allen Key (3/16”, not included) by assembly upside down, place disturb the putty bead. -
Page 4: Warranty
If this faucet should ever develop a leak or drip during the Warranty Period, • Use only cold water for drinking or cooking Moen will FREE OF CHARGE provide the parts necessary to put the faucet back • If you wish to flush the entire plumbing system of water that has... -
Page 5: Instrucciones De Instalación
INSTRUCCIONES DE INSTALACIÓN 1. Para instalar el sellador en la ranura del 2. Asegúrese que la superficie de 3. Coloque la mezcladora en sello (Seal Trap Primer) , remueva el montaje esté limpia y seca. posición sobre el fregadero, tapón del juego con la Llave Allen Sujetando el ensamble de la con cuidado de no afectar la estándar (3/16"... - Page 6 Cía. de servicio o Ud. mismo se excluyen de esta garantía. Moen no será responsable de costos laborales y/o daños producidos durante la instalación, reparación o cualquier daño incidental o consiguiente, pérdidas, heridas u costos de...
-
Page 7: Directives D'installation
DIRECTIVES D’INSTALLATION 1. Pour installer l’amorce de siphon 2. S’assurer que la surface d’installation 3. Placer le robinet à la d’étanchéité, enlever le bouchon est propre et sèche. En tenant position appropriée d’arrêt à l’aide d’une clé hexagonale l’assemblage du robinet à l’envers, l’évier en s’assurant de (3/16 po, non incluse) en tournant placer une perle de mastic de... - Page 8 à Moen incorporée, d’expliquer le défaut et d’inclure une preuve d’achat, d’inscrire son nom, adresse ainsi que code régional et numéro de téléphone. ® Copyright, 2012 INS137 DEC 12 Moen Incorporate 25300 Al Moen Dr., North Olmsted, OH 44070, U.S.A. 2816 Bristol Circle, Oakville (Ontario) L6H5S7...