
Related Manuals for ION Charge Time iSP99


Summary of Contents for ION Charge Time iSP99
- Page 1 iSP99 Quickstart Guide English ( 3 – 11 ) Guía de inicio rápido Español ( 12 – 20 ) Appendix English ( 22 )
-
Page 3: Box Contents
Quickstart Guide (English) Introduction Thank you for purchasing the Charge Time. At ION, your entertainment is as important to us as it is to you. That’s why we design our products with one thing in mind—to make your life more fun and more convenient. - Page 4 Features Top Panel...
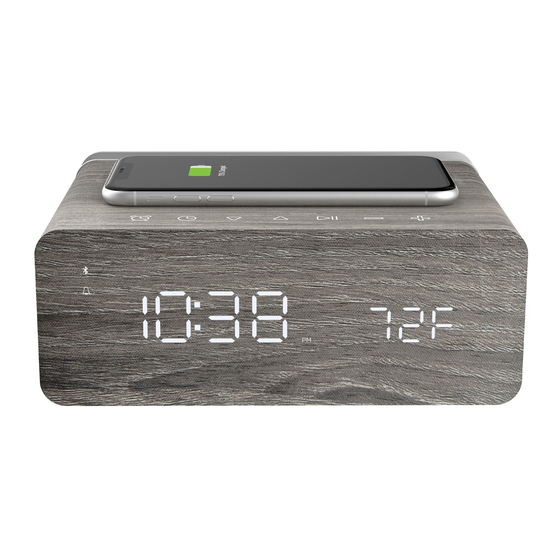
- Page 5 Qi Charging Pad: Place your Qi-compatible device here to wirelessly charge it. See Operation Using the Qi Charging Pad for more information. Alarm Button: Press and hold this button for 2 seconds to adjust the alarm time. See Operation Using the Alarm for more information.
-
Page 6: Front Panel
Front Panel Bluetooth LED: This LED will be lit solid when a Bluetooth device is connected. Alarm LED: This LED will be lit solid when an alarm is enabled. Display: Shows the current time, alarm time, or temperature. PM LED: This LED will be lit to indicate PM time. Microphone: This microphone will pick up your voice when receiving calls on a connected device. -
Page 7: Rear Panel
Rear Panel Power Input: Use the included power adapter to connect this input to a power outlet. Aux Input: This stereo 1/8” (3.5 mm) input can be used to connect a CD player, MP3 player, or other audio source. Note: Only one audio source (Bluetooth, Aux or USB) can play at a time. Temperature Gauge: This gauge will take the current temperature to show on the display. -
Page 8: Operation
Operation Using the Qi Charging Pad To wirelessly charge your Qi-compatible device, place it on Charge Time in the Qi charging area. When a successful charging connection is made, the Qi LED will be lit green and remain solid to indicate the device is charging. If the charging area cannot establish a charging connection with a device, the Qi LED will flash green and red to alert you. -
Page 9: Using The Alarm
Using the Alarm To set the alarm: Press and hold the Alarm button for 2 seconds. The hours' digits on the display will flash. Tap the Up () and Down () buttons to set the desired hour. Tap the Alarm button to switch to the minutes' digits, which will flash on the display. Tap the Up () and Down () buttons to set the desired minutes. -
Page 10: Clock Format
Adjusting the Display Brightness Press the Plus and Minus buttons at the same time to cycle through the brightness settings for the display: low, medium and high. Clock Format Press and hold the Up button for 2 seconds to change the clock format setting. Tap Up to toggle between 12 Hour and 24 Hour clock format and press and hold it to confirm the setting. -
Page 11: Connecting A Bluetooth Device
Connecting a Bluetooth Device To connect a Bluetooth device: Turn on your Bluetooth device. If it is not already on, turn on Charge Time by connecting the power input to a power outlet using the included power adapter. If you have previously paired a Bluetooth device, Charge Time will reconnect automatically. -
Page 12: Contenido De La Caja
Guía de inicio rápido (Español) Introducción Gracias por comprar el Charge Time. En ION, su entretenimiento es tan importante para nosotros como para usted. Por eso es que diseñamos nuestros productos con una sola cosa en mente— hacer que su vida sea más divertida y cómoda. - Page 13 Características Panel superior...
- Page 14 Base de carga Qi Coloque aquí su teléfono inteligente (smartphone) compatible con Qi para cargarlo de forma inalámbrica. Consulte Funcionamiento > Uso de la base de carga Qi para obtener más información. Botón de alarma: Mantenga pulsado este botón durante 2 segundos para ajustar la hora de la alarma.
-
Page 15: Panel Frontal
Panel frontal LED de Bluetooth: Este LED permanecerá encendido cuando se conecte un dispositivo Bluetooth. LED de alarma: Este LED permanecerá encendido cuando haya una alarma programada. Pantalla: Muestra la hora actual, la hora de la alarma o la temperatura. LED PM: Este LED se encenderá... -
Page 16: Panel Trasero
Panel trasero Alimentación: Utilice el adaptador de corriente incluido para conectar esta entrada a un tomacorriente. Entrada auxiliar: Esta entrada estéreo de 3,5 mm (1/8 pulg.) se puede utilizar para conectar un reproductor de CD, un reproductor de MP3 u otra fuente de audio. Nota: Sólo se puede reproducir una fuente de audio (Bluetooth, auxiliar o USB) a la vez. - Page 17 Funcionamiento Uso de la base de carga Qi Para cargar de forma inalámbrica su dispositivo compatible con Qi, colóquelo en Charge Time en la zona de carga Qi. Una vez realizada una conexión de carga exitosa, el LED Qi se iluminará...
-
Page 18: Uso De La Alarma
Uso de la alarma Cómo programar la alarma: Mantenga pulsado el botón Set durante 2 segundos. Las unidades de medida parpadearán en la pantalla. Toque los botones arriba () y abajo () para ajustar la hora deseada. Toque el botón Alarm (alarma) para pasar a los dígitos que indican los minutos, los cuales parpadearán en la pantalla. -
Page 19: Formato Del Reloj
Ajuste de la pantalla Brillo Pulse los botones más y menos al mismo tiempo para alternar entre los ajustes de brillo de la pantalla: alto, medio y bajo. Formato del reloj Mantenga pulsado el botón arriba durante 2 segundos para modificar los ajustes de formato del reloj. -
Page 20: Conexión Con Un Dispositivo Bluetooth
Conexión con un dispositivo Bluetooth Cómo conectar a un dispositivo Bluetooth: Encienda su dispositivo Bluetooth. Si no estuviera encendido, encienda el Charge Time conectando la entrada de alimentación a un tomacorriente utilizando el adaptador de alimentación incluido. apareado previamente dispositivo Bluetooth, reconectará... -
Page 22: Technical Specifications
0.70 kg Trademarks & Licenses ION Audio is a trademark of ION Audio, LLC, registered in the U.S. and other countries. The word mark and logos are owned by the Bluetooth SIG, Inc. and any use of such marks by ION Audio is under license. The ‘Qi’ symbol is a trademark of the Wireless Power Consortium. - Page 24 i o n a u d i o . c o m Manual Version 1.1 iSP99...