Table of Contents
Advertisement
Advertisement
Table of Contents

Related Manuals for Focusrite iTrack Solo


Summary of Contents for Focusrite iTrack Solo
- Page 1 User Guide www.focusrite.com FA0687-03...
-
Page 2: Important Safety Instructions
IMPORTANT SAFETY INSTRUCTIONS 1. Read these instructions. 2. Keep these instructions. 3. Heed all warnings. 4. Follow all instructions. 5. Do not use this apparatus with water. 6. Clean only with dry cloth. 7. Do not install near any heat sources such as radiators, heat registers, stoves, or other apparatus (including amplifiers) that produce heat. 8. Protect the power cord from being walked on or pinched particularly at plugs, convenience receptacles, and the point where they exit from the apparatus. 9. Only use attachments/accessories specified by the manufacturer. 10. Use only with the cart, stand, tripod, bracket, or table specified by the manufacturer, or sold with the apparatus. When a cart is used, use caution when moving the cart/apparatus combination to avoid injury from tip-over. - Page 3 ENVIRONMENTAL DECLARATION Compliance Information Statement: Declaration of Compliance procedure Product Identification: Focusrite iTrack Solo Responsible party: American Music and Sound Address: 5304 Derry Avenue #C Agoura Hills, CA 91301 Telephone: 800-994-4984 This device complies with part 15 of the FCC Rules. Operation is subject to the following two conditions: (1) This device may not cause harmful interference, and (2) this device must accept any interference received, including interference that may cause undesired operation. For USA To the User: 1. Do not modify this unit! This product, when installed as indicated in the instructions contained in this manual, meets FCC requirements. Modifications not expressly approved by Novation may void your authority,...
-
Page 4: Table Of Contents
TABLE OF CONTENTS IMPORTANT SAFETY INSTRUCTIONS . . . . . . . . . . . . . . . . . . . . . . . . . . . . . . . . . . . . . . . . . . . . . . 2 TABLE OF CONTENTS . -
Page 5: Overview
If the main User Guide sections do not provide the information you need, be sure to consult http://www.focusrite.com/answerbase, which contains a comprehensive collection of common technical support queries. Features The iTrack Solo audio interface allows you to connect a microphone and/or guitar to an iPad, iPad 2 or iPad (3rd Generation). The signals connected to the physical inputs of the iTrack Solo can then be... -
Page 6: System Requirements
System Requirements Compatible iOS devices: iPad, iPad 2, iPad (3rd generation) Mac OS Apple Macintosh with a high-speed USB 2.0-compliant USB port OS: Mac OS X 10.7 or later (Lion or Mountain Lion) Windows Windows compatible computer with a USB 2.0-compliant USB port OS: Windows 7... -
Page 7: Getting Started
GETTING STARTED Using the iTrack Solo with an iOS device Powering the iTrack Solo The iTrack Solo is an active device, and needs a DC power source to operate. It is important to remember that when you use the iTrack Solo with an iPad, it will not be powered from the iOS device via the interface cable. Use the supplied USB cable to connect the iTrack Solo to a standard Apple USB Power Supply (or other standard USB power supply). One of these is supplied with every iOS device, or can be... -
Page 8: Using The Itrack Solo With Garageband
Using the iTrack Solo with GarageBand GarageBand is one of the most popular recording apps for iOS devices. It is a useful compositional tool and used on its own, allows you to create music from the range of virtual instruments it provides. With iTrack Solo, you can add vocals and real-world instruments as well. To route the iTrack Solo mic input into GarageBand follow the procedure below (operating instructions for GarageBand are beyond the scope of this User Guide, but the application includes a full set of Help files): 1. Open the GarageBand song you are working on. 2. Create a vocal track by tapping the ‘+’ button on the bottom left-hand corner of the screen and select Audio Recorder. 3. Tap the jack plug icon to open the Input Settings controls. 4. Select Left Channel to route the mic input to the vocal track. 5. Switch Monitor OFF and enable Direct Monitor (8) on the iTrack Solo. See “Using Direct Monitoring” on page 13 for further details on the benefits of using iTrack’s Direct Monitor feature. -
Page 9: Using The Itrack Solo With A Mac Or Pc
Software Installation You will need to install the appropriate drivers onto your laptop/computer before you can you use the iTrack Solo with it. (Drivers are small software applications which ensure that your laptop/computer communicates correctly and efficiently with the iTrack Solo). The drivers can be downloaded from www.focusrite.com/downloads. Navigate to the iTrack Solo download area. Mac OS Select the Mac disk image (*.dmg) version of the driver to start the download. Double-click the file from the Downloads folder and then run the installation package (*.pkg). Follow all on-screen instructions; a confirmation will be given when the driver has been installed successfully. Your OS should automatically switch the computer’s default audio outputs to be the USB port to which the iTrack Solo is connected. To verify this, go to System Preferences >... -
Page 10: Windows
Your OS should automatically switch the computer’s default audio outputs to be the USB port to which the iTrack Solo is connected. To verify this: on Windows 7 - go to Start > Control Panel > Hardware and Sound > Sound > Manage Audio Devices and set ‘Default Playback’ and ‘Recording’ to ‘iTrack Solo’. Connecting your iTrack Solo IMPORTANT: Before you connect the iTrack Solo to your computer, please complete the software installation according to the instructions above. This will ensure that the hardware uses the correct drivers, and... - Page 11 Once the iTrack Solo is set as the preferred Audio Device* in your DAW, Inputs 1 & 2 and Outputs 1 & 2 will appear in your DAW’s Audio I/O preferences. Depending on your DAW, you may need to enable certain inputs or outputs before use. The two examples below show Inputs 1 & 2 and Outputs 1 & 2 enabled in the Ableton Lite Audio Preferences. *Typical name. Terminology may differ slightly between DAWs.
-
Page 12: Example Of Use
Example of use The iTrack Solo is the ideal interface for an iPad or a DAW application on a laptop or other computer. A typical set of connections is illustrated below: Connecting a microphone / instrument This setup illustrates a typical configuration for recording – either into your iOS device, or by using DAW software on your Mac or PC. In this case, you might record vocals through Input 1 and guitar through Input 2 into your recording application, while monitoring the playback via headphones or loudspeakers. The iTrack Solo’s inputs are on the front panel; Input 1 uses a standard 3-pin XLR socket, and is configured to work with microphones of most types; you will probably have a mating XLR male connector on the end of your mic cable. Input 2 uses a 2-pole ¼” (6.35 mm) jack socket, and is intended to accept signals from a guitar or bass. -
Page 13: Using Direct Monitoring
Solo’s headphone and main monitor outputs. This enables you to hear yourself with zero latency – i.e., in “real time” – along with the computer playback. The input signals to your computer are not affected in any way by this setting. When “Direct Monitoring” is set to ON, ensure that your recording software is not set to route its input (what you are currently recording) to its output. If it is, you will hear yourself “twice”, with one signal audibly delayed as an echo. Headphone monitoring Connect a pair of stereo headphones to the front panel headphones socket to hear both what you are recording (your current input signal(s)) and any tracks you’ve already recorded in your laptop or iOS device. The pre-recorded tracks will be heard in stereo, and the current input signals in mono – central in the stereo image. If you are using both the mic and instrument inputs, the two inputs will be summed in mono. Connecting iTrack Solo to loudspeakers The phono (RCA) outputs on the rear panel can be used to connect monitoring speakers. Self-powered monitors (i.e., typical computer speakers) incorporate internal amplifiers, and may be connected directly. Larger, passive loudspeakers will require a separate stereo amplifier; in this case, the rear panel outputs should be connected to the amplifier’s inputs. -
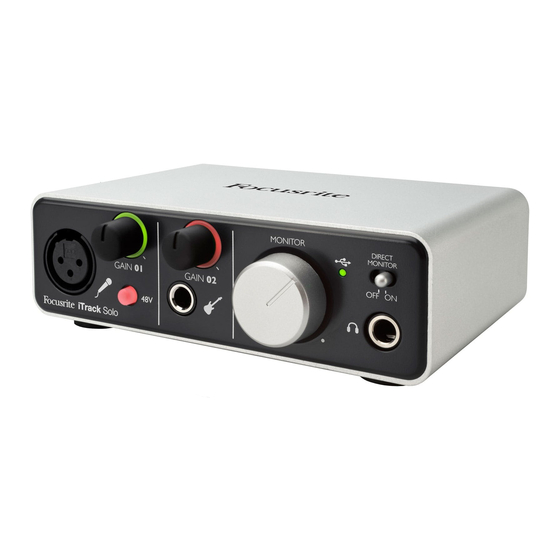
Page 14: Hardware Features
The line output connectors are standard phono (RCA) sockets. Typical consumer (hi-fi) amplifiers and small powered monitors will have inputs on phono (RCA) sockets or a single 3.5 mm 3-pole jack plug (intended for direct connection to a computer). In either case, use a suitable connecting cable with phono plugs (RCA jacks) at one end. NOTE: You run the risk of creating an audio feedback loop if loudspeakers are active at the same time as a microphone! We recommend that you always turn off (or turn down) monitoring loudspeakers while recording, and use headphones when overdubbing. HARDWARE FEATURES Front Panel The front panel includes the input connectors for mic and instrument signals, and the input gain and monitoring controls. 1. Input 1 - electronically balanced input via 3-pin XLR socket for microphones. 2. GAIN 01 - adjust the gain for the microphone signal on input 1. The gain control has a concentric bi-colour LED ‘ring’ to confirm signal level: green indicates an input level of at least -24 dBFS (i.e.,‘signal present’), the ring then turns red when signal level reaches 0 dBFS. 3. 48V - phantom power switch for mic input - enables 48 V phantom power at the XLR socket. 4. Input 2 - unbalanced input for connecting instruments; ¼” TS jack socket. 5. GAIN 02 - adjust the gain for the instrument signal on input 2. 6. MONITOR - main monitor output level control - sets the output level at the main (rear panel) outputs 1 & 2 and the front panel headphone output. -
Page 15: Back Panel
Back Panel 1. Kensington security lock - secure your iTrack Solo to a suitable structure if desired. 2. USB 2 .0 port - Type B connector; connect to your laptop or desktop with cable supplied. You will need to connect this port to an Apple USB Power Supply when using the iTrack Solo with an iOS device. 3. DEVICE LINK - proprietary connector; use the cable supplied to connect this port to your iPad. 4. LINE OUTPUTS - 2 x phono (RCA) sockets; +8 dBV max. output level. -
Page 16: Performance Specifications
PERFORMANCE SPECIFICATIONS Clock source: Internal 105 dB ‘A-weighted’ (all inputs). Converter chipset A/D ADC Dynamic Range dynamic range 114 dB Range 105 dB ‘A-weighted’ (all outputs). Converter chipset DAC Dynamic Range D/A dynamic range 114 dB 44.1 kHz, 48 kHz, 88.2 kHz, 96 kHz / 24 bit – for Mac and PC Supported Sample Rates 44.1 kHz, 48 kHz / 16 bit – operation with iPad. 24 bit audio available on playback only with iPad. Microphone Input 1 Frequency Response 20 Hz – 20 kHz +/- 0.2 dB Gain Range... -
Page 17: Physical And Electrical Characteristics
Front panel switch; allows zero-latency Direct Monitoring monitoring of inputs Other I/O 1 x USB 2.0 Type B connector Device Link 10-pin (proprietary) Front Panel Indicators LED (green); indicates active USB connection Colour-coded LED rings: green (-24 dBFS) and Gain controls red (0 dBFS) Weight and Dimensions W x H x D 150mm x 45mm x 100mm Weight 0.5 Kg TROUBLESHOOTING For all troubleshooting queries, please visit the Focusrite Answerbase at , where you will find articles covering numerous www.focusrite.com/answerbase troubleshooting examples. COPYRIGHT AND LEGAL NOTICES Focusrite iTrack Solo is a trademark of Focusrite Audio Engineering Limited registered in the UK and other countries. iPad, iPhone and iPod touch are trademarks of Apple Inc., registered in the U.S. and other countries. All other trademarks and trade names are the property of their respective owners. 2012 © Focusrite Audio Engineering Limited. All rights reserved.