Juniper ACX5096 Quick Start Manual
Universal metro routers
Hide thumbs
Also See for ACX5096:
- Configuration manual (3270 pages) ,
- Hardware manual (217 pages) ,
- Manual (232 pages)
Table of Contents
Advertisement
Quick Links
Download this manual
See also:
Configuration Manual
ACX5096 Universal Metro Routers Quick Start
July 2015
Part Number: 530-065016
Revision 01
This document describes how to install the Juniper Networks
Contents
Safety Warnings | 13
Revision History | 16
®
ACX5096 Universal Metro Routers.
1
Advertisement
Table of Contents

Related Manuals for Juniper ACX5096


Summary of Contents for Juniper ACX5096
-
Page 1: Table Of Contents
ACX5096 Universal Metro Routers. Contents ACX5096 Quick Start Description | 2 Step 1: Prepare the Site for ACX5096 Router Installation | 3 Step 2: Install the Router | 4 Tools Required to Install the Router in a Rack | 4... -
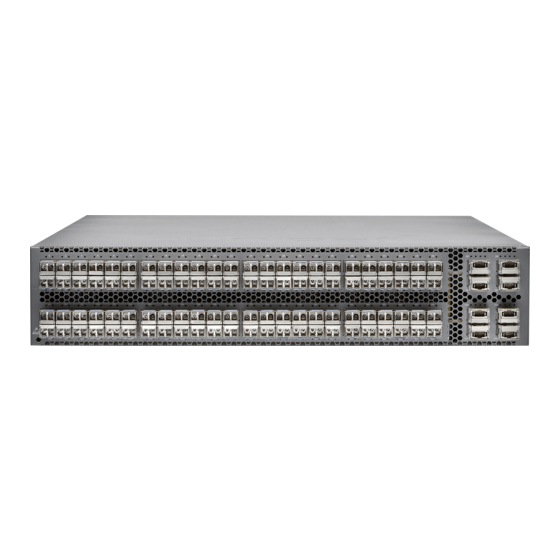
Page 2: Acx5096 Quick Start Description
40-Gbps speed or can be channelized to four independent ports with 10-Gbps speed. The eight QSFP+ ports can be used as either access ports or uplink ports. The ACX5096 router has a 2 U form factor and is shipped with redundant fans and redundant power supplies. The router can be ordered with AC or DC power supplies. -
Page 3: Step 1: Prepare The Site For Acx5096 Router Installation
Prepare your site for installing the ACX5096 router by observing the following guidelines: The ACX5096 router can be installed in a two-post or four-post rack. Use a two-post or four-post rack that provides bracket holes or hole patterns spaced at 1 U (1.75 in. or 4.45 cm) increments and that meets the size and strength requirements to support the weight. -
Page 4: Step 2: Install The Router
(Optional) Grounding cable kit with bracket, lug, and three nuts with integrated washers. To install the grounding cable, see the ACX5096 router documentation at https://www.juniper.net/documentation/ Install the Mounting Brackets The ACX5096 router can be mounted in either a two or four-post rack configuration. - Page 5 The router weighs approximately 32.5 lb (14.74 kg). Installing the ACX5096 router in a rack or cabinet requires two people to lift the router and secure it to the rack.
-
Page 6: Install The Acx5096 Router In The Rack
Install the ACX5096 Router in the Rack The router can be installed horizontally in a rack or cabinet. Two people are required to install the ACX5096 router. The chassis weighs approximately 32.5 lb (14.74 kg). To install the chassis: 1. Ensure that the rack is in its permanent location and is secured to the building. Ensure that the installation site allows adequate clearance for both airflow and maintenance. -
Page 7: Step 3: Ground The Acx5096 Router
Protective earthing terminal bracket—This bracket attaches to the ACX5096 router chassis through the front mounting bracket on the left, providing a protective earthing terminal for the router. Grounding cable for your ACX5096 router—The grounding cable must be 14 AWG (2 mm²), minimum 90° C wire, or as permitted by the local code. -
Page 8: Connect The Grounding Cable
Connect the Grounding Cable To connect earth ground to an ACX5096 router: 1. Secure the provided protective earthing terminal bracket through the ACX5096 router mounting bracket to the chassis with the nut provided. The posts on the protective earthing terminal bracket should point to the left. -
Page 9: Step 4: Connect Power To The Acx5096 Router
Depending on your configuration, your router uses either AC or DC power supplies. Perform the appropriate procedures for each power supply in your router. The power supply in an ACX5096 router is a hot-removable and hot-insertable field-replaceable unit (FRU). You can remove and replace it without powering off the router or disrupting router functions. -
Page 10: Connect Dc Power To An Dc-Powered Acx5096 Router
6. If the AC power source outlet has a power router, set it to the on (|) position. 7. Verify that the AC LEDs are lit green and on steadily. Connect DC Power to an DC-Powered ACX5096 Router To connect power to an DC-powered router: 1. -
Page 11: Step 5: Perform Initial Software Configuration
connect –48 V from feed B to the input terminals of the second power supply on the other side of the chassis. This configuration provides the commonly deployed A/B feed redundancy for the system. To connect the power supply to the power source: a. - Page 12 To connect and configure the router from the console: 1. Connect the console port to a laptop or PC by using the provided RJ-45 cable and RJ-45 to DB-9 serial port adapter. The console (CON) port is located on the management panel of the router. 2.
-
Page 13: Safety Warnings
0 family inet address address/prefix-length NOTE: The management ports, em0 (C0) and em1 (C1), are found on the FRU end of the ACX5096 router. 9. (Optional) Configure the static routes to remote prefixes with access to the management port. [edit] root@# set routing-options static route remote-prefix next-hop destination-ip retain no-readvertise 10. - Page 14 Before connecting the router to a power source, read the installation instructions in the ACX5000 router documentation. The ACX5096 router weighs approximately 32.5 lb (14.74 kg). Manually installing the ACX5096 router in a rack or cabinet at a height above 60 in. (152.4 cm) requires two people to lift the router and install mounting screws.
-
Page 15: Junos Os Documentation And Release Notes
JTAC Hours of Operation —The JTAC centers have resources available 24 hours a day, 7 days a week, 365 days a year. Self-Help Online Tools and Resources For quick and easy problem resolution, Juniper Networks has designed an online self-service portal called the Customer Support Center (CSC) that provides you with the following features: Find CSC offerings: https://www.juniper.net/customers/support/... -
Page 16: Creating A Service Request With Jtac
Copyright © 2019 Juniper Networks, Inc. All rights reserved. Juniper Networks, the Juniper Networks logo, Juniper, and Junos are registered trademarks of Juniper Networks, Inc. and/or its affiliates in the United States and other countries. All other trademarks may be property of their respective owners.