Advertisement
Quick Links
-
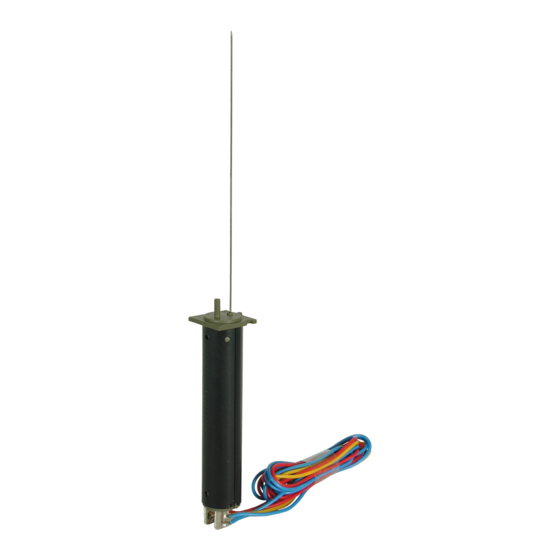
The actuator rod is made from spring steel wire and
can therefore be shortened only with the correct
side cutters. For safe cutting you should hold the
piece you are cutting off with small pliers.
-
The motor can be universally used for signals from
different manufacturers or for your own hand-built
signals. The connection of the motor to the signal
can be arranged to best suit the requirements dic-
tated by the layout you have planned and built.
3. Function control
Before final installation you must check the function-
ing of the unit:
Connect the yellow cable of the drive to one terminal
on the accessories output from your model train con-
troller (14 – 16 V AC~ / DC=).Then if you connect the
brown cable to the other terminal on your controller
and touch the red-banded, blue cable to this terminal,
the actuator wire will extend. Touching the green-band-
ed cable to this terminal will retract the actuator wire.
Note that power must not be supplied both blue cable
simultaneously.
The yellow cable is the common feed to both of the
drive unit solenoids. The red cable allows you to con-
trol other functions such as warning lights, track feeds
etc,.
4. Connection
Reed contact 1 x IN (e. g. for train control): Contact is
closed when the actuator rod is retracted.
Connections for operating the solenoid coils: A pulse
on the red-banded blue cable will extend the actua-
tor rod, a pulse on the green-banded blue cable will
retract it.
Connections for operating the solenoid coils: A pulse
on the red-banded blue cable will extend the actua-
tor rod, a pulse on the green-banded blue cable will
retract it.
5. Trouble-shooting
Problem:
The power supply is doubtlessly working well but the
motor does not switch.
Remedy:
Possible cause: The internal end stop contact is in
an intermediate position. Make sure to switch off the
power supply before moving the reeds gently upwards
with a needle or a fine wire.
6. Technical data
Operating voltage:
Operating current:
Actuator travel:
Actuator power:
Do not dispose of this product through
(unsorted) domestic waste, supply it to
recycling instead.
Subject to change without prior notice. No liability for
mistakes and printing errors.
You will find the latest version of the manual on the
Viessmann website using the item-No.
Viessmann
Modelltechnik GmbH
Bahnhofstraße 2a
D - 35116 Hatzfeld-Reddighausen
www.viessmann-modell.de
4
14 – 16 V AC~ / DC=
600 mA for 25 msec
ca 5 mm
ca. 0,1 N
98143
Stand 03/sw
09/2018
Ho/Kf
Made in Europe
4551
Stellantrieb für Signale
Motion drive for signals
Modellbauartikel, kein Spielzeug! Nicht geeignet für Kinder
DE
unter 14 Jahren! Anleitung aufbewahren!
Model building item, not a toy! Not suitable for children
EN
under the age of 14 years! Keep these instructions!
Ce n'est pas un jouet. Ne convient pas aux enfants de
FR
moins de 14 ans ! C'est un produit décor! Conservez cette
notice d'instructions!
Não é um brinquedo! Não aconselhável para menores de
PT
14 anos. Conservar a embalagem.
Modelbouwartikel, geen speelgoed! Niet geschikt voor kin-
NL
deren onder 14 jaar! Gebruiksaanwijzing bewaren!
Articolo di modellismo, non è un giocattolo! Non adatto a
IT
bambini al di sotto dei 14 anni! Conservare instruzioni per
l'uso!
Artículo para modelismo. No es un juguete! No recomen-
ES
dado para menores de 14 años! Conserva las instrucciones
de servicio!
Bedienungsanleitung
Operation Manual
DE
1. Wichtige Hinweise
Bitte lesen Sie vor der ersten Anwendung des Pro-
duktes bzw. dessen Einbau diese Bedienungsanlei-
tung aufmerksam durch und bewahren Sie diese auf.
Sie ist Teil des Produktes.
1.1 Sicherheitshinweise
Vorsicht:
Verletzungsgefahr!
Aufgrund der detaillierten Abbildung des Originals
bzw. der vorgesehenen Verwendung kann das Pro-
dukt Spitzen, Kanten und abbruchgefährdete Teile
aufweisen. Für die Montage sind Werkzeuge nötig.
Stromschlaggefahr!
Die Anschlussdrähte niemals in eine Steckdose ein-
führen! Verwendetes Versorgungsgerät (Transfor-
mator, Netzteil) regelmäßig auf Schäden überprü-
fen. Bei Schäden am Versorgungsgerät dieses kei-
nesfalls benutzen!
Alle Anschluss- und Montagearbeiten nur bei abge-
schalteter Betriebsspannung durchführen!
Ausschließlich nach VDE/EN-gefertigte Modell-
bahntransformatoren verwenden!
Stromquellen unbedingt so absichern, dass es bei
einem Kurzschluss nicht zum Kabelbrand kommen
kann.
1.2 Das Produkt richtig verwenden
Dieses Produkt ist bestimmt:
-
Zum Einbau in Modelleisenbahnanlagen und
Dioramen
-
Zum Anschluss an einen Modellbahntransformator
(z. B. Art. 5200) bzw. an einer Modellbahnsteue-
rung mit zugelassener Betriebsspannung.
-
Zum Betrieb in trockenen Räumen.
Jeder darüber hinausgehende Gebrauch gilt als nicht
bestimmungsgemäß. Für daraus resultierende Schä-
den haftet der Hersteller nicht.
1.3 Packungsinhalt überprüfen
Kontrollieren Sie den Lieferumfang auf Vollständigkeit:
-
Signalmotor mit Anschlusskabeln
-
Haltering
-
Anleitung
2. Einbau
-
Signalmotor vorsichtig aus der Verpackung nehmen.
-
Vor dem Einbau auf Funktion prüfen.
-
Am Einbauort ein Loch (Ø 13 mm) zur Montage
bohren (Abb. 1).
-
Motor mit den Anschlusskabeln von oben in die Boh-
rung stecken. Von unten den Haltering aufschieben.
Darauf achten, dass die Rastnasen um 90° zu der
Riffelung am Gehäuseblech des Antriebs verdreht
sind. Stehen nun die vier Kunststoffenden des Be-
festigungsringes mit der Grundplatte unter mecha-
nischer Spannung, wird der Ring so gedreht, dass
1
Advertisement

Related Manuals for Viessmann 4551


Summary of Contents for Viessmann 4551
-
Page 1: Function Control
Motor mit den Anschlusskabeln von oben in die Boh- You will find the latest version of the manual on the rung stecken. Von unten den Haltering aufschieben. Viessmann website using the item-No. Darauf achten, dass die Rastnasen um 90° zu der 98143 Riffelung am Gehäuseblech des Antriebs verdreht... -
Page 2: Technische Daten
Änderungen vorbehalten. Keine Haftung für Druckfehler Fantasie lediglich durch die physikalischen Gesetz- und Irrtümer. mäßigkeiten Grenzen gesetzt. Die aktuelle Version der Anleitung finden Sie auf der Viessmann Homepage unter der Artikelnummer. Abb. 1 Fig. 1 1. Important information Please read this manual completely and attentively before using the product for the first time.