
Related Manuals for Kodak LUMA 350


Summary of Contents for Kodak LUMA 350
-
Page 1: User Manual
KODAK LUMA 350 PORTABLE SMART PROJECTOR User Manual 4.4"H | 4.4"W | 0.87"D (11.2 cm | 11.2 cm | 2.2 cm) Please read all directions before using the product and retain this guide for reference. -
Page 2: Table Of Contents
CONTENTS INTRODUCTION SPECIFICATIONS BOX CONTENTS SAFETY PRECAUTIONS PRODUCT OVERVIEW REMOTE CONTROL OVERVIEW USING YOUR PHONE USING A MOUSE CHARGING THE PROJECTOR USING THE PROJECTOR TO CHARGE DEVICES USING THE AUDIO OUT JACK POWERING THE PROJECTOR ON/OFF PHOTO PLAYBACK CONTROLS VIDEO PLAYBACK CONTROLS ADJUSTING FOCUS ADJUSTING VOLUME CONNECTING TO WIRELESS NETWORKS... -
Page 3: Introduction
1. INTRODUCTION Thank you for purchasing the KODAK LUMA 350 PORTABLE SMART PROJECTOR. This User Guide is intended to provide you with guidelines to ensure that operation of this product is safe and does not pose risk to the user. Any use that does not conform to the guidelines described in this User Guide may void the limited warranty. -
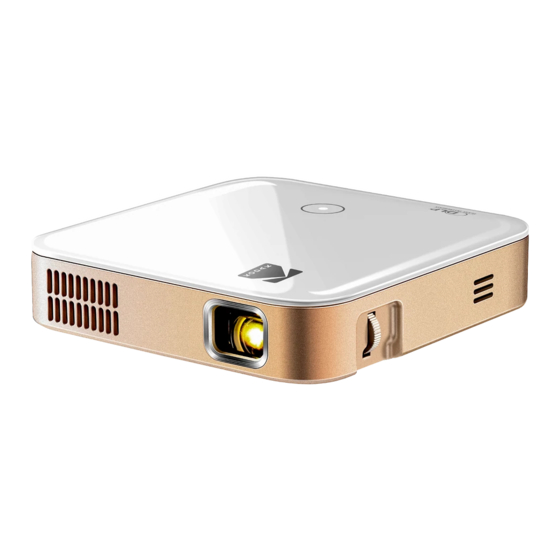
Page 4: Product Overview
• Do not place, drop, or submerge the projector in water or any other liquid. • If the projector somehow falls into water despite you taking all of the above precautions, please do not reach into the water to retrieve it. Unplug it immediately and then retrieve it. •... -
Page 5: Remote Control Overview
7. USING YOUR PHONE For greater ease of use and a more intuitive experience, you can control the projector with the KODAK LUMA Companion App from the Apple App Store or the Google Play store. Once installed, you can use your phone as a remote to navigate through menus, mirror your screen, easily input login information for apps, and control media volume. -
Page 6: Using A Mouse
8. USING A MOUSE If you’d rather use a mouse instead of the provided remote control, this projector supports USB and wireless mice, as well as USB and wireless keyboards. 1. Left: Confirm 2. Right: Return 3. Wheel: Page up/down 9. -
Page 7: Using The Projector To Charge Devices
10. USING THE PROJECTOR TO CHARGE DEVICES When the projector is powered on, you can connect the charging cable of your device to the USB port of the projector, and it will operate as a mobile power bank to charge your electronic devices. The power output is 5V/1A. -
Page 8: Photo Playback Controls
13. PHOTO PLAYBACK CONTROLS To access your photos, from the home screen, navigate to Source > File Browser. From there you can view individual photos or a slideshow of all photos stored either on your removable storage, or on the projector itself (if you’ve downloaded anything). -
Page 9: Adjusting Volume
16. ADJUSTING VOLUME To adjust the device volume during playback, use the + and - buttons on the remote control. To adjust the volume without using the remote control, follow these instructions: 1. From the home screen, select Settings. 2. From the Settings menu, select Sounds. 3. -
Page 10: Adjusting Brightness
4. The projector should connect to that network whenever it is in range. NOTE: It is necessary to connect to a wireless network if you want to take advantage of the Android functionality on your projector. 18. ADJUSTING BRIGHTNESS If you’d like to adjust the brightness of your projector to conserve electricity and energy usage, follow these steps: 1. -
Page 11: Setting Date And Time
2. From the Settings menu, select Projector Mode. 3. Select the image that most closely resembles the positioning of your projector and it will adjust the display accordingly. 20. SETTING DATE AND TIME Your projector should automatically update to the correct date and time once you connect to a wireless network. -
Page 12: Connecting External Devices
4. When you’ve finished backing up your data (or not), select the bottom option, “Factory Data Reset”. 22. CONNECTING EXTERNAL DEVICES A. USB Drives To access photos or videos stored on any USB drive, simply insert the drive into the corresponding port on the side. -
Page 13: Screen Mirroring (Android/Windows - Miracast®)
23. SCREEN MIRRORING (ANDROID/WINDOWS - MIRACAST®) 1. From the projector home screen, select “Source,” select “Screen Mirroring,” and then select “Miracast®”. The name of the projector will be displayed on the screen so that you can accurately identify it when attempting to connect. 2. -
Page 14: Pre-Loaded Apps
All Apps option on the home screen. NOTE: Some of your favorite apps may look different when installed, due to the fact that the LUMA 350 utilizes the TV versions of these applications to accommodate the screen size and navigation. -
Page 15: Updating Your Software
29. WARRANTY LIMITED WARRANTY TO ORIGINAL CONSUMER This KODAK LUMA 350 Projector (“Product”), including any accessories included in the original packaging, as supplied and distributed new by an authorized retailer is warranted by C&A Marketing, Inc. (the “Company”) to the original consumer purchaser only, against certain defects in material and workmanship (“Warranty”) as follows:... - Page 16 Company’s property. Refunds can only be given if the original Product is returned. This Warranty does not apply to: (a) Any non-KODAK LUMA 350 Projector product, hardware or software, even if packaged or sold with the Product; (b) Damage caused by use with non-KODAK LUMA 350 Projector products;...
- Page 17 This warranty gives you specific legal rights, and you may have other rights that vary from state to state or province to province. Contact your authorized retailer to determine if another warranty applies. Kodak does NOT manufacture this Product or provide any Warranty or support.
- Page 18 The Kodak trademark, logo, and trade dress are used under license from Eastman Kodak Company. Android and Google Play are trademarks of Google, LLC. IOS is a trademark of Cisco in the U.S. and other countries and is used under license.