Table of Contents
Advertisement
Advertisement
Table of Contents

Related Manuals for Panasonic KX-HNB700


Summary of Contents for Panasonic KX-HNB700
- Page 1 User’s Guide Text entity: en_us Model No.
-
Page 2: Table Of Contents
Linking with your Google Home ......33 Panasonic Home Monitoring Camera device Using Google Home to control devices ....34 lineup ..............6 System settings and maintenance ....35 Access point (KX-HNB700, KX-HNB705) ...8 Event logs ............35 Front door camera (KX-HNC700, Deregistering devices ........36 KX-HNC705) ............9 Support information ........37... - Page 3 Table of Contents Talking to the camera ........61 Registering other mobile devices to the access Playing back recordings ........61 point ..............82 Erasing recordings ..........62 Front door camera and outdoor camera Protecting recordings ........63 features ............84 Adjusting the lighting .........64 Front door camera and outdoor camera features Battery status ............64 (overview) ............84 Mode settings ..........65...
- Page 4 Table of Contents Country/region settings ........102 Recording overwrite ........126 Displaying device information ......102 Talk mode ............126 Updating the firmware ........102 Recording sound ..........126 Notification settings .........103 Night vision mode ...........126 Login settings ..........103 Thumbnail image ..........127 Network features ..........104 Other image settings ........127 Home wireless network SSID features ...105 HD camera settings ........128 Access point SD cards ........105...
-
Page 5: What Is The Homehawk
Getting started with the HomeHawk! What is the HomeHawk? Overview The Panasonic Home Monitoring Camera is a wireless network of devices that help you monitor your home. Its easy-to-use app allows you to stay in charge even when away from home. -
Page 6: What Kinds Of Devices Are Available
Getting started with the HomeHawk! What kinds of devices are available? Panasonic Home Monitoring Camera device lineup The maximum number of camera devices for each type are listed below. In order to use front door cameras and outdoor cameras, they must be connected to an access point. - Page 7 Getting started with the HomeHawk! Overview: Floor camera (KX-HNC850) Setup: Floor camera setup (overview) Features: Floor camera features (overview) Shelf camera (KX-HNC810) Overview: Shelf camera (KX-HNC810) Registration: Shelf camera setup (overview) Features: Shelf camera features (overview) HD camera (KX-HNC800, KX-HNC805, KX-HN1003) Overview: HD Camera (KX-HNC800, KX-HNC805, KX-HN1003) Registration: HD camera setup (overview) Features: HD camera main features (overview)
-
Page 8: Access Point (Kx-Hnb700, Kx-Hnb705)
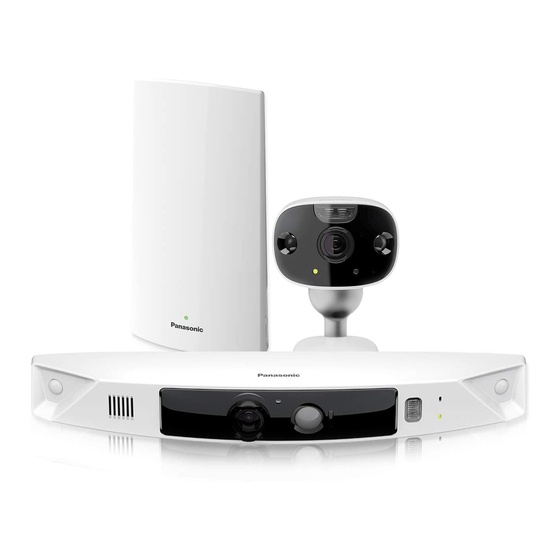
Getting started with the HomeHawk! Access point (KX-HNB700, KX-HNB705) R Joins front door cameras and outdoor cameras together R Connects to your wireless router with an Ethernet cable R Supports SD card connection for recording video and audio from cameras... -
Page 9: Front Door Camera (Kx-Hnc700, Kx-Hnc705)
Getting started with the HomeHawk! Front door camera (KX-HNC700, KX-HNC705) R Full-color camera with night vision (including color night vision) and built-in microphone for live monitoring and recording R Built-in motion sensor (visual detection) can be used to trigger other actions (alerts, etc.) R Built-in microphone and speaker for two-way communication... -
Page 10: Outdoor Camera (Kx-Hnc710, Kx-Hnc715)
Getting started with the HomeHawk! Outdoor camera (KX-HNC710, KX-HNC715) R Full-color camera with night vision (including color night vision) and built-in microphone for live monitoring and recording R Built-in motion sensor (visual detection) can be used to trigger other actions (alerts, etc.) R Built-in microphone and speaker for two-way communication... -
Page 11: Hd Camera (Kx-Hnc800, Kx-Hnc805, Kx-Hn1003)
Getting started with the HomeHawk! HD Camera (KX-HNC800, KX-HNC805, KX-HN1003) R Full-color, high-definition camera with night vision and built-in microphone for live monitoring and recording R Built-in motion sensor (visual detection), sound sensor, and temperature sensor can be used to trigger other actions (camera recording, etc.) R Built-in microphone and speaker for two-way communication... -
Page 12: Shelf Camera (Kx-Hnc810)
Getting started with the HomeHawk! Shelf camera (KX-HNC810) R Smart and discreet design that blends in with your home environment R Full-color, high-definition camera with night vision and built-in microphone for live monitoring and recording R Built-in motion sensor (visual detection) can be used to trigger other actions (camera recording, sending notifications, etc.) R Built-in sound sensor and temperature sensor can be used to trigger other actions (sending notifications, etc.) -
Page 13: Floor Camera (Kx-Hnc850)
Getting started with the HomeHawk! Floor camera (KX-HNC850) R Smart and discreet design that blends in with your home environment R Ambient light that can be turned on and off, and adjusted to 3 different levels R Full-color, high-definition camera with night vision and built-in microphone for live monitoring and recording R Built-in motion sensor (visual detection) can be used to trigger other actions (camera recording, sending notifications, etc.) -
Page 14: Usage Examples
Getting started with the HomeHawk! Usage examples Introduction This section describes commonly used system features, the devices required for each example, and briefly explains the required settings. I want to view live camera images while I’m out While away from home, you can view live camera images. Supported devices R Shelf camera (KX-HNC810) R Floor camera (KX-HNC850) -
Page 15: I Want To View Color Images At Night
Getting started with the HomeHawk! Required procedures R Use the [HomeHawk] app to configure a mode or use a preset mode. See “Mode settings (overview)”, Page 91. I want to view color images at night You can configure cameras to display images in color even at night or when the area surrounding the cameras is dark. -
Page 16: I Want The Lights To Turn On Automatically When I Come Home
Getting started with the HomeHawk! I want the lights to turn on automatically when I come home You can configure the floor camera to turn on its light when it detects your mobile device, such as when you return home from outside. Supported devices R Floor camera (KX-HNC850) Required procedures... -
Page 17: Downloading The [Homehawk] App
{{"https://panasonic.net/cns/pcc/support/homehawk"|tolink("https://panasonic.net/cns/pcc/ support/homehawk")}} Using your device’s app store iPhone, iPad users Search for “Panasonic HomeHawk”. iPad users should search in the “iPhone only” category. Android device users Search for “Panasonic HomeHawk”. Compatible mobile devices Please check the latest information at the following supported page. -
Page 18: Setting Up Devices
Getting started with the HomeHawk! Setting up devices Refer to the following for information on setting up your device. – Shelf cameras: “Shelf camera setup (overview)”, Page 40 – Floor cameras: “Floor camera setup (overview)”, Page 52 – Access points, front door cameras, and outdoor cameras: “Front door camera and outdoor camera setup (overview)”, Page 81 –... -
Page 19: Using The Home Screen
Getting started with the HomeHawk! – HD cameras: “HD camera setup (overview)”, Page 107 R You can change the password if necessary. – Shelf cameras/floor cameras: “Login settings”, Page 78 – Access points, front door cameras, and outdoor cameras: “Login settings”, Page 103 –... - Page 20 Getting started with the HomeHawk! Shelf camera and floor camera home screen HomeHawk Displays the settings menu Displays the camera setting screen Shows the camera’s name Adjusts the brightness for the light (floor cameras only) Shows the selected mode and displays the Displays the HD camera list mode screen ( “Mode settings (overview)”, Page 65)
- Page 21 Getting started with the HomeHawk! Front door camera and outdoor camera home screen HomeHawk Displays the settings menu Shows the selected mode and displays the mode screen ( “Mode settings (overview)”, Page 91) Shows the access point’s name Displays the camera setting screen Shows the camera’s name Displays the HD camera list Note:...
-
Page 22: Displaying The Settings Menu
Getting started with the HomeHawk! – is displayed when connected away from home without using a relay server. *1 Front door cameras/outdoor cameras: “Viewing the live camera image screen”, Page 86 Floor cameras: “Viewing the live camera image screen”, Page 57 Shelf cameras: “Viewing the live camera image screen”, Page 45 *2 Front door cameras/outdoor cameras: “Viewing the live camera image screen”, Page 86 Floor cameras: “Viewing the camera image/recording list screen”, Page 56... -
Page 23: Selecting Devices
Getting started with the HomeHawk! Selecting devices You can select the desired device (cameras, access points, etc.) when viewing recorded images, configuring settings, etc. If there are multiple devices registered to your mobile device, you can select devices by tapping Accessing from multiple mobile devices There are certain limitations when multiple mobile devices are connected to your devices at the same time, as explained below. -
Page 24: Confirming System Status
Getting started with the HomeHawk! Confirming system status Confirming system status (overview) Your devices can provide information about system status in a variety of ways. – Displaying status notifications on your mobile device using your mobile device’s notifications features ( “Status notifications”, Page 24) –... -
Page 25: Device Led Indicators
Getting started with the HomeHawk! The selected mode was changed An error occurred The shelf camera’s or floor camera’s sound sensor was triggered The shelf camera’s or floor camera’s temperature sensor was triggered The shelf camera’s or floor camera’s privacy mode was enabled The shelf camera’s or floor camera’s privacy mode was disabled Device LED indicators Each device can provide information about its status by turning on its LED indicator. - Page 26 Getting started with the HomeHawk! IP address is not obtained, or Ethernet cable is not connected to the router *1 You can configure the access point so that its LED indicator does not light in most states. See “Status LED”, Page 99. *2 It may take some time for the access point to finish starting up.
- Page 27 Getting started with the HomeHawk! Blue Normal operation, connected to wireless router , privacy shutter is open White Normal operation, connected to wireless router , privacy shutter is closed Camera is searching for wireless router Green Initial setup required Initial setup is in progress with mobile device connected Initial setup is starting Motion detected , or camera is starting up...
-
Page 28: System Expansion
Getting started with the HomeHawk! *1 You can configure the camera so that its LED indicator does not light in most states. See “Status”, Page 70. *2 The signal level (strong, good, weak, out of range) is shown after pressing the SETUP button for 3 seconds. -
Page 29: Registering Devices
Getting started with the HomeHawk! Registering devices If you purchased devices that are not registered, you must register them before you can use them. Note: R To register a mobile device, use the procedure described in the following. – Floor cameras: “Registering other mobile devices to the floor camera”, Page 54 –... -
Page 30: Mobile Device Features
Note: R This feature requires third-party equipment and services. R Feature availability may vary depending on the availability of third-party services. Panasonic cannot be held responsible for the availability and functionality of third-party services. R Only English is supported for use with Amazon Alexa features. -
Page 31: Linking With Your Amazon Echo Show
– Create a Panasonic ID for logging in to the Panasonic server ( “Creating a Panasonic ID”, Page 31) – Log in to the Panasonic server and configure your Amazon Echo to link with your devices ( “Logging in to the Panasonic server and linking with your Amazon Echo Show”, Page 31) Note: R This feature requires third-party equipment and services. -
Page 32: Using Amazon Alexa To Control Devices
Getting started with the HomeHawk! Using Amazon Alexa to control devices Once you have enabled the “Panasonic HomeHawk” skill and linked your devices to your Amazon Echo Show, you can use Amazon Alexa to control your devices. Devices are controlled by talking to Amazon Alexa and using the voice commands specified in the enabled “Panasonic HomeHawk”... -
Page 33: Google Home Features
– Create a Panasonic ID for logging in to the Panasonic server ( “Creating a Panasonic ID”, Page 33) – Log in to the Panasonic server and configure your Google Home to link with your devices ( “Logging in to the Panasonic server and linking with your Google Home”, Page 33) Note: R This feature requires third-party equipment and services. -
Page 34: Using Google Home To Control Devices
Tap [Google Home]. Select the desired device. Tap [Unlink from Google Home] ® [OK], and follow the steps in “Logging in to the Panasonic server and linking with your Google Home”, Page 33 to log in using the new Panasonic ID. -
Page 35: System Settings And Maintenance
Getting started with the HomeHawk! Enabling/disabling the privacy mode (shelf cameras and floor cameras only) The privacy mode of cameras can be enabled and disabled. Enabling privacy mode voice command example: R OK Google, turn on privacy mode of <camera name>. Disabling privacy mode voice command example: R OK Google, turn off privacy mode of <camera name>. -
Page 36: Deregistering Devices
Getting started with the HomeHawk! ® [OK]. R All event logs for the selected device are deleted. Deregistering devices Deregistering mobile devices ® [Settings]. From the [HomeHawk] app home screen, tap Tap [Deregistration] ® [Mobile Device]. Select the desired device. R A list of mobile devices registered to the selected device is displayed. -
Page 37: Support Information
Getting started with the HomeHawk! Tap [Deregistration] ® [Camera(s)]. Select the device that you want to deregister. R A dialog is displayed asking whether you want to deregister the device. Tap [OK]. Note: R Refer to “Registering front door cameras and outdoor cameras”, Page 29 if you want to register your front door camera or outdoor camera again. -
Page 38: Viewing System Information
{{"https://panasonic.net/cns/pcc/support/homehawk"|tolink("https://panasonic.net/cns/pcc/support/ homehawk")}} At least three (3) years from delivery of this product, Panasonic Corporation will give to any third party who contacts us at the contact information provided below, for a charge of no more than the cost of physically distributing source code, a complete machine-readable copy of the corresponding source code and the copyright notices covered under the GPL and the LGPL. - Page 39 Getting started with the HomeHawk! COMPLIANCE WITH THE AVC STANDARD ("AVC VIDEO") AND/OR (ii) DECODE AVC VIDEO THAT WAS ENCODED BY A CONSUMER ENGAGED IN A PERSONAL AND NON-COMMERCIAL ACTIVITY AND/OR WAS OBTAINED FROM A VIDEO PROVIDER LICENSED TO PROVIDE AVC VIDEO. NO LICENSE IS GRANTED OR SHALL BE IMPLIED FOR ANY OTHER USE.
-
Page 40: Using A Shelf Camera And Floor Camera
Using a shelf camera and floor camera Shelf camera setup Shelf camera setup (overview) There are 3 basic steps you need to perform in order to connect to the camera from your mobile device. Download the app Download the [HomeHawk] app to your mobile device. See “Downloading the [HomeHawk] app (overview)”, Page 17. - Page 41 Using a shelf camera and floor camera Tap [SHELF Camera]. Tap [Add New Camera]. Follow the on-screen instructions, remove the rear cover from the camera, and then tap [Next]. Follow the on-screen instructions, plug in the camera, and then tap [Next]. R Wait about 1 minute for the camera to start up.
-
Page 42: Registering Other Mobile Devices To The Shelf Camera
Using a shelf camera and floor camera When prompted, create a login password for the camera, and then tap [Next]. When prompted, enter a name for the camera and mobile device, and then tap [OK]. R The camera name setting is used by your mobile device to identify the camera. This is useful when you have multiple cameras. - Page 43 Using a shelf camera and floor camera Start the [HomeHawk] app by tapping its icon (shown below). R The end-user license agreement is displayed the first time you start the app. R Confirm all of the displayed permission screens and agree as necessary. R Select your country or region if necessary, and then tap [Next].
-
Page 44: Shelf Camera Features
Using a shelf camera and floor camera Shelf camera features Shelf camera features (overview) You can use a shelf camera to monitor and record the sights and sounds of the area where the camera is located. Shelf cameras have built-in motion, sound, and temperature detection features. When the motion detection is triggered, camera images can be recorded, notifications can be sent to your mobile device, and beeps can be sounded from the camera. -
Page 45: Viewing The Live Camera Image Screen
Using a shelf camera and floor camera Displays the temperature of the area Turns sound on/off surrounding the camera ( “Turning the camera audio on and off”, Page 47) Shows the live camera image Takes snapshots ( “Taking snapshots”, Page 48) Starts/stops recording Enables talking with the camera ( “Recording camera images (manual... - Page 46 Using a shelf camera and floor camera To access the live camera image screen, tap the desired camera from the [HomeHawk] app home screen ( “Shelf camera and floor camera home screen”, Page 20), and then tap the displayed camera image.
- Page 47 Using a shelf camera and floor camera Enables talking with the camera Starts/stops recording ( “Talking to the camera”, Page 49) ( “Recording camera images (manual recording)”, Page 48) Takes snapshots Hides/displays the buttons on the bottom of ( “Taking snapshots”, Page 48) the screen Note: R Multiple mobile devices can view live images from the same camera at the same time ( “Accessing...
-
Page 48: Recording Camera Images (Manual Recording)
Using a shelf camera and floor camera Displaying images upside down To display images upside down while viewing live camera images, see “Displaying images upside down”, Page 48. Talking to the camera To use your mobile device’s microphone and the camera’s built-in speaker to talk to someone where the camera is installed, see “Talking to the camera”, Page 49. -
Page 49: Talking To The Camera
Using a shelf camera and floor camera Tap [Video]. Slide the [Upside Down] switch to the desired position. Talking to the camera You can use your mobile device’s microphone and the camera’s built-in speaker to talk to someone where the camera is installed. You can either tap and hold to talk or tap once to talk alternatively with the other party. -
Page 50: Erasing Recordings
Using a shelf camera and floor camera Note: R When connected away from home, is displayed on the playback screen. See “Connection mode when away from home”, Page 21 for more information. R Recorded images can also be played back from the camera image/recording list screen ( “Viewing the camera image/recording list screen”, Page 44). -
Page 51: Protecting Recordings
Using a shelf camera and floor camera Select the desired camera. to select a recording date. Select the desired recording. ® [OK] ® [OK]. Erasing multiple images ® [Recording List]. From the [HomeHawk] app home screen, tap Select the desired camera. to select a recording date. -
Page 52: Floor Camera Setup
Using a shelf camera and floor camera Floor camera setup Floor camera setup (overview) There are 3 basic steps you need to perform in order to connect to the camera from your mobile device. Download the app Download the [HomeHawk] app to your mobile device. See “Downloading the [HomeHawk] app (overview)”, Page 17. - Page 53 Using a shelf camera and floor camera Tap [FLOOR Camera]. Tap [Add New Camera]. Follow the on-screen instructions, plug in the camera, and then tap [Next]. R Wait about 1 minute for the camera to start up. Follow the on-screen instructions and confirm the LED color on your camera. –...
-
Page 54: Registering Other Mobile Devices To The Floor Camera
Using a shelf camera and floor camera When prompted, enter a name for the camera and mobile device, and then tap [OK]. R The camera name setting is used by your mobile device to identify the camera. This is useful when you have multiple cameras. -
Page 55: Floor Camera Features
Using a shelf camera and floor camera Start the [HomeHawk] app by tapping its icon (shown below). R The end-user license agreement is displayed the first time you start the app. R Confirm all of the displayed permission screens and agree as necessary. R Select your country or region if necessary, and then tap [Next]. -
Page 56: Floor Camera Features (Overview)
Using a shelf camera and floor camera Floor camera features (overview) You can use a floor camera to monitor and record the sights and sounds of the area where the camera is located. Floor cameras have built-in motion, sound, and temperature detection features. When the motion detection is triggered, camera images can be recorded, notifications can be sent to your mobile device, and beeps can be sounded from the camera. -
Page 57: Viewing The Live Camera Image Screen
Using a shelf camera and floor camera Turns sound on/off Adjusts the brightness for the light ( “Turning the camera audio on and off”, Slide to the bottom to turn off the light Page 59) Takes snapshots Starts/stops recording ( “Taking snapshots”, Page 60) ( “Recording camera images (manual recording)”, Page 60) Enables talking with the camera... - Page 58 Using a shelf camera and floor camera To access the live camera image screen, tap the desired camera from the [HomeHawk] app home screen ( “Shelf camera and floor camera home screen”, Page 20), and then tap the displayed camera image.
- Page 59 Using a shelf camera and floor camera Adjusts the brightness for the light Enables talking with the camera Slide to the bottom to turn off the light ( “Talking to the camera”, Page 61) Starts/stops recording Takes snapshots ( “Recording camera images (manual ( “Taking snapshots”, Page 60) recording)”, Page 60) Hides/displays the buttons on the bottom of...
-
Page 60: Recording Camera Images (Manual Recording)
Using a shelf camera and floor camera Taking snapshots To save snapshots (i.e., still images) while viewing live camera images, see “Taking snapshots”, Page 60. Talking to the camera To use your mobile device’s microphone and the camera’s built-in speaker to talk to someone where the camera is installed, see “Talking to the camera”, Page 61. -
Page 61: Talking To The Camera
Using a shelf camera and floor camera Talking to the camera You can use your mobile device’s microphone and the camera’s built-in speaker to talk to someone where the camera is installed. You can either tap and hold to talk or tap once to talk alternatively with the other party. -
Page 62: Erasing Recordings
Using a shelf camera and floor camera Note: R When connected away from home, is displayed on the playback screen. See “Connection mode when away from home”, Page 21 for more information. R Recorded images can also be played back from the camera image/recording list screen ( “Viewing the camera image/recording list screen”, Page 56). -
Page 63: Protecting Recordings
Using a shelf camera and floor camera Select the desired camera. to select a recording date. Select the desired recording. ® [OK] ® [OK]. Erasing multiple images ® [Recording List]. From the [HomeHawk] app home screen, tap Select the desired camera. to select a recording date. -
Page 64: Adjusting The Lighting
Using a shelf camera and floor camera Adjusting the lighting You can adjust the brightness of the camera’s light and configure the light to turn on automatically according to a schedule or when motion is detected, etc. ® [Settings]. From the [HomeHawk] app home screen, tap Tap [Camera Settings] and select the desired camera. -
Page 65: Mode Settings
Using a shelf camera and floor camera Mode settings Mode settings (overview) Modes allow the cameras to operate according to pre-determined settings. You can use modes to match where you are (at home, away from home, etc.) and what actions you want cameras to make (record images when motion is detected, etc.). -
Page 66: Checking The Selected Mode
Using a shelf camera and floor camera Settings for when motion is detected You can specify the settings for when motion is detected. Setting [Away] [Home] Recording Recording Duration [15 sec] – Camera Sound Push Notification Checking the selected mode The name of the selected mode is displayed next to the name of the camera in the home screen ( “Shelf camera and floor camera home screen”, Page 20). -
Page 67: Editing Modes
Using a shelf camera and floor camera Mode Name When creating a new mode, you can set the name used for the mode. This helps you to identify the mode from other modes used on your mobile device. – To enter a name: Tap the text field, enter the text, and then tap [OK]. When this mode is activated You can choose the actions that will take place when the mode is activated (either via a manual change or via geo-fencing). -
Page 68: Configuring Geo-Fencing
Using a shelf camera and floor camera Note: R In order to use Automatic Mode Switching with the geo-fencing feature, your mobile device must be able to communicate with your camera. Therefore, the mode may not switch automatically in the following situations. - Page 69 Using a shelf camera and floor camera Setting the mode for when you are at home (in radius) You can specify the mode that will be used when your mobile device is inside of the specified radius around the geo-fencing area (i.e., when you are at home). This mode will be activated when any one of the selected mobile devices ( “Selecting the mobile devices to use with geo-fencing”, Page 69) is in the radius.
-
Page 70: General Features
Using a shelf camera and floor camera General features Status Camera signal strength You can check the signal strength of the camera’s wireless connection. ® [Settings]. From the [HomeHawk] app home screen, tap Tap [Camera Settings] and select the desired camera. Tap [Signal Strength]. -
Page 71: Recording Settings
Using a shelf camera and floor camera Tap [Camera Settings] and select the desired camera. Tap [Sound] ® [Privacy Mode Change Sound Volume]. Adjust the volume as desired and then tap [OK]. Adjusting the microphone sensitivity You can adjust the sensitivity of the microphone. ®... -
Page 72: Using Night Vision
Using a shelf camera and floor camera – [SD Card]: Displays the currently used capacity and the maximum capacity of the SD card, the current number of recorded files, and the maximum number of files that can be recorded. R A maximum of 65,535 files can be recorded. If 65,535 files are recorded, additional files cannot be recorded even if there is free capacity in the SD card. -
Page 73: Detection Area
Using a shelf camera and floor camera R Lower frame rates mean images are refreshed less often and moving subjects may appear “choppy”, however, images displayed on your mobile device will be less delayed and sound may be more consistent when talking to the camera over a slow or congested network connection. Changing the brightness You can adjust the overall brightness of the camera image. -
Page 74: Detection Test
Using a shelf camera and floor camera – [Very Low]: The image sensor is only slightly sensitive to changes, i.e., a large change is required to trigger the sensor. When finished, tap [OK]. Detection test You can test which areas of the camera image can be detected while viewing live images from the camera. -
Page 75: Changing The Name Of Cameras
Using a shelf camera and floor camera Tap [Camera Settings] and select the desired camera. Tap [Detection] ® [Sound Sensitivity]. Select the desired setting, and then tap [OK]. – [High]: The microphone is very sensitive to sound, i.e., even a small sound will trigger the notification. -
Page 76: Resetting Camera Settings
Using a shelf camera and floor camera Resetting camera settings ® [Settings]. From the [HomeHawk] app home screen, tap Tap [Camera Settings] and select the desired camera. Tap [System] ® [Reset Camera Settings]. Select the desired setting. – [Reset All Settings]: Resets all camera settings, including network settings. –... -
Page 77: Country/Region Settings
Using a shelf camera and floor camera Country/region settings You can select the country and region where you use your devices. ® [Settings]. From the [HomeHawk] app home screen, tap Tap [Camera Settings] and select the desired device. Tap [System] ® [Country / Region]. Select the desired country/region and then tap [OK]. -
Page 78: Login Settings
Using a shelf camera and floor camera – [Privacy Mode Change]: Determines whether a notification is displayed when the privacy mode is changed. Login settings Configuring automatic login You can specify whether or not you must enter a login password in order to connect to your devices while away from home. -
Page 79: Home Wireless Network Ssid Features
Using a shelf camera and floor camera Important: R In order to use this feature, you must first configure your devices to use a static IP address ( “Changing IP settings”, Page 78). ® [Settings]. From the [HomeHawk] app home screen, tap Tap [Camera Settings] and select the desired device. -
Page 80: Camera Sd Cards
Using a shelf camera and floor camera Updating the wireless network SSID information ® [Settings]. From the [HomeHawk] app home screen, tap Tap [Camera Settings] and select the desired device. Tap [Home Wireless Network SSID]. Tap [Update] to update the information. Camera SD cards SD card capacity and total recording time The following recording times apply when images from one camera are recorded. -
Page 81: Using A Front Door Camera And Outdoor Camera
Using a front door camera and outdoor camera Front door camera and outdoor camera setup Front door camera and outdoor camera setup (overview) There are 4 basic steps you need to perform in order to access the access point and your cameras from your mobile device. -
Page 82: Registering Other Mobile Devices To The Access Point
Using a front door camera and outdoor camera Tap [FRONT DOOR Camera Kit ( + OUTDOOR Cameras )], wait for a while, and then follow the on-screen instructions. R If the access point’s LED indicator lights in green, tap the green lit icon, and then go to step 4. R If the access point’s LED indicator blinks in amber, tap the amber blinking icon, and then connect the Ethernet cable between the access point and router. - Page 83 Using a front door camera and outdoor camera Follow the on-screen instructions. Tap [FRONT DOOR Camera Kit ( + OUTDOOR Cameras )], wait for a while, and then follow the on-screen instructions. R If the access point’s LED indicator lights in green, tap the green lit icon, and then go to step 4. R If the access point’s LED indicator blinks in amber, tap the amber blinking icon, and then connect the Ethernet cable between the access point and router.
-
Page 84: Front Door Camera And Outdoor Camera Features
Using a front door camera and outdoor camera Front door camera and outdoor camera features Front door camera and outdoor camera features (overview) You can use front door cameras and outdoor cameras to monitor and record the sights and sounds of the area where the cameras are located. - Page 85 Using a front door camera and outdoor camera To access the camera image/recording list screen, tap the desired camera from the [HomeHawk] app home screen ( “Front door camera and outdoor camera home screen”, Page 21). Used to switch between available cameras Displays a recording list of all images of the selected camera ( “Playing back recordings”, Page 89)
-
Page 86: Viewing The Live Camera Image Screen
Using a front door camera and outdoor camera Viewing the live camera image screen The live camera image screen shows you live camera images and also allows you to operate the selected camera to zoom in, recording images, etc. To access the live camera image screen, tap the desired camera from the [HomeHawk] app home screen ( “Front door camera and outdoor camera home screen”, Page 21), and then tap the displayed camera image. - Page 87 Using a front door camera and outdoor camera Note: R Multiple mobile devices can view live images from the same camera at the same time ( “Accessing from multiple mobile devices”, Page 23). However, only one mobile device can use certain features at a time (talking to the camera, etc.).
-
Page 88: Recording Camera Images (Manual Recording)
Using a front door camera and outdoor camera Dual images with horizontal viewing Dual images can also be displayed when your mobile device is displaying camera images horizontally. You can move the sub-image by tapping and holding it and then selecting where it will be displayed. The sub-image can be displayed in the 4 corners of an image. -
Page 89: Playing Back Recordings
Using a front door camera and outdoor camera R Talk in turns with the other party. (While you are talking to the camera, you will not be able to hear audio from the camera’s microphone.) Note: R For information about adjusting the camera’s speaker volume, see “Adjusting the talk volume”, Page 95. -
Page 90: Erasing Recordings
Using a front door camera and outdoor camera Erasing recordings Erasing individual images ® [Recording List]. From the [HomeHawk] app home screen, tap Select the desired access point and camera. R Select [All Cameras] to see recorded images from all the cameras registered to the specified access point. -
Page 91: Mode Settings
Using a front door camera and outdoor camera Select the desired access point and camera. R Select [All Cameras] to see recorded images from all the cameras registered to the specified access point. to select a recording date. Tap [Edit] ® [Protect]. Select the desired recordings. -
Page 92: Checking The Selected Mode
Using a front door camera and outdoor camera Checking the selected mode The name of the selected mode is displayed next to the name of access points in the home screen ( “Front door camera and outdoor camera home screen”, Page 21). Accessing the mode screen The mode screen can be accessed by tapping the mode icon displayed next to the name of access points in the home screen ( “Front door camera and outdoor camera home screen”, Page 21). -
Page 93: Creating New Modes
Using a front door camera and outdoor camera [Silent Mode] [Protection Mode] Setting 2nd or later 2nd or later 1st camera 1st camera camera camera Camera Sound [Announcement [OFF] [OFF] [OFF] *1 Refer to “Sync”, Page 93 for more information. Creating new modes You can create new modes to operate your devices when an event occurs such as motion is detected. -
Page 94: Editing Modes
Using a front door camera and outdoor camera [Camera Sound] You can specify what sounds a camera will automatically make when motion is detected. This can be used to warn suspicious people approaching your house that they have been detected and that there are cameras that can record images of them. -
Page 95: Camera Signal Strength
Using a front door camera and outdoor camera medium needs charging R Battery charging status icons: charging Camera signal strength You can check the signal strength of each camera’s wireless connection to the access point. ® [Settings]. From the [HomeHawk] app home screen, tap Tap [Camera Settings] and select the desired camera. -
Page 96: Recording Settings
Using a front door camera and outdoor camera Tap [Camera Settings] and select the desired camera. Tap [Speaker Volume] ® [Motion detection volume]. Adjust the volume as desired and then tap [OK]. Recording settings Recording sound You can select whether audio is recorded when recording camera images. ®... -
Page 97: Detection Settings
Using a front door camera and outdoor camera Tap [Camera Settings] and select the desired camera. Tap [Video] ® [Resolution]. Select the desired setting and then tap [OK]. Changing the frame rate The frame rate determines the speed at which images from the camera are refreshed. ®... -
Page 98: Motion Sensitivity
Using a front door camera and outdoor camera Tap [Camera Settings] and select the desired camera. Tap [Detection] ® [Set Detection Area]. Tap the desired areas of the camera image. R Gray areas of the camera image indicate areas for which image detection is disabled. When finished, tap [OK]. -
Page 99: Front Door Camera And Outdoor Camera Settings
Using a front door camera and outdoor camera IR Sensor Shows which IR sensors of the camera detected motion. Video Motion A live image of the selected camera is displayed with detection areas colored to show their detection status. – Pink outlined areas: Areas where motion was detected. –... -
Page 100: Resetting Camera Settings
Using a front door camera and outdoor camera Tap [Camera Settings] and select the desired camera. Tap [System] ® [Firmware Update]. R The camera will connect to the Internet and check for a newer version of its firmware. Follow the on-screen instructions. Resetting camera settings ®... -
Page 101: Recording Settings
Using a front door camera and outdoor camera Tap [OK]. Status LED settings You can specify whether the device’s LED indicator lights or is disabled. ® [Settings]. From the [HomeHawk] app home screen, tap Tap [Access Point Settings] and select the desired access point. Tap [System]. -
Page 102: Time Adjustment
Using a front door camera and outdoor camera ® [Settings]. From the [HomeHawk] app home screen, tap Tap [Access Point Settings] and select the desired access point. Tap [System] ® [Bit Rate]. Select the desired setting. Note: R This setting is only available when Amazon Echo Show ( “Amazon Alexa features (overview)”, Page 30) or Google Home ( “Google Home features (overview)”, Page 33) settings are enabled. -
Page 103: Notification Settings
Using a front door camera and outdoor camera Tap [Access Point Settings] and select the desired access point. Tap [System] ® [Firmware Update]. R Your device will connect to the Internet and check for a newer version of its firmware. Follow the on-screen instructions. -
Page 104: Network Features
Using a front door camera and outdoor camera Network features Changing IP settings Typically these settings should not be changed. ® [Settings]. From the [HomeHawk] app home screen, tap Tap [Access Point Settings] and select the desired access point. Tap [Network] ® [IP Settings]. Select the desired IP address mode. -
Page 105: Home Wireless Network Ssid Features
Using a front door camera and outdoor camera Tap [Access Point Settings] and select the desired access point. Tap [Network] ® [Remote Access Mode]. Select the desired value and then tap [OK]. Home wireless network SSID features The app remembers the SSIDs of wireless routers that your mobile device uses at home to connect to your devices;... - Page 106 Using a front door camera and outdoor camera SD card formatting Before inserting an SD card into the access point, format the SD card using your computer and the SD formatting tool available from the web page listed below. {{"www.sdcard.org/downloads/formatter_4/"|tolink("http://www.sdcard.org/downloads/formatter_4/")}} Note: R All data stored on the SD card will be erased when it is formatted.
-
Page 107: Using An Hd Camera
{{"https://panasonic.net/cns/pcc/support/homehawk"|tolink("https://panasonic.net/cns/pcc/ support/homehawk")}} Using your device’s app store iPhone, iPad users Search for “Panasonic HomeHawk”. iPad users should search in the “iPhone only” category. Android device users Search for “Panasonic HomeHawk”. Compatible mobile devices Please check the latest information at the following supported page. -
Page 108: Setting Up The Hd Camera
Using an HD camera Setting up the HD camera Before you begin In this procedure, the camera will enter “temporary access point mode”. In this mode, you can use your mobile device’s wireless network feature to connect directly to the camera, and then use your mobile device to change the camera’s wireless settings so that the camera can connect to your wireless router. - Page 109 Using an HD camera When prompted, enter a name for your mobile device and then tap [OK]. R This setting allows you to change the name assigned to your device. It can help you identify your mobile device when performing certain operations, such as deregistering a mobile device. R A list of HD cameras registered to the app is displayed when initial setup is complete.
-
Page 110: Hd Camera Basics
Using an HD camera When prompted, enter the password required to connect to the camera. R This password was set during initial setup. When prompted, enter a name for your mobile device and then tap [OK]. R This setting allows you to change the name assigned to your device. It can help you identify your mobile device when performing certain operations, such as deregistering a mobile device. -
Page 111: Displaying The Options Menu
Using an HD camera Displaying the options menu The method used to display the options menu varies depending on your mobile device. Note that the options menu is not available on all screens. iPhone, iPad Android devices with a dedicated “menu” button Press your device’s menu button. -
Page 112: Hd Camera Main Features
Using an HD camera HD camera main features HD camera main features (overview) You can use HD cameras to monitor and record the sights and sounds of the surrounding area. Built-in motion detection features allow cameras to record images automatically or send a notification to your mobile device when motion is detected. - Page 113 Using an HD camera Important: R Some mobile devices may become hot when viewing HD camera images continuously for long periods of time. If your mobile device becomes too hot, stop viewing HD camera images and wait for the mobile device to cool down. Turning the camera audio on and off Slide the switch to the desired position while viewing live images from a single camera.
-
Page 114: Taking Snapshots
Using an HD camera Talking to the HD camera To use your mobile device’s microphone and the camera’s built-in speaker to talk to someone where the camera is installed, see “Talking to the HD camera”, Page 114. Taking snapshots You can save snapshots (i.e., still images) while viewing live camera images. Snapshots are saved in your mobile device’s default photo album app. -
Page 115: Recording Hd Camera Images (Manual Recording)
Using an HD camera The [Talk] feature is turned on. Your voice will be heard at the camera. View live images from the desired camera. Tap and hold [Talk]. When you are finished talking or you want to hear the other party, release [Talk]. Note: R To adjust the camera’s speaker volume, open the options menu (see “Displaying the options menu”, Page 111) and tap [Camera Speaker Volume]. -
Page 116: Playing Back Hd Camera Recordings
Using an HD camera The recording was recorded manually. Note: R If a recording was recorded with no audio, is displayed next to the recording in the recording list. To enable or disable audio recording when recording camera images, see “Recording sound”, Page 126. HD camera recording list options The following items are available in the options menu (see “Displaying the options menu”, Page 111) while viewing the recording list. -
Page 117: Erasing Hd Camera Recordings
Using an HD camera Erasing HD camera recordings View live images from the desired camera. Tap [Videos]. To erase recordings recorded on one specific date Select the desired recording date. To erase recordings recorded on multiple dates Continue to the next step. Open the options menu (see “Displaying the options menu”, Page 111). -
Page 118: Confirming Hd Camera Status
Using an HD camera How recordings are saved on the SD card R Recordings are saved on the camera’s SD card in folders based on the recording date, in the following path. \PRIVATE\PANA_GRP\PSN\HN_HDCAM R The file naming convention is: 1 + recording type + recording start time. –... -
Page 119: Hd Camera Led Indicator
Using an HD camera Status notifications for Android devices The app provides information about camera status by displaying status notifications, error messages, and the following icons in your mobile device’s status bar and notifications panel. If your mobile device is registered to multiple cameras, your mobile device can receive notifications from any camera. -
Page 120: Smart Recording Features
Using an HD camera Live images are being viewed or recorded, or camera is starting up Device malfunction *1 You can configure the camera so that its LED indicator does not light during normal operation or when motion is detected. See “Enabling and disabling the HD camera’s LED indicator”, Page 120. Enabling and disabling the HD camera’s LED indicator View live images from the desired camera. -
Page 121: Turning Smart Recording Scenarios On And Off
Using an HD camera Tap [Schedule]. Under [Timer], set each item. – [Start Time]: Determines when camera recording starts. – [Recording Duration]: Determines the length of the recording. The maximum setting is 15 minutes. Under [Repeat], set each item. – [Days]: Determines the days on which the scenario can record images. When finished, tap [OK]. -
Page 122: Editing Smart Recording Scenarios
Using an HD camera Turn the checkbox for the desired scenario on or off. Editing smart recording scenarios View live images from the desired camera. Open the options menu (see “Displaying the options menu”, Page 111). Tap [Smart Recording]. R A list of existing scenarios is displayed. Select the desired scenario. -
Page 123: Temperature Sensor
Using an HD camera Built-in motion sensor Built-in sound sensor Built-in temperature sensor Sensor history options The following items are available in the options menu (see “Displaying the options menu”, Page 111). – [Filter] Allows you to choose which sensors are displayed in the sensor history. –... -
Page 124: Motion Detection
Using an HD camera – [Low]: The microphone is only slightly sensitive to sound, i.e., a large sound is required to trigger the notification. Note: R The camera’s microphone will not detect sound while a mobile device user is talking to the camera ( “Talking to the HD camera”, Page 114). -
Page 125: Image Brightness
Using an HD camera View live images from the desired camera. Open the options menu (see “Displaying the options menu”, Page 111). Tap [Camera Speaker Volume]. Adjust the volume as desired and then tap [OK]. Image brightness You can adjust the overall brightness of the camera image. View live images from the desired camera. -
Page 126: Recording Overwrite
Using an HD camera Recording overwrite You can choose whether recorded camera images are erased automatically by new images when the camera’s SD card is full. View live images from the desired camera. Open the options menu (see “Displaying the options menu”, Page 111). Tap [Settings] ®... -
Page 127: Thumbnail Image
Using an HD camera R Disabling night vision mode will reduce the visibility of images at night. Thumbnail image You can capture a still image from the camera and use it as its thumbnail, i.e., a small preview image. The thumbnail is displayed in the camera list. View live images from the desired camera. -
Page 128: Hd Camera Settings
Using an HD camera however, if it is consistently low, confirm the network conditions (network traffic, camera and wireless router placement or obstacles, etc.) for possible causes. View live images from the desired camera. Open the options menu (see “Displaying the options menu”, Page 111). Tap [Settings] ®... -
Page 129: Login Password
Using an HD camera [Device Profiles] See “HD camera device profiles”, Page 130. [Notification Settings] You can select which types of status notifications are displayed, and which are not. – [Motion Detect] This setting determines whether a notification is displayed when the camera detects motion. –... -
Page 130: Hd Camera Device Profiles
Using an HD camera HD camera device profiles The camera’s device profile allows you to assign a name and location to the camera. These settings are especially convenient when you have multiple cameras. You can also change the camera’s date and time setting. -
Page 131: Updating The Hd Camera's Firmware
Using an HD camera [Port Forwarding] settings These settings are only required if you need to configure your wireless router’s port forwarding feature in order to connect to the camera while away from home. Important: R In order to use this feature, you must first configure the camera to use a static IP address ( “Changing IP settings”, Page 130). -
Page 132: Resetting The Hd Camera's Settings
Using an HD camera Open the options menu (see “Displaying the options menu”, Page 111). Tap [Firmware Update]. R The camera will connect to the Internet and check for a newer version of its firmware. Follow the on-screen instructions. Resetting the HD camera’s settings View live images from the desired camera. -
Page 133: System Expansion
Using an HD camera System expansion Registering other mobile devices to the HD camera To register a mobile device to the camera, use the procedure described in “Registering additional mobile devices to the camera”, Page 109. Adding another HD camera You can register your mobile device to multiple HD cameras and monitor each of them from your mobile device. - Page 134 Using an HD camera Note: R If you use this procedure to deregister the mobile device you are using to perform the procedure, and if there are no other cameras or access points that the app can connect to, the initial setup screen is displayed.
-
Page 135: Troubleshooting
If you experience any trouble while using this product, the following information will solve most problems. If the trouble persists, refer to the appropriate section in this chapter according to the trouble you are experiencing. For the latest troubleshooting information, visit {{"https://panasonic.net/cns/pcc/support/ homehawk"|tolink("https://panasonic.net/cns/pcc/support/homehawk")}}. Power Use these steps to make sure that all devices are receiving power. - Page 136 Troubleshooting Make sure your HD camera can connect to your wireless router. →Disconnect the HD camera’s AC adaptor, connect it again, and wait for the camera to start up. If the camera’s LED indicator remains blinking in white after a few minutes, the camera is not connected to your wireless router.
-
Page 137: Messages
Troubleshooting →Access points, shelf cameras, and floor cameras: “Time adjustment”, Page 102 →HD cameras: “HD camera device profiles”, Page 130 Information on Disposal in other Countries outside the European Union These symbols are only valid in the European Union. If you wish to discard these items, please contact your local authorities or dealer and ask for the correct method of disposal. -
Page 138: Connecting From Your Mobile Device
Troubleshooting Connecting from your mobile device Refer to the following after checking the general troubleshooting information described in “General information”, Page 135. The connection is slow or disconnects while away from home R There is too much traffic on your home network or on the mobile device’s network. →Wait for network traffic to decrease. -
Page 139: Notification Features
Troubleshooting SSIDs (i.e., wireless network names) for each band, and then make sure that your mobile device and HD camera are connecting via the same SSID. To change the SSID that your mobile device is using for wireless communication, change your mobile device’s wireless network settings. -
Page 140: Shelf Camera Features
Troubleshooting R Too many notifications were sent in a short amount of time. →If many notifications are sent in a short time, notifications may be received late. This is a characteristic your mobile device’s notifications service. Shelf camera features General issues Refer to the following after checking the general troubleshooting information described in “General information”, Page 135. -
Page 141: Initial Setup By Wps
Troubleshooting The Automatic Mode Switching feature does not work even though the geo-fencing feature is enabled. R Your mobile device may have failed to communicate with your camera. The mode may not switch automatically in the following situations. – your mobile device and/or your camera do not have good network conditions –... -
Page 142: Initial Setup By Basic Setup
Troubleshooting →Perform one of the following. – If you want to connect your mobile device to the wireless router which the camera is connected with: Reconnect your mobile device to the router whose WPS button was pressed, restart the [HomeHawk] app, and then follow the on-screen instructions. –... -
Page 143: Floor Camera Features
Troubleshooting If the situation still does not improve, refer to your wireless router’s manual for information on how to change the router channel of your wireless network. R The "Isolation" function on the wireless router is enabled. Sometimes when the "Isolation" function is enabled, the camera will not be able to communicate with your mobile device via your wireless router. - Page 144 Troubleshooting The light turns on at night by itself R The light will automatically turn on at night if [Color] is selected for the night vision mode and you view or record images with the camera. →Turn off night vision mode or set it to [Monochrome] ( “Using night vision”, Page 72). Note: R Turning off night vision mode will reduce the visibility of images at night.
-
Page 145: Initial Setup By Wps
Troubleshooting Note: R When inserting or replacing batteries, disconnect the AC adaptor from the wall outlet before inserting or replacing the batteries. Initial setup by WPS WPS is a function of wireless routers that is used to easily connect wireless devices to wireless routers. A WPS button on a wireless router indicates that it has the WPS function. -
Page 146: Initial Setup By Basic Setup
Troubleshooting →Follow the on-screen instructions, and press and hold the SETUP button on the camera until it beeps (about 5 seconds). The camera’s LED indicator is blinking quickly in green. The camera is searching for your wireless router. Check the following causes/solutions first and wait until the LED indicator is lit in blue. -
Page 147: Front Door Camera And Outdoor Camera Features
Troubleshooting Front door camera and outdoor camera features Refer to the following after checking the general troubleshooting information described in “General information”, Page 135. [Camera update failed] is displayed R An error occurred while updating the camera. →Fully charge the camera and try again. I fully charged the camera (the charging LED indicator is lit in red), but its operation time seems to be shorter than usual R The temperature of the location where the camera is being used is too low. -
Page 148: Hd Camera Sensor Features
Troubleshooting Camera images are not displayed at first while away from home, and are displayed after some time passes R Your mobile device’s network connection is slow or congested. →Wait for network traffic to decrease. →Lower the [Frame Rate] setting ( “Changing the frame rate”, Page 97). I have to wait a long time before camera images are displayed while away from home R There is too much traffic on your home network or on the mobile device’s network. -
Page 149: Amazon Alexa Features
Troubleshooting →Enable the desired notification type ( “[Notification Settings]”, Page 129). R The camera’s date and time setting is incorrect. →Adjust the date and time setting ( “HD camera device profiles”, Page 130). Sensor detections are not displayed in the sensor history R The desired feature is not enabled. - Page 150 Troubleshooting My Google Home device does not respond to my voice commands R You have not set up your Google Home device for use with the [HomeHawk] app. →Set up your Google Home device for use with the [HomeHawk] app ( “Linking with your Google Home”, Page 33).
-
Page 151: Warranty
If your product does not work properly because of a defect in materials or workmanship, Panasonic Corporation of North America (referred to as “the warrantor”) will, for the length of the period indicated on the chart below, which starts with the date of original purchase (“warranty period”), at its option either (a) repair your product with new or refurbished parts,... - Page 152 Service Center. If the problem is not handled to your satisfaction, then write to: Consumer Affairs Department Panasonic Corporation of North America 661 Independence Pkwy Chesapeake, VA 23320 PARTS AND SERVICE, WHICH ARE NOT COVERED BY THIS LIMITED WARRANTY, ARE YOUR RESPONSIBILITY.
-
Page 153: About This Document
About this document Compatible environments For best results when viewing this document, we recommend the following environments. When using a computer – Internet Explorer 9 or later – Firefox, latest version – Google Chrome, latest version – Safari 4.1 or later When using a mobile device –... - Page 154 Notes...
- Page 155 Notes...
- Page 156 PNQP1406VA/eng CC1803YK4039...