Sony FST-ZX8 Operating Instructions Manual
Sony operating instructions compact hi-fi stereo system fst-zx8, fst-zx6, lbt-zx8, lbt-zx6
Hide thumbs
Also See for FST-ZX8:
- Operating instructions manual (96 pages) ,
- Service manual (96 pages)
Table of Contents
Advertisement
4-253-172-15(1)
Compact
Hi-Fi Stereo
System
Operating Instructions
Owner's Record
The model and serial numbers are located on the rear of the unit. Record the serial
number in the space provided below. Refer to them whenever you call upon your
Sony dealer regarding this product.
Model No.
Serial No.
FST-ZX8
FST-ZX6
LBT-ZX8
LBT-ZX6
©2004 Sony Corporation
Advertisement
Table of Contents

Related Manuals for Sony FST-ZX8


Summary of Contents for Sony FST-ZX8
- Page 1 Owner’s Record The model and serial numbers are located on the rear of the unit. Record the serial number in the space provided below. Refer to them whenever you call upon your Sony dealer regarding this product. Model No. Serial No.
- Page 2 For customers in the United States ® is a U.S. NERGY registered mark. As an E NERGY ® partner, Sony Corporation has determined that this product ® meets the E NERGY guidelines for energy efficiency.
-
Page 3: Table Of Contents
... 22 Selecting the surround effect ... 23 Selecting the MP3 Booster effect ... 23 Creating a party environment ... 24 (FST-ZX8/LBT-ZX8 only) — X-ROUND — FLASH Listening to the sound in another room ... 25 —... - Page 4 Optional Components Hooking up optional components ... 33 Listening to audio from a connected component ... 34 Recording on a connected component ... 35 Connecting external antennas ... 35 Troubleshooting Problems and remedies ... 36 Messages ... 39 Additional Information Precautions...
-
Page 5: About This Manual
About this manual • The instructions in this manual are for models FST-ZX8, FST-ZX6, LBT-ZX8 and LBT- ZX6. In this manual, the FST-ZX8 is used for illustration purposes unless stated otherwise. • This manual mainly explains operations using the buttons on the system, but the same... -
Page 6: Notes On Discs
Discs that this system cannot play • A disc that has a non-standard shape (e.g., card, heart). • A disc that has the adhesive, cellophone tape, or a sticker still left on it. • Discs other than the following: – Audio CDs –... - Page 7 Note on DualDiscs This product is designed to play back discs that conform to the Compact Disc (CD) standard. A DualDisc is a two sided disc product which mates DVD recorded material on one side with digital audio material on the other side. Please be aware that the audio side of a DualDisc may not be played back on this product because these discs do not conform to the CD standard.
-
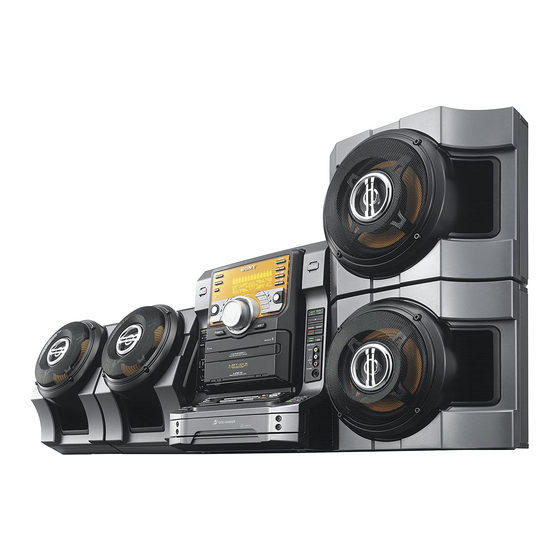
Page 8: Getting Started
Do the following procedures 1 to 5 to hook up your system using the supplied cords and accessories (page 43). Surround speaker* (Right) Front speaker (Right) * FST-ZX8/LBT-ZX8 only. 1 Connect the front speakers. (FST-ZX8/LBT-ZX8 only) Connect the speaker cords to the FRONT SPEAKER (SPEAKER A) terminals. AM loop antenna... - Page 9 Connect the speaker cords to the terminals on the speakers. Black (#) Black (#) 2 Connect the surround speakers. (FST-ZX8/LBT-ZX8 only) Connect the speaker cords to the SURROUND SPEAKER (SPEAKER B) terminals and to the terminals on the speakers as shown in the tip above.
-
Page 10: Positioning The Speakers
Attaching the speaker pads Attach the supplied speaker pads to the bottom of the speakers to stabilize the speakers and prevent them from slipping. FST-ZX8/LBT-ZX8 only FST-ZX6/LBT-ZX6 only Notice for carrying this system Do the following procedure to protect the disc mechanism. -
Page 11: Setting The Clock
Positioning the speakers for FST-ZX6/LBT-ZX6 only Place the front speakers at an angle of 45 degrees from your listening position. Main Unit Front Speaker Setting the clock Press ?/1 to turn on the system. Press CLOCK/TIMER SET. “CLOCK” appears in the display. Then, the hour indication flashes in the display. -
Page 12: Cd/Mp3
CD/MP3 Loading a disc Press Z OPEN/CLOSE. The disc tray slides out. Place a disc with the label side facing up on the disc tray. When you play a CD single, place it on the inner circle of the tray To load additional discs, press DISC SKIP to rotate the disc tray. -
Page 13: Other Operations
When the playback is stopped, press PLAY MODE repeatedly until the indication of the play mode you want appears in the display. Select To play ALL DISCS The tracks on all discs in the (Normal Play) disc tray continuously. 1 DISC The tracks on the disc you (Normal Play) have selected in original... -
Page 14: Playing Repeatedly
Notes • This system can playback MP3 audio tracks in the format of MPEG 1 Audio Layer 3, MPEG 2 Audio Layer 3 and MPEG 2.5 Audio Layer 3. • This system can playback Multi Session discs when an MP3 audio track is located in the first session. Any subsequent MP3 audio tracks, recorded in the later sessions, can also be played back. -
Page 15: Creating Your Own Program
Creating your own program — Program Play You can make a program of up to 25 steps from all the discs in the order you want to play them. You can synchro record the programmed tracks onto a tape (page 19). Press FUNCTION repeatedly until “CD”... -
Page 16: Tuner
Tuner Presetting radio stations You can preset up to 20 FM stations and 10 AM stations. You can then tune in any of those stations simply by selecting the corresponding preset number. Automatic tuning preset You can automatically tune in all of the stations that can be received in your area and then store the frequency of your favorite stations manually. -
Page 17: Listening To The Radio
To improve tuner reception When the tuner reception is poor, set the CD power manage function to “CD POWER OFF”. The default setting is “CD POWER ON”. Use buttons on the system for the operation. Press FUNCTION repeatedly until “CD” appears in the display. -
Page 18: Tape
Tape Loading a tape Press A Z or Z B. Load a tape in deck A or B. With the side you want to play/record facing forward. Playing a tape You can use TYPE I (normal) tape. Load a tape. Press FUNCTION (or TAPE on the remote) repeatedly until “TAPE A”... -
Page 19: Tape - Recording
Searching for the beginning of a track (AMS*) During playback, press .m or M> (or press –. or >+ on the remote) repeatedly for the number of songs you want to skip forward (or backward). The search direction, + (forward) or –... -
Page 20: Program Edit
Recording a disc by specifying track order — Program Edit You can record tracks from all the discs in the order you want. Between step 2 and step 3 of “CD Synchro Recording” (page 19), perform step 1 to 6 of “Creating your own program” (page 15). -
Page 21: Sound Adjustment
Note You cannot listen to other sources while recording. Tips • When you record on both sides, be sure to start from the front side. If you start from the reverse side, recording stops at the end of the reverse side. •... -
Page 22: Selecting The Preset Effect
Selecting the preset effect Press one of the Preset Effect buttons to select the preset effect you want. The preset effect name appears in the display. See the chart “Preset effect options.” Preset effect options “SURR” lights up in the display if you select an effect with surround effects. -
Page 23: Selecting The Surround Effect
Selecting the surround effect Press SURROUND. Each time you press the button, the display changes as follows: SURROUND ON SURROUND OFF Note When you select certain preset effect, the surround effect may be canceled. Selecting the MP3 Booster effect You can improve the sound quality of MP3 audio tracks during playback. -
Page 24: Creating A Party Environment
FLASH for flashing effect. To enjoy the X-ROUND mode, place your front and surround speakers at an equal distance from your listening position (see Example 2 of “Positioning the speakers for FST-ZX8/ LBT-ZX8 only” on page 10). Moving sound effect — X-ROUND Press X-ROUND ON/OFF repeatedly until the X-ROUND indicator lights up. -
Page 25: Listening To The Sound In Another Room
Listening to the sound in another room — Multi Room (FST-ZX8/LBT-ZX8 only) You can place your front speakers in one room and your surround speakers in another room. Then, use the Multi Room function to select the speakers you want to turn on. -
Page 26: Mixing Video Game Sound With Other Sound Source
Mixing video game sound with other sound source — Game Mixing You can mix the sound from the component connected to the GAME INPUT jacks with another function such as CD, tape, radio, VCR or turntable connected to this system. Select the source sound you want. -
Page 27: Timer
Timer Falling asleep to music — Sleep Timer You can set the system to turn off after a certain time, so that you can fall asleep to music. Press SLEEP repeatedly. Each time you press the button, the minute display (the turn-off time) changes cyclically as follows: AUTO* t 90 t 80 t 70 t …... -
Page 28: Timer Recording Radio Programs
Press ENTER. The type of timer, followed by start time, stop time and the music source appears in the display. Press ?/1 to turn off the system. Other operations Do this Check the setting Press CLOCK/TIMER SELECT. Press –. on the remote) repeatedly until “PLAY SELECT?”... -
Page 29: Display
Press DIRECTION repeatedly to select “g” to record on one side. Select “j” (or “RELAY”) to record on both sides. If you want to record on the reverse side, press h (TAPE B). Then, press x (TAPE B). When you record on both sides, be sure to start from the front side. -
Page 30: Viewing Information About The Disc
Viewing information about the disc in the display You can check the playing time and remaining time of the current track or current disc. When a CD-TEXT disc or a disc with MP3 audio tracks is loaded, you can check the information stored on the disc, such as the titles. -
Page 31: Changing The Power Illuminator
PATTERN 1 t PATTERN 2 t PATTERN 3 t PATTERN 4 t PATTERN OFF When X-ROUND mode is selected (FST-ZX8/LBT-ZX8 only) Each time you press the button, the power illuminator changes cyclically as follows: X-PATTERN* y PATTERN OFF The power illuminator will synchronize with the selected X-ROUND effect. -
Page 32: Adjusting The Brightness Of The Display
Adjusting the brightness of the display Press AMP MENU repeatedly to select “DIMMER”. The last selected dimmer appears in the display. Press < or , repeatedly to select the setting you want. The display changes as follows: DIMMER 1 DIMMER 3* * DIMMER 3 is the darkest. -
Page 33: Optional Components
Optional Components Hooking up optional components To enhance your system, you can connect optional components. Refer to the operating instructions provided with each component. Turntable From the audio output of the turntable From the video output of the video game player Video game player A GAME INPUT VIDEO jack Use video cable (not supplied) to connect the... -
Page 34: Listening To Audio From A Connected Component
C CD DIGITAL OUT jack Use a digital optical cable (square, not supplied) to connect the digital input of the optional MD deck to this jack. You can then record digital audio from this system. Note There is no digital audio output from this jack during playback of MP3 audio tracks. -
Page 35: Recording On A Connected Component
Recording on a connected component Do this Make a digital 1 Connect the optional optical recording from cable from CD DIGITAL OUT an audio CD onto jack to digital audio input of the a connected MD MD deck. deck See “Hooking up optional components”... -
Page 36: Troubleshooting
Find your problem in the troubleshooting checklist below and take the indicated corrective action. If the problem persists after doing all of the above, consult your nearest Sony dealer. When the ?/1 indicator flashes Immediately unplug the power cord and check the following items. - Page 37 TV set. CD/MP3 player The disc tray does not open and “LOCKED” appears on the display. • Contact your Sony dealer or local authorized Sony service facility. The disc tray does not close. • Place the disc correctly. • Always close the tray by pressing Z OPEN/ CLOSE on the system.
-
Page 38: Tape Deck
The disc title, album title, track title, ID3 tag and the CD-TEXT characters do not appear properly. • Use a disc that conforms with ISO 9660 level 1, level 2, or Joliet in the expansion format. • The ID3 tag is not version 1 or version 2. •... -
Page 39: Messages
Messages One of the following messages may appear or flash in the display during operation. CD/MP3 No Disc There is no disc on the disc tray. Cannot Edit • You pressed EDIT before the information of a disc is read. •... -
Page 40: Additional Information
• When you move the system, take out any disc. If you have any question or problem concerning your system, please consult your nearest Sony dealer. Notes on discs • Before playing, clean the disc with a cleaning cloth. -
Page 41: Specifications
RMS power, with no more than 10% total harmonic distortion from 250 miliwatts to rated output. Amplifier section FST-ZX8 Mexican models: The following measured at AC 127 V, 60 Hz DIN power output (rated): 140 2 + 140 2 watts... - Page 42 More than 90 dB 660 nm –18 dBm 4-track 2-channel, stereo 50 – 13,000 Hz (±3 dB), using Sony TYPE I tapes ±0.15% W. Peak (IEC) 0.1% W. RMS (NAB) ±0.2% W. Peak (DIN) 87.5 – 108.0 MHz FM lead antenna 75 ohms unbalanced 10.7 MHz...
- Page 43 Speaker Speaker SS-ZX8 for FST-ZX8/LBT-ZX8 Speaker system 2-way, bass-reflex type Speaker units Woofer: 22 cm, cone type Tweeter: 6.5 cm, cone type Rated impedance 6 ohms Dimensions (w/h/d) Approx. 290 × 353 × 482 mm Mass Approx. 9.5 kg net per...
-
Page 44: List Of Button Locations And Reference Pages
(13, 15, 21) TAPE A function: h/H (play) ef (18, 19, 29) x (stop) ef (18) .m/M> ef (18, 19) TAPE B function: h/H (play) qk (18, 19, 29) x (stop) qk (18, 19, 38) .m/M> qk (18, 19) * FST-ZX8/LBT-ZX8 only. - Page 45 23 456 7 89 q; qz qs "/1 * FST-ZX8/LBT-ZX8 only. wl wk rk rj PLAY MODE continued...
-
Page 46: Remote Control
Remote control ALPHABETICAL ORDER A – E ALBUM + qf (13) ALBUM – qh (13) CD wf CLEAR qk (15) CLOCK/TIMER SELECT 2 (28, 29) CLOCK/TIMER SET 4 (11, 27, DISC SKIP qd (12, 13, 15) DISPLAY wh (29, 30) ENTER qs (11, 27, 28, 29, 31, EQ qj F –... - Page 48 Sony Corporation Printed in Malaysia...