
Related Manuals for Jensen CD-565


Summary of Contents for Jensen CD-565
- Page 1 Portable Stereo Bluetooth Music System with CD USER MANUAL CD-565 PLEASE READ THIS USER MANUAL COMPLETELY BEFORE OPERATING THIS UNIT AND RETAIN THIS BOOKLET FOR FUTURE REFERENCE.
-
Page 2: Important Safety Instructions
WARNING TO PREVENT FIRE OF SHOCK HAZARD, DO NOT USE THIS PLUG WITH AN EXTENSION CORD, RECEPTACLE OR OTHER OUTLET UNLESS THE BLADES CAN BE FULLY INSERTED TO PREVENT BLADE EXPOSURE. TO PREVENT FIRE OR SHOCK HAZARD, DO NOT EXPOSE THIS APPLIANCE TO RAIN OR MOISTURE. The Caution Marking is located at the bottom enclosure of the apparatus. - Page 3 15. This appliance shall not be exposed to dripping or splashing water and that no object filled with liquids such as vases shall be placed on the apparatus. 16. Do not overload wall outlet. Use only power source as indicated. 17.
-
Page 4: Compliance With Fcc Regulations
COMPLIANCE WITH FCC REGULATIONS FCC ID: 2ASQA6961448 This device complies with Part 15 of the FCC Rules. Operation is subject to the following two conditions: (1) This device may not cause harmful interference, and (2) This device must accept any interference received, including interference that may cause undesired operation. -
Page 5: Protect Your Furniture
Do not put anything in the safety slot. If you do, the laser diode will be ON when the CD door is still open. If the unit is not to be used for a long period of time, make sure that all power sources are disconnected from the unit. -
Page 6: Dear Jensen® Customer
The serial number of this product is found on its bottom cover. You should note the serial number of this unit in the space provided as a permanent record of your purchase to aid in identification in the event of theft of loss. Model Number: CD-565 Serial Number:... -
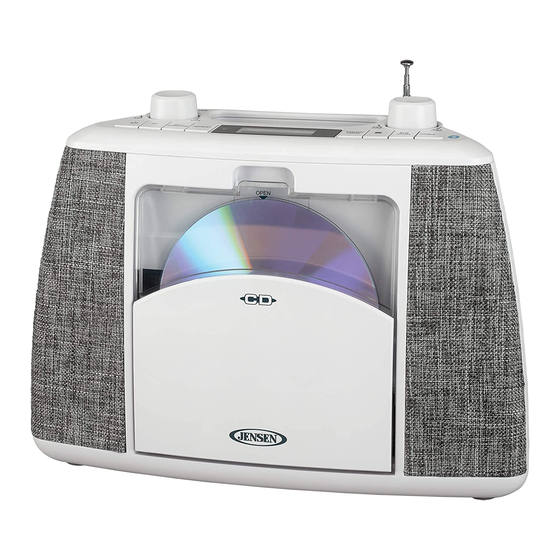
Page 7: Location Of Controls
LOCATION OF CONTROLS Top View VOLUME TUN+ 1ALL SOURCE FM ST. PROG/ REPEAT RANDOM /PAIR PROG RAND MH z 3 4 5 Front View Rear View DC 5V 1.2A AUX IN OPEN OPEN... -
Page 8: Power Source
VOLUME CONTROL 11 SOURCE BUTTON POWER BUTTON 12 TUNING CONTROL KNOB MEMORY- BUTTON 13 TELESCOPIC ANTENNA MEMORY+ / RANDOM PLAY BUTTON 14 CD DOOR OPEN REPEAT BUTTON 15 AUX IN JACK FM STEREO INDICATOR 16 HEADPHONE JACK LCD DISPLAY 17 BATTERY DOOR PROGRAM/MEMORY BUTTON 18 DC IN JACK STOP... -
Page 9: Battery Replacement
NOTE: To avoid losing any preset radio stations saved in memory, it’s important that you plug the AC Adaptor into a 120V AC wall outlet within 30 seconds from the time the DC plug is inserted into the CD-565. BATTERY NOTE AND CARE 1. - Page 10 TIPS FOR BEST RADIO RECEPTION If a stereo broadcast program is being received, the FM STEREO INDCATOR will automatically light. Always keep the FM TELESCOPIC ANTENNA fully extended for best performance. If the FM reception is weak, try rotating the antenna or reposition the unit closer to a window until the reception improves.
-
Page 11: Program Operation
To establish a new link, turn on the Bluetooth function of your Bluetooth enabled device and enable the search or scan feature to find “CD-565” in the list of discoverable Bluetooth devices. Select the “CD-565” from your available device list when it appears on its screen and a brief welcome melody will be heard if pairing and connection is successful. -
Page 12: Aux In Operation
CD-565 as your computer’s default sound device. RE-LINKING TO A SMARTPHONE OR BLUETOOTH ENABLED DEVICE Even if your smartphone or Bluetooth device is already paired with the CD-565 and with both Bluetooth functions turned on, they can become unlinked at some point due to intentional manual disconnection or undesirable external signal interferences or over-range for more than 3 seconds. -
Page 13: Care And Maintenance
2. Tap the SOURCE button repeatedly to select AUX mode. 3. AUX indicator and “AUH” will show on the LCD DISPLAY. 4. Turn on and start playing the external device you plugged into the AUX IN JACK. 5. Slowly adjust both the volume controls of your unit and the external device until you reach a comfortable listening level. -
Page 14: Troubleshooting Guide
TROUBLE SHOOTING GUIDE If you experience difficulties in the use of this unit, please check the following or call 1-800-777-5331 for Customer Service and support. Symptom Possible Cause Solution Noise or sound Station not tuned properly for FM. Fine tune the FM broadcast distorted on FM station. -
Page 15: Specification
SPECIFICATION Power requirement: AC adaptor for main unit AC input: 120V ~ 60Hz DC output: 5V 1000 mA Battery: 6 x "C"(UM-2) batteries (not included) Frequency Range Radio Band: FM 87.5 ~ 108 MHz At Spectra, environmental and social responsibility is a core value of our business. - Page 16 register receipt) so that we may establish your eligibility for warranty service and repair of the unit without cost. Also include a note with a description explaining how the unit is defective. A customer service representative may need to contact you regarding the status of your repair, so please include your name, address, phone number and email address to expedite the process.