
Related Manuals for Jensen Media PRO 5000


Summary of Contents for Jensen Media PRO 5000
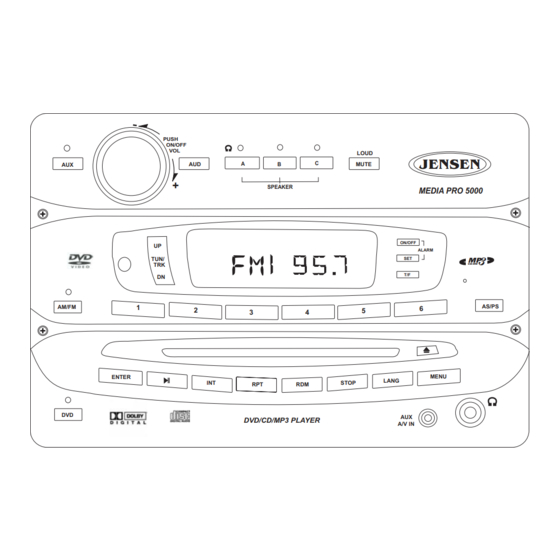
- Page 1 MP5000 Owner’s Manual PUSH ON/OFF TUN/ AM/FM ENTER SPEAKER DVD/CD/MP3 PLAYER LOUD JENSEN MUTE MEDIA PRO 5000 ON/OFF ALARM CD-RW MENU LANG STOP A/V IN AS/PS...
-
Page 2: Table Of Contents
Thank You! Thank you for choosing a Jensen product. We hope you will find the instructions in this owner’s manual clear and easy to follow. If you take a few minutes to look through it, you’ll learn how to use all the features of your new Jensen receiver for maximum enjoyment. -
Page 3: Installation
Installation Select Mounting Location Select a mounting location, taking care to avoid the following: • Places exposed to heat-radiating appliances such as electric heaters • Adjacent to other equipment that radiates heat • Poorly-ventilated or dusty places • Moist or humid locations Preparing the Opening Use the mounting hole diagram (below) to measure and cut a mounting hole, and mount the unit using the four 3x20min self-tapping screws provided. -
Page 4: Wiring
Wiring The wiring diagram depicts all the wiring connections required for proper operation of the unit. -
Page 5: Basic Operation
Optimal LCD operation will return to normal when the temperature increases to a normal range. AM/FM ENTER Basic Operation PUSH ON/OFF SPEAKER TUN/ DVD/CD/MP3 PLAYER LOUD JENSEN MUTE MEDIA PRO 5000 ON/OFF ALARM CD-RW AS/PS MENU LANG STOP A/V IN MP5000... -
Page 6: Audio Adjustment
4. Audio Adjustment Press AUD (4) momentarily to step through the following audio adjustment options: Volume, Bass, Treble, Balance (left to right) and Fader (front to back). When the desired option appears in the display, rotate the volume control knob (1) to adjust that audio feature. When no adjustments have been made for three seconds, the unit will resume normal operation. -
Page 7: Tuner Operation
Press and hold TUN/TRK UP or DN to automatically tune up or down to the next strong station. AM/FM ENTER Tuner Operation PUSH ON/OFF SPEAKER TUN/ DVD/CD/MP3 PLAYER LOUD JENSEN MUTE MEDIA PRO 5000 ON/OFF ALARM CD-RW AS/PS MENU LANG STOP A/V IN MP5000... - Page 8 12. Preset Stations Store Preset Stations Six numbered preset buttons (12) store and recall stations for each AM and FM band. To store a station, select a band (if needed), then select a station. Hold a preset button for three seconds. The current station will be stored, and the corresponding preset number will appear in the display.
-
Page 9: Cd Operation
SPEAKER ENTER DVD/CD/MP3 PLAYER JENSEN ON/OFF CD-RW MENU LANG STOP MP5000... -
Page 10: Dvd Operation
17. Intro Scan (INT) Press and hold INT(17) for more than three seconds during disc play to play the first 10 seconds of each track on the current disc. Press INT again to end the scan and play the selected track. 18. -
Page 11: Remote Control
DVD Operation (continued) The included remote control operations many functions of the unit, including DVD functions. The following buttons on the remote correspond with buttons on the front panel of the radio to control basic, tuner and CD functions in the same manner as described in those sections: Power (24) Menu (25) Mute (26) or Loud (hold for one second) -
Page 12: Numeric Buttons
39. Numeric Buttons To directly access a track, press the corresponding numeric button (1-9) (39). To access a track with a number of 10 or greater, press 10+, then the other numbers. For example, to access track 12, press 10+, then 1, then 2. -
Page 13: Dvd Setup
DVD Operation (continued) DVD Setup Press SETUP on the remote control to access setup mode, which allows setup of the following four DVD functions: • System Setup • Language Setup • Audio Setup • Video Setup While in the setup menus, use your directional arrows to select and change settings. The “up” and “down”... -
Page 14: Language Setup
Language Setup The language setup menu controls the following features: LANGUAGE SETUP OSD LANGUAGE AUDIO LANG SUBTITLE LANG MENU LANG EXIT SETUP On-Screen Display Language: Set the on-screen display language ON. Audio Language: Set the audio language to one of the following: English, German, Spanish, French, Portuguese or Italian. -
Page 15: Video Setup
DVD Operation (continued) Video Setup The video setup menu controls the following features: VIDEO SETUP BRIGHTNESS CONTRAST SATURATION SHARPNESS EXIT SETUP Brightness: Adjust the brightness of the screen from the following levels: 12, 10, 8, 6, 4, 2 or 0. Contrast: Adjust the contrast of the screen from the following levels: 6, 4, 2, 0, -2, -4 or -6. -
Page 16: Specifications
Specifications General Power Supply Requirements ......DC 12 Volts, Negative Ground Operating Voltage ..........11-16VDC Overall Dimensions.