
Related Manuals for Furuno BBWX4 SiriusXM


Summary of Contents for Furuno BBWX4 SiriusXM
- Page 1 Furuno BBWX4 SiriusXM Marine Weather & Audio Receiver Installation instructions English (en-US) Date: 3-2019 © 2019 Furuno USA & Sirius XM Radio Inc.
- Page 2 Sea Surface Temperature images that can help fishermen locate fishing hot spots. Hardware and the SiriusXM weather service subscription are sold separately. The Furuno BBWX4 SiriusXM Receiver also provides access to over 150* channels of SiriusXM satellite radio service which can be added at a discounted rate to the Marine subscription.
-
Page 3: Safety Notices
This product contains no user serviceable components. Please refer all maintenance and repair Caution: Power supply protection to authorized Furuno dealers. Unauthorized repair may affect your warranty. When installing this product ensure the power source is adequately protected by means of a suitably-rated... -
Page 4: General Information
Water Ingress For optimum EMC performance we recommend that Water ingress disclaimer: wherever possible: • Furuno equipment and cables connected to it Although the waterproof rating capacity of this are: product meets the IPX6 & IPX7 standard, water intrusion and subsequent equipment failure may... -
Page 5: Product Disposal
Requirement for ferrites on non-Furuno cables. If The equipment described within this document your Furuno equipment is to be connected to other is intended for use on leisure marine boats and equipment using a cable not supplied by Furuno, a... -
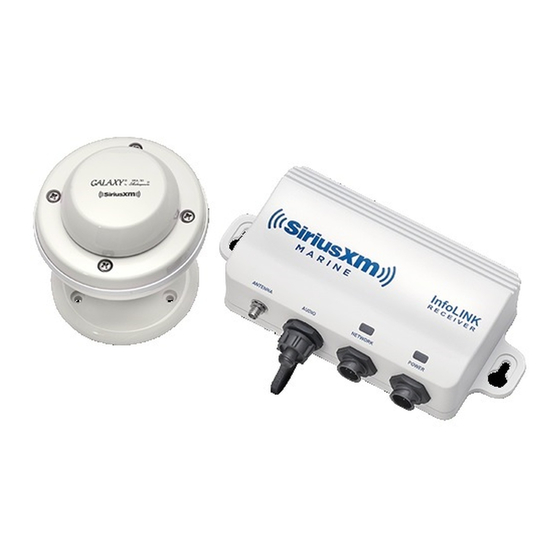
Page 6: Parts Supplied
R E C E I V E R M A R I N E ANTENNA AUDIO NETWORK POWER Furuno BBWX4 Stereo Audio Cable Furuno BBWX4 SiriusXM Receiver Furuno BBWX4 Power Cable SMA to SMB Adapter Mounting Screws (2) ® Shakespeare SRA-50 Antenna (Includes 25’... -
Page 7: Installation Overview
R E C E I V E R M A R I N E The BBWX4 Receiver can be ANTENNA AUDIO NETWORK POWER SMA to SMB connected directly to a Furuno ADAPTER Multifunction Display, or to an Ethernet Hub or Network Switch. Switched NETWORK SWITCH POWER Circuit... -
Page 8: Required Additional Components
Required for Component / Service SiriusXM Satellite Radio SiriusXM Marine Weather Sirius SRA-50 type-approved antenna Compatible Furuno multifunction display GPS receiver — provides position information for your vessel in the weather, chart and radar applications. Some multifunction displays have an internal GPS receiver. -
Page 9: Cable Identification
Cable Identification The following is the pin identification for the Network Cable provided with the BBWX4 Receiver. SiriusXM Receiver Furuno MFD SiriusXM Furuno Description Description Connector Connector Ethernet RX+ (White/Green) Ethernet TX+ Ethernet RX– (Green) Ethernet TX– Ethernet TX+(White/Orange) Ethernet RX+ Ethernet TX–... - Page 10 The following is the pin and wire identification for the Power Cable provided with the BBWX4 Receiver. Power Wire Description Description Connector Color Battery + (Switched) Battery + (Switched) Ground - Black Ground - RF Shield Ground White RF Shield Ground The following is the pin and connector identification for the Audio Cable provided with the BBWX4 Receiver.
- Page 11 BBWX4 Receiver Installation Connect the Power Cable The BBWX4 Receiver should be connected to a 12 or Select a mounting location for the BBWX4 Receiver 24 volt power source, negative ground. that is sheltered from the elements. While the Caution: Some vessels may have a positive ground receiver is water resistant, it should be mounted system.
- Page 12 • Each unit should have its own dedicated are connecting. If in doubt consult an authorized power cable wired back to the distribution Furuno dealer. panel. Connect the Power Cable to the POWER connection of the receiver. Total Length Supply...
-
Page 13: Connect The Network Cable
If you are not installing an audio connection, do not connectors. remove the water resistant cap that is installed on If your Furuno system does not utilize a Network the BBWX4 Receiver’s AUDIO connector. Switch, connect the RJ45 end of the cable to the The Audio Cable provides an RCA-style Left and Furuno MFD’s Ethernet port. -
Page 14: Antenna Installation
Antenna Installation Caution: When installing the antenna, do not cut or alter the antenna cable, or remove the cable connectors. Two considerations are necessary before installing the antenna. First, finding a suitable mounting location, and second determine how the antenna will be mounted. There are several in-box mounting options for the antenna, or accessories can be purchased from marine stores for additional mounting options. - Page 15 Choose a Mounting Option In-Box Mounting Options Surface Mount Antenna secured from the underside of the mounting surface. For mounting surfaces between 1/4” and 1” thick, use the supplied extension shaft. Route antenna cable through the mounting surface. Secure from below mounting surface using the mounting lock washer &...
- Page 16 Installing the Antenna Follow the instructions in the next sections for the mounting method you’ve selected. Do not cut the In-box antenna mounting options are surface mount, 6” antenna lead or remove the connectors from low-profile surface mount, or pedestal mount. any of the cables under any circumstances.
- Page 17 that was drilled. center hole for the antenna cable. When drilling fiberglass surfaces, use a small backup 4. Apply a small bead of marine sealant around block of scrap wood to control push-through the outer edge of the antenna base to insure a splintering.
- Page 18 5. Either pass the 6” antenna lead along with the connector through the center hole, or, lay the 6” antenna lead into the cable opening in the Antenna base gasket. Place the antenna, base, and base gasket on the mounting surface aligning it to Mounting Holes the marks made in step 3.
- Page 19 b. Align the base with the antenna, the base o-ring in place. gasket, and the pedestal top so that the 7. If you are not routing the 6” antenna lead openings for the 4 screws are aligned, and out through the side of the pedestal bottom, use the provided screws to screw them continue with step 9.
- Page 20 out through the side of the pedestal bottom, Rail Mount make sure the antenna lead can turn freely so The center hole in ratchet-type antenna mounts that it does not get twisted as you screw the will not accommodate the SRA-50’s connector. You antenna assembly onto the pedestal bottom.
-
Page 21: Verify Operation
5. Activation signals can be sent again at any time by visiting www.siriusxm.com/refresh (in USA) 1. Make sure the Furuno system is turned on. or www.siriusxm.ca/refresh (in Canada). Verify that you are receiving the SiriusXM signal by entering the SiriusXM menu in your MFD. -
Page 22: Troubleshooting
Troubleshooting The troubleshooting information in this section is for general reference. Consult the documentation that accompanied your Furuno system for specific operating instructions and advisory messages that may be displayed. LED Indicator Lights The BBWX4 Receiver has two LED indicator lights which show the current state of the receiver. - Page 23 Connect) Turn the MFD off, then on, to reset this message. If the message persists, most likely the antenna Furuno customer support cable has been damaged. Replace the antenna. For support, please obtain the following information Antenna Check the antenna connection to...
-
Page 24: Specifications
The user is cautioned that changes or modifications not expressly BBWX4 Receiver approved by Furuno Inc. or Sirius XM Radio Inc. can void the user’s authority to operate this device. This device complies with Part 15 of the Dimensions . . . . . . . . . . . . . . . . . . .7 in (W) x 3 . 1 in (H) x 1 .7 in (D) FCC Rules. -
Page 25: Environmental Information
Copyrights and Trademarks Furuno Legal Information Furuno and related marks are property of Furuno Inc. All Rights Reserved. Shakespeare Legal Information Shakespeare and related marks are property of Shakespeare Company, LLC. All Rights Reserved. SiriusXM Legal Information ©... - Page 26 You must ensure that all products are installed in adherence with local laws and regulations and in such a manner as to allow a vehicle to be operated safely and without distraction. Furuno nor SiriusXM product warranties do not cover the installation, removal, or reinstallation of any product.
-
Page 27: Limited Warranty Certificate
The warranty start date may not exceed eighteen (18) months from the original date of purchase by a dealer from Furuno U.S.A., Inc. and applies to new equipment installed and operated in accordance with Furuno U.S.A.’s published instructions. -
Page 28: How To Obtain Warranty Service
Internet: www.furunousa.com Furuno U.S.A., Inc. is proud to supply you with the highest quality in Marine Electronics. We know you had several choices when making your selection of equipment, and from everyone at Furuno, we thank you. Furuno takes great pride in customer satisfaction. - Page 29 Notes:...
- Page 30 Notes:...
- Page 31 Notes:...
- Page 32 Furuno USA Inc. 4400 NW Pacific Rim Blvd Camas, WA 98607 Tel: (+1) 360-834-9300 www.FurunoUSA.com www.furunousa.com...