Sony MEX-BT2500 Operating Instructions Manual
Bluetooth audio system
Hide thumbs
Also See for MEX-BT2500:
- Operating instructions manual (156 pages) ,
- Service manual (48 pages) ,
- Installation/connections (2 pages)
Table of Contents
Advertisement
Available languages
Available languages
Advertisement
Chapters
Table of Contents

Related Manuals for Sony MEX-BT2500


Summary of Contents for Sony MEX-BT2500
- Page 1 Bluetooth™ Audio System Operating Instructions Manual de instrucciones To cancel the demonstration (DEMO) display, see page 15. Para cancelar la pantalla de demostración (DEMO), consulte la página 16. MEX-BT2500 © 2007 Sony Corporation 3-100-199-32 (1)
- Page 2 Be sure to install this unit in the dashboard of the car for safety. For installation and connections, see the supplied installation/ connections manual. This label is located on the bottom of the chassis. Warning if your car’s ignition has no ACC position Be sure to set the Auto Off function (page 15).
-
Page 3: Table Of Contents
Table of Contents Welcome ! ......4 Getting Started Resetting the unit ......5 Preparing the card remote commander . -
Page 4: Welcome
IMPORTANT NOTICE! Safe and efficient use Changes or modifications to this unit not expressly approved by Sony may void the user’s authority to operate the equipment. Please check for exceptions, due to national requirement or limitations, in usage of Bluetooth equipment before using this product. -
Page 5: Getting Started
Radio frequency exposure RF signals may affect improperly installed or inadequately shielded electronic systems in cars, such as electronic fuel injection systems, electronic antiskid (antilock) braking systems, electronic speed control systems or air bag systems. For installation or service of this device, please consult with the manufacturer or its representative of your car. -
Page 6: Setting The Clock
Setting the clock The clock uses a 12-hour digital indication. Press and hold the select button. The setup display appears. Press the select button repeatedly until “CLOCK-ADJ” appears. Press (SEEK) +. The hour indication flashes. Rotate the select button to set the hour and minute. -
Page 7: Attaching The Front Panel
Attaching the front panel Engage part A of the front panel with part B of the unit, as illustrated, and push the left side into position until it clicks. Note Do not put anything on the inner surface of the front panel. -
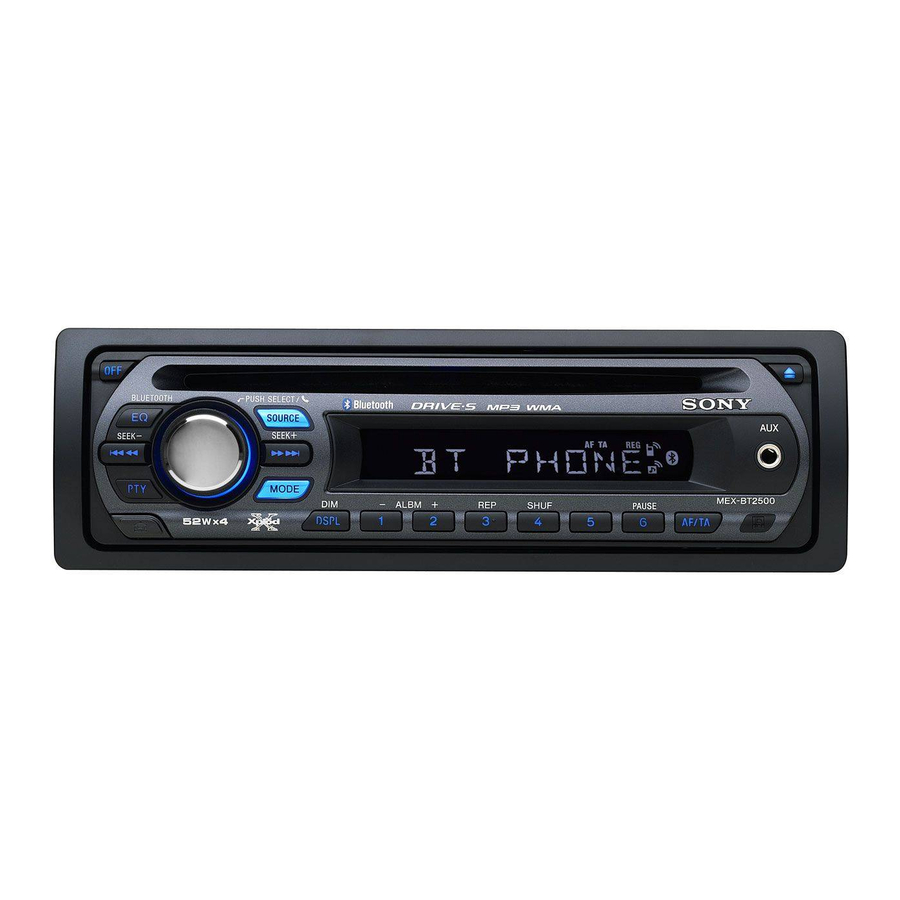
Page 8: Location Of Controls And Basic Operations
Location of controls and basic operations Main unit BLUETOOTH PUSH SELECT / SEEK qa qs RESET Card remote commander RM-X304 SOURCE – DSPL – SOURCE SEEK MODE ALBM SHUF DSPL Refer to the pages listed for details. The corresponding buttons on the card remote commander control the same functions as those on the unit. -
Page 9: Mode Button
E Disc slot To insert the disc (label side up). Playback starts automatically. F Display window G AUX input jack 16 To connect a portable audio device. H Z (eject) button To eject the disc. (front panel release) button 6 J BTM button 10 To start the BTM function (press and hold). -
Page 10: Display Items
Display items Track number/Elapsed playing time, Disc/ artist name, Album number* name, Track name, Text information* Clock *1 Album number is displayed only when the album is changed. *2 When playing an MP3, ID3 tag is displayed, and when playing a WMA, WMA tag is displayed. To change display items, press (DSPL);... -
Page 11: Tuning Automatically
Tuning automatically Select the band, then press (SEEK) –/+ to search for the station. Scanning stops when the unit receives a station. Repeat this procedure until the desired station is received. If you know the frequency of the station you want to listen to, press and hold (SEEK) –/+ to locate the approximate frequency, then press (SEEK) –/+ repeatedly to fine adjust to the desired frequency... -
Page 12: About Bluetooth Icons
Set the Bluetooth device to search for this unit. A list of detected devices appears in the display of the connecting device. This unit is displayed as “XPLOD” on the connecting device. DR-BT30Q XPLOD XXXXXXX If Passcode* input is required on the display of a connecting device, input “0000.”... -
Page 13: Connecting An Audio Device
Connecting the last-connected cellular phone from this unit 1 Be sure that both this unit and the cellular phone are switched to Bluetooth signal on. 2 Press (SOURCE) repeatedly until “BT PHONE” appears. 3 Press (handsfree). “ ” flashes while the connection is being made. -
Page 14: Music Streaming
Music streaming Listening to music from an audio device You can listen to music of an audio device on this unit if the audio device supports A2DP (Advanced Audio Distribution Profile) of Bluetooth technology. Turn down the volume on this unit. Press (SOURCE) repeatedly until “BT AUDIO”... -
Page 15: Other Functions
Other functions Changing the sound settings Adjusting the balance and fader — BAL/FAD Press the select button repeatedly until “BAL” or “FAD” appears. The item changes as follows: t HI* t BAL (left-right) t LOW* FAD (front-rear) t AUX* t BT AU* *1 When EQ lite is activated (page 15). -
Page 16: Using Optional Equipment
LOCAL (Local Seek Mode) – “LOCAL-ON” : to only tune into stations with stronger signals. – “LOCAL-OFF” ( ): to tune normal reception. MONO (Monaural Mode)* To improve poor FM reception, select monaural reception mode. – “MONO-ON” : to hear stereo broadcast in monaural. -
Page 17: Additional Information
Additional Information Precautions • If your car has been parked in direct sunlight, allow the unit to cool off before operating it. • Power antenna (aerial) will extend automatically while the unit is operating. Moisture condensation On a rainy day or in a very damp area, moisture condensation may occur inside the lenses and display of the unit. -
Page 18: About Bluetooth Function
• ID3 tag versions 1.0, 1.1, 2.2, 2.3 and 2.4 apply to MP3 only. ID3 tag is 15/30 characters (1.0 and 1.1), or 63/126 characters (2.2, 2.3 and 2.4). WMA tag is 63 characters. Playback order of MP3/WMA files MP3/WMA Notes •... -
Page 19: Maintenance
• If you experience discomfort after using the Bluetooth device, stop using the Bluetooth device immediately. Should any problem persist, consult your nearest Sony dealer. If you have any questions or problems concerning your unit that are not covered in this manual, consult your nearest Sony dealer. -
Page 20: Specifications
3 Pull out the release keys to remove the protection collar. Remove the unit. 1 Insert both release keys simultaneously until they click. 2 Pull the release keys to unseat the unit. 3 Slide the unit out of the mounting. Specifications CD Player section Signal-to-noise ratio: 95 dB... -
Page 21: Troubleshooting
Mass: Approx. 1.2 kg (2 lb 11 oz) Supplied accessory: Card remote commander: RM-X304 Parts for installation and connections (1 set) Your dealer may not handle some of the above listed accessories. Please ask the dealer for detailed information. MPEG Layer-3 audio coding technology and patents licensed from Fraunhofer IIS and Thomson. - Page 22 Radio reception The stations cannot be received. The sound is hampered by noises. • Connect a power antenna (aerial) control lead (blue) or accessory power supply lead (red) to the power supply lead of a car’s antenna (aerial) booster (only when your car has built-in FM/MW/SW antenna (aerial) in the rear/side glass).
-
Page 23: Error Displays/Messages
If these solutions do not help improve the situation, consult your nearest Sony dealer. If you take the unit to be repaired because of CD playback trouble, bring the disc that was used at the time the problem began. - Page 24 Support site If you have any questions or for the latest support information on this product, please visit the web site below: Customers in Latin America: http://esupport.sony.com/ES/LA/ Customers in Asia and Oceania: http://www.css.ap.com/caraudio/ http://www.sony-asia.com/caraudio/ http://www.sony.net/ Sony Corporation Printed in Thailand...
- Page 25 Asegúrese de instalar esta unidad en el tablero del automóvil por razones de seguridad. Para realizar la instalación y las conexiones, consulte el manual de conexiones y de instalación suministrado. Esta etiqueta está situada en la parte inferior del chasis. Advertencia: si el encendido del automóvil no dispone de una posición Asegúrese de ajustar la función de...
- Page 26 Tabla de contenido Bienvenido......4 Procedimientos iniciales Restauración de la unidad ....5 Preparación del control remoto de tarjeta .
-
Page 27: Bienvenido
AVISO IMPORTANTE Utilización segura y eficaz Los cambios o modificaciones que se realicen en esta unidad sin la aprobación de Sony pueden anular la autorización del usuario para utilizar el equipo. Revise las excepciones, debido a requisitos nacionales o limitaciones, en cuanto a la utilización de los equipos Bluetooth antes de utilizar el equipo. -
Page 28: Procedimientos Iniciales
Exposición a radiofrecuencia Las señales de radiofrecuencia pueden afectar a los sistemas electrónicos que no hayan sido instalados o protegidos correctamente en automóviles, como los sistemas electrónicos de inyección de combustible, sistemas electrónicos de frenado antideslizante (antibloqueo), sistemas electrónicos de control de velocidad o sistemas de bolsas de aire. -
Page 29: Ajuste Del Reloj
Ajuste del reloj El reloj emplea una indicación digital de 12 horas. Mantenga presionado el botón de selección. Aparecerá la pantalla de ajustes. Presione el botón de selección varias veces hasta que aparezca “CLOCK- ADJ”. Presione (SEEK) +. La indicación de la hora parpadea. Gire el botón de selección para ajustar la hora y los minutos. -
Page 30: Colocación Del Panel Frontal
Colocación del panel frontal Fije la parte A del panel frontal en la parte B de la unidad, tal como muestra la ilustración, y presione el lado izquierdo hasta que encaje. Nota No coloque ningún objeto sobre la superficie interior del panel frontal. -
Page 31: Ubicación De Los Controles Y Operaciones Básicas
Ubicación de los controles y operaciones básicas Unidad principal BLUETOOTH PUSH SELECT / SEEK qa qs RESET Control remoto de tarjeta RM-X304 SOURCE – DSPL – SOURCE SEEK MODE ALBM SHUF DSPL Consulte las páginas indicadas para obtener información detallada. Los botones correspondientes en el control remoto de tarjeta controlan las mismas funciones que los de la unidad. - Page 32 E Ranura del disco Para insertar el disco (con la etiqueta hacia arriba). La reproducción se inicia automáticamente. F Pantalla G Toma de entrada AUX 16 Para conectar un dispositivo de audio portátil. H Botón Z (expulsar) Para expulsar el disco. I Botón (extracción del panel frontal) 6 J Botón BTM 10...
-
Page 33: Elementos De La Pantalla
Elementos de la pantalla Número de pista/Tiempo de reproducción transcurrido, Nombre de disco/artista, Número de álbum* , Nombre del álbum, Nombre de la pista, Información de texto* Reloj *1 El número del álbum se muestra solamente cuando se cambia de álbum. *2 Si se reproduce un archivo MP3, se muestra el indicador ID3;... -
Page 34: Sintonización Automática
Sintonización automática Seleccione la banda y, a continuación, presione (SEEK) –/+ para buscar la emisora. La búsqueda se detiene cuando la unidad recibe una emisora. Repita este procedimiento hasta recibir la emisora deseada. Sugerencia Si conoce la frecuencia de la emisora que desea escuchar, mantenga presionado (SEEK) –/+ para localizar la frecuencia aproximada y, a continuación, presione (SEEK) –/+ varias veces para ajustar la... -
Page 35: Acerca De Los Iconos De Bluetooth
Mantenga presionado (EQ/BLUETOOTH) hasta que “ parpadee (aproximadamente 7 segundos). La unidad entrará en modo de espera de emparejamiento. Ajuste el dispositivo Bluetooth para que busque esta unidad. Aparecerá una lista con los dispositivos detectados en la pantalla del dispositivo de conexión. -
Page 36: Conexión A Un Dispositivo De Audio
Conexión al teléfono celular al que se conectó por última vez desde esta unidad 1 Asegúrese de que tanto esta unidad como el teléfono celular tienen la señal Bluetooth activada. 2 Presione (SOURCE) varias veces hasta que aparezca “BT PHONE”. 3 Presione (manos libres). -
Page 37: Transmisión Continua De Música
Transmisión continua de música Escuchar música desde un dispositivo de audio Esta unidad permite escuchar música de un dispositivo de audio si el dispositivo de audio es compatible con A2DP (Advanced Audio Distribution Profile) de la tecnología Bluetooth. Baje el volumen de esta unidad. Presione (SOURCE) varias veces hasta que aparezca “BT AUDIO”. -
Page 38: Otras Funciones
Otras funciones Cambio de los ajustes de sonido Ajuste del balance y el equilibrio — BAL/FAD Presione el botón de selección varias veces hasta que aparezca “BAL” o “FAD”. El elemento cambia de la manera siguiente: LOW* t HI* t BAL (izquierda-derecha) t FAD (frontal-posterior) t AUX* BT AU* *1 Si EQ lite está... -
Page 39: Uso De Un Equipo Opcional
B.OUT (Desactivar pantalla) Para desactivar la iluminación de una fuente automáticamente (por ejemplo, durante la reproducción de un CD/recepción de radio, etc.). – “B.OUT-ON”* : para desactivar la iluminación si no se efectúa ninguna operación durante 5 segundos. – “B.OUT-OFF” ( ): para desactivar la función de apagar la iluminación. -
Page 40: Información Complementaria
Información complementaria Precauciones • Si estaciona el automóvil bajo la luz directa del sol, deje que la unidad se enfríe antes de usarla. • La antena motorizada se extenderá automáticamente mientras la unidad se encuentra en funcionamiento. Condensación de humedad En días lluviosos o en zonas muy húmedas, es posible que se condense humedad en el interior de las lentes y la pantalla de la unidad. -
Page 41: Acerca De La Función Bluetooth
– archivos MP3/WMA (pistas) y carpetas contenidas en un disco: 300 (si un nombre de archivo o carpeta contiene muchos caracteres, este número puede ser inferior a 300). – caracteres que se pueden visualizar en el nombre de una carpeta/archivo: 32 (Joliet) o 64 (Romeo). •... -
Page 42: Mantenimiento
• Si no se siente cómodo después de utilizar el dispositivo Bluetooth, deje de utilizarlo inmediatamente. Si el problema persiste, consulte con el distribuidor Sony más cercano. Si desea realizar alguna consulta o solucionar algún problema relativo a la unidad que no se trate en este manual, póngase en contacto con el distribuidor... -
Page 43: Extracción De La Unidad
Limpieza de los conectores Es posible que la unidad no funcione correctamente si los conectores entre ésta y el panel frontal están sucios. Para evitar esta situación, extraiga el panel frontal (página 6) y limpie los conectores con un hisopo de algodón. No aplique demasiada fuerza, ya que podría dañar los conectores. -
Page 44: Solución De Problemas
Rango de sintonización: SW1: de 2 940 a 7 735 kHz SW2: de 9 500 a 18 135 kHz (excepto 10 140 – 11 575 kHz) Terminal de antena: conector de antena externa Frecuencia intermedia: 10,7 MHz/450 kHz Sensibilidad: 30 µV Comunicación inalámbrica Sistema de comunicación: Versión estándar Bluetooth 2.0... - Page 45 Las emisoras almacenadas y la hora correcta se borraron. El fusible se fundió. Se escucha ruido cuando se cambia la posición del encendido. Los cables no se conectaron de forma correcta al conector de alimentación auxiliar del automóvil. Las indicaciones desaparecen de la pantalla o no aparecen en ella.
-
Page 46: Mensajes/Indicaciones De Error
Función Bluetooth El dispositivo de conexión no puede detectar esta unidad. • Antes de finalizar el emparejamiento, ajuste la unidad en el modo de espera de emparejamiento. • Mientras está conectado a un dispositivo Bluetooth, esta unidad no puede detectarse desde otro dispositivo. - Page 47 Web: http://esupport.sony.com http://www.sony.com/xplod Si estas soluciones no ayudan a mejorar la situación, póngase en contacto con el distribuidor Sony más cercano. Si entrega la unidad para su reparación a causa de problemas en la reproducción de CD, lleve el disco que se utilizó...
- Page 49 请务必将本机安装在汽车的仪表板中以确 保安全。 有关安装和线路连接的注意事项, 请参阅附带的安装 / 线路连接说明书。 您的汽车引擎没有 ACC 位置时的警告 请务必设定自动关机功能 (第 12 页) 。 本机将在本机关闭后设定的时间内自动彻 底关机,这样可防止电池亏电。 若未设定自动关机功能, 每次熄火时请按住 (OFF) 直到显示消失为止。...
- Page 50 目录 鸣谢惠顾! ...4 入门指南 重设本机 ...5 准备卡片式遥控器 ...5 设定时钟 ...5 调整每个设备的音量电平 ...5 拆卸前面板 ...5 安装前面板 ...5 控制器位置和基本操作 主机 ...6 卡片式遥控器 RM- X304 ...6 显示项目 ...8 重复和随机播放 ...8 无线电 存储和接收电台 ...8 自动储存 — BTM ...8 手动储存 ...8 收听已储存的电台 ...8 自动调谐 ...8 Bluetooth 功能...
-
Page 51: 鸣谢惠顾
鸣谢惠顾! 感谢您惠购 Sony Bluetooth™ 音频系统。使 用以下功能,您可以享受驾驶的乐趣。 • CD 播放 您可播放 CD-DA (也包含 CD TEXT*) 、CD-R/ CD-RW (MP3/WMA 文件也包含 Multi Session (第 14 页) ) 。 光盘类型 光盘上的标签 CD-DA • 无线电接收 – 每个波段 (FM1、 FM2、 FM3、 MW、 SW1 和 SW2) 最多可以存储 6 个电台。... -
Page 52: 入门指南 重设本机
入门指南 重设本机 在第一次使用本机前,或更换汽车电瓶或改 变连接后,必须重设本机。 卸下前面板,并用带尖头的物体,如圆珠笔 等,按 RESET 按钮。 RESET 按钮 注意 按 RESET 按钮,将消除时钟设定和某些已储存的内容。 准备卡片式遥控器 首次使用卡片式遥控器之前,请取出绝缘胶 片。 设定时钟 时钟采用 12 小时制数字显示。 按住选择按钮。 将出现设定画面。 反复按选择按钮直至出现 “CLOCK-ADJ” 。 按 (SEEK) +。 小时指示闪烁。 转动选择按钮设定小时和分钟。 若要移动数字显示,请按 (DSPL)。 按选择按钮。 设定完成,时钟开始运行。 若要显示时钟, 请按 (DSPL)。 再次按 (DSPL) 将返回到上一个画面。... -
Page 53: 控制器位置和基本操作 主机
控制器位置和基本操作 主机 BLUETOOTH PUSH SELECT / SEEK qa qs RESET 卡片式遥控器 RM- X304 SOURCE – DSPL – SOURCE SEEK MODE ALBM SHUF DSPL 详细说明,请参阅列出页。卡片式遥控器上与 本机上对应的按钮控制相同的功能。 A OFF 按钮 关闭电源;停止音源。 B EQ (均衡)/BLUETOOTH 按钮 12 MODE CD/ 无线电 /Bluetooth 音频: 选择均衡类型 (XPLOD、NATURAL、HARD、 UPBEAT、VOCAL、CUSTOM 或... - Page 54 G AUX 输入插孔 13 连接便携式音频设备。 H Z (退出)按钮 弹出光盘。 (前面板释放)按钮 5 J BTM 按钮 8 启动 BTM 功能 (按住) 。 K SEEK -/+ 按钮 跳过曲目 (按);连续跳过曲目(按,约 1 秒钟内再按住);在曲目中后退 / 快进 (按住) 。 无线电: 自动调台 (按);手动调台 (按住) 。 Bluetooth 音频设备 * :...
-
Page 55: 显示项目
显示项目 曲目编号 / 已播放时间, 光盘 / 艺术 家名称,专辑编号 * ,专辑名称,曲 目名称,文本信息 * ,时钟 *1 仅当改变专辑时才显示专辑编号。 *2 播放 MP3 时, 显示 ID3 标记;播放 WMA 时, 显示 WMA 标 记。 若要更改显示项目,请按 (DSPL) ﹔若要滚动 显示项目, 则按 (SCRL) 或设定 “A.SCRL-ON” (第 12 页) 。 提示... -
Page 56: Bluetooth 功能 Bluetooth 操作
Bluetooth 功能 Bluetooth 操作 为了使用 Bluetooth 功能, 必须进行如下如下 操作。 1 配对: 当第一次连接 Bluetooth 设备时,需要进 行相互注册。此操作被称为 “配对”。仅 在第一次连接时需要注册 (配对),从下 次起本机和其他设备会自动相互识别。最 多可为 8 个设备配对。 (视设备而定, 可能 每次连接都需要输入密码。 ) 2 连接 有时通过配对可实现自动连接。为了在配 对后使用相应的设备,启动连接。 3 免提通话 / 音乐流 连接后可向手机打电话,也可听音乐。 配对 首先,将本机与 Bluetooth 设备(如手机等) 进行相互注册 ( “配对” )最多可为 8 个设备 配对。一旦建立起配对,就不需再进行配对。... -
Page 57: 若要将本机的 Bluetooth 信号输出切换为 开启
连接 若已经建立配对,请从这里开始操作。 若要将本机的 Bluetooth 信号输出切换 为开启 若要使用 Bluetooth 功能,请将本机的 Bluetooth 信号输出切换为开启。 当本机处于关闭状态时,按住并保持 (EQ/BLUETOOTH) 直到 “ 钟) 。 于是 Bluetooth 信号被切换为开启。 连接手机 请确认本机和手机都已将 Bluetooth 信号 切换为开启。 用您的手机连接到本机。 “ ” 将在建立连接后出现在显示画面上。 从本机连接上次连接的手机 1 请确认本机和手机都已将Bluetooth信号切 换为开启。 2 反复按 (SOURCE) 直至出现 “BT PHONE” 。 3 按... -
Page 58: 呼叫转移
呼叫转移 为了激活 / 关闭相应的设备 (本机 / 手机) , 请选择如下项目。 按住并保持 (免提)或使用手机。 关于手机操作的详情信息,请参考手机操作 手册。 注意 根据不同的手机,当试图进行呼叫转移时,免提连接可 能会被切断。 音乐流 从音频设备聆听音乐 如果音频设备支持 Bluetooth 技术的 A2DP (Advanced Audio Distribution Profile) , 您可在本机上聆听音频设备的音乐。 调低本机上的音量。 反复按 (SOURCE) 直至出现“BT AUDIO” 。 操作音频设备开始播放。 调节本机上的音量。 调整音量电平 根据本机与 Bluetooth 音频设备的差异, 可调 节音量电平。... -
Page 59: 其他功能 改变声音设置
其他功能 改变声音设置 调节平衡和衰减器 — BAL/FAD 反复按选择按钮直至出现 “BAL”或 “FAD” 。 项目将改变如下: LOW * t HI* t BAL (左 - 右) t FAD (前 - 后) t AUX* *1 当 EQ lite 激活时 (第 12 页) 。 *2 当 AUX 音源激活时 (第 13 页) 。 *3 当... -
Page 60: 使用选购设备
MONO (单声道模式) * 若要改善信号较差的 FM 接收,则选择单声道 接收模式。 –“MONO-ON” :以单声道收听立体声广播。 –“MONO-OFF” ( ) :以立体声收听立体声广 播。 LOUD (响度) 可以较低的音量听得很清晰。 –“LOUD-ON” :强调低音和高音。 –“LOUD-OFF” ( ) :不强调低音和高音。 BTM (第 8 页) BT INIT* (第 11 页) *1 本机关闭时。 *2 当自动熄灯功能处于开启状态时,本机无法用卡片 式遥控器操作。 *3 接收 FM 时。 使用选购设备... -
Page 61: 附加信息 使用前注意事项
附加信息 使用前注意事项 • 倘若您的汽车停在直射阳光下,则在操作前必 须先使本机充分冷却。 • 本机工作时,电动天线将自动伸出。 湿气凝结 在雨天或非常潮湿的地区,本机的透镜和显示屏 内会产生湿气凝结。一旦如此,本机将无法正常 运行。此时,请将光盘取出,并等待约一小时, 直至湿气蒸发。 为保持高质量声音 请随时注意,切勿将果汁或其他软饮料溅在本机 或光盘上。 光盘注意事项 • 为保持光盘清洁,切勿接触其表面。拿光盘时 请持其边缘。 • 不使用时请将光盘装入光盘盒或光盘匣。 • 切勿使光盘受到热源 / 高温的影响。避免将光 盘遗留在停放的车中或仪表盘 / 后托架上。 • 切勿贴标签,或使用带有黏性墨水 / 残留物的 光盘。这类光盘在使用时会停止转动,从而造 成故障或损坏光盘。 • 切勿使用任何贴有标签或贴纸的光盘。 使用此类光盘可能会引起如下故障: – 不能退出光盘 (由于标签或贴纸剥落并卡住 弹出设备)... -
Page 62: 关于 Bluetooth 功能
也有可能无法连接或正常工作。 – 当在免提设备上进行通话时,视设备或通信 环境而定,可能会出现噪音。 • 视所要连接的设备而定,可能需要片刻时间开 始通信。 其他 • 视无线电电波的情况和使用设备的场所而定, 在手提电话上可能无法使用 Bluetooth 设备。 • 如果在使用 Bluetooth 设备后您身体出现任何 不适,请立即停止使用 Bluetooth 设备。若症 状依旧,请与最近的 Sony 经销商联系。 如果您对设备有疑问或问题,而本说明书中未提 及,请向附近的 Sony 经销商咨询。 保养 更换卡片式遥控器的锂电池 一般情况下,电池能维持大约 1 年时间。 (使 用寿命可能会变短,这取决于电池的使用状 况。 ) 当电池的电力变弱时,卡片式遥控器的操控 范围将变短。 请更换一枚新的 CR2025锂电池。... -
Page 63: 取出本机
更换保险丝 更换保险丝时, 必须确保所使 用的保险丝与原保险丝的额 定安培数相同。 如果保险丝烧 断, 请检查电源连接并更换保 险丝。 如果保险丝更换后又被 烧断,则可能是内部故障。此 时,请向附近的 Sony 经销商 咨询。 清洁连接器 如果本机与前面板之间的连接器不干净,则本机 可能会运作不正常。为防止这种情况发生,请拆 卸前面板 (第 5 页) ,然后用棉签清洁连接器。 切勿施加太大的力量。否则,可能会损坏连接 器。 主机 注意 • 为了安全起见,在清洁连接器之前,应关闭引擎并从 点火开关上拔下钥匙。 • 千万不要用手指或任何金属工具直接接触连接器。 取出本机 拆卸保护环。 1 拆卸前面板 (第 5 页) 。... -
Page 64: 故障排除
调谐范围: SW1: 2940 – 7735 kHz SW2: 9500 – 18135 kHz (10140 – 11575 kHz 除外) 天线端子:外接天线连接器 中频:10.7 MHz/450 kHz 灵敏度:30 µV 无线通信 通信系统: Bluetooth 标准 2.0 版 输出: Bluetooth Standard Power Class 2 (Max. +4 dBm) 最大通信范围:视线范围内约 10 m* 频率波段:... - Page 65 CD 播放 无法装入光盘。 • 已装入另外的光盘。 • 光盘倒置,或以错误的方法被强行插入。 光盘不播放。 • 光盘有缺陷或脏了。 • CD-R/CD-RW 不作音频使用 (第 14 页) 。 无法播放 MP3/WMA 文件。 光盘与 MP3/WMA 格式以及版本不兼容(第 14 页) 。 MP3/WMA 文件的开始播放时间较其他文件长。 以下光盘要花费较长时间才能开始播放。 – 以复杂的树形结构录制的光盘。 – 以 Multi Session 录制的光盘。 – 能增加数据的光盘。 显示项目不滚动。 • 对于有许多字符的光盘,可能无法滚动显示。 •“A.SCRL”被设定为...
-
Page 66: 出错显示 / 信息
在 MP3/WMA 文件中未写入文本信息。 NO MUSIC 此光盘不是音乐文件。 t 请插入音乐光盘。 NO NAME 曲目中未写入专辑 / 曲目名称。 OFFSET 可能发生内部故障。 t 检查连接。如果此出错指示仍然显示在显示屏 中,请联系附近的 Sony 经销商。 READ 本机正在读取光盘上所有曲目和专辑的信息。 t 请等待至读取完成并自动开始播放。视光盘的 结构而定,可能要花一分多钟。 PUSH EJT 由于故障,CD 机无法正常工作。 t 按 Z (退出) (第 7 页) 。 “ ”或 “...