
Related Manuals for Lantronix PremierWave XN


Summary of Contents for Lantronix PremierWave XN
- Page 1 PremierWave Intelligent Gateway User Guide Part Number 900-606 Revision F October 2016...
-
Page 2: Intellectual Property
Intellectual Property © 2016 Lantronix, Inc. All rights reserved. No part of the contents of this publication may be transmitted or reproduced in any form or by any means without the written permission of Lantronix. Lantronix and PremierWave are registered trademarks of Lantronix, Inc. in the United States and other countries. -
Page 3: Disclaimer
Sales Offices For a current list of our domestic and international sales offices, go to the Lantronix web site at www.lantronix.com/about/contact. Disclaimer All information contained herein is provided “AS IS.” Lantronix undertakes no obligation to update the information in this publication. Lantronix does not make, and specifically disclaims,... -
Page 4: Table Of Contents
Hardware Address _____________________________________________________ 19 IP Address ___________________________________________________________ 19 Port Numbers _________________________________________________________ 19 Product Information Label ___________________________________________________ 19 3: Installation of the PremierWave XN Device Package Contents _________________________________________________________ 21 User-Supplied Items _______________________________________________________ 21 Hardware Components _____________________________________________________ 22 Front/Top Panel _______________________________________________________ 22... - Page 5 4: Device Discovery and Quick Setup Accessing the PremierWave XN Device Using UPnP _____________________________ 30 Accessing the PremierWave XN Device Using DeviceInstaller ______________________ 31 Device Detail Summary _____________________________________________________ 31 5: Configuration Using Web Manager Accessing Web Manager ___________________________________________________ 33 Device Status Page ________________________________________________________ 34...
- Page 6 To Configure WLAN Profile WPA and WPA/IEEE802.11i Settings ________________ 59 WLAN Quick Connect ______________________________________________________ 60 To Configure WLAN Quick Connect ________________________________________ 60 Gateway ________________________________________________________________ 61 Status _______________________________________________________________ 61 WAN ________________________________________________________________ 61 WAN MAC Address Filters _______________________________________________62 To Configure Gateway WAN Settings ______________________________________ 62 Port Forwarding _______________________________________________________ 62 To Configure Gateway Port Forwarding Settings ______________________________ 63 Static Routes _________________________________________________________ 63...
- Page 7 To Configure Tunnel Serial Settings ________________________________________ 80 Packing Mode _________________________________________________________ 81 To Configure Tunnel Packing Mode Settings _________________________________ 81 Accept Mode __________________________________________________________ 82 To Configure Tunnel Accept Mode Settings __________________________________ 84 Connect Mode ________________________________________________________ 84 Connecting Multiple Hosts _______________________________________________87 Host List Promotion ____________________________________________________ 87 Disconnect Mode ______________________________________________________ 87 To Configure Tunnel Disconnect Mode Settings ______________________________ 88 Modem Emulation ______________________________________________________ 88...
- Page 8 Traceroute ___________________________________________________________ 98 To Perform a Traceroute ________________________________________________ 99 Log _________________________________________________________________ 99 To Configure the Diagnostic Log Output ____________________________________ 99 Memory _____________________________________________________________ 100 To View Memory Usage ________________________________________________ 100 Processes ___________________________________________________________ 100 To View Process Information ____________________________________________ 100 Threads ____________________________________________________________ 100 To View Thread Information _____________________________________________ 100 Clock __________________________________________________________________ 101 To Specify Clock Setting Method _________________________________________ 101...
- Page 9 Trusted Authorities _______________________________________________________ 113 Obtaining Certificates _____________________________________________________ 113 Self-Signed Certificates ____________________________________________________ 113 Certificate Formats _______________________________________________________ 113 OpenSSL _______________________________________________________________ 114 Steel Belted RADIUS _____________________________________________________ 114 Free RADIUS ___________________________________________________________ 114 SSH Settings ____________________________________________________________ 115 SSH Server Host Keys _________________________________________________ 115 SSH Client Known Hosts _______________________________________________ 116 SSH Server Authorized Users ___________________________________________ 116 SSH Client Users _____________________________________________________ 117 To Configure SSH Settings _____________________________________________ 118...
- Page 10 To Configure SMTP Settings ____________________________________________ 134 Email Settings ___________________________________________________________ 134 To View, Configure and Send Email _______________________________________ 135 17: Branding the PremierWave XN Device Web Manager Customization _______________________________________________ 136 Short and Long Name Customization _________________________________________ 137 To Customize Short or Long Names ______________________________________ 137...
-
Page 11: List Of Figures
Figure 3-5 PremierWave XN Male DB9 DTE Serial Ports _________________________________ 24 Figure 3-6 PremierWave XN Pinout Configuration for RS-232 ______________________________ 24 Figure 3-7 PremierWave XN Pinout Configuration for Full Duplex RS-422/485 (4-wire) __________ 24 Figure 3-8 PremierWave XN Pinout Configuration for Half Duplex RS-422/485 (2-wire) __________ 24... -
Page 12: List Of Tables
List of Tables Table 3-2 PremierWave XN LEDs and Descriptions_____________________________________ 22 Table 3-3 Fault Conditions Indicated by Blink Patterns __________________________________ 23 Table 3-4 WPS Status Indicator ____________________________________________________ 23 Table 3-9 Left Ethernet LED _______________________________________________________ 25 Table 3-10 Right Ethernet LED _____________________________________________________ 25 Table 3-11 WLAN Signal Strength Indicator at 2.4 GHz __________________________________ 25... - Page 13 Table 6-27 Routing Protocol Settings ________________________________________________ 65 Table 6-28 Virtual IP Settings ______________________________________________________ 66 Table 6-29 DDNS Configuration ____________________________________________________ 67 Table 6-30 VPN Configuration _____________________________________________________ 67 Table 6-31 GRE Settings _________________________________________________________ 70 Table 7-1 Action Settings _________________________________________________________ 71 Table 7-2 Script Settings__________________________________________________________ 74 Table 8-1 Line Configuration Settings________________________________________________ 77 Table 8-2 Line Command Mode Settings _____________________________________________ 78 Table 8-3 Tunnel Serial Settings____________________________________________________ 80...
- Page 14 Table 13-3 SSH Server Authorized Users ___________________________________________ 116 Table 13-4 SSH Client Users _____________________________________________________ 117 Table 13-5 Certificate and Key Generation Settings____________________________________ 118 Table 13-6 Upload Certificate Settings ______________________________________________ 120 Table 13-7 Trusted Authority Settings_______________________________________________ 121 Table 14-1 Byte Header of Modbus Application Protocol ________________________________ 122 Table 14-2 Modbus Transmission Modes ____________________________________________ 122 Table 14-3 Modbus Configuration__________________________________________________ 123 Table 16-1 DNS Settings ________________________________________________________ 127...
-
Page 15: 1: Using This Guide
Using This Guide Purpose and Audience This guide provides the information needed to configure, use, and update the Lantronix PremierWave® XN intelligent gateway and application server. It is intended for software developers and system integrators who are installing this product into their designs. -
Page 16: Additional Documentation
Detailed information about the commands. Also provides details for XML configuration and status. PremierWave XN Intelligent Instructions for getting the PremierWave XN device up and running. Gateway Quick Start DeviceInstaller™ Utility Online Instructions for using the Windows operating system-based utility to Help locate the intelligent gateway and to view its current settings. -
Page 17: 2: Introduction
Controller: 32-bit ARM9 microprocessor running at 400 megahertz (Mhz) with 32 Kilobyte (KB) Configurable Cache and 32 Kilobytes (KB) internally based around the PremierWave XN intelligent gateway. Memory: 64 MB SDRAM, 256 MB Flash, and 8 MB serial SPI Flash. -
Page 18: Protocol Support
Configuration Methods After installation, the PremierWave XN unit requires configuration. For the unit to operate correctly on a network, it must have a unique IP address on the network. There are four basic methods for logging into the PremierWave XN intelligent gateway and assigning IP addresses and other... -
Page 19: Addresses And Port Numbers
The hardware address is also referred to as the Ethernet address, physical address, or MAC address. The first three bytes of the Ethernet address are fixed and identify the unit as a Lantronix product. The fourth, fifth, and sixth bytes are unique numbers assigned to each unit. Sample hardware address: ... -
Page 20: Figure 2-1 Premierwave Xn Unit Product Label
2: Introduction Figure 2-1 PremierWave XN Unit Product Label Bar Code Serial Number Part Number Revision Country of Origin Manufacturing & Manufacture Date Code PremierWave® XN Intelligent Gateway User Guide... -
Page 21: 3: Installation Of The Premierwave Xn Device
Installation of the PremierWave XN Device This chapter describes how to install the PremierWave XN intelligent gateway. It contains the following sections: Package Contents User-Supplied Items Hardware Components Wi-Fi Protected Setup (WPS) Installing the PremierWave XN Device ... -
Page 22: Hardware Components
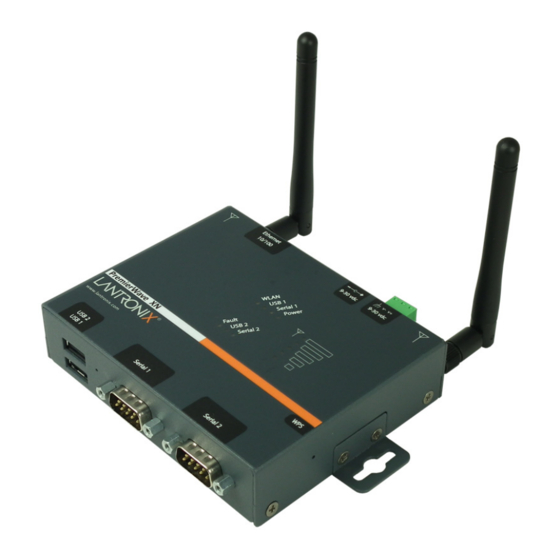
3: Installation of the PremierWave XN Device Hardware Components Front/Top Panel Figure 3-1 shows the top panel view of the PremierWave XN unit. Table 3-11, Table 3-12, Table 3-2, Table 3-3, Table 3-4 Table 3-13 list and explain the behavior of the LEDs on the top panel. -
Page 23: Table 3-3 Fault Conditions Indicated By Blink Patterns
3: Installation of the PremierWave XN Device LED (continued) Description Signal Strength Indicates WLAN signal strength when connection is established During WPS negotiation and connection establishment, it reports status of WPS transaction. When indicating the WLAN signal strength, see Table 3-12 for signal strength ... -
Page 24: Figure 3-5 Premierwave Xn Male Db9 Dte Serial Ports
Serial 2 Ports Button Figure 3-6 PremierWave XN Pinout Configuration for RS-232 Figure 3-7 PremierWave XN Pinout Configuration for Full Duplex RS-422/485 (4-wire) Figure 3-8 PremierWave XN Pinout Configuration for Half Duplex RS-422/485 (2-wire) PremierWave® XN Intelligent Gateway User Guide... -
Page 25: Table 3-9 Left Ethernet Led
3: Installation of the PremierWave XN Device Ethernet LEDs The Ethernet port (see Figure 3-14) has two LEDs that indicate the status of the connection as described in the Table 3-9 Table 3-10 below: Table 3-9 Left Ethernet LED Color/Status... -
Page 26: Back Panel
Reset Button You can reset the PremierWave XN intelligent gateway to factory defaults, including clearing the network settings. The IP address, gateway, and netmask are set to 00s. To reset the unit to factory defaults, perform the following steps. -
Page 27: Wi-Fi Protected Setup (Wps)
3: Installation of the PremierWave XN Device Wi-Fi Protected Setup (WPS) Using WPS, you have the option of connecting to PremierWave XN devices with a router or access point in a single operation instead of manually creating a profile with a network name (SSID), setting up wireless security parameters and updating the choice list. -
Page 28: Installing The Premierwave Xn Device
Connect your RJ-45 Ethernet cable to the RJ-45 port of the unit. The PremierWave XN device supports a power range of 9 to 30 VDC. You can power up the device with barrel-power connector and/or the 3-pin terminal connector for backup power supply. -
Page 29: Figure 3-16 Premierwave Xn Unit Dimensions In Inches (In) And Centimeters (Cm)
3: Installation of the PremierWave XN Device Figure 3-16 PremierWave XN Unit Dimensions in Inches (in) and Centimeters (cm) PremierWave® XN Intelligent Gateway User Guide... -
Page 30: 4: Device Discovery And Quick Setup
Accessing the PremierWave XN Device Using DeviceInstaller Accessing the PremierWave XN Device Using UPnP This section covers the steps for locating a PremierWave XN unit and viewing its properties and device details using UPnP (Network Discovery). You may also use the DeviceInstaller utility to discover PremierWave XN units. -
Page 31: Accessing The Premierwave Xn Device Using Deviceinstaller
4: Device Discovery and Quick Setup Accessing the PremierWave XN Device Using DeviceInstaller This section covers the steps for locating a PremierWave XN unit and viewing its properties and device details. The DeviceInstaller application is a free utility program provided by Lantronix that discovers, configures, upgrades and manages Lantronix device servers. - Page 32 Interfaces Shows information about the Ethernet (eth0) and wireless (wlan0) interfaces for your PremierWave XN unit. Click the + sign beside eth0 or wlan0, and then the Status and Configuration subcategories to view status and configuration information on these interfaces.
-
Page 33: 5: Configuration Using Web Manager
1. Open a standard web browser. Lantronix supports the latest versions of Internet Explorer, Mozilla Firefox, Safari, Opera or Chrome web browsers. 2. Enter the IP address or hostname of the PremierWave XN unit in the address bar. The IP address may have been assigned manually using DeviceInstaller (see the PremierWave XN Intelligent Gateway Quick Start Guide) or automatically by DHCP. -
Page 34: Device Status Page
5: Configuration Using Web Manager Device Status Page The page is the first to appear after you log into Web Manager. The Device Status page also appears when you click Status in the menu bar in Web Manager. Figure 5-1 Device Status Page Note: The Logout button is available on... -
Page 35: Web Manager Components
5: Configuration Using Web Manager Web Manager Components The layout of a typical Web Manager page is below. Figure 5-2 Components of the Web Manager Page Links to Items to subpages configure Header Menu Bar Footer Information Configuration and/or Status Area and Help Area Web Manager pages have these sections: The menu bar always appears at the left side of the page, regardless of the page shown. -
Page 36: Navigating Web Manager
Note: There may be times when you must reboot the PremierWave XN device for the new configuration settings to take effect. The chapters that follow indicate when a change requires a reboot. Anytime you reboot the unit, this operation will take some time to complete. - Page 37 5: Configuration Using Web Manager Web Manager Page Description (continued) Page DDNS Alllows you to view and configure DDNS settings. Shows the current configuration of the DNS subsystem and the DNS cache. Email Shows email statistics and lets you clear the email log, configure email settings, and send an email.
-
Page 38: 6: Network Settings
Link settings are related to the physical link connection, which carries the IP traffic. The PremierWave XN device server contains two network interfaces. Both interfaces will be activated and controlled by the bridging subsystem when bridging is enabled.The Ethernet interface is called Network 1 or eth0, and the WLAN interface is called Network 2 or wlan0 Notes:. - Page 39 BOOTP is enabled, the PremierWaveXN device tries to obtain an IPv4 address from a DHCP or BOOTP server. If it cannot, the PremierWave XN unit generates and uses an Auto IP address in the range of 169.254.xxx.xxx, with a network mask of 255.255.0.0.
-
Page 40: To Configure Network 1 Interface Settings
6: Network Settings Network Interface Description Settings (continued) IPv6 State Select to enable of disable the IPv4 state. IPv6 DHCP Client Select to turn On or Off. On: will provide an additional IPv6 addres in addition to the displayed Link Local ... -
Page 41: Network 1 (Eth0) Link Settings
6: Network Settings Network 1 (eth0) Link Settings Physical link parameters can be configured for an Ethernet (eth0) Network Link (see Table 6-2) and a WLAN (wlan0) Link Interface (see Table 6-6). Table 6-2 Network 1 (eth0) Link Settings Network 1 Ethernet (eth0) Description Link Settings Select the Ethernet link speed. -
Page 42: To Configure Network 1 Qos Settings
6: Network Settings Move bandwidth allocation is a minimum 5% each to Network control. Voice: Bandwidth allocation is minimum 30%. Video: Bandwidth allocation is minimum 20%. Critical Applications: Bandwidth allocation is minimum 15%. Excellent Effort: Bandwidth allocation is minimum 10%. ... -
Page 43: Network 1 (Eth0) Failover
6: Network Settings Network 1 (eth0) Failover The PremierWave XN intelligent gateway provides WAN network failover, in the form of a "dead remote host reachability" mechanism (essentially a ping against a known host). If the remote host is determined to be not reachable, the device will failover to the Wi-Fi interface. If the remote host is determined to be reachable, the device will failback to the Ethernet interface. -
Page 44: Network 2 (Wlan0) Interface Settings
6: Network Settings To view Ethernet (wlan0) QoS status, click Network on the menu and select Network 2 -> QoS -> Status. To view Ethernet (wlan0) Failover status, click Network on the menu and select Network 2 -> Failover ->... -
Page 45: To Configure Network 2 Interface Settings
6: Network Settings Network 2 (wlan0) Description Interface Settings IPv6 Address Enter the static IPv6 address to use for the interface. Note: This setting is used if Static IPv6 is active (DHCPv6 is Disabled). Changing this value requires a reboot. When DHCPv6 is enabled, the XPort Pro Lx6 tries to obtain an IPv6 address from a DHCPv6 server. -
Page 46: Network 2 (Wlan0) Link Settings
6: Network Settings Note: RSSI is reported in two different ways. When displayed in scan results the RSSI is an instantaneous value obtained from a single beacon/probe response, and therefore may vary across scan results. When reported in the status of the current connection (for the associated access point) the value is averaged over time and is less prone to fluctuation. -
Page 47: Network 2 (Wlan0) Qos
6: Network Settings Using the CLI To enter the link command level: enable -> if 2 -> link Using XML Include in your file: <configgroup name = "wlan link" instance = "wlan0"> Network 2 (wlan0) QoS QoS (Quality of Service) can be enabled and configured for both Network 1 (eth0) and Network 2 (wlan0). -
Page 48: To Configure Network 2 Qos Settings
6: Network Settings Adding or Deleting Description Network 2 (QoS) Settings MAC Address Enter the MAC address, if the MAC Address filter type is selected. Network Enter the Network, if the Network filter type is selected. Ports Enter the Port, if the Port filter type is selected. Priority Select the priority of the filter from the drop-down menu. -
Page 49: Table 6-10 Network 2 Link Scan Results On Web Manager
6: Network Settings Table 6-10 Network 2 Link Scan Results on Web Manager WLAN Link Scan Results Field Description SSID Service Set Identifier (network name) of the device. Clicking a specific SSID brings you to the specific WLAN profile of the device selected. WLAN Profiles (on page 51) for more information. -
Page 50: To View Wlan Link Scan And Status Information
<statusgroup name="wlan scan"></statusgroup> Network 2 (wlan0) Failover The PremierWave XN intelligent gateway provides wlan0 failover, in the form of a "dead remote host reachability" mechanism (essentially a ping against a known host). If the remote host is determined to be not reachable, the device will failover to the Ethernet interface. If the remote host is determined to be reachable, the device will failback to the Wi-Fi interface. -
Page 51: To Configure Network 2 Failover Settings
A WLAN profile defines all of the settings necessary to establish a wireless connection with either an access point (in infrastructure mode) or another wireless client (in Adhoc mode, limited to four connections.) A maximum of eight profiles can exist on the PremierWave XN intelligent gateway at a time. All enabled profiles are active. -
Page 52: To Configure Wlan Profile Basic Settings
6: Network Settings Table 6-13 Creating, Deleting or Enabling WLAN Profiles WLAN Profile Basic Settings Description Delete (checkbox) Click the Delete checkbox beside the profile(s) to be deleted. Three buttons will appear: Click the Submit button to permanently delete profile(s). ... -
Page 53: To Configure Wlan Profile Advanced Settings
TX Power Maximum Specify the maximum transmission output power in dBm. Select the antenna the radio will use or allow PremierWave XN unit to automatically make the selection. Antenna Diversity Enabled = allows the PremierWave XN unit to select the antenna. -
Page 54: Wlan Profile Security Settings
<configitem name=”security”> WLAN Profile Security Settings The PremierWave XN intelligent gateway supports WEP, WPA, and WPA2/IEEE 802.11i to secure all wireless communication. WPA and WPA2/IEEE 802.11i are not available for Adhoc topology. The WPA2/IEEE 802.11i mode is compliant with the Robust Secure Network specified in the IEEE standard 802.11i. -
Page 55: To Configure Wlan Profile Security Settings
This configuration option becomes available only when suites, WEP, WPA or WPA2/IEEE 802.11i are selected. Note: Lantronix recommends using a passphrase of 20 characters or more for maximum security. Spaces and punctuation characters are permitted. Note: The passphrase input is not the same as ASCII input (as used on some products.) ASCII is translated directly into hexadecimal bytes according to the... -
Page 56: Wlan Profile Wep Settings
Note: This configuration option becomes available only when suites, WEP, WPA or WPA2/IEEE 802.11i are selected. Note: Lantronix recommends using a passphrase of 20 characters or more for maximum security. Spaces and punctuation characters are permitted. Note: The passphrase input is not the same as ASCII input (as used on some products.) ASCII is translated directly into... -
Page 57: To Configure Wlan Profile Wep Settings
IEEE802.11i specification. WEP was becoming vulnerable and finalizing the IEEE802.11i standard was still far away. WPA2 is Wi-Fi’s subset of the broad IEEE802.11i standard to enforce better interoperability. The PremierWave XN intelligent gateway is compliant with both WPA2 and IEEE802.11i. - Page 58 SSL configuration that is able to verify the RADIUS server’s certificate. In case of EAP-TLS, also a certificate and matching private key need to be configured to authenticate the PremierWave XN device to the RADIUS server. For more information about SSL certificates see TLS (SSL) on page 120.
-
Page 59: To Configure Wlan Profile Wpa And Wpa/Ieee802.11I Settings
6: Network Settings WLAN Profile WPA Description & WPA2 Settings (continued) Select one or more encryption types, listed from strongest to least strong. At least one selection will have to match the Access Points intended to connect with. CCMP = Uses AES as basis and is the strongest encryption option. ... -
Page 60: Wlan Quick Connect
Enter a network name and click Scan to search for a network. Scan “<network SSID>” Perform a scan for devices within range of the PremierWave XN intelligent gateway. Including the optional network SSID limits the scan to devices configured with the specified network SSID. Omitting the network SSID performs a scan for all devices in range. -
Page 61: Gateway
6: Network Settings Gateway The PremierWave XN intelligent gateway can be configured as a wireless router with DHCP server functionality. Status This page displays the current configuration and statistics information for the gateway. To view gateway status: click Gateway on the menu and select Status. -
Page 62: Wan Mac Address Filters
6: Network Settings WAN MAC Address Filters Accept or drop traffic from specified MAC addresses using the settings below. Table 6-21 Adding a New MAC Address Filters Adding or Deleting New MAC Description Address Filter Settings Delete Click the checkbox to the left of any existing mac address filter to be deleted and click the Submit button. -
Page 63: To Configure Gateway Port Forwarding Settings
6: Network Settings Table 6-23 Adding a New Port Forwarding Rule Adding New Port Description Forwarding Rule Settings Name Enter a user friendly name for the rule (optional). Ingress IP Address Enter the destination address of the packets. This option can only be used with single ports and not with port range. -
Page 64: To Configure Gateway Static Route Settings
6: Network Settings Table 6-25 Adding a New Static Route Adding New Static Route Description Settings Name Enter the user friendly name for the route. Network Enter the Network or Host for the route. Gateway Enter the Gateway for the route. Interface Select the Interface for the route. -
Page 65: To Configure Gateway Dhcp Server Settings
Routing Protocols The PremierWave XN intelligent gateway allows the configuration of routing protocols. Routing protocols specify how routers communicate with each other, disseminating information that enables the selection of routes between any two nodes on a computer network. Routing algorithms determine the specific choice of route. -
Page 66: To Configure Gateway Routing Protocol Settings
Virtual IP The PremierWave XN intelligent gateway allows the configuration of Virtual IP addresses. Virtual IP is a means to map an externally visible IP address to LAN-side IP addresses. PremierWave units will support creating up to three virtual IP address mappings by creating loop back interfaces and publishing this information via the routing protocols. -
Page 67: Ddns
Not any. The PremierWave XN intelligent gateway provides the option to configure a virtual private network (VPN) to extend a private network across a public network. Data may be sent and received across a shared or public network as if directly connected to the private network, while benefiting from the functionality, security and management policies of the private network. - Page 68 6: Network Settings VPN Settings Description Connection Type Select connection type: Host to Subnet - VPN tunnel for local and remote subnets are fixed. Host to Host - VPN tunnel for remote subnet area is dynamioca nd local subnet is fixed.
-
Page 69: To Configure Vpn Settings
6: Network Settings VPN Settings Description NAT Traversal Select to enable or disable NAT Traversal. If there is an external NAT device between VPN tunnels, the user must enable NAT Traversal. Encryption Select the encryption algorithm in key exchange. Authentication Select the hash algorithm in key exchange. -
Page 70: Gre Settings
6: Network Settings GRE Settings GRE tunneling is available on the PremierWave XNintelligent gateway, providing more capabilities than IP-in-IP tunneling. For example, it supports transporting multicast traffic and IPv6 through a GRE tunnel. Table 6-31 GRE Settings GRE Settings Description Name Enter the user-defined name of the GRE tunnel. -
Page 71: 7: Action Settings
Action Settings Actions can be configured for alarms and reports available in the PremierWave XN intelligent gateway. Alarms and Reports PremierWave XN intelligent gateway updates the action settings page to display and configure the alarms. The following alarm and report actions are available in PremierWave XN device: eth0 link state change ... -
Page 72: To Configure Action Settings
7: Action Settings Action Settings Description FTP Put Use FTP Put to put a file on configured FTP server. Filename will be used to upload to remote FTP server. The IP Address or hostname is the FTP server to connect. Port number is port on which FTP server is listening on. Use Protocol to connect to FTP server. -
Page 73: Python
Python interpreter, making it easy to load and run custom Python scripts on your embedded system on module. The version of Python programming language installed on the Lantronix PremierWave XN intelligent gateway comes with "batteries included" by having the Python language's standard library. -
Page 74: Applications
7: Action Settings Applications The PremierWave XN intelligent gateway supports the ability to install and uninstall user-defined Python scripts and packages and will include the following: python libpython{version}.so <ltrx python sdk> "python precompiled scripts libpython{version} "python shared libraries Table 7-2 contains the setting options for configuring, installing, uninstalling and running external applications via Python scripts. -
Page 75: To Configure Application Settings
7: Action Settings To Configure Application Settings Using Web Manager To configure application scripts, click Applications on the menu. Using the CLI To enter the application script change command level: enable -> config -> applications Using XML Include in your file: <configgroup name = "applications"> ... -
Page 76: 8: Line And Tunnel Settings
Line and Tunnel Settings The PremierWave XN intelligent gateway contains two serial lines. All lines use standard RS232/ RS485 serial ports. All lines can be configured to operate in the following modes: RS232 RS485 Full Duplex (also compatible with RS-422) ... -
Page 77: Table 8-1 Line Configuration Settings
8: Line and Tunnel Settings Table 8-1 Line Configuration Settings Line Settings Description Name Enter a name or short description for the line, if desired. By default, there is no name specified. A name that contains white space must be quoted. Interface Set the interface type for the Line. -
Page 78: Table 8-2 Line Command Mode Settings
8: Line and Tunnel Settings Line Settings Description Gap Timer Set the Gap Timer delay to Set the number of milliseconds to pass from the last character received before the driver forwards the received serial bytes. By default, the delay is four character periods at the current baud rate (minimum 1 msec). -
Page 79: To Configure Line Command Mode
8: Line and Tunnel Settings To Configure Line Command Mode Using Web Manager To configure a specific line in Command Mode, click Line in the menu and select Line 1 -> Command Mode (Table 8-2). Using the CLI To enter Line 1 command level: enable -> line 1 ... -
Page 80: Tunnel Settings
8: Line and Tunnel Settings Tunnel Settings Tunneling allows serial devices to communicate over a network, without “being aware” of the devices that establish the network connection between them. Tunneling parameters are configured using the Tunnel menu and submenus. The Tunnel settings allow you to configure how the Serial-Network tunneling operates. -
Page 81: Packing Mode
8: Line and Tunnel Settings Packing Mode With Packing, data from the serial Line is not sent over the network immediately. Instead, data is queued and sent in segments, when either the timeout or byte threshold is reached. Packing applies to both Accept and Connect Modes. Table 8-4 Tunnel Packing Mode Settings Tunnel Packing Description... -
Page 82: Accept Mode
8: Line and Tunnel Settings Accept Mode In Accept Mode, the PremierWave XN device listens (waits) for incoming connections from the network. A remote node on the network initiates the connection. The configurable local port is the port the remote device connects to for this connection.There is no remote port or address. - Page 83 8: Line and Tunnel Settings Tunnel Accept Mode Description Settings (continued) Initial Send Enter the Initial Send string indicating whether it is in Text or Binary form. This Initial Send data will be sent out to the network upon connection establishment, before any data, from the Line.
-
Page 84: To Configure Tunnel Accept Mode Settings
(TCP or UDP). When established, Connect Mode is always on. Enter the remote station as an IPv4 or IPv6 address or DNS name. The PremierWave XN device will not make a connection unless it can resolve the address. - Page 85 8: Line and Tunnel Settings Tunnel Connect Mode Description Settings (continued) Host (Number) Click on the displayed information to expand it for editing. If <None> is displayed, clicking it will allow you to configure a new host. At least one Host is required to enable Connect Mode as this information is necessary to connect to that host.
- Page 86 8: Line and Tunnel Settings Tunnel Connect Mode Description Settings (continued) Host Mode Select how multiple hosts shall be used in Connect Mode. Sequential: will start with host 1 and attempt each host in sequence until a connection is accepted. Simultaneous: will connect to all of the hosts that accept a connection.
-
Page 87: Connecting Multiple Hosts
8: Line and Tunnel Settings Connecting Multiple Hosts If more than one host is configured, a Host Mode option appears. Host Mode controls how multiple hosts will be accessed. For the PremierWave device, the Connect Mode supports up to 32 hosts. -
Page 88: To Configure Tunnel Disconnect Mode Settings
8: Line and Tunnel Settings To Configure Tunnel Disconnect Mode Settings Using Web Manager To configure the Disconnect Mode for a specific tunnel, click Tunnel in the menu and select Tunnel 1 -> Disconnect Mode. Using the CLI To enter the Tunnel 1 Disconnect command level: enable -> tunnel 1 -> disconnect ... -
Page 89: To Configure Tunnel Modem Emulation Settings
8: Line and Tunnel Settings Tunnel Modem Description Emulation Settings Connect String Enter the customized Connect String sent to the Serial Line with the Connect Modem Response Code. Display Remote IP Set whether the Display Remote IP is enabled so that the incoming RING sent on the Serial Line is followed by the IP address of the caller. -
Page 90: 9: Terminal And Host Settings
Terminal and Host Settings Predefined connections are available via Telnet, SSH, or a serial port. A user can choose one of the presented options and the device automatically makes the predefined connection. Either the Telnet, SSH, or serial port connection can present the CLI or the Login Connect Menu. By default, the CLI is presented when the device is accessed. -
Page 91: To Configure The Terminal Network Connection
9: Terminal and Host Settings To Configure the Terminal Network Connection Using Web Manager To configure the Terminal on Network, click Terminal on the menu and select Network -> Configuration. Using the CLI To enter the Terminal Network command level: enable -> config -> terminal ... -
Page 92: To Configure Host Settings
9: Terminal and Host Settings Host Settings Description SSH Username Appears if you selected SSH as the protocol. Enter a username to select a pre- configured Username/Password/Key (configured on the SSH: Client Users page), or leave it blank to be prompted for a username and password at connect time. Note: This configuration option is only available when SSH is selected for Protocol. -
Page 93: 10: Maintenance And Diagnostics Settings
USB ports. If USB mount option is disabled, USB drive will not be mounted. Table 10-1 File Statistics Filesystem Commands Description Format Displays a list of files on the PremierWave XN device, and their respective sizes. USB Auto Mount Click to enable or disable USB auto mount. To View Statistics... -
Page 94: To Display Files
Format the file system and remove all data. File Transfer Files can be transferred to and from the PremierWave XN device via the TFTP protocol. This can be useful for saving and restoring XML configuration files. Files can also be uploaded via HTTP. -
Page 95: To Transfer Or Modify Filesystem Files
10: Maintenance and Diagnostics Settings File Transfer Settings Description TFTP Action Select the action that is to be performed via TFTP: Get = a “get” command will be executed to store a file locally. Put = a “put” command will be executed to send a file to a remote ... -
Page 96: To Configure Ip Protocol Stack Settings
10: Maintenance and Diagnostics Settings To Configure IP Protocol Stack Settings Using Web Manager To configure IP protocol settings, click Protocol Stack in the menu and select IP. Using the CLI To enter the command level: enable -> config -> ip ... -
Page 97: To Configure Arp Network Stack Settings
Using XML Include in your file: <configgroup name=”arp”> Diagnostics The PremierWave XN intelligent gateway has several tools for diagnostics and statistics. Various options allow for the configuration or viewing of IP socket information, ping, traceroute, memory, and processes. Hardware... -
Page 98: Ping
Traceroute Here you can trace a packet from the PremierWave XN intelligent gateway to an Internet host, showing how many hops the packet requires to reach the host and how long each hop takes. If you visit a web site whose pages appear slowly, you can use traceroute to determine where the longest delays are occurring. -
Page 99: To Perform A Traceroute
10: Maintenance and Diagnostics Settings To Perform a Traceroute Using Web Manager To perform a Traceroute, click Diagnostics in the menu and select Traceroute. Using the CLI To enter the command level: enable, trace route <host> Using XML Not applicable. -
Page 100: Memory
Include in your file: <statusgroup name=”memory”> Processes The PremierWave XN device shows all the processes currently running on the system. It shows the Process ID (PID), Parent Process ID (PPID), user, CPU percentage, percentage of total CPU cycles, and process command line information. -
Page 101: Clock
10: Maintenance and Diagnostics Settings Clock The Clock settings page can be updated by one of three methods: manually entering the date and time, synchronizing with the SNTP, or synchronizing with the wireless network server. If the network synchronization method is selected, the user can also choose the time zone to be detected automatically. -
Page 102: System Settings
10: Maintenance and Diagnostics Settings System Settings The PremierWave XN intelligent gateway system settings allow for rebooting the device, restoring factory defaults, uploading new firmware and updating a system’s short and long name. Note: Anytime you reboot the unit, this operation will take some time to complete. -
Page 103: 11: Management Interface Settings
The Command Line Interface settings allow you to control how users connect to and interact with the command line of the PremierWave XN intelligent gateway. It is possible to configure access via the Telnet and SSH protocols, in addition to general CLI options. -
Page 104: Telnet Settings
11: Management Interface Settings Telnet Settings The Telnet settings control CLI access to the PremierWave XN intelligent gateway telnet over the Telnet protocol. Table 11-2 Telnet Settings Telnet Settings Description Telnet State Select to enable or disableCLI access via Telnet Telnet Port Enter an alternative Telnet Port to override the default used by the CLI server. -
Page 105: To Configure Ssh Settings
It can also be modified and imported to update the configuration on this PremierWave XN unit or another. The XML data can be dumped to the screen or exported to a file on the file system. -
Page 106: To Export Configuration In Xml Format
11: Management Interface Settings XML Export Configuration Description Settings (continued) Groups to Export Check the configuration groups that are to be exported to the XML configuration record. The group list should be comma delimited and encased in double quotes. The list of available groups can be viewed with the “xcr list” command. Click Clear All to clear all checkmarks, or Select All but Networking to check all checkmarks except Networking. -
Page 107: Xml: Import Configuration
Import Configuration from Description Filesystem Settings Filename Enter the name of the file on the PremierWave XN unit (local to its filesystem) that contains XCR data. Lines to Import Select filter instances to be imported in the line, serial, tunnel and terminal groups. -
Page 108: To Import Configuration In Xml Format
11: Management Interface Settings To Import Configuration in XML Format Using Web Manager To import configuration, click XML in the menu and select Import Configuration. Using the CLI To enter the XML command level: enable -> xml Using XML Not applicable. -
Page 109: 12: Bridging
12: Bridging The PremierWave XN intelligent gateway supports bridging of traffic between a single external Ethernet device and the wireless network. When bridging is enabled and active, the MAC address of the external device is used as the MAC address for the WLAN interface. The unit then bridges traffic between the two interfaces. -
Page 110: Bridging Operation
12: Bridging Bridging Operation During initialization, both eth0 and wlan0 are enabled and controlled by the bridging subsystem. Important aspects to keep in mind: If eth0 physical link is down, wlan0 is the Primary Interface. If eth0 physical link is up, eth0 is the Primary Interface. ... - Page 111 12: Bridging Using the CLI To enter the Bridge command level: enable -> config -> bridge 1 enable - > config -> bridge br0 Using XML Include in your file: <configgroup name=”bridge” instance=”br0”> PremierWave® XN Intelligent Gateway User Guide...
-
Page 112: 13: Security Settings
In proving its own authenticity, the PremierWave XN intelligent gateway will use its own "personal" certificate. In verifying the authenticity of the other party, the PremierWave XN device will use a "trusted authority" certificate. -
Page 113: Digital Certificates
PEM. Certificate and key can be in the same file or in separate files. Additionally, the key can be either be encrypted with a password or left in the clear. However, PremierWave XN intelligent gateway currently only accepts separate PEM files, with the key unencrypted. -
Page 114: Openssl
-in sbr_certkey.sbrpvk -nodes -out sbr_certkey.pem The sbr_certkey.pem file contains both certificate and key. If loading the SBR certificate into an PremierWave XN intelligent gateway as an authority, you will need to edit it: 1. Open the file in any plain text editor. -
Page 115: Ssh Settings
Configuration is required when the PremierWave XN device is either (1) the SSH server or (2) an SSH client.. The SSH server is used by the CLI (Command Mode) and for tunneling in Accept Mode. -
Page 116: Ssh Client Known Hosts
13: Security Settings SSH Client Known Hosts The SSH Client Known Hosts are used by all applications that play the role of an SSH Client. Specifically in Connect Mode. Configuring these public keys are optional but if they exist another layer of security is offered which helps prevent Man-in-the-Middle (MITM) attacks. -
Page 117: Ssh Client Users
The SSH Client Users are used by all applications that play the role of an SSH Client. Specifically Tunneling in Connect Mode. To configure the PremierWave XN intelligent gateway as an SSH client, an SSH client user must be both configured and also exist on the remote SSH server. -
Page 118: To Configure Ssh Settings
The PremierWave XN intelligent gateway can generate self signed certificates and their corresponding keys. This can be done for both the rsa and dsa certificate formats. Certificates can be identified on the PremierWave XN unit by a name provided at generation time. Table 13-5 Certificate and Key Generation Settings... -
Page 119: To Create A New Credential
13: Security Settings Certificate Generation Description Settings (continued) Expires Enter the expiration date, in mm/dd/yyyy format, for the new self-signed certificate. Example: An expiration date of May 9, 2018 is entered as 05/09/2018. Type Select the type of key: RSA = Public-Key Cryptography algorithm based on large prime ... -
Page 120: Certificate Upload Settings
13: Security Settings Certificate Upload Settings SSL certificates identify the PremierWave XN intelligent gateway to peers, and can be used with some methods of wireless authentication. Certificate and key pairs can be uploaded to the PremierWave XN unit through either the CLI or XML import mechanisms. Certificates can be identified on the PremierWave XN intelligent gateway by a name provided at upload time. -
Page 121: Trusted Authorities
13: Security Settings and <value name="RSA certificate"/> or <value name="DSA certificate"/> Trusted Authorities One or more authority certificates are needed to verify a peer's identity. Authority certificates are used with some wireless authentication methods. These certificates do not require a private key. Table 13-7 Trusted Authority Settings Trusted Authorities Description... -
Page 122: 14: Modbus
Identification of remove slave Serial Transmission Mode PremierWave XN intelligent gateways can be set up to communicate on standard Modbus networks using either RTU or ASCII. Users select the desired mode and serial port communication parameters (baud rate, parity mode, etc) when in the line configuration options. -
Page 123: Modbus Statistics
14: Modbus Modbus Statistics This read-only web page displays the current connection status of the Modbus servers listening on the TCP ports. When a connection is active, the remote client information is displayed as well as the number of PDUs that have been sent and received. Additionally, a Kill link will be present which can be used to kill the connection. -
Page 124: 15: Updating Firmware
15: Updating Firmware Obtaining Firmware Obtain the most up-to-date firmware and release notes for the unit from the Lantronix Web site (www.lantronix.com/support/downloads/) or by using anonymous FTP (ftp://ftp.lantronix.com/). Devices upgrading from existing firmware version 7.8 needing Python support will need to include a two-step upgrade process. -
Page 125: Figure 15-1 Uploading New Firmware
2. Click Browse (under the Upload New Firmware heading) to browse to the firmware file. 3. Select the file and click Open. 4. Click Upload to install the firmware on the PremierWave XN unit. 5. Click OK in the confirmation popup which appears. The firmware will be installed and the device will automatically reboot afterwards. -
Page 126: Loading New Firmware Through Ftp
15: Updating Firmware Loading New Firmware through FTP Firmware may be updated by sending the file to the PremierWave XN intelligent gateway over an FTP connection. The destination file name on the PremierWave XNunit must have a "firmware.rom" type of format. The device will reboot upon successful completion of the firmware upgrade. -
Page 127: 16: Network Services
16: Network Services DNS Settings This section describes the active run-time settings for the domain name system (DNS) protocol. The primary and secondary DNS addresses come from the active interface. The static addresses from the Network Interface configuration settings may be overridden by DHCP. Note: blue text in the XML command strings of this chapter are to be replaced with... -
Page 128: Ftp Settings
16: Network Services FTP Settings The FTP protocol can be used to upload and download user files, and upgrade the PremierWave XN intelligent gateway firmware. A configurable option is provided to enable or disable access via this protocol. FTP Settings Table 16-2 FTP Settings Description... -
Page 129: To View Or Configure Syslog Settings
16: Network Services Syslog Settings Description (continued) Severity Log Level Specify the minimum level of system message the PremierWave device should log by selecting from the drop-down menu. This setting applies to all syslog facilities. The drop-down list in the Web Manager is in descending order of severity (e.g., Emergency is more severe than Alert.) To View or Configure Syslog Settings Using Web Manager... -
Page 130: To Configure Http Settings
16: Network Services HTTP Settings (continued) Description Max Timeout Enter the maximum time for the HTTP server to wait when receiving a request. This prevents Denial-of-Service (DoS) attacks. The default is 10 seconds. Max Bytes Enter the maximum number of bytes the HTTP server accepts when receiving a request. -
Page 131: To Configure Http Authentication
16: Network Services HTTP Authentication Settings Table 16-5 HTTP Authentication Description Settings Enter the Uniform Resource Identifier (URI). Note: The URI must begin with ‘/’ to refer to the filesystem. Auth Type Select the authentication type: None = no authentication is necessary. ... -
Page 132: To Configure Rss Settings
Specify a system location for the SNMP setting. Lantronix MIB File Click the Lantronix MIB file name to save and load it into the MIB browser and trap receiver. This is the base MIB file for Lantronix products. Load or compile this file first. -
Page 133: To Configure Snmp Settings
Using XML Include in your file: <configgroup name=”snmp”> Discovery The current statistics and configuration options for device discovery, including UPnP query port are available for the PremierWave XN intelligent gateway. Table 16-8 Discovery Settings Discovery Description Query Port Server... -
Page 134: Smtp Settings
16: Network Services SMTP Settings Table 16-9 SMTP Settings SMTP Settings Description From Address Enter the From Address here. This is an email address and is required. If you wish to direct oubtound email messages through a mail server, put your client email address here. -
Page 135: To View, Configure And Send Email
16: Network Services Email – Configuration Description Settings (continued) Message File Enter the path of the file to send with the email alert. This file appears within the message body of the email, not as an attachment. Priority Select the priority level for the email alert: Urgent ... -
Page 136: 17: Branding The Premierwave Xn Device
The Web Manager files are hidden and are incorporated directly into the firmware image but may be overridden by placing the appropriate file in the appropriate directory on the PremierWave XN unit file system. Web Manager files can be retrieved and overridden with the following procedure: 1. -
Page 137: Short And Long Name Customization
17: Branding the PremierWave XN Device Short and Long Name Customization You can customize the short and long names in your PremierWave XN intelligent gateway. The names display in the CLI show command and in the System web page in the Current Configuration table. -
Page 138: Appendix A: Lantronix Technical Support
Appendix A: Lantronix Technical Support Lantronix offers many resources to support our customers and products at http://www.lantronix.com/support. For instance, you can ask a question, find firmware downloads, access the FTP site and search through tutorials. At this site you can also find FAQs, bulletins, warranty information, extended support services and product documentation. -
Page 139: Appendix B: Binary To Hexadecimal Conversions
Appendix B: Binary to Hexadecimal Conversions Many of the unit's configuration procedures require you to assemble a series of options (represented as bits) into a complete command (represented as a byte). The resulting binary value must be converted to a hexadecimal representation. Use this chapter to learn to convert binary values to hexadecimals or to look up hexadecimal values in the tables of configuration options. - Page 140 Appendix B: Binary to Hexadecimal Conversions Figure B-2 Windows Scientific Calculator 4. Click Hex. The hexadecimal value appears. Figure B-3 Hexadecimal Values in the Scientific Calculator PremierWave® XN Intelligent Gateway User Guide...
-
Page 141: Appendix C: Compliance
Appendix C: Compliance (According to ISO/IEC Guide 17050-1, 17050-2 and EN 45014) Manufacturer's Name & Address: Lantronix, Inc. 7535 Irvine Center Drive, Suite 100, Irvine, CA 92618 USA Product Name Model: PremierWave® XN Intelligent Gateway Conforms to the following standards or other normative documents:... - Page 142 Lantronix, Inc. 7535 Irvine Center Drive, Suite 100 Irvine, CA 92618 USA Tel: 949-453-3990 Fax: 949-453-3995 RoHS, REACH and WEEE Compliance Statement Please visit http://www.lantronix.com/legal/rohs/ for Lantronix’s statement about RoHS, REACH and WEEE compliance. PremierWave® XN Intelligent Gateway User Guide...
- Page 143 Appendix C: Compliance Table C-1 PremierWave Regulatory Domains REGION: US/CANADA JAPAN EUROPEAN UNION WORLDWIDE Scan Adhoc Scan Adhoc Scan Adhoc Adhoc Frequency Channel Scan Type Type Permitted Type Permitted Type Permitted Permitted 2412 Active Active Active Passive 2417 Active Active Active Passive Band...