Advertisement
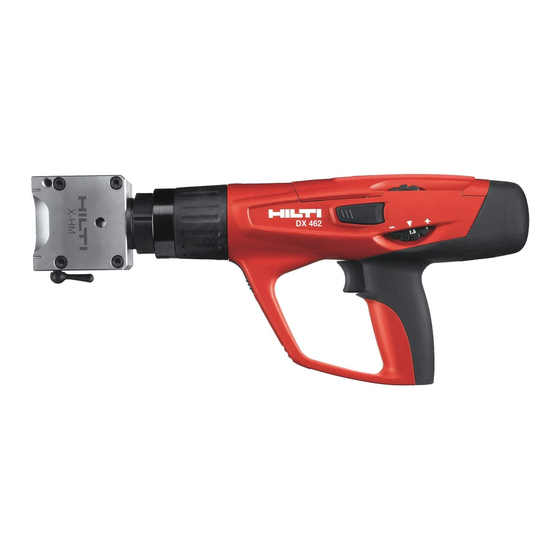
X 462 powder-actuated tool
It is essential that the operating
instructions are read before the
tool is operated for the first time.
Always keep these operating
instructions together with the tool.
Ensure that the operating instruc-
tions are with the tool when it is
given to other persons.
@ Exhaust gas piston return unit
Description of main parts
; Guide sleeve
= Housing
% Cartridge guideway
& Power regulation wheel release button
( Power regulation wheel
) Trigger
+ Grip
§ Piston return unit release button
/ Ventilation slots
: Piston rings
· Piston *
£ Fastener guide release button
| Buffer *
Fastener guide *
* These parts may be replaced by the user/operator.
Contents
1. General information
1.1 Signal words and their meaning
WARNING
The word WARNING is used to draw attention to a poten-
tially dangerous situation which could lead to severe
personal injury or death.
CAUTION
The word CAUTION is used to draw attention to a poten-
tially dangerous situation which could lead to minor per-
sonal injury or damage to the equipment or other prop-
erty.
1.2 Pictograms
Warning signs
General
warning
Obligation signs
Wear eye
protection
The numbers refer to the illustrations. The illustra-
tions can be found on the fold-out cover pages. Keep
these pages open while you read the operating instruc-
tions.
In these operating instructions, the designation "the
tool" always refers to the DX 462 powder-actuated tool.
Page
Location of identification data on the tool
15
The type designation and the serial number are printed
16
on the type plate on the tool. Make a note of this infor-
17
mation in your operating instructions and always refer
to it when making an enquiry to your Hilti representa-
18
tive or service department.
18
19
20
Type:
21
23
27
Serial no.:
27
Symbols
Read the opera-
Warning:
tion instructions
hot surface
before use
Wear a
Wear ear
safety helmet
protection
DX462
en
15
Advertisement
Table of Contents

Related Manuals for Hilti DX462


Summary of Contents for Hilti DX462
-
Page 1: Table Of Contents
Make a note of this infor- 3. Accessories mation in your operating instructions and always refer to it when making an enquiry to your Hilti representa- 4. Technical data tive or service department. -
Page 2: Description
The tool can be fired only when pressed ful- ly against the work surface in this way. The tool is designed for professional use in fastening In addition, all Hilti DX tools are equipped with an unin- applications where nails, threaded studs and composite tentional firing safety device . -
Page 3: Accessories
Clip for fastening wire or chain hangers. X-HS Suspension system with threaded boss. X-(E)M6/8 Threaded studs for temporary fastenings on concrete and steel. Please contact your local Hilti Center or Hilti representative for details of other fasteners and accessories. Cartridges Ordering designation Colour code Power level 6.8/11 M green... -
Page 4: Technical Data
5.6 General safety precautions G To avoid the risk of injury, use only original Hilti fas- G Operate the tool only as directed and only when it is teners, cartridges, accessories and spare parts or those in faultless condition. -
Page 5: Before Use
If necessary, servicing or changing parts and before storage. have the tool repaired at a Hilti service centre. G Store cartridges and unused tools unloaded, in a dry, G Check the buffer and piston for wear (see “8. Care high or locked place out of the reach of children. -
Page 6: Operation
Fastening guidelines NOTE These application recommendations must always be observed. For more specific information, refer to the Hilti Fastening Technology Manual, which is available from your local Hilti organisation. Concrete min. edge distance = 70 mm (2 ") min. spacing = 80 mm (3 ") -
Page 7: Care And Maintenance
G Never use grease for maintenance/lubrication of tool parts. This may strongly affect the functionality of the tool. Use only Hilti spray or such of equivalent quality. G Dirt from DX tool contains substances that could be endangering your health. - Page 8 NOTE NOTE Do not use worn pistons. Do not modify or grind pis- G The use of lubricants other than Hilti spray could dam- tons. age rubber parts, especially the buffer. Cleaning the piston rings 1. Use the flat brush to clean the piston rings.
-
Page 9: Troubleshooting
I Clean the cartridge strip guide- way (see 8.10) If the problem persists: I Tool damaged I Contact Hilti Repair Centre I Tool overheated because of high I Let the tool cool down and then Cartridge strip cannot be setting rate... - Page 10 I Clean the tool (see 8.3–8.14) If the problem persists: I Contact Hilti Repair Centre I Piston and/or buffer damaged I Unscrew the fastener guide Piston stuck in magazine fastener I Check buffer and piston and...
- Page 11 Cause Possible remedies Fault I Fastener too short I Use longer fastener Fastener penetrates too deeply I Driving power too high I Reduce power setting I Use lighter cartridge I Fastener too long I Use shorter fastener Fastener does not penetrate deeply enough I Driving power too low I Increase power setting...
- Page 12 Cause Possible remedies Fault I Driving power too low Nail does not I Try higher power setting or heavier cartridge penetrate surface I Short nail application: I Application limit exceeded (very hard surface) I Use co-acting principle/fastener guide I Switch to more powerful system like DX 750, DX 600 N I Unsuitable system I Thin steel base material...
-
Page 13: Disposal
10. Disposal Most of the materials from which Hilti power actuated tools are manufactured can be recycled. The materials must be correctly separated before they can be recycled. In many countries, Hilti has already made arrange- ments for taking back your old powder actuated tools for recycling. Please ask your Hilti customer service department or Hilti sales representative for further information. - Page 14 Noise information as per German legislation (3, GSGV dated January 18, 1991): The noise (power) level L as per § 1 (2) 1b) applicable to the tool and, due to different workplaces depend- WA, 1S ing on the application for which the tool is used, also the noise (pressure) level L at the measurement sur- pAImax face at a distance of 1 metre as per §...