Table of Contents
Advertisement
Quick Links
Advertisement
Table of Contents

Related Manuals for Ericsson LBI-38862A


Summary of Contents for Ericsson LBI-38862A
- Page 1 LBI-38862A Operator’s Manual MONOGRAM SERIES MOBILE RADIO ERICSSONZ...
-
Page 2: Table Of Contents
Ericsson Inc., at any time and without notice. Such changes will be incorporated into new editions of this manual. No part of... -
Page 3: Safety Information
SAFETY INFORMATION The operator of any mobile radio should be aware of certain hazards common to the operation of vehicular radio transmissions. A list of possible hazards are: Explosive Atmospheres Just as it is dangerous to fuel a vehicle with the motor running, be sure to turn the radio off while fueling the vehicles. -
Page 4: Safe Driving Recommendations For Users Of Mobile Radios
Liquefied (LP) Gas Powered Vehicles Mobile radio installations in vehicles powered by liquefied petroleum gas with the LP gas container in the trunk or other sealed-off space within the interior of the vehicle must conform to the National Fire Protection Association standard (NFPA) 58 which requires that: Space containing the radio equipment shall be isolated by a seal from the space containing the LP gas container and its fittings. - Page 5 When using your two-way radio remember these rules: It is a violation of FCC rules to interrupt any distress or emergency message. And, as your radio operates in much the same way as a telephone "party line", always listen to make sure that the line is clear and that no one else is on the air before sending messages.
-
Page 6: Introduction
INTRODUCTION The Monogram Series Mobile Radio utilizes advanced design techniques using state-of-the-art technology. Microcomputer technology and a Phase Locked-Loop (PLL) synthesizer provide the added flexibility and capability inherent in quality radios. 16 channel capability, CTCSS (Channel Guard) and DCS signaling sys- tems compatibility, as well as a quick scan function, (including dual-level priority scan) are all controlled by the microprocessor. -
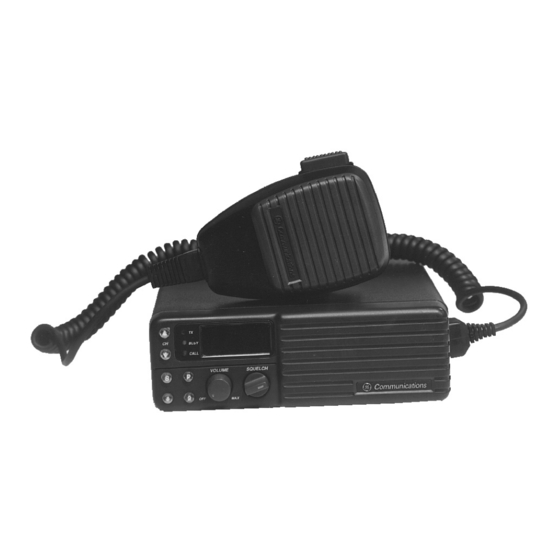
Page 7: Controls And Indicators
CONTROLS AND INDICATORS CONTROLS ON/OFF/VOLUME Turns the radio ON or OFF and allows the user to CONTROL adjust the volume to the desired listening level. SQUELCH CONTROL Quiets the radio receiver when there are no incoming calls. Maximum squelch is obtained at full clockwise rotation. -
Page 8: Indicators
SCAN PUSH-BUTTON Turns the SCAN function ON or OFF (ON indicated by a RED backlit display). Provides the "ENTER" function during scan programming. PRIORITY SCAN Turns priority scan on/off (ON indicated by a green PUSH-BUTTON backlit display). Provides access to programming mode at radio turn-on. -
Page 9: Alert Tones
ALERT TONES Self Check ALERT TONE - Sounded for one second each time the radio is turned on and the microprocessor completes its self-check. It also indicates proper operation by momentarily displaying 4000 in the display window. POWER UP - A power up alert tone is sounded to indicate proper operation of the microprocessor. -
Page 10: Operation
OPERATION POWER UP/DOWN 1. Turn the radio on by rotating the volume control 1/2 turn clockwise. "4000" appears in the display window for approximately 1 second. A power up alert tone is then sounded for approximately 1 second to indicate proper operation of the micro- processor. -
Page 11: To Transmit A Message
NOTES DO NOT adjust the SQUELCH control while other parties are using the channel. If your radio is equipped with Channel Guard, tone or digital, push the Monitor button (if lit) to enable the option. The CALL LED will now be off. -
Page 12: Channel Scan Operation
CHANNEL SCAN OPERATION Scan permits you to monitor any or all programmed channels; the receiver continuously scrolls through each channel selected from the scan list. The channels to be scanned are user programmable and may or may not be assigned a priority level, its up to you the user to make this determination. -
Page 13: Priority Scan
1. To enter the non-priority scan mode, press the "S" button; it will light and the radio will start scanning all valid channels on the scan list. 2. To exit the non-priority scan mode, press the "S" button, the radio will return to normal operation. PRIORITY SCAN Any of the radio’s programmed channels may be assigned a priority level. -
Page 14: Limited Priority Scan
2. To exit the priority scan mode, press the "S" and "P" buttons. The radio will return to Priority Chan- nel #1 for normal operation. LIMITED PRIORITY SCAN In Limited Priority Scan, the radio operates in the same manner as in Priority Scan, the radio will monitor Priority Channels 1 and 2 (at the intervals programmed by your dealer) as well as the non-priority channel to which you assigned limited priority scan. -
Page 15: Transmit Time Out Timer
2. To exit the Vacant Channel Scan Mode, press the PTT bar. The TX LED will light. TRANSMIT TIME OUT TIMER The Transmit Time Out Timer is a dealer programmable option that disables the radio transmitter if a single transmission (PTT pressed continu- ously) exceeds a preprogrammed time. -
Page 16: Priority Channel Programming
2. To add a channel to the scan list, select the channel and press the "S" button while the channel is flash- ing in the display. The number will be displayed continuously to indicate that it is stored on the scan list. - Page 17 PRIORITY CHANNEL PROGRAMMING 1. To display the current priority channel, press the "P" button. Note: you must be in the user program- ming mode. Refer to Front Panel Pro-gramming. If Channel 1 is Priority 1, "P1:01"is displayed; if no channel has been assigned priority, then "P1:--" is displayed.
-
Page 18: Error Messages
ERROR MESSAGES During normal operation, from turn-on to turn-off, the microprocessor is working. From initial self-check to channel scan operation it is designed to keep you informed of its operating status. If your radio displays: ER:01 - there is a problem with the EEPROM (For example, EEPROM not installed or installed incorrectly). - Page 19 MONOGRAM SERIES WARRANTY Ericsson Inc. (hereinafter "Seller") warrants to the original purchaser for use (hereinafter "Buyer") that Equipment manufactured by Seller shall be free from defects in material, workmanship and title, and shall conform to its published specifications. With respect to any Equipment not manufactured by Seller (except for integral parts of Seller’s Equipment to which the warranties...
- Page 20 Ericsson Inc. Private Radio Systems Mountain View Road Lynchburg, Virginia 24502 1-800-528-7711 (Outside USA, 804-528-7711) Printed in U.S.A.
- Page 21 QUICK REFERENCE CARD 3. Press the PTT on the microphone and from a distance RADIO ON/OFF, POWER UP of 1/2 to 2 inches speak directly into the microphone in 1. Turn the radio on by rotating the on/off control 1/2 a normal tone of voice.
- Page 22 7. Exit the scan mode by pressing "S". Your radio will re- 2. As in priority Scan, the transceiver will monitor the display. The channel number will be displayed continu- turn to normal operation. priority channels every Look Back Time as programmed ously to indicate that it is stored in the scan list.