Table of Contents
Advertisement
Advertisement
Table of Contents

Related Manuals for Singer 2639


Summary of Contents for Singer 2639
- Page 1 2639 Model/Modelo/Modèle INSTRUCTION MANUAL MANUAL DE INSTRUCCIONES MODE D’EMPLOI...
-
Page 2: Important Safety Instructions
3. “Never operate this sewing machine if it has a damaged cord or plug, if it is not working properly, if it has been dropped or damaged, or dropped into water. Return the sewing machine to the nearest authorized dealer or service center for examination, repair, electrical or mechanical adjustment.”... - Page 3 ESPAÑOL IMPORTANTES INSTRUCCIONES DE SEGURIDAD Cuando se usa un aparato eléctrico, debe seguirse unas precauciones básicas y que vienen incluidas a continuación. "Leer las instrucciones antes de usar la máquina de coser." PELIGRO - Para reducir el riesgo de una descarga 1.
- Page 4 FRANÇAIS «MESURES DE SÉCURITÉ IMPORTANTES» «Lorsqu’un appareil électrique est en usage, il faut toujours observer certaines mesures élémentaires de sécurité y compris les suivantes.» «Lire les instructions en entier avant d’utiliser cette machine à coudre.» «DANGER- Pour réduire le risque de décharge électrique:» 1.
-
Page 5: Table Of Contents
ENGLISH TABLE OF CONTENTS 1. KNOWING YOUR SEWING MACHINE Machine identification ... 6 - 7 Accessories ... 8 Setting up your machine ... 9 - 10 Foot control, Power/light switch, Spool pins, Presser foot lifter Winding bobbin ... 11 Threading the bobbin thread ... 12 Needle, thread and fabric chart ... - Page 6 FRANÇAIS TABLE DES MATIERES 1. VOTRE MACHINE À COUDRE Description de la machine ... 6 - 7 Accessoires ... 8 Préparation de la machine ... 9 - 10 Rhéostat, Interrupteur moteur et lumière, Porte-bobine, Levier du pied de biche Préparation de la canette ... 11 Enfilage du fil de canette ...
-
Page 7: Knowing Your Sewing Machine
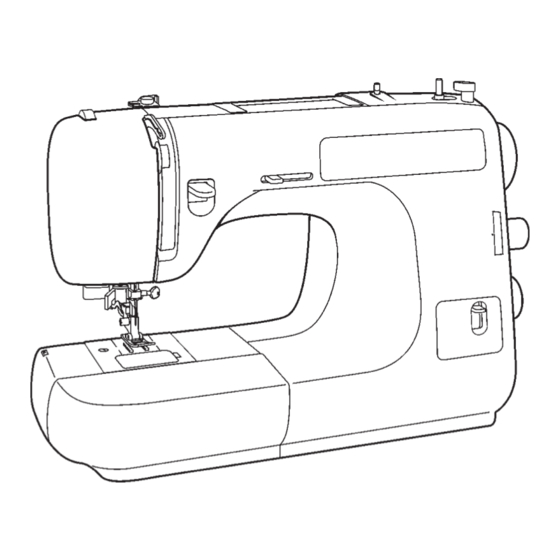
ENGLISH 1. KNOWING YOUR SEWING MACHINE MACHINE IDENTIFICATION 1. Bobbin winder tension disc 2. Pressure regulator 3. Thread take-up 4. Thread tension control 5. Face cover 6. Thread cutter 7. Extension table 8. Feed dog control 9. Reverse stitch lever 10. -
Page 9: Accessories
ENGLISH ACCESSORIES 1. Needles 2. Bobbins 3. Spool pin cap (large) 4. Spool pin cap (small) 5. Buttonhole opener/Brush 6. Screwdriver (large) 7. Screwdriver (small) 8. Oiler 9. Zipper foot 10. Buttonhole foot 11. Blind stitch foot 12. Overcasting foot 13. -
Page 10: Setting Up Your Machine
ENGLISH SETTING UP YOUR MACHINE Be sure to wipe off any surplus oil from needle plate area before using your machine the first time. FOOT CONTROL Connect the plug of the foot control into the machine socket (1) and your wall outlet (2) as illustrated. POWER/LIGHT SWITCH Your machine will not operate until the power/light switch is turned on. - Page 11 ENGLISH ESPAÑOL SPOOL PINS PORTA CARRETES Place a spool of thread on the spool Coloque un carrete de hilo en el porta- pin. carretes. Fijelo con la tapa (A) Secure it with a suitable size spool cap asegurándose una salida fluida del (A) to ensure smooth flow of thread.
-
Page 12: Winding Bobbin
ENGLISH WINDING BOBBIN 1. Pass thread from spool through thread guides as shown. 2. Pull end of thread through hole in bobbin as shown. 3. Push bobbin winder shaft to far left position, if it is not already there. Place bobbin onto shaft with end of thread coming from top of bobbin. -
Page 13: Threading The Bobbin Thread
ENGLISH THREADING THE BOBBIN THREAD 1. Raise the needle to its highest position by rotating the hand wheel towards you. 2. Remove the bobbin cover plate by pushing the release button to the right while pushing the left corner of plate. 3. -
Page 14: Needle, Thread And Fabric Chart
Tricot Polyester Nylon * Do not use on stretch fabrics. * For best sewing results, always use a Singer Branded Needle. Changing the needle 1. Raise the needle bar to its highest position by turning the hand wheel toward you. - Page 15 Tricot * Non recommandés pour les tissus extensibles. * Pour obtenir les meilleurs résultats de couture, utilisez toujours une aiguille de marque Singer. Changement d’aiguille 1. Relever la barre à aiguille à sa position la plus haute en tournant le volant vers vous.
-
Page 16: Threading The Top Thread
ENGLISH THREADING THE TOP THREAD 1. Raise the presser foot lifter. 2. Raise the needle to its highest position by rotating the hand wheel towards you. 3. Thread the machine in the order as illustrated. ESPAÑOL ENHEBRADO DEL HILO SUPERIOR 1. -
Page 17: Using Automatic Needle Threader
ENGLISH USING AUTOMATIC EMPLEO DEL NEEDLE THREADER ENHEBRADOR AGUJA Raise the needle to its highest position by Levantar la aguja a la posición más elevada rotating the hand wheel towards you. girando el volante de la máquina hacia uated. 1. H o o k t h r e a d t o t h r e a d g u i d e a s illustrated. -
Page 18: Utilisation De L'enfileur De Chas D'aiguille
FRANÇAIS UTILISATION DE L’ENFILEUR DE CHAS D’AIGUILLE Amener l’aiguille en position haute en toumant le volant vers vous. 1. Accrocher le fil au guide-fil de la manière indiquée sur l’illustration. 2. Abaisser le levier tout en tenant l’extrémité du fil. 3. -
Page 19: Picking Up Bobbin Thread
ENGLISH PICKING UP BOBBIN THREAD 1. Raise the presser foot lifter. 2. Holding needle thread loosely with your left hand, turn hand wheel towards you with your right hand first lowering the needle and continuing until the needle comes to its highest position. 3. -
Page 20: Adjusting Top Thread Tension
ENGLISH ADJUSTING TOP THREAD TENSION Straight stitching: the good looking appearance of your stitching is largely determined by the balanced tension of both top and bobbin threads. The tension is well balanced when these two threads ‘lock’ in the middle of layers of fabric you are sewing. -
Page 21: Changing Presser Foot
ENGLISH CHANGING PRESSER FOOT Be sure needle is in the up position. Raise presser foot lifter. 1. Raise foot release lever to remove the foot. (Fig. 1) 2. Place the desired foot on the needle plate aligning the presser foot pin with the foot holder. (Fig. 1) 3. -
Page 22: Feed Dog Control
ENGLISH FEED DOG CONTROL The feed dogs control the movement of the fabric that is being sewn. They should be raised for all general sewing purposes and lowered for darning, freehand embroidery and monogramming so that you, not the feed dogs, are moving the fabric. -
Page 23: Stitch Selector And Indicator
ENGLISH ESPAÑOL STITCH SELECTOR SELECTOR E AND INDICATOR INDICADOR DE PUNTADAS 1. To select a stitch, be sure needle is out of fabric at its highest 1. Para seleccionar una puntada position. asegurarse que la aguja está fuera del tejido y en su posición más 2. -
Page 24: Super (Stretch) Pattern Group Selector, Reverse Stitch Lever, Pressure Regulator
ENGLISH ESPAÑOL SUPER (STRETCH) SELECTOR GRUPO DE PATTERN GROUP PUNTADAS ELESTICAS SELECTOR Para seleccionar grupo de puntadas rojos baje la palanca. Súbala para To select red patterns, push down the grupos de puntadas azules. selector. Push it up for blue patterns. PALANCA DE LA REVERSE STITCH PUNTADA DE... -
Page 25: Stitch Width Control, Converting To Free-Arm Sewing
ENGLISH ESPAÑOL STITCH WIDTH SELECTOR ANCHO CONTROL PUNTADA The width of all the stitches produced En esta máquina puede regularse el on this machine can be made ancho de puntada ajustando el narrower or wider by adjusting the “selector ancho puntada”. stitch width control. -
Page 26: Starting To Sew
ENGLISH 2. STARTING TO SEW MACHINE SETTING CHART BUTTONHOLE ③ ① STRAIGHT ② ④ ⑤ ZIGZAG ⑥ BLIND ① ① ① ① ① INDICATOR MULTI-STITCH ZIGZAG FOUR- POINT LINGERIE ② ② ② ② ② STITCH LENGTH CONTROL STRETCH BLIND ③ ③ ③ ③ ③ STITCH WIDTH CONTROL DECORATIVE ④... -
Page 27: Empezer A Coser
ESPAÑOL 2. EMPEZER A COSER ESQUEMA DE AJUSTE DE LA MAQUINA OJALES ③ ① RECTA ② ④ ⑤ ZIG-ZAG ⑥ INVISIBLE ① ① ① ① ① INDICADOR ZIG-ZAG DE TRES PUNTADAS LENCERIA CUATRO PUNTOS ② ② ② ② ② CONTROL ANCHO PUNTADA INVISIBLE SUPER ELASTICO ③... -
Page 28: Commencez À Coudre
FRANÇAIS 2. COMMENCEZ À COUDRE TABLEAU DE RÉGLAGE DE LA MACHINE BOUTONNIÈRE ③ ① DROIT ② ④ ⑤ ZIG- ZAG ⑥ OURLET INVISIBLE ① ① ① ① ① INDICATEUR ZIG- ZAG MULTI-POINT LINGERIE ② ② ② ② ② LONGUEUR DE POINT OURLET EXTENSIBLE ③... -
Page 29: Straight Stitches
ENGLISH ESPAÑOL STRAIGHT STITCHES PUNTADA RECTA 1 Straight stitch at center needle 1 Puntada recta posición aguja en position with following settings; el centro realizar los siguientes ajustes: Stitch selector - Selector puntada - Stitch width control - Selector ancho puntada - 2 Straight stitch at left needle position with following settings;... - Page 30 ENGLISH ESPAÑOL REMOVING FABRIC SACANDO EL TEJIDO First turn the handwheel towards you Gire el volante hacia Vd. hasta que la until the needle is at its highest aguja se encuentre en su posición position, then raise the presser foot, más alta, suba la pata prensatelas draw materials to the rear and cut off lleve el matarial hacia atras y corte el...
-
Page 31: Inserting Zippers And Piping, Darning
ENGLISH ESPAÑOL INSERTING ZIPPERS AND INSERCION DE PIPING CREMALLERAS Y VIVO Use zipper foot which allows you to Utilizar el prensatelas de cremalleras sew to the right or left of the zipper or que permite coser a la derecha o la close to the cord. -
Page 32: Zigzag Stitch
ENGLISH ESPAÑOL DARNING ZURCIDO Lower feed dogs and remove presser Baje los dientes y saque la pata foot. prensatelas. Con el bastidor de Stretch fabric with an embroidery bordar tense el material con el hoop with the hole at center. Holding agujero en el centro. -
Page 33: Free Motion Stippling, Embroidery And Monograms
ENGLISH Free Motion Stippling, Embroidery and Monograms Drop feed dogs and remove presser foot. Using a marking pencil trace your design onto your fabric. Hoop your fabric before sewing. Sew using a straight stitch (stippling) or zigzag (Embroidery & Monograms) following your design line. Using a hoop will give you better control as you work. -
Page 34: Blind Stitch
ENGLISH BLIND STITCH 1. First finish the raw edge. Do this by turning it under on fine fabrics or overcasting it on medium to heavyweight fabrics. Then turn the hem up the required depth, press and pin in place. 2. Now fold the fabric as illustrated. 3. -
Page 35: Multi-Stitch Zigzag, Rampart Stitch
ENGLISH ESPAÑOL MULTI-STITCH ZIG-ZAG DE TRES ZIGZAG PUNTADAS This is a strong stitch because as its Esta es una puntada fuerte, ya que name implies, it makes multiple short como su nombre implica, realiza tres stitches where the normal zigzag puntadas cortas donde el zig-zag makes only one. -
Page 36: Shell Stitch
ENGLISH ESPAÑOL SHELL STITCH PUNTADA DE LENCERIA Shell stitch is for seaming and La puntada de lencería es para coser overcasting sheer, soft fabrics in one y sobrehilar en una operación tejidos operation. It also produces a delicate finos y suaves. También produce un shell hem on lingerie and other fine dobladillo de concha delicado en garments. -
Page 37: Faggoting
ENGLISH FAGGOTING This is a popular decorative stitch (used in sleeves or fronts of blouses and dresses). To attach two separate pieces of fabric together, leave a little space in between. To prepare the fabric: Fold under the seam allowances on the cut edges, and press. -
Page 38: Point Ajouré
FRANÇAIS POINT AJOURÉ C'est un point décoratif très apprécié (utilisé pour la couture des manches ou des devants de blouses et de robes). Pour assembler deux morceaux de tissus, laisser un peu d'espace entre les deux. Pour préparer le tissu: Plier les valeurs de couture, et presser. -
Page 39: Double Overedge Stitch
ENGLISH ESPAÑOL PUNTADA OVEREDGE STITCH SOBRE-BORDE This is the same type stitch used by the garment industry in making Este es el mismo tipo de puntada sportswear - it forms and finishes the u s a d a p o r l a i n d u s t r i a d e l a seam in one operation. -
Page 40: Slant Overedge Stitch
ENGLISH ESPAÑOL CHEVRON STITCH PUNTADA CHEVRON Use to create decorative borders and Utilicela para crear dobladillos for embroidery. decorativos y para bordados. SLANT OVEREDGE PUNTADA STITCH SOBREORILLA INCLINADO Stretch overlock seams and overcasts in one to produce a narrow, supple Las costuras overlock elásticas seam, particularly suited to swimwear, producen una costura estrecha y... -
Page 41: Feather Stitch
ENGLISH ESPAÑOL PUNTADA ALFILER SLANT PIN STITCH INCLINADO Excellent for hemstitching table and bed linens with an elegant touch. E s e x c e l e n t e p a r a d o b l a d i l l a r Picot-like stitch can also be made on manteles y sobrecamas dando un sheer materials. -
Page 42: Point Crois
ENGLISH ESPAÑOL CROSSED STITCH PUNTO CRUZADO Use to sew and finish elastic fabrics Usela para coser y acabar tejidos or for decoration of borders. elásticos o en la decoración de dobladillos. REINFORCED PUNTADA SOBRE- OVEREDGE STITCH BORDE REFORZADO It is perfect for overcasting and Es perfecto para sobrehilado y seaming and overcasting in one on costura y sobrehilado en uno sobre... -
Page 43: Decorative Embroidery Designs
ENGLISH DECORATIVE EMBROIDERY DESIGNS Your Machine will produce a wide range of beautiful decorative embroidery patterns as illustrated on the Stitch indicator panel. Simply select the design of your choice and follow the settings on page 25. The final effect of each design will depend on the setting. -
Page 44: Buttonhole Making
ENGLISH ESPAÑOL BUTTONHOLE MAKING CONFECCION DE OJALES 1. M a r q u e c u i d a d o s a m e n t e l a 1. Carefully mark the position of posición del ojal en la prenda buttonhole on your garment. - Page 45 ENGLISH ESPAÑOL CORDED BUTTONHOLES OJALES CON CORDON Hook filler cord (crochet thread or Enganchar el cordón de relleno al buttonhole twist) to the spur and pull saliente de la guía y estirar ambos both ends of the cord forward under extremos del cordón hacia adelante, the guide.
-
Page 46: Caring For Your Machine
3. Remove the bobbin case (B). 4. Clean the feed dogs and hook area with the lint brush. Put one drop of sewing machine oil (C) on the hook race as indicated by the arrows. 5. Replace the bobbin case with the projection (D) positioned against the spring (E). - Page 47 ENGLISH Changing light bulb 1. Remove the face cover. Push up the bulb slightly and turn counterclockwise. 2. Insert new bulb, push up and turn clockwise. Replace the face cover. Disconnect the machine from power supply before changing a bulb. Do not use a bulb of more than 15 watts. Always disconnect the machine from power supply by removing the plug from the wall- outlet.
-
Page 48: Performance Checklist
ENGLISH 4. PERFORMANCE CHECKLIST GENERAL PROBLEMS Machine does not sew. * Foot control is not connected. - See page 9. * Power switch is turned off. - Turn on the switch. Machine jams/knocks. * Thread is caught in hook. - Clean hook (see page 45). * Needle is damaged. -
Page 49: Vérification Des Petits
FRANÇAIS 4. VÉRIFICATION DES PETITS PROBLÈMES DE COUTURE PROBLÈMES GENERAUX La machine ne coud pas: * Le cordon électrique ou le rhéostat n’est pas branché - Voir page 9. * Le régulateur est sur “OFF” - le placer sur SLOW ou FAST. La machine est coince: * Le fil est cassé... -
Page 50: Special Accessories
ENGLISH ESPAÑOL 5. SPECIAL 5. ACCESORIOS ACCESSORIES ESPECIALES PATA PARA OVERCASTING FOOT OVERLOCADO This foot is used to guide fabric when overcasting. Place your fabric under Este pata se utiliza para guiar el the foot with its edge against the edge material durante el overlocado. - Page 51 © Part No. 77139 6/03...