Chapters
Table of Contents
Troubleshooting

Related Manuals for Savin SP 3300 Series


Summary of Contents for Savin SP 3300 Series
- Page 1 SP 3300 Series User’s Guide Read this manual carefully before you use this machine and keep it handy for future reference. For safe and correct use, please be sure to read the Safety Information in this manual before using the machine.
- Page 2 Contents of this manual are subject to change without prior notice. In no event will the company be liable for direct, indirect, incidental or consequential damages as a result of handling or operating the machine. Copyright © 2008 • PCL and PCL 6 are trademarks of Hewlett-Packard company. •...
-
Page 3: Table Of Contents
Printing a demo page ... 2.1 Using toner save mode ... 2.1 3. Software overview Supplied software ... 3.1 Printer driver features ... 3.1 System requirements ... 3.2 4. Network setup (SP 3300DN only) Introduction ... 4.1 Supported operating systems ... 4.1 Using SetIP program ... - Page 4 Common Macintosh problems ... 9.10 10. Installing accessories Precautions to take when installing accessories ... 10.1 Installing a memory module ... 10.1 Activating the added memory in the PS printer properties ... 10.2 11. Specifications Printer specifications ... 11.1 ... 8.2...
- Page 5 Safety Information When using this machine, the following safety precautions should always be followed. Safety During Operation In this manual, the following important symbols are used: WARNING: Indicates a potentially hazardous situation which, if instructions are not followed, could result in death or serious injury. CAUTION: Indicates a potentially hazardous situation which, if instructions are not followed, may result in minor or moderate injury or damage to property.
-
Page 6: Power Saver
If you continuously print multiple pages, moist or vapor may appear from the paper exit area. However this will not have any impact on the performance of your printer. Be cautious not to touch the surface, or wait until cooled down, and keep children away from the surface. -
Page 7: Laser Safety
Safety precautions and interlock mechanisms have been designed to prevent any possible laser beam exposure to the operator. The following label is attached on rear side of the printer. For Users in the United States of America CDRH Regulations This equipment complies with requirements of 21 CRF subchapter J for class 1 laser products. -
Page 8: Introduction
• Changing the font setting Special features Your new printer is equipped with several special features that improve the print quality. You can: Print with excellent quality and high speed • You can print up to 1200 x 1200 dpi effective output. -
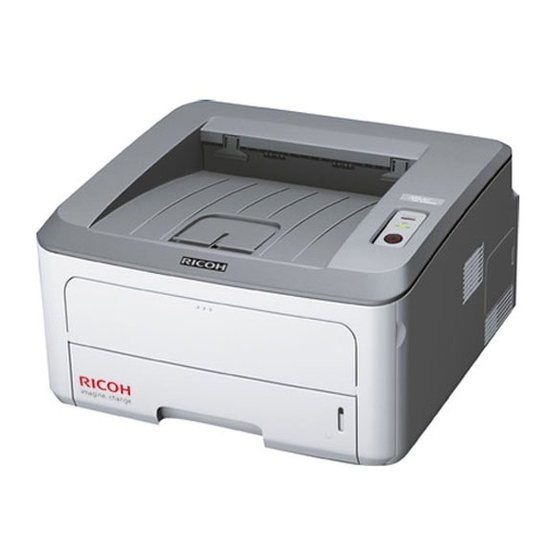
Page 9: Printer Overview
SP 3300DN output tray control panel control board cover front cover manual tray <Introduction> Printer overview * SP 3300DN is shown in the above figure. tray 1 optional tray 2 paper level indicator output support manual tray paper width guides... -
Page 10: Rear View
SP 3300DN only. Control panel overview Alert: Indicates the status of your printer. See page 9.5. Online: Indicates the status of your printer. See page 9.5. Cancel: Prints a demo page or configuration page. Cancels the print job. -
Page 11: Finding More Information
Finding more information You can find information for setting up and using your printer from the following resources, either printed or onscreen. Quick Install Provides information on setting up your Guide printer, therefore, be sure to follow the instructions in the guide to get the printer ready. -
Page 12: Altitude Adjustment
Ensure that you have installed the printer driver with the provided supplied CD-ROM. For Windows, from the Start menu, select Programs or All Programs > SP 3300 Series > Printer Settings Utility. For MAC OS X, open the Applications folder > RNP > SP 3300 Series > Printer Settings Utility. -
Page 13: Changing The Font Setting
Ensure that you have installed the printer driver from the provided supplied CD-ROM. For Windows, from the Start menu, select Programs or All Programs > SP 3300 Series > Printer Settings Utility. For MAC OS X, open the Applications folder > RNP > SP 3300 Series > Printer Settings Utility. -
Page 14: Basic Setup
• Using toner save mode Printing a demo page After setting up your printer, print a demo page to make sure that the printer is operating correctly. Press and hold the Cancel button for about 2 seconds. A demo page prints out. -
Page 15: Software Overview
• System requirements Supplied software You must install the printer software using the supplied CD-ROM after you have set up your printer and connected it to your computer. The CD provides you with the following software: Contents Windows • Printer driver: Use this driver to take full advantage of your printer’s features. -
Page 16: System Requirements
System requirements Before you begin, ensure that your system meets the following requirements: Windows Item Requirements Operating Windows 2000/XP/Vista and Windows Server 2003 system Windows 2000 Pentium II 400 MHz or higher Windows XP/ Pentium III Vista and 933 MHz or Windows Server higher 2003... -
Page 17: Network Setup (Sp 3300Dn Only)
You need to set up the network protocols on the printer to use it as your network printer. Protocols can be set up by the following programs: • Web Image Monitor SP 3300 Series: A web server embedded to your network print server, which allows you to configure the network parameters necessary for the printer to connect to various network environments. -
Page 18: Loading Print Media
Loading print media This chapter will help you understand the types of paper you can use with your printer and how to properly load paper in the different paper trays for the best print quality. This chapter includes: • Selecting print media •... -
Page 19: Supported Sizes Of Paper
Supported sizes of paper Type Size Letter Legal Folio Oficio Plain paper JIS B5 ISO B5 Executive Envelope B5 Envelope Monarch Envelope COM-10 Envelope Envelope DL Envelope C5 Envelope C6 Transparency Letter, A4 Letter, Legal, Folio, Oficio, A4, JIS B5, Labels ISO B5, Executive, A5, A6... -
Page 20: Guidelines For Selecting And Storing Print Media
- Carbonless paper and Tracing paper. • Use of these types of paper could result in paper jams, chemical smells, and damage to your printer. • Store print media in its ream wrapper until you are ready to use it. -
Page 21: Loading Paper
Exposed adhesive can also cause damage to printer components. • Do not run a sheet of labels through the printer more than once. The adhesive backing is designed for only a single pass through the printer. -
Page 22: Using The Tray 1 Or The Optional Tray 2
Using the tray 1 or the optional tray 2 Use the print material you use for the majority of your print jobs in the tray 1. The tray 1 can hold a maximum of 250 sheets of 75 g/m paper. You can purchase an optional tray 2 and attach it below the tray 1 to load an additional 250 sheets of paper. -
Page 23: Using Manual Feeder
The printer picks up the print media and prints. Note • If you do not press the Cancel button, after a pause the printer will automatically pick the print media. Insert the next sheet into the manual tray and press the Cancel button. -
Page 24: Knowing An Output Location
Knowing an output location The output tray collects paper face down, in the order in which the sheets were printed. Notes • If you continuously print many pages, the surface of the output tray may become hot. Be careful not to touch the surface, and especially keep children away from the surface. -
Page 25: Basic Printing
For Windows XP (32/64 bit) and Windows Server 2003, select Printers and Faxes. For Windows Vista, select Control Panel > Hardware and Sound > Printers. Double-click the SP 3300 Series icon. From the Document menu, select Cancel. Note • You can access this window simply by double-clicking the printer icon at the bottom right corner of the Windows desktop. -
Page 26: Supplies And Accessories
When the toner runs out, you can order the following type of toner cartridge for your printer: Toner yield: Approx. 5,000 pages Accessory You can purchase and install the following accessory to your printer: Accessory Description Optional Tray If you are experiencing frequent paper supply problems, you can attach additional 250 sheet tray. -
Page 27: Maintenance
Cleaning the outside of the printer Clean the cabinet of the printer with a soft, lint-free cloth. You can dampen the cloth slightly with water, but be careful not to let any water drip onto or into the printer. -
Page 28: Maintaining The Toner Cartridge
• Do not remove the toner cartridge from its package until ready for use. • Do not refill the toner cartridge. The printer warranty does not cover damage caused by using a refilled cartridge. • Store toner cartridge in the same environment as the printer. -
Page 29: Redistributing Toner Cartridge
Open the front cover. Pull the toner cartridge out. Notes • Avoid reaching too far into the printer. The fuser area may be hot. • To prevent damage to the toner cartridge, do not expose it to light for more than a few minutes. Cover it with a piece of paper, if necessary. -
Page 30: Replacing The Toner Cartridge
• Do not touch the green surface underside of the toner cartridge. Use the handle on the cartridge to avoid touching this area. Hold the toner cartridge by the handle and slowly insert the cartridge into the opening in the printer. <Maintenance>... -
Page 31: Printing A Configuration Page
Close the front cover. Make sure that the cover is securely closed. Printing a configuration page You can print a configuration page to view current printer settings, or to help troubleshoot printer problems. Press and hold the Cancel button for about 5 seconds. -
Page 32: Troubleshooting
If the paper does not move when you pull, or if you do not see the paper in this area, check the fuser area around the toner cartridge. See page 9.2. Insert the tray 1 into the printer until it snaps into place. Printing automatically resumes. In the optional tray 2 Pull the optional tray 2 open. -
Page 33: Around The Toner Cartridge
In the manual tray Remove the jammed paper from the printer. Open and close the front cover. Load a paper into the manual feeder, then the printer resumes. Around the toner cartridge Note The fuser area is hot. Take care when removing paper from the printer. -
Page 34: In The Paper Exit Area
Duplex jam 0 Pull the duplex unit out of the printer. Remove the jammed paper from the duplex unit. If the paper does not come out with the duplex unit, remove the paper from the bottom of the printer. -
Page 35: Tips For Avoiding Paper Jams
• Do not overload the tray. Ensure that the paper level is below the paper capacity mark on the inside wall of the tray. • Do not remove paper from the tray while your printer is printing. • Flex, fan, and straighten paper before loading. -
Page 36: Troubleshooting Checklist
Troubleshooting checklist If the printer is not working properly, consult the following checklist. If the printer does not pass a step, follow the corresponding suggested solutions. Condition Suggested solutions Make sure that the • If the Online LED is off, check the power Online LED on the cord connection. -
Page 37: Printer Specifications
Open the front cover and remove the debris. Disconnect and reconnect the printer cable. Try a print job that you have already printed successfully. If possible, attach the cable and printer to another computer and try a print job that you know works. -
Page 38: Solving Print Quality Problems
Solving print quality problems Dirt inside of the printer or improper paper loading may reduce print quality. See the table below to troubleshoot problems. Condition Suggested solutions Light or faded If a vertical white streak or faded area appears... - Page 39 See page 8.4. • Parts of the printer may have toner on them. If the defects occur on the back of the page, the problem will likely correct itself after a few more pages.
-
Page 40: Common Windows Problems
• Check the paper type and quality. See page 5.2. • Install a new toner cartridge. See page 8.4. • If the problem persists, the printer may require repair. Contact a service representative. Character voids Character voids are white areas within characters that should be solid black: •... -
Page 41: Common Postscript Problems
Common PostScript problems The following situations are PostScript language specific and may occur when several printer languages are being used. Note • To receive a printed or screen displayed message when PostScript errors occur, open the Print Options window and click the desired selection next to the PostScript errors section. -
Page 42: Installing Accessories
If the module does not seem to fit into the slot properly, carefully try the previous procedure again. Replace the control board cover. Reconnect the power cord and printer cable, and turn the machine Note To release the memory module, pull the two tabs on the sides of the slot outwards, then the module springs out. -
Page 43: Activating The Added Memory In The Ps Printer Properties
Activating the added memory in the PS printer properties After installing the memory module, you need to select it in the printer properties of the PostScript printer driver in order to use it. Make sure that the PostScript printer driver is installed on your computer. -
Page 44: Specifications
Specifications Printer specifications Item Specifications and description Printing speed Up to 28 ppm in A4 (30 ppm in Letter) Duplex: 14 ipm in A4 (14.5 ipm in Letter) Resolution Up to 1200 x 1200 dpi effective output Warm-up time Less than 15 seconds (From sleep mode) First print out 8.5 seconds (From Ready) - Page 45 9.7 PS errors 9.10 Windows 9.9 quality problems 9.7 redistributing, toner cartridge 8.3 replacing, toner cartridge 8.4 special print media, guidelines 5.3 specification, printer 11.1 supplies, order information 7.1 system requirements Windows 3.2 toner cartridge maintaining 8.2 redistributing 8.3 replacing 8.4...
- Page 46 Software section...
- Page 47 Software section Contents 1. Installing Printer Software in Windows Installing Printer Software ... 3 Installing Software for Local Printing ... 3 Installing Software for Network Printing ... 6 Reinstalling Printer Software ... 9 Removing Printer Software ... 10 2. Basic Printing Printing a Document ...
- Page 48 Using Onscreen Help ... 24 Opening the Troubleshooting Guide ... 24 Changing the Status Monitor Program Settings ... 24 7. Using Your Printer with a Macintosh Installing Software ... 25 Printer driver ... 25 Setting Up the Printer ... 26 For a Network-connected ...
-
Page 49: Installing Printer Software In Windows
A local printer is a printer directly attached to your computer using the printer cable supplied with your printer, such as a USB or parallel cable. If your printer is attached to a network, skip this step and go to “Installing Software for Network Printing” on page 6. - Page 50 • After connecting the printer, click Next. • If you don’t want to connect the printer at this time, click Next, and No on the following screen. Then the installation will start and a test page will not be printed at the end of the installation.
- Page 51 • After connecting the printer, click Next. • If you don’t want to connect the printer at this time, click Next, and No on the following screen. Then the installation will start and a test page will not be printed at the end of the installation.
-
Page 52: Installing Software For Network Printing
Click Finish. Installing Software for Network Printing When you connect your printer to a network, you must first configure the TCP/IP settings for the printer. After you have assigned and verified the TCP/IP settings, you are ready to install the software on each computer on the network. - Page 53 • If you do not see your printer on the list, click Update to refresh the list, or select Add TCP/IP Port to add your printer to the network. To add the printer to the network, enter the port name and the IP address for the printer.
- Page 54 Set IP Address button. The Set IP Address window appears. Do as follows: a. Select a printer to be set with a specific IP address from the list. b. Configure an IP address, subnet mask, and gateway for the printer manually and click Configure to set the specific IP address for the network printer.
-
Page 55: Reinstalling Printer Software
Select the components you want to reinstall and click If you installed the printer software for local printing and select SP 3300 Series, the window asking you to print a test page appears. Do as follows: a. To print a test page, select the check box and click b. -
Page 56: Removing Printer Software
Removing Printer Software Start Windows. From the Start menu select Programs or All Programs → SP 3300 Series → Maintenance. Select Remove and click Next You will see a component list so that you can remove any item individually. Select the components you want to remove and then click... -
Page 57: Basic Printing
Please refer to the OS Compatibility section of Printer Specifications in your Printer User’s Guide. • If you need to know the exact name of your printer, you can check the supplied CD-ROM. The following procedure describes the general steps required for printing from various Windows applications. -
Page 58: Printing To A File (Prn)
Printer Settings You can use the printer properties window, which allows you to access all of the printer options you need when using your printer. When the printer properties are displayed, you can review and change the settings needed for your print job. -
Page 59: Layout Tab
You have to load one sheet at a time into the Manual Feeder. If the paper source is set to Auto Select, the printer automatically picks up print material in the following tray order: Manual Feeder, Tray 1, optional Tray 2. -
Page 60: Graphics Tab
• On: Select this option to allow the printer to use less toner on each page. • Off: If you don’t need to save toner when printing a document, select this option. -
Page 61: Extras Tab
• Print Subset: You can set the sequence in which the pages print. Select the print order from the drop-down list. - Normal (1,2,3): Your printer prints all pages from the first page to the last page. - Reverse All Pages (3,2,1): Your printer prints all pages from the last page to the first page. -
Page 62: About Tab
When you save Favorites, all current driver settings are saved. To use a saved setting, select the item from the Favorites drop down list. The printer is now set to print according to the Favorites setting you selected. To delete a Favorites item, select it from the list and click Delete. -
Page 63: Advanced Printing
Guide may differ depending on the printer in use. However the composition of the printer properties window is similar. • If you need to know the exact name of your printer, you can check the supplied CD-ROM. This chapter includes: •... -
Page 64: Printing Posters
Printing Booklets This printer feature allows you to print your document on both sides of the paper and arranges the pages so that the paper can be folded in half after printing to produce a booklet. -
Page 65: Printing On Both Sides Of Paper
Fitting Your Document to a Selected Paper Size This printer feature allows you to scale your print job to any selected paper size regardless of the digital document size. This can be useful when you want to check fine details on a small document. -
Page 66: Using Watermarks
“CONFIDENTIAL” printed diagonally across the first page or all pages of a document. There are several predefined watermarks that come with the printer, and they can be modified, or you can add new ones to the list. Using an Existing Watermark To change the print settings from your software application, access printer properties. -
Page 67: Using Overlays
To print a letter with your company’s letterhead, you WORLD BEST do not need to load preprinted letterhead paper in the printer. You need only tell the printer to print the letterhead overlay on your document. Creating a New Page Overlay To use a page overlay, you must create a new page overlay containing your logo or image. -
Page 68: Using Windows Postscript Driver
Printer Settings You can use the printer properties window, which allows you to access all of the printer options you need when using your printer. When the printer properties are displayed, you can review and change the settings needed for your print job. -
Page 69: Sharing The Printer Locally
• Check the Operating System(s) that are compatible with your printer. Please refer to the OS Compatibility section of Printer Specifications in your Printer User Guide. • If you need to know the exact name of your printer, you can check the supplied CD-ROM. Setting Up a Host Computer Start Windows. -
Page 70: Using Utility Applications
Change the settings. To send the changes to the printer, click the Apply button. If you connect your printer to a network, the Web Image Monitor SP 3300 Series window appears instead of the Printer Settings Utility window. Using Onscreen Help... -
Page 71: Using Your Printer With A Macintosh
Double-click the MAC_Installer folder. Double-click the MAC_Printer folder. For Mac OS 8.6~9.2, double-click the SP 3300 Series Installer Classic icon. For Mac OS 10.1 or higher, double-click the SP 3300 Series Installer OSX icon. Click Continue. Click Install. After the installation is finished, click Quit. -
Page 72: Setting Up The Printer
For MAC OS 10.3, if Auto Select does not work properly, select SP 3300 Series in Printer Model and your printer name in Model Name. • For MAC OS 10.4, if Auto Select does not work properly, select SP 3300 Series in Print Using and your printer name in Model. -
Page 73: Printing
• You can check your printer name in the supplied CD-ROM. Printing a Document When you print with a Macintosh, you need to check the printer software setting in each application you use. Follow these steps to print from a Macintosh. -
Page 74: Printing Multiple Pages On One Sheet Of Paper (N-Up Printing)
To print a border around each page on the sheet, select the option you want from the Border drop-down list. Click Print, and the printer prints the selected number of pages on one side of each page. Using Your Printer with a Macintosh... -
Page 75: Duplex Printing
▲ Mac OS 10.3 Select a binding orientation from Two-Sided option. Click Print and the printer prints on both sides of the paper. : If you have selected duplex printing and then try to print multiple copies of a document, the printer may not print the document in the way you want. - Page 76 Macintosh 25 Windows 3 Layout properties, set Windows 13 Macintosh driver install 25 printing 27 setting up the printer 26 n-up printing Macintosh 28 Windows 17 orientation, print Windows 13 overlay create 21 delete 21 print 21...
- Page 77 uninstall, software Windows 10 watermark create 20 delete 20 edit 20 print 20...
- Page 78 M000-8650A...
- Page 79 Network Printer User’s Guide (SP 3300DN only)
-
Page 80: Original Ssleay License
OpenSSL License Copyright (c) 1998-2001 The OpenSSL Project. All rights reserved. Redistribution and use in source and binary forms, with or without modification, are permitted provided that the following conditions are met: 1. Redistributions of source code must retain the above copyright notice, this list of conditions and the following disclaimer. - Page 81 Contents of this manual are subject to change without prior notice. In no event will the company be liable for direct, indirect, incidental or consequential damages as a result of handling or operating the machine. Copyright© 2008 • Microsoft, Windows, Windows 2000, Windows XP, Windows Vista, and Windows Server 2003 are registered trademarks of Microsoft Corporation. •...
- Page 82 Introduction ... 1.1 Supported network environments ... 1.1 Network Printer Card ... 1.1 System requirements ... 1.1 Connecting your Network Printer Card ... 1.1 2. Programs supplied on the CD System requirements ... 2.1 Installing software ... 2.1 Uninstalling software ... 2.1 IP address setup ...
- Page 83 5. EtherTalk environment EtherTalk printing ... 5.1 Configuring EtherTalk ... 5.1 Configuring the printer ... 5.1 TCP/IP printing ... 5.2 Bonjour printer ... 5.2 6. Administration Tools Maintenance using Internet Services ... 6.1 Enabling Internet Services ... 6.1 Checking Printer Status ... 6.1 Printing Reports ...
-
Page 84: Getting Started
Getting started Introduction The Network Printer Card allows you to connect your printer directly to a network to share the printer among multiple users. The printer functions as a network print server supporting various network environments, such as Windows 2000/XP/Vista, Windows Server 2003, and Macintosh 8.6 or higher. -
Page 85: Programs Supplied On The Cd
You should remove the Network utilities if you are upgrading the software or if the installation fails. Note: Close all programs before uninstalling software. Click Start > Programs > SP 3300 Series > Set IP > Set IP. Click OK to confirm uninstallation. Click Finish when uninstallation is done. -
Page 86: Ip Address Setup
You can set your print server’s IP address via the following methods: • Set IP program: Go to the Using SetIP. • Web Image Monitor SP 3300 Series: Once you have set an IP address for your network print server, you can use the embedded web server in the network printer card to change the address. -
Page 87: Print Driver Installation For Networked Printers
Browse to the required Windows Vista driver on the CD-ROM and select OK. Note: The driver will be found in the Printer folder on the CD in the appropriate PCL folder. The driver is identified by the file extension .inf. -
Page 88: Windows 2000 (Tcp/Ip)
Browse to the required Windows XP driver on the CD-ROM and select OK. Note: The driver will be found in the Printer folder on the CD in the appropriate PCL folder. The driver is identified by the file extension .inf. -
Page 89: Test Print
Open a document on a client workstation. Select the SP 3300 Series as the printer for sending documents to. Print the document on the device and verify that it prints correctly. Ensure the print driver is installed on every workstation that will be sending jobs to the device. -
Page 90: Tcp/Ip Environment
DHCP server, if one exists. To set an IP address manually, see page 2.2. Configuring DHCP/BOOTP To enable or disable DHCP/BOOTP, use one of the following methods: • Web Image Monitor SP 3300 Series: Select Network Settings > TCP/IP and select DHCP or BOOTP from the IP Address Assignment Method list. -
Page 91: Slp
Internet networks. Configuring WINS Access Web Image Monitor SP 3300 Series and select Network Settings > TCP/IP. You will configure two WINS server addresses, the Primary WINS Server or the Secondary WINS Server. The default value is 0.0.0.0. -
Page 92: Bonjour
Simple Service Discovery Protocol (SSDP) which allows addressing, description, and discovery. Configuring UPnP • Web Image Monitor SP 3300 Series: Select Network Settings > UPnP. - Auto IP Enabled: You can enable or disable Auto IP. When this option is selected, the network print server cannot find the control point and receive an IP address from the control point. -
Page 93: Printing Protocols
Configuring Standard TCP/IP in Windows 2000/XP/Vista/ Windows Server 2003 You can enable or disable the Standard TCP/IP Printing port through Web Image Monitor SP 3300 Series. Select Network Settings > Raw TCP/IP,LPR,IPP. You can also change the port number of the Standard TCP/IP port. The default port number is 9100. -
Page 94: Ipp Port
Setting IPP security Web Image Monitor SP 3300 Series allows administrators to choose an authentication method and to create or modify user accounts. Run your web browser and access Web Image Monitor SP 3300 Series. -
Page 95: Additional Functions
Click Apply. Only system administrators or authorised users can set, via Web Image Monitor SP 3300 Series, IP addresses that can access the device. Up to 10 addresses or ranges of address choices can be made and set. Authorised users are able to change the action (Apply/ Undo) and to print to the network print server. -
Page 96: Ethertalk Environment
The following steps must be taken to configure the network printer for use on a Macintosh system. If the network printer you want to use is not listed in the printer pop-up menu when you try to print a document, you should add it to your list of available printers. -
Page 97: Tcp/Ip Printing
LPD/LPR, IPP, or Socket or Jet Direct) to make itself accessible to your computer. If the IP printer you want to use is not listed when you want to print, you can add it to your list of available printers. To add an IP printer, you need to know its IP address or DNS name. -
Page 98: Administration Tools
URL field: http://192.168.100.100 Checking Printer Status Use these instructions to check the status of SP 3300 Series, the paper trays and consumables. To check the status, perform these steps: Enable SP 3300 Series (see “Enabling Internet Services” on page 6.1). -
Page 99: Appendix
2003 • Macintosh: MAC OS 8.6 ~ 9.2, 10.1 ~ 10.5 Protocol TCP/IP, EtherTalk, SNMP, HTTP 1.1, Bonjour Configurationu SetIP, Web Image Monitor SP 3300 Series tilities Hardware • PC: requirements - 80486 CPU or higher - Minimum of 16 MB of RAM - 2 MB of free disk space •... - Page 100 Printing Reports 6.1 Upgrading Firmware 6.1 IP address setup BOOTP 2.2 DHCP 2.2 SetIP 2.2 Web Image Monitor SP 3300 Series 2.2 IP filtering 4.6 IPP port 4.5 LEDs 1.1 LPR port 4.4 Network administration software, install 2.1 Network environments, supported 1.1 Network Printer Card 1.1...
- Page 101 M000-8651...