
Related Manuals for Breville BES870


Summary of Contents for Breville BES870
-
Page 1: Barista Express
Barista Express ™ Instruction Book - BES870 BES870_IB_F16.indd 1 16/06/2016 3:18 PM... - Page 2 RECOMMENDS • Remove safely discard SAFETY FIRST any packaging material and promotional labels or At Breville we are very safety stickers before using the conscious. We design and Barista Express™ for the manufacture consumer products with the safety of you, first time.
- Page 3 • Do not use the Barista • Do not operate the Express™ on a sink drain grinder without the board. hopper lid in position. Keep fingers, hands, hair, • Do not place the Barista clothing and utensils away Express™ on or near a hot from the hopper during gas or electric burner, or operation.
- Page 4 IMPORTANT • Do not touch hot surfaces. Allow the Barista SAFEGUARDS Express™ to cool down FOR ALL before moving or cleaning ELECTRICAL any parts. • Do not place anything, APPLIANCES other than cups for • Unwind the power cord warming, on top of the fully before use.
- Page 5 Return the electrical appliances. entire appliance to It is advisable that a the nearest authorised safety switch with a rated Breville Service Centre residual operating current for examination and/or not exceeding 30mA be repair. installed in the electrical circuit supplying the •...
- Page 6 INTEGRATED CONICAL BURR ELECTRONIC PID TEMPERATURE GRINDER CONTROL Stainless steel conical burrs maximise ground For increased temperature stability. coffee surface area for a full espresso flavour. AUTO PURGE ADJUSTABLE GRIND SIZE Automatically adjusts water temperature after 18 grind settings (fine, 1–16, coarse) from steam for optimal coffee extraction.
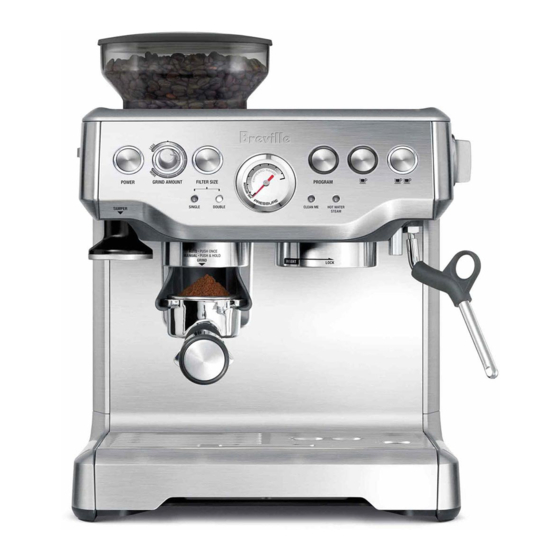
- Page 7 Components A. Automatic Dosing. K. Group Head. Select between single or double L. Extra-Tall Cup Height For Coffee Mugs. filter basket. M. Removable Wet And Dry Coffee. B. Mechanical Clutch Protection. Separator Drip Tray. C. Grind Size Selector. N. Drip Tray Full Indicator. D.
- Page 8 U. Instant Hot Water. NOT SHOWN Dedicated hot water outlet for making long blacks and pre-heating cups. PID Temperature Control. For increased temperature stability. V. Stainless Steel Portafilter. With commercial style spouts. Adjustable Temperature Control. W. 360° Swivel Action Steam Wand For optimum coffee flavour.
- Page 9 • To install filter, push down to lock into place. • Slide the water tank into position and lock into place. NOTE To purchase water filters contact Breville Customer Service Centre on 1300 139 798 (Australia) or 0800 273 845 (New Zealand). BES870_IB_F16.indd 9...
-
Page 10: Filling The Water Tank
FILLING THE WATER TANK There are 18 settings on the GRIND SIZE select dial - The smaller the number, the finer • Ensure the water filter is securely fitted inside the grind size. The larger the number, the the tank. coarser the grind size. - Page 11 ADJUSTING THE GRIND AMOUNT Set the GRIND AMOUNT dial to the 3 o’clock position as a starting point for dose amount. Adjust towards LESS or MORE as required to adjust the dose amount so the cap on the supplied tamper is level with the top edge of the filter basket rim, AFTER tamping.
- Page 12 PRE-PROGRAMMED Insert portafilter into group head to extract coffee. SHOT VOLUME – 2 CUP Press the 2 CUP button once. A preset double espresso volume of approx. 60ml will be extracted. The machine will automatically stop INSERT LOCK once the preset volume has been extracted. PRE-PROGRAMMED PROGRAM SHOT VOLUME –...
- Page 13 RESETTING DEFAULT VOLUMES ESPRESSO PRESSURE GAUGE To reset the machine to the default 1 CUP IDEAL ESPRESSO ZONE and 2 CUP shot volumes and espresso water temperature press and hold the PROGRAM The gauge needle, when positioned in button until the machine beeps three times. the middle zone during extraction, indicates Release the PROGRAM button.
- Page 14 Standby to the Steam position to begin texturing. • To stop, return the STEAM dial to the STANDBY position and remove the jug. TEXTURING MILK The Breville Barista Express™ comes complete with a commercial style 360˚stainless steel steam wand. NOTE WARNING...
- Page 15 USING HOT WATER OUTLET Turn the STEAM/HOT WATER selector dial to the hot water position. The white steam light will flash to indicate the machine is heating to create hot water. When the steam light stops flashing, the hot POWER PROGRAM water is up to temperature.
- Page 16 PRE-HEATING 6. Increase Water Temperature +2˚C: In Advanced Mode, press the 2 CUP button. Heating your cup or glass A warm cup will help maintain the coffee’s optimal temperature. Pre-heat your cup by rinsing with hot water and place on the cup warming tray.
- Page 17 SELECTING A FILTER BASKET NOTE Single Wall Filter Baskets Regardless of whether you use Single Wall or Dual Wall filter baskets, use the 1 CUP basket Use Single Wall filter baskets if grinding fresh when brewing a single cup and the 2 CUP whole coffee beans.
-
Page 18: The Grind
THE GRIND TRIMMING THE DOSE When grinding coffee beans, the grind size • Insert the Razor™ dosing tool into the coffee basket until the shoulders of the tool rest on should be fine but not too fine. The grind size the rim of the basket. - Page 19 ADJUSTING CONICAL BURRS Some types of coffee may require a wider grind range to achieve an ideal extraction or brew. A feature of your Barista Express™ is the ability to extend this range with an adjustable upper burr. We recommend making only one adjustment at a time. SINGLE DOUBLE PUSH...
- Page 20 EXTRACTION GUIDE GRIND GRIND DOSE TAMP SHOT TIME OVER EXTRACTED TOO FINE TOO MUCH TOO HEAVY OVER 40 SEC BITTER • ASTRINGENT 10-12g (1 CUP) BALANCED OPTIMUM 25-35 SEC 15-20kg 18-20g (2 CUP) UNDER EXTRACTED TOO COARSE TOO LITTLE TOO LIGHT UNDER 20 SEC UNDERDEVELOPED •...
- Page 21 • Keep the tip just under the surface of the HINTS & TIPS milk until the milk is spinning clockwise, producing a vortex (whirlpool effect). • Always use freshly ground coffee for a superior flavour and body. • Use freshly roasted coffee beans, with a ‘roasted on’...
- Page 22 • To install, push down to lock into place. The water filter can be removed from the water tank during operation if not required. NOTE For replacement water filters contact Breville Customer Service Centre on 1300 139 798 (Australia) or 0800 273 845 (New Zealand). BES870_IB_F16.indd 22...
- Page 23 CLEANING CONICAL BURRS Regular cleaning helps the burrs achieve consistent grinding results. SINGLE DOUBLE PUSH POWER GRIND AMOUNT FILTER SIZE Unlock hopper Remove beans Replace & lock Run grinder Unlock & remove hopper until empty hopper Remove upper Clean upper Clean lower Push upper Lock upper burr...
-
Page 24: Cleaning Cycle
CLEANING CYCLE The espresso machine features an in-built cleaning cycle which should be carried out periodically. The CLEAN ME light will automatically illuminate to indicate when a cleaning cycle is required. INSERT LOCK CLEAN ME POWER Cleaning required Empty drip tray and fill Insert cleaning disc &... - Page 25 WARNING Do not immerse power cord, power plug or appliance in water or any other liquid. The water tank should never be removed or completely emptied during decalcifying. DECALCIFYING THE MACHINE • Remove the portafilter and frothing attachment. Pour the mixture of white vinegar and water into the water tank.
- Page 26 CLEANING THE CONICAL BURR GRINDER This grinder cleaning cycle removes oil build-up on the burrs which can impede performance. SINGLE DOUBLE PUSH POWER GRIND AMOUNT FILTER SIZE POWER GRIND AMOUNT FILTER SIZE Unlock hopper Empty hopper Replace hopper Lock hopper Run grinder empty Unlock hopper Remove hopper...
-
Page 27: Cleaning The Steam Wand
CLEANING THE STEAM WAND Run steam to clear milk Wipe steam wand after Clean hole with pin Remove tip Soak tip overnight then from wand after texturing each use re-attach The steam wand should always be cleaned • If the steam wand continues to be blocked, after texturing milk. - Page 28 CLEANING THE OUTER HOUSING / STORING YOUR MACHINE CUP WARMING PLATE Before storing, press the POWER button to off, turn the steam dial to STANDBY switch Off at The outer housing and tray warming plate can the power outlet and unplug. be cleaned with a soft, damp cloth.
-
Page 29: Troubleshooting
Troubleshooting PROBLEM POSSIBLE CAUSES EASY SOLUTION • • When the machine is Steam dial is not in STANDBY Turn the Steam dial to ‘STANDBY’ switched On, the steam position. position. Machine will commence lights is flashing. normal heat up procedure. •... - Page 30 PROBLEM POSSIBLE CAUSES EASY SOLUTION • • Coffee is too cold. Cups not preheated. Preheat cups. Refer to ‘Pre-Warming The Cups’, page 21. • • Milk not heated enough (if making When the base of the jug a cappuccino or latté). becomes too hot to touch this is when the milk is heated at the correct temperature.
- Page 31 PROBLEM POSSIBLE CAUSES EASY SOLUTION • • Coffee extracts as drops from The water tank is empty or low. Refer to ‘Filling The Water the portafilter. Tank’, page 10. • • Coffee grind is too fine. Ensure you use a suitable espresso grind.
- Page 32 PROBLEM POSSIBLE CAUSES EASY SOLUTION • Machine is not working. The safety thermal-cut may have activated due to the pump or grinder overheating. • Turn the machine off and allow to cool for about 30–60 minutes. • • No ground coffee coming from No coffee beans in hopper.
-
Page 33: Coffees To Try
MACCHIATO Coffees to try Traditionally served short, the macchiato is also poured as a long black with a dash of milk or a dollop of textured milk. CAPPUCCINO A single shot of espresso with textured milk, garnished with drinking chocolate. Cup size 150–220ml. - Page 34 Notes BES870_IB_F16.indd 34 16/06/2016 3:18 PM...
- Page 35 BES870_IB_F16.indd 35 16/06/2016 3:18 PM...
- Page 36 Web: www.breville.co.nz Breville is a registered trademark of Breville Pty. Ltd. A.B.N. 98 000 092 928. Copyright Breville Pty. Ltd. 2016. Due to continued product improvement, the products illustrated/photographed in this brochure may vary slightly from the actual product.