Table of Contents
Advertisement
Advertisement
Table of Contents

Related Manuals for Saeco Conical Burr Grinder Titan

Summary of Contents for Saeco Conical Burr Grinder Titan
- Page 1 Instruction Manual Manuel d’instruction Manual de instrucción...
-
Page 2: Table Of Contents
Introduction Thank you for choosing Saeco’s Titan Burr Grinder. Small, versatile and powerful, the Titan will adapt to all of your coffee needs. The Titan features a 1-10 cup count with an automatic shut off. The burrs guarantee a uniform grind, of constant quality whether for percolator, drip, French press or espresso. -
Page 3: Important Safeguards
1. Close supervision is necessary when any appliance is used by or near children. 2. Do not abuse cord. Never carry the coffee grinder by the cord or pull it to remove it from an outlet. Instead grasp the plug firmly and pull to disconnect. -
Page 4: Short Cord Instructions
TO OTHERWISE AVOID INJURY: Keep appliance from direct contact with water. Keep your hands and the cord away from the moving parts of the appliance during operation. When cleaning, never scrub vigorously or use a hard or damaging tool. Short Cord Instructions A short power supply cord is provided to reduce your risk of tripping over, or otherwise becoming entangled with, a longer cord. -
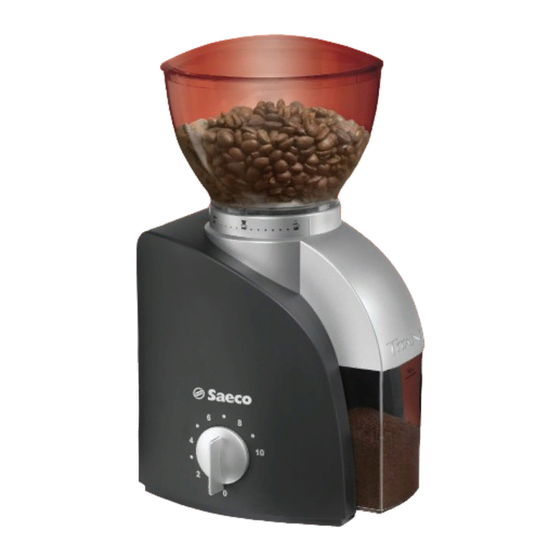
Page 5: Your Saeco Burr Grinder
Your Saeco Burr Grinder Grind Control Ring Cup Control Dial (Automatic Shut Off) Bean Hopper Lid Bean Hopper (Removable) Internal Cord Storage Preground Chute Ground Coffee Container (Removable) -
Page 6: Technical Specifications
Technical Specifications Voltage Power Consumption Dimensions (w x d x h) Weight Cord Length Using your Saeco Burr Grinder Initial Set Up 1. Carefully unpack your grinder making sure to remove all literature and packing materials. 2. Place grinder on a flat, steady surface that is clean, well lit, dry and close to a power outlet. 3. - Page 7 Using your Saeco Burr Grinder Grinding Beans 1. Fill the bean hopper with fresh coffee beans. 2. Replace the lid on the coffee bean hopper. 3. Make sure the ground coffee container is firmly in place. 4. Select the number of cups of coffee you will be brewing, from 1 to 10. 5.
-
Page 8: Grind Setting Chart
Grind Setting Chart The grind control ring goes from fine to coarse. Settings will vary according to the desired taste and type of coffee being brewed. We recommend you start at the following settings and experiment until you find the perfect setting to meet your needs: Fine Espresso and Cappuccino Helpful Grinding Tips... -
Page 9: Cleaning And Maintenance
Cleaning and Maintenance 1. CAUTION: Always unplug your grinder after use and before cleaning. To protect against electric shock, do not immerse cord, plug or unit in water or other liquid. 2. Clean the ground coffee chute. For best results we recommend doing this after every use. 3. -
Page 10: Troubleshooting
Troubleshooting PROBLEM POSSIBLE CAUSE The unit does not grind. Cup control dial has not been set. Unit is unplugged. No power to outlet. Motor has overheated. Not enough ground coffee Cup control dial set incorrectly. dispensed by end of cycle. Insufficient amount of whole beans in bean hopper. -
Page 11: Limited Warranty
Limited Warranty This warranty covers all defects in workmanship or materials in the mechanical and electrical parts, arising under normal usage and care, in this Saeco USA product for a period of 1 (one) year from the date of purchase. A valid proof-of-purchase must be provided prior to any warranty service being rendered. - Page 12 *Unauthorized returned products will not be accepted and will be returned to sender at sender's expense.* IN THE EVENT SERVICE IS REQUIRED: To obtain warranty service, a valid proof-of-purchase must be submitted to Saeco USA before returning product. Maintain a copy of proof-of-purchase for your records. Return Authorization number issued by Saeco USA is necessary to obtain warranty service and must be clearly labeled on box.