Table of Contents
Advertisement
WELCOME TO THE ULTIMATE HOT TUB EXPERIENCE!
We sincerely hope your spa life is a pleasant experience. If problems should
arise, contact your authorized Marquis
any of the following:
Email: service@marquiscorp.com
Web: www.marquisspas.com
Marquis Corp.
596 Hoffman Road
Independence, OR 97351, USA
This manual is provided to enhance your enjoyment of your spa and to
prevent non-warranty situations. It is your sole responsibility to read, under-
stand and comply with the instructions in the owner's manual. Please save
your original sales receipt for reference in case of a future warranty claim.
Failure to use, maintain or install the spa in compliance with this owner's
manual could result in loss of warranty coverage.
sERIAL NUMBER LOCATION
You will find the serial number on the tag in the equipment area.
PLEAsE FILL OUT AND KEEP FOR FUTURE REFERENCE
Name of Purchaser_________________________________________________________
Date of Purchase ________________________________________________________
Address _________________________________________________________________
City _________________________________State _________Zip Code ____________
Telephone ______________________________________________________________
Spa Model/Color ________________________________________________________
Spa Serial # _____________________________________________________________
Pack Serial # ____________________________________________________________
Dealer's Name __________________________________________________________
Dealer's Address ________________________________________________________
City ____________________________________State_______Zip Code_____________
Telephone ________________________________________________________________
Every effort has been made to ensure the accuracy of this manual. However,
Marquis
reserves the right to improve its product without notice. This could
®
create a minor variation between this manual and the actual product you
receive. We apologize for any inconvenience this may cause.
AQUATIC TRAINING VESSELS O WN E R' S M AN U AL
dealer. Or contact Marquis Corp. at
®
Advertisement
Table of Contents

Related Manuals for Marquis ATV-14


Summary of Contents for Marquis ATV-14
- Page 1 AQUATIC TRAINING VESSELS O WN E R’ S M AN U AL WELCOME TO THE ULTIMATE HOT TUB EXPERIENCE! We sincerely hope your spa life is a pleasant experience. If problems should arise, contact your authorized Marquis dealer. Or contact Marquis Corp. at ® any of the following: Email: service@marquiscorp.com Web: www.marquisspas.com...
-
Page 2: Table Of Contents
Personal Safety ......................6-7 • INsTALLATION INsTRUCTIONs Location ........................8-9 Filter Cartridges ....................... 10 Suction Guards......................11 Electrical Requirements ..................11 • MARQUIs ATV-14 MODEL................12 ® • ATV ZONEs ......................13-14 • sTARTING YOUR ATV ..................15-16 • •... -
Page 3: Important Safety Instructions
S A fE Ty I NS TR U CT I O NS The following instructions contain important safety information. We strong- ly encourage you to read and apply them. IMPORTANT sAFETY INsTRUCTIONs WHEN INsTALLING AND UsING THIs ELECTRICAL EQUIP- MENT, BAsIC sAFETY PRECAUTIONs sHOULD ALWAYs BE FOLLOWED, INCLUDING THE FOLLOWING: READ AND FOLLOW ALL INsTRUCTIONs... - Page 4 S A F E T Y I N S T R UC TI O N S 6. Your vessel requires the use of Ground Fault Circuit Interrupter (GFCI). • Before each use of the vessel and with the unit operating press the Test button on each breaker.
- Page 5 12. DANGER: Children are especially sensitive to hot water. At no time should children have unsupervised access to the vessel. Children must not be allowed to climb onto the vessel cover. All Marquis vessels are equipped with a locking cover that meets the ASTM F1346-91 Standard for Safety Covers.
-
Page 6: Personal Safety
S A fE Ty I NS T RU C TI O N S WARNING: Pregnant or possibly pregnant women should consult a physician before using the vessel. WARNING: To avoid injury, exercise care when entering and exiting the vessel. WARNING : MAINTAIN WATER CHEMISTRY IN ACCORDANCE WITH MANUFACTURER’S INSTRUCTIONS. -
Page 7: Personal Safety
S A f E T y I N S T R UC TI O N S PERsONAL sAFETY DOs: • Be sure your vessel is connected to the power supply correctly – only use a licensed electrical contractor. • Shut off power supply before draining the vessel or servicing the electri- cal components. -
Page 8: Installation Instructions
• The vessel contains equipment on both ends. Your vessel MUST be installed to permit access for servicing the equipment above and/or below any decks or floors. Access is essential and must allow adequate room for service. To facilitate repairs, Marquis Corp. or its agent may require access to vessel equipment. It is your responsibility to provide unencumbered access. See vessel diagrams for location of power supply. • Leave access to the circuit breakers in the sub panel. - Page 9 ou t d o o r & p a t io i n s t a lla t io n OUTDOOR INSTALLATION To install the vessel outdoors, a flat level concrete reinforced pad at a mini- mum thickness of 152mm - 203mm is required. Placement of the vessel on pavers, gravel, or dirt is not approved and will void the warranty. The reinforcing material should be attached to a #8 AWG bonding wire per national and local electrical code.
-
Page 10: Filter Cartridges
SHUT-OFF VALVES Your vessel is equipped with shut-off valves (see EqUipMEnT DiAGRAM) that shut off the water flow to the equipment system for authorized Marquis dealer ® service. At times, a new vessel or one that has recently been serviced, may have the shut-off valves partially closed which can restrict the water flow and hinder jet performance. Be sure the valves are fully open. -
Page 11: Electrical Requirements
in s t a llat i o n i ns t ru c ti o n s A fitting with a damaged guard(s) can be dangerous, especially to small chil- dren or people with long hair. Should any part of the body become drawn to a fitting, turn the jet pump(s) off immediately. Long hair should be restrained. never allow long hair to float freely in the vessel. Replace any missing or damaged suction guard(s). NOTE: it is normal for the flow rates of the suction fittings to vary from strong to barely noticeable. ELECTRICAL REQUIREMENTS It is the responsibility of the spa owner to ensure that all electrical connections are made by a qualified electrician in accordance with all national, state, and local electrical codes in effect at the time of installation. - Page 12 ATV-14 Specifications size 168.5” x 89.5” x 56” h 428 x 227 x 143 cm water depth 48” / 122 cm weight dry/full 2,140 lb / 16,526 lb 971 kg / 7,496 kg water capacity 1,725 gal / 6,529 l...
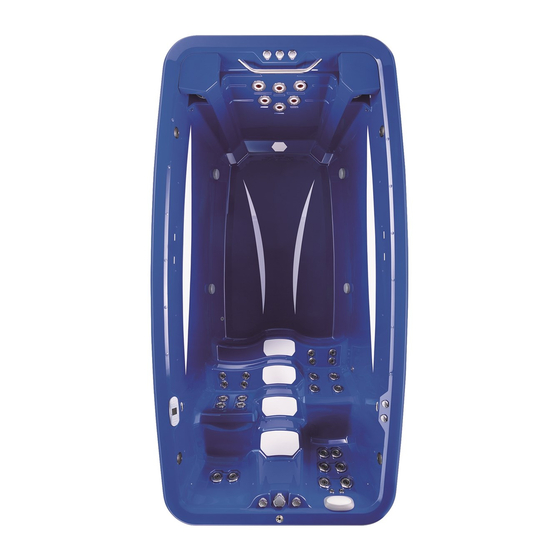
- Page 13 PUMP 1 ZONE 1C PUMP 2 ZONE 2 Swim jets Swim jets PUMP 3 ZONE 3 Swim jets...
- Page 14 PUMP 1 ZONE 1A PUMP 1 ZONE 1B Seat jets Seat jets...
-
Page 15: Starting Your Atv
Improperly wired vessels are beyond Marquis Corp. control and are not cov- ered under the warranty. Other items beyond Marquis Corp. control include, but are not limited to, damage resulting from: improper connections; accidents; failure to follow procedures and instructions defined in the Marquis printed ® instructions; cleaning agents; and natural occurrences including but not lim- ited to rodent or insect infestation, mold, lightning and other acts of nature. -
Page 16: Starting Your Atv
s t a rt i ng y o u r atv WARNING: Spa must be completely filled with water before turning on power. 7. Your vessel is now in “pump priming” mode and a “priming Mode” message displays in the LCD win- dow of the control panel. While in this mode the spa appears idle, which lasts approximately four to five minutes if not exited manually. To exit manually, press the JETS 1 pad. Vent air by slightly opening pump unions. 8. Allow the vessel to circulate on high-speed (see SpA COnTROL OpERATiOn) for four to five min- utes to discharge air from the plumbing system. Do not expect hot water immediately from the jets;... -
Page 17: Operating Your Atv
Never attempt to open or remove the cover by grasping or pulling on the cover skirting or cover lock straps as the skirting will tear. Marquis suggests you use the safety locks to help keep out unintended users, prevent covers from being blown off in windy conditions and to maximize heat retention/energy efficiency. The cover and retractable cover... -
Page 18: Operating Your Atv
operating y o u r atv PUMP PRIMING (Pr) pump priming feature begins at startup. When your vessel is energized, the LCD window displays a “pr” message. This mode lasts approximately four to five minutes if not exited manually by pressing the TEMp+ pad. Your vessel has been configured at the factory to run without any additional programming changes other than setting the desired temperature. We do however recommend that the time is set as this will be shown in the dis- play as a convenience and aids in controlling when the vessel will filter. See “changing the system settings” below on setting the time. The vessel controls are state of the art and will retain all of the settings or changes that have been made in the event of a power failure. - Page 19 operating y o u r atv CONTROL PANEL OPERATION INSTRUCTIONS HOT KEYS Using pump 1: (Jets in seats and swim jets) Pressing the Jets 1 button will turn pump 1 on low speed. Pressing a second time will turn the pump on high speed. Pressing the button a third time will turn the pump off.
- Page 20 operating y o u r atv SETTING THE TEMPERATURE Pressing the temp up or temp down buttons allow you to adjust the heat to the desired temperature. The set temperature is shown in the left hand side of the LCD display. Pressing and holding the temp up or temp down button will allow for an accelerated change of the temp.
- Page 21 • Initial set up: • In order to communicate and operate the vessel, you will need to go to the App Store and download the free “Marquis Spas” app to your device. • Go to the settings section on your device and choose the “Wi-Fi” tab. Be sure that the Wi-Fi selection slider is set to the “On” position so your device will discover all available Wi-Fi choices. Choose the tab labeled BWG followed by a series of numbers. Be sure your device connects...
-
Page 22: Audio System
• Return to the main screen and open the Marquis App and proceed to “connect” with the vessel. Stopping the connection process and restarting may be required. There is nothing wrong with the unit as this can be caused by protocols issued by Apple inc. • Once connected you will be able to operate the jets and light on the control tab of the App. Moving to the settings tab will allow changing the time, temperature and filtration settings of the vessel. • Note: If your device goes to sleep, screen darkens, or is turned off you will need to reconnect again with the vessel in order to reestablish control. -
Page 23: Swim Tether
swim tether™ Swim Tether™ Installation please visit the website, www.SwimTether.com for installation instructions. • place connecting rod into base plate on ATV lip. • Attach belt and the bar to enclosed bungee cord by the use of spring clips. • When placing belt around waist adjust slide clip so that there is some slack between your spine and where the slide clip is located, then latch buckle. Place belt so that it rests on the forward portion of your hips and nOT tight around the waist. Swim Tether™ Use •... -
Page 24: Maintenance
Replenish the water level if necessary so that it is approximately two-thirds up the Vortex skimmer opening (Marquis) and 4” (102mm) E-Series. (See STARTING YOUR VESSEL.) Low and high water levels can damage your ves- sel. It is important to check your water level often. - Page 25 CAution: Overtightening of the filter can cause the filter or filter housing to crack. Tighten filter until it is just snug. noTe: Filters and filter lids do not qualify for labor coverage. These parts can be purchased or exchanged under warranty at your authorized Marquis ® dealer.
- Page 26 MARQUIS ATV MAInTenAnce ® every tHree to four MontHs Draining and filling the vessel The average vessel needs to be drained every three to four months. After months of continually adding chemicals to the water and introducing body oils and lotions, the water can be difficult to manage and chemicals are not as effective as usual.
- Page 27 As neeDeD MAintenAnCe Cover Care It is recommended that you use Marquis Cover Cleaner to keep the interior surface clean and conditioned. Proper care of the cover increases the life and keeps it looking great in even the harshest conditions. note: Do not use regular household products or products that contain silicone, alcohol, steel wool, or bleach.
- Page 28 MARQUIS ATV MAInTenAnce ® water line To avoid buildup of oils and lotions at the water line, clean the interior weekly or when needed. We suggest the Glove Sponge to clean without scratching. note: Do not use the same brush or sponge to clean the exterior of the ves- sel and the interior of the vessel.
- Page 29 After adding chemicals, wait the amount of time recommended on the chemical container before retesting your water for an accurate reading. Retest your vessel water before using. 10. If you have any questions or concerns about the correct procedures for handling chemicals, please contact your authorized Marquis dealer. ®...
- Page 30 Marquis® dealer. Gaskets and seals are not covered under the warranty. The control system in your Marquis vessel will automatically circulate and filter. (See Vessel Control Operation, ConstantClean™ and SmartClean™ sections.) The sanitation requires minimal effort if done consistently and properly.
- Page 31 & enjoyment guide ® total alkalinity Alkalinity acts as a buffer to prevent the pH from changing as other sub¬stances are added to the water. Stability of the pH is directly related to the alkalinity. The alkalinity should be between 80 - 140 ppm. Alkalinity below 80 ppm makes it difficult to stabilize the pH.
- Page 32 & enjoyment guide ® ShoCK Initial treatment Shock the vessel using granular Chlorine Sanitizer or non-chlorine Spa Shock. Add directly to the vessel per the instructions on the container. For the initial treatment, Chlorine Sanitizer is preferred as it will also estab- lish a residual of sanitizer.
- Page 33 Spa defoamer If foam appears in your vessel, the action of the jets will keep it from dis- sipating. The use of Marquis SpaCare Defoamer instantly rids your ATV of foam. metal and Stain remover Metal and Stain Remover will remove metals such as iron and copper from vessel water.
- Page 34 & enjoyment guide ® foaming P: High concentration of body oils, lotions or soaps, as well as excessive or- ganics. S: Use Vessel Defoamer and adjust pH and sanitizer as needed. Scum Line in Vessel P: Body oils and dirt.
-
Page 35: Marquis Atv Owner's Protection Plan
Corp. aquatic training Vessels (atV) limited warranty Covers Marquis Corp. warrants that our products will be free from defects in materials and workmanship for the term set forth exclusively in this warranty. Accessories purchased from Marquis Corp. or a Marquis Corp. authorized Marquis dealer and added to the ®... - Page 36 ® In the event that Marquis Corp. or its agent determines that your problem can be addressed by providing a replacement part to you for installation in your ATV, a replacement part will be provided to you at no charge when you return the defective part.
- Page 37 Limited Warranty is made only to the original purchaser of the ATV and is not transferable. In no event shall any obligation of Marquis Corp. extend beyond the original period of any applicable warranty determined according to the effective warranty date of the original purchaser.