Advertisement
Quick Links
Download this manual
See also:
User Manual
QUICK START GUIDE
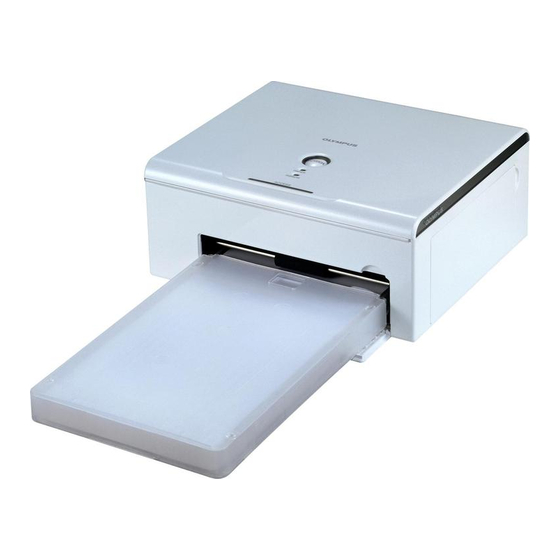
Digital Photo Printer
P-S100
Thank you for purchasing this OLYMPUS
Digital Photo Printer P-S100.
This guide contains instructions for
using this printer with other Olympus
Dock&Done products.
For details on operations and settings,
refer to the supplied user's manual
For inquiries, contact the OLYMPUS service
center listed in the user's manual.
Your new life of photography has begun.
What is QDock&Done?
Dock&Done is a total digital photography system that puts personal
imaging into a single process. For example, by simply setting the digital
camera on the cradle, new pictures are saved, photo printing is prepared,
and the camera's batteries are recharged.
QDock&Done-compatible digital camera
QDock&Done-compatible
Digital Camera
digital camera and storage unit*
Print with a
PictBridge-compatible camera
Print directly by
QDock&Done
Digital
Photo Printer
Regular printing
PC
* Sold separately
Tip
Availability of these models may vary from country to country.
User registration
To stay informed of important updates and news regarding your Olympus
product, it is recommended to register your purchase. You can register by
one of the following ways:
• Register online
Install the software from the supplied CD-ROM.
When restarting your computer after installation, the registration screen
appears.
• Use the registration card*
Fill out the supplied registration card, and return it by mail.
* Not provided in some areas.
Printer setting
For printing, a paper-in tray and a ribbon cartridge are required (both
supplied, as well as commercially available as replacements).
Setting the ribbon cartridge
a Open the ribbon cartridge
door.
b Remove slack from the ribbon.
If the ribbon cassette has been
used before, take in any ribbon
slack before loading.
c Insert the ribbon cartridge into the printer following
the direction of the arrow, and then close the ribbon
cartridge door completely.
• Push the cartridge until it clicks.
• If the ribbon cartridge door cannot
be closed completely, take out the
ribbon cartridge and then reinsert
it.
Setting the paper-in tray
Open the paper-in tray door
and insert the paper-in tray
all the way.
• Push the paper-in tray until it clicks into place.
• When closing the paper-in tray door, push the paper-in tray door tab in as
you close the door until it clicks into place and locks.
QDock&Done printing
Go to "Printing with the PictBridge-compatible camera" for PictBridge
printing. Go to "Printing with a PC" for PC printing.
Connecting with a Dock&Done-compatible digital
camera
a Set the print order (DPOF) for the image fi les to be
printed on the digital camera.
b Connect the USB cable to the cradle of the digital
camera.
c Connect the AC adapter and the power cord, then
turn on the printer.
d Set the digital camera on the cradle.
e On the digital camera, select "PRINT" from the
"PC/PRINTER" menu, then press the 9 button.
Image fi les with print orders are printed.
PC / PRINTER
PC
PRINT
SEL.PRINT
EXIT
SELECT
GO
Tips
• If you do not set the print order, select "SEL.PRINT" to set printing in the
PictBridge mode.
• For details on the print order (DPOF), refer to the reference manual supplied
with the digital camera.
Advertisement

Related Manuals for Olympus P-S100


Summary of Contents for Olympus P-S100
- Page 1 Availability of these models may vary from country to country. PRINT User registration SEL.PRINT Setting the paper-in tray To stay informed of important updates and news regarding your Olympus EXIT product, it is recommended to register your purchase. You can register by SELECT Open the paper-in tray door...
- Page 2 Connecting the Dock&Done-compatible digital Printing Cancel automatic print Printing with a PictBridge-compatible camera camera to the storage unit On the digital camera, select the desired item from the a Press the 9 button on the digital camera during Use the USB cable supplied with the digital camera for connection. “QDOCK MODE”...