
Related Manuals for Accu-Chek Guide


Summary of Contents for Accu-Chek Guide
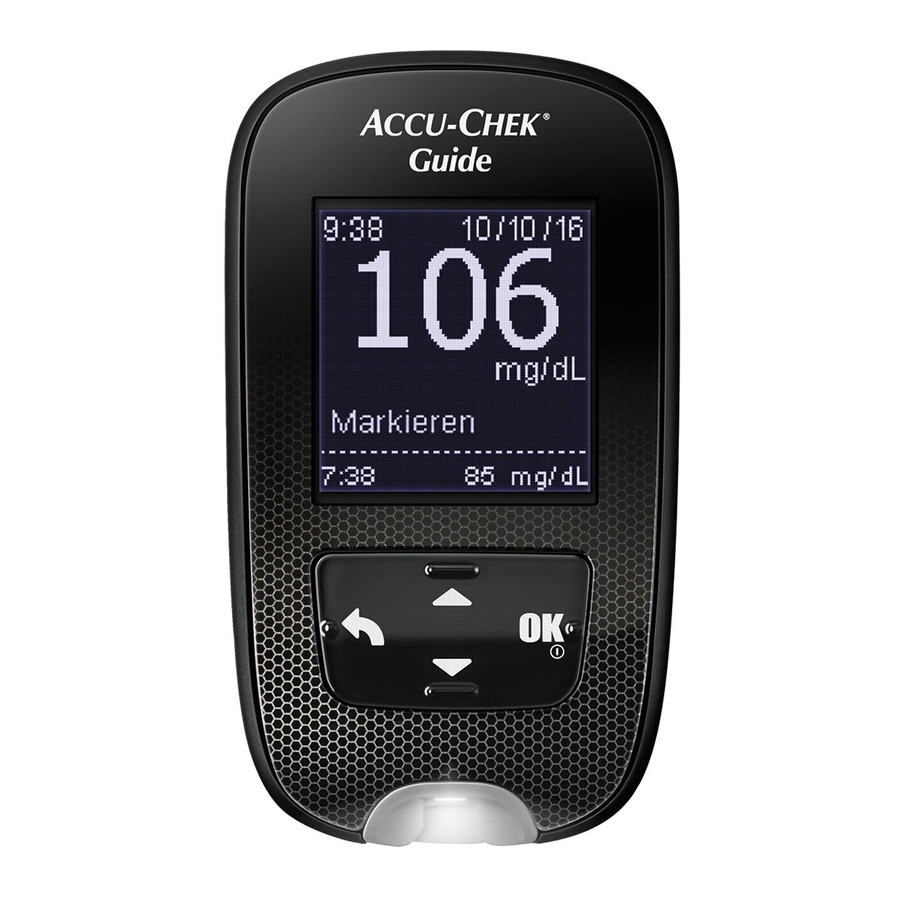
- Page 1 Blood Glucose Monitoring System User’s Manual for Single Patient Use Only Blood Glucose Meter...
-
Page 3: Table Of Contents
Contents Important Safety Information ....................3 Chapter 1: Your New System ....................9 Chapter 2: The Accu‑Chek FastClix Lancing Device ..............19 Chapter 3: Blood Glucose Tests .....................23 Chapter 4: Control Tests ......................37 Chapter 5: Meter Settings .....................43 Chapter 6: Review Your Data....................63 Chapter 7: Wireless Communication and Meter Pairing ............81 Chapter 8: Meter and Lancing Device Cleaning and Disinfecting...........95 Chapter 9: Meter Maintenance and Troubleshooting ............103... -
Page 5: Important Safety Information
The Accu‑Chek Guide Blood Glucose Monitoring System is intended for in vitro diagnostic single‑patient use by people with diabetes. The Accu‑Chek Guide Blood Glucose Monitoring System is intended to be used by a single person and should not be shared. - Page 6 Important Safety Information Limitations • Do not use the meter at high hematocrit levels above 65 % or low hematocrit levels below 10 %. • Not for use in diagnosis or screening of diabetes mellitus. • Not for neonatal use. •...
-
Page 7: About Testing Yourself Or Others
Important Safety Information Need Help? For questions, contact the Accu‑Chek Customer Care Service Center toll‑free at 1‑800‑858‑8072. Hours of operation are Monday through Friday between 8:00 am and 8:00 pm eastern standard time (EST). We offer assistance in many languages. You can also visit accu‑chek.com for diabetes management tools and product demonstrations. - Page 8 Important Safety Information WARNING • During normal testing, any blood glucose meter or lancing device may come in contact with blood. All parts of the kit are considered biohazardous and can potentially transmit infectious diseases from bloodborne pathogens, even after you have performed cleaning and disinfecting. •...
- Page 9 Important Safety Information NOTE • Perform a control test when you open a new test strip box or if you think that a test result is incorrect. Performing a control test lets you know that the meter and test strips are working properly.
-
Page 10: Before You Start Testing
• The meter, test strips, and control solution are only for use outside the body (in vitro). Do not eat the test strips. Do not swallow or inject the control solution or use the control solution for any purpose other than testing the Accu‑Chek Guide system. NOTE •... -
Page 11: Chapter 1: Your New System
Your New System The Accu‑Chek Guide Meter Side View Front View Back View 1. Display 6. Battery Door Shows results, messages, and test Flip open to replace batteries. results stored in memory. 7. Micro USB Port 2. Back Button Transfers data from the meter to a computer Returns to a previous display or field. - Page 12 Your New System (for example) Test Strip 9. Test Strip Container* 13. Batteries 10. Metallic End 14. USB Cable* Insert this end into meter. Connects the meter to a PC. 11. Yellow Edge *Some items may not be included in the kit. Touch blood drop or control solution here.
- Page 13 Your New System The Accu‑Chek FastClix Lancing Device 1. Cap 4. Lever For fingertip testing. Advance to a new lancet. 2. Comfort Dial with Depth Selection 5. Lancet Counter Window Select penetration depth. Shows number of available lancets. 3. Penetration Depth Indicator 6.
- Page 14 Your New System Button Functions Here are the functions of the back, arrow, and Power/Set/OK buttons on the meter. These functions are used throughout this manual. See the chapter Meter Settings for specific instructions on setting up the meter. Button Function Return to the previous display.
- Page 15 Your New System Meter Menus 1 Title of display or menu 2 Menu options 3 Scroll down 4 Scroll up Display Description There are more menu options listed beneath the last option. Press on the meter to view the options. There are more menu options listed above the first option.
- Page 16 Your New System Display Description Highlighted option (Test) Press to enter the Test menu. Highlighted field (Hour) Press to increase or decrease the hour. Press to set the hour and move to the minutes field.
- Page 17 Your New System Symbols Here is a list of the symbols on the meter display. Symbols Description Above target range After meal Bedtime Before meal Below target range Blood glucose test Checkmark / Control test OK / Selected option or setting Control bottle Control test not OK Edit...
- Page 18 Your New System Symbols Description Flight mode Help Low battery My data No comment Other Overall Settings Test reminder Warning Within target range...
- Page 19 Your New System Set the Language The meter may prompt you to choose a language the first time you turn it on. Turn the meter on by briefly Press to set the desired pressing . Language language and return to Main appears.
- Page 20 Your New System...
-
Page 21: Chapter 2: The Accu-Chek Fastclix Lancing Device
The Accu-Chek FastClix Lancing Device Using the Accu‑Chek FastClix Lancing Device • The black cap is for fingertip testing only. • Remember that the opening where the lancet comes out is not in the center of the cap. • Remove the cap by pulling it straight off. Do not twist the cap. -
Page 22: Inserting A Lancet Drum
The Accu-Chek FastClix Lancing Device Inserting a Lancet Drum You must first load the lancet drum into the lancing device to get it ready for use. Remove the cap. Slide the cap on until it stops by You are now ready to use the aligning the notch on the cap first lancet. - Page 23 The Accu-Chek FastClix Lancing Device Using the Accu‑Chek FastClix Lancing Device Obtain a blood drop. See the chapter Blood Glucose Tests. Adjust the lancet depth by turning the comfort dial. Advance to the next lancet by sliding the lever forward and back all the way.
-
Page 24: Changing The Lancet Drum
The Accu-Chek FastClix Lancing Device Changing the Lancet Drum When you have used the sixth and last lancet, change the lancet drum. Remove the cap. Hold the lancet drum between your thumb and index finger and pull it straight out. -
Page 25: Chapter 3: Blood Glucose Tests
Blood Glucose Tests WARNING • The meter and lancing device should never be used by more than one person. Do not share the meter and lancing device with anyone, including family members, due to the risk of infection from bloodborne pathogens. Do not use on multiple patients! •... - Page 26 Blood Glucose Tests Using the Accu‑Chek Guide System • The Accu‑Chek Guide test strips are for testing fresh capillary whole blood. • Use only Accu‑Chek Guide test strips. • Use the test strip immediately after removing it from the test strip container.
-
Page 27: Performing A Blood Glucose Test With Blood From Your Fingertip
Blood Glucose Tests WARNING To prevent inaccurate results: • DO NOT expose test strips to heat, moisture, or humidity. Temperatures outside the required range, as well as moisture and humidity, can damage the test strips and lead to inaccurate results. •... - Page 28 Blood Glucose Tests Wash your hands with warm Adjust the comfort dial. Check the Use By date on the soapy water and dry thoroughly. test strip container. Dirty or wet hands could affect Do not use test strips past the test results.
- Page 29 Blood Glucose Tests When Apply drop appears, Press the lancing device firmly Gently squeeze your finger to obtain a blood drop. against the side of your assist the blood flow. This helps fingertip. you get a blood drop. Press the release button all the way down to prick your finger.
- Page 30 Blood Glucose Tests Press here to eject test strip Add Comment appears. Press The final result appears. Press Remove and discard the used to highlight a comment. to set the comment test strip by pulling the test Press to set the comment for and return to Main Menu.
- Page 31 Blood Glucose Tests Blood Glucose Warnings If your blood glucose result is outside the measurement range of the meter, a warning is displayed. Press to acknowledge the LO or HI warning, OR the meter automatically moves to the LO or HI result display. Blood glucose may be lower than the measurement range of the system.
- Page 32 Blood Glucose Tests Adding Comments to Blood Glucose Results NOTE Analyzing your blood glucose results stored in the meter is an effective way for you and your healthcare professional to determine how well you are controlling your diabetes. This analysis is a valuable tool for making improvements to your diabetes management.
- Page 33 Blood Glucose Tests Here is a list of comment symbols that can be added to a blood glucose result. Symbols Name Description Before meal If Patterns is On, select Before breakfast, lunch, dinner, or snack (see the following page for adding comments with Patterns On). After meal If Patterns is On, select After breakfast, lunch, dinner, or snack (see the following page for adding comments with Patterns On).
- Page 34 Blood Glucose Tests After performing a blood The Add Comment menu If Patterns feature is On: glucose test, the test result is appears. Press to highlight If Patterns is On and you select displayed on the screen with the desired comment. (The Before meal or After meal, Add Comment highlighted.
-
Page 35: Alternate Site Testing
Blood Glucose Tests Performing a Blood Glucose Test with Blood from Your Palm or Upper Arm (Alternate Site Testing) WARNING • Do not use Alternate Site Testing to calibrate a continuous glucose monitoring system or to make insulin dosing calculations. •... -
Page 36: Unusual Blood Glucose Results
Blood Glucose Tests Unusual Blood Glucose Results If your blood glucose result does not match how you feel, follow these steps: 1. Perform a control test. See the chapter Control Tests. 2. Repeat the blood glucose test. If your blood glucose result still does not match how you feel, follow your healthcare professional’s instructions or call your healthcare professional immediately. -
Page 37: Symptoms Of Low Or High Blood Glucose
Blood Glucose Tests Symptoms of Low or High Blood Glucose WARNING The meter is designed to provide a numerical value for blood glucose in the range of 20–600 mg/dL. Being aware of the symptoms of low or high blood glucose can help you understand your test results and decide what to do if they seem unusual. - Page 38 Blood Glucose Tests...
-
Page 39: Chapter 4: Control Tests
• you want to check if you are performing the test correctly. About the Control Solutions • Use only Accu‑Chek Guide control solutions. • Close the control solution bottle tightly after use. • Write the date you open the control solution bottle on the bottle label. The control solution must be discarded 3 months from the date the control solution bottle was opened (discard date) or on the Use By... -
Page 40: Performing A Control Test
Control Tests Performing a Control Test You need the meter, a test strip, and control solution Level 1 or Level 2. Check the Use By date on the test strip container. Remove a test strip from the test strip container. Do not use test strips past the Use By date. - Page 41 Control Tests Select the control solution to test. You will enter Remove the bottle cap. Wipe the tip of the bottle the level later in the test. with a tissue. Squeeze the bottle until a tiny drop forms at the tip. Touch the drop to the yellow Analyzing appears when there edge of the test strip.
- Page 42 Control Tests Control Result and the control bottle symbol appear. Press to select the control level you tested. If you do not select a level, the control result is saved without a control level. Press Within range and appear if the control result is within range. Out of range and appear if the control result is out of range.
- Page 43 Control Tests Wipe the tip of the bottle with a tissue. Cap the bottle tightly. Remove and discard the used test strip. NOTE • Most people just test the Level 1 control. If you wish, you can also test a Level 2 control. A set of Level 1 and Level 2 control solutions is available for purchase.
- Page 44 Control Tests Understanding Out‑of‑Range Control Results WARNING The control range applies only to a control result. It only indicates that the test strips and meter are working properly. Do not use a control result to interpret blood glucose results. If the control result is out of range, do not use the meter until you solve the problem. Check this list to help solve the problem.
-
Page 45: Chapter 5: Meter Settings
Meter Settings Overview You can adjust the following settings in the meter for your personal preferences. Refer to the sections later in this chapter for details and how to set the options. Setting Options Function Time/Date Time / Date Set the time and date. Beeper On / Off Select On or Off. -
Page 46: Meter Settings
Meter Settings Setting Options Function Patterns On / Off On – a pattern is detected when 2 below‑target or 3 above‑target results with the same comment are detected within a 7‑day period. Reminders On / Off / Edit time On – set up to 4 reminders per day to remind you to test Post Meal On / Off / Edit time... - Page 47 Meter Settings Time/Date Time/Date Turn the meter on by briefly Time/Date is highlighted. Press Press to adjust each pressing . From Main Menu, field. Press to set and press to highlight Settings. proceed to the next field. Set Press am or pm if necessary. Press to save and return to the previous menu.
- Page 48 Meter Settings Beeper Beeper The beeper prompts you: • when a test strip is inserted. • to apply blood or control solution to the test strip. • when enough blood or control solution is drawn into the test strip. • when the blood glucose or control test is complete. •...
- Page 49 Meter Settings Target Ranges Target Ranges Your healthcare professional can tell you what blood glucose range is appropriate for you. It is very important to stay within your target range. Target Ranges can be set from a lower limit of 60–100 mg/dL to an upper limit of 101–300 mg/dL. Options Function Arrow symbols for above, within, or below target ranges do not appear with the...
- Page 50 Meter Settings Target Ranges WARNING This function is no substitute for hypoglycemia training by your healthcare professional. Turn the meter on by briefly Press to highlight More Target Ranges is highlighted. pressing . From Main Menu, Options. Press Press press to highlight Settings.
- Page 51 Meter Settings Target Ranges The meter may prompt you to turn on Patterns. appears next to the option you selected. Press to highlight Yes or No. Press to return to the Press to set the option and return to the previous menu (see the previous menu.
- Page 52 Meter Settings Patterns NOTE Analyzing your blood glucose results stored in the meter is an effective way for you and your healthcare professional to determine how well you are controlling your diabetes. This analysis is a valuable tool for making improvements to your diabetes management. Use care when adding comments to blood glucose results.
- Page 53 Meter Settings Patterns Turn the meter on by briefly Press to highlight More Press to highlight Patterns. pressing . From Main Menu, Options. Press Press press to highlight Settings. Press Press to highlight On. Press This message appears if Target Ranges appears on the to move to the option.
- Page 54 Meter Settings Patterns If Patterns is On and a new pattern is detected with a blood glucose result, a message appears on the display. Press to select Details to Press to highlight View view the blood glucose results Later. that make up that pattern. Press to return to the previous screen.
- Page 55 Meter Settings Reminders Reminders You can set up to 4 general test Reminders per day to remind you to test. A series of beeps sound and is displayed for Reminders set in the meter. Reminders: • turn off by inserting a test strip or pressing any button. •...
- Page 56 Meter Settings Patterns Pre‑set reminder times appear The pre‑set reminder time on the display. Press appears. Press highlight a reminder time. Press select On or Off. Press move to the option. To change the Reminder time Press to adjust each shown: field.
- Page 57 Meter Settings Reminders The reminder time appears. indicates the reminder is set for the time shown and Press to continue to set automatically set to On. To turn additional reminders or press the reminder off, press to return to More Options. highlight Off.
- Page 58 Meter Settings Post Meal Reminders Post Meal Reminders Post Meal reminders can be set to remind you to test again later when you add a Before Meal comment to a blood glucose result. When a reminder occurs, a series of beeps sound and is displayed.
- Page 59 Meter Settings Post Meal Reminders Turn the meter on by briefly Press to highlight More Press to highlight Post . From Main Menu, Options. Press Meal. Press pressing press to highlight Settings. Press...
- Page 60 Meter Settings Post Meal Reminders Press to highlight On. Press to highlight Edit time. Press to highlight Press to move to the Press 1 hour, 1.5 hours, or 2 hours option. after a meal for Post Meal reminders to occur. Press to move to the option.
- Page 61 Meter Settings Last Result Last Result Select whether the previous blood glucose result appears with the current blood glucose result. Test results older than 24 hours do not appear. Turn the meter on by briefly Off – only the current blood glucose result appears.
- Page 62 Meter Settings Last Result Press to highlight More Press to highlight Last Press to highlight On Options. Press Result. Press or Off. Press to move the option. Press to set the option and return to the previous menu.
- Page 63 Meter Settings Language Language Choose the language that appears on the meter. to highlight More Turn the meter on by briefly Press Press to highlight pressing . From Main Menu, Options. Press Language. Press press to highlight Settings. Press Press to highlight the desired language.
- Page 64 Meter Settings...
-
Page 65: Chapter 6: Review Your Data
Review Your Data Overview • Blood glucose results are stored from the newest to the oldest. • The meter automatically stores up to 720 blood glucose results in memory with the time and date of the test and any test result comments. •... - Page 66 Review Your Data Logbook Logbook Logbook is highlighted. Turn the meter on by briefly pressing . From Main Menu, Press press to highlight My Data. Press Press to scroll through Logbook. The most recent test result The 2nd most recent test result...
- Page 67 Review Your Data Logbook To view details about a test result, press to highlight the test result. Press . Test result details shown below only appear if Target Ranges is On or comments were added to a test result. The 2nd most recent test result. The most recent test result.
- Page 68 Review Your Data Averages Averages Turn the meter on by briefly Press to highlight Averages. Press to highlight a category pressing . From Main Menu, Press (the example here is Overall). press to highlight My Data. Press Press Press to highlight a time Press to return to the previous menu if you want to review a period (the example here is 90...
- Page 69 Review Your Data Target Percent (%) Target Percent (%) Target Percent (%) allows you to view the percentage of your Overall, Before meal, After meal, Fasting, and Bedtime blood glucose results that are above, within, or below your target ranges. •...
- Page 70 Review Your Data Target Percent (%) Press to highlight a time The Target % appears (for the period (the example here is 90 Before meal example). The days). Press number of total tests included in the Target % appears at the bottom of the display.
- Page 71 Review Your Data Low/High Data NOTE Analyzing your blood glucose results stored in the meter is an effective way for you and your healthcare professional to determine how well you are controlling your diabetes. This analysis is a valuable tool for making improvements to your diabetes management. Use care when adding comments to blood glucose results.
- Page 72 Review Your Data Low/High Data You can select Low BG and High BG results for Overall, Before meal, After meal, Fasting, or Bedtime blood glucose results. Symbol Name Description Overall Includes high and low blood glucose results based on Target Ranges set in the meter.
- Page 73 Review Your Data Low/High Data Turn the meter on by briefly Press to highlight Low/High pressing . From Main Menu, Data. Press press to highlight My Data. Press If Target Ranges is set to On: If Target Ranges have NOT been On within the last 30 to select Low or High Press...
- Page 74 Review Your Data Low/High Data Press to highlight a If test results with detailed category (the example here is meal comments are saved in Before meal). Press the Logbook: The meter may prompt you to select detailed categories to view. Press to highlight a category (the example here is before Breakfast).
- Page 75 Review Your Data Patterns NOTE Analyzing your blood glucose results stored in the meter is an effective way for you and your healthcare professional to determine how well you are controlling your diabetes. This analysis is a valuable tool for making improvements to your diabetes management. Use care when adding comments to blood glucose results.
- Page 76 Review Your Data Patterns Patterns detected by the meter may be displayed on the Main Menu as: Patterns High and low patterns have been detected Patterns may include the following blood glucose High Pattern(s) One or more high patterns have been detected results marked with comments: Low Pattern(s)
- Page 77 Review Your Data Patterns Press to highlight a category Turn the meter on by briefly Press to highlight Low to review (the example here is pressing . From Main Menu, Patterns or High Patterns (the Before breakfast). Press example here is Low Patterns). press to highlight the Patterns option at the bottom of...
- Page 78 Review Your Data Data Transfer Using Wireless Data Transfer Using Wireless This feature allows you to transfer data wirelessly from your meter to another device. to highlight Data to select Wireless. Turn the meter on by briefly Press Press pressing .
- Page 79 Review Your Data Data Transfer Using Wireless If a device has not been paired with your If the meter has already been paired with at meter: least one device: The meter prompts you to pair a device to the Press to choose a wireless device for meter (see the First‑Time Pairing section in the data transfer.
- Page 80 Review Your Data Data Transfer Using USB Cable Data Transfer Using USB Cable This feature allows you to transfer data from your meter to special software for diabetes management on a PC using a USB cable. Start the software for data analysis and initiate a data transfer.
- Page 81 Review Your Data Data Transfer Using USB Cable The meter transfers the data to the software.
- Page 82 Review Your Data...
-
Page 83: Chapter 7: Wireless Communication And Meter Pairing
Wireless Communication and Meter Pairing Overview You can wirelessly and automatically synchronize your diabetes information with a mobile device. The process of creating a connection between the meter and the other device is called pairing. You need an application on your mobile device that can accept the meter’s data. Setting Options Function... - Page 84 Wireless Communication and Meter Pairing First‑Time Pairing First‑Time Pairing The steps below are for first‑time pairing. Up to 5 devices can be paired with the meter at any time. Each device must be paired with the meter one at a time. The meter and the device to be paired should be within 1 meter of each other.
- Page 85 Wireless Communication and Meter Pairing First‑Time Pairing Pair Device appears. To pair a device, press The meter displays its code. to highlight Yes. Press The mobile device displays a list of found devices, including the meter. Select the meter from the list.
- Page 86 Wireless Communication and Meter Pairing Flight Mode Flight Mode Select whether wireless communication is available or not. When Flight Mode is on, appears in the title bar and wireless communication is not available. to highlight Wireless. Turn the meter on by briefly Press Flight Mode is highlighted.
- Page 87 Wireless Communication and Meter Pairing Default Device Default Device If more than 1 device is paired, select the default paired device for the Auto‑Send and Sync Time features. to highlight Wireless. Turn the meter on by briefly Press pressing . From Main Menu, Press press to highlight Settings.
- Page 88 Wireless Communication and Meter Pairing Auto‑Send Auto‑Send Select whether data is automatically sent to the default paired device after each test. to highlight Wireless. Turn the meter on by briefly Press Press to highlight pressing . From Main Menu, Press Auto‑Send.
- Page 89 Wireless Communication and Meter Pairing Sync Time Sync Time Select whether to synchronize the time and date to the default paired device. Turn the meter on by briefly Press to highlight Wireless. Press to highlight Sync pressing . From Main Menu, Press Time.
- Page 90 Wireless Communication and Meter Pairing Pairing Additional Devices Pairing Additional Devices This procedure is to add another paired device (assumes there is already 1 paired device). You can pair 5 devices. If you have 5 paired devices, you must delete a pairing before you can add another device. The device you choose remains the default until you change it.
- Page 91 Wireless Communication and Meter Pairing Pairing Additional Devices Press to highlight Pair If there are already 5 paired Press to highlight the Device. Press devices: device to delete. Press Proceed to Step 5. If there are less than 5 paired Maximum paired devices devices: appears.
- Page 92 Wireless Communication and Meter Pairing Pairing Additional Devices If there is more than 1 paired device, the meter asks if you want When pairing is complete, the new device to be the default device. Press to highlight and the name of the paired No or Yes.
- Page 93 Wireless Communication and Meter Pairing Delete Pairing Delete Pairing This procedure is to delete a paired device (assumes there is at least 1 paired device). You can pair 5 devices. If you have 5 paired devices, you must delete a pairing before you pair to another device.
- Page 94 Wireless Communication and Meter Pairing Delete Pairing Press to highlight Press to highlight the Delete Pairing. Press device to delete. Press to set the option.
- Page 95 Wireless Communication and Meter Pairing Delete Pairing If the selected device is not If the selected device is the Highlight the new default the default device: default device: device and press .The name of the deleted device and The pairing is deleted. The The meter prompts you to appear, along with the new name of the deleted device and...
- Page 96 Wireless Communication and Meter Pairing...
-
Page 97: Chapter 8: Meter And Lancing Device Cleaning And Disinfecting
Meter and Lancing Device Cleaning and Disinfecting What is the difference between cleaning and disinfecting? Cleaning is the removal of dirt from the meter or lancing device. Disinfecting is the removal of most, but not all, disease‑causing and other types of microorganisms (bloodborne pathogens) from the meter or lancing device. -
Page 98: Cleaning And Disinfecting The Meter
Meter and Lancing Device Cleaning and Disinfecting NOTE For technical assistance or questions on cleaning and disinfecting, contact the Accu‑Chek Customer Care Service Center at 1‑800‑858‑8072. Cleaning and Disinfecting the Meter WARNING If the meter is being operated by a second person who is providing testing assistance to the user, the meter and lancing device should be cleaned and disinfected prior to use by the second person. - Page 99 Meter and Lancing Device Cleaning and Disinfecting How to Clean and Disinfect the Meter WARNING Failure to follow these instructions will damage the meter and stop it from working properly. • DO NOT clean or disinfect the meter while performing a blood glucose or control test.
- Page 100 Meter and Lancing Device Cleaning and Disinfecting Wash hands thoroughly with soap and water.
-
Page 101: Cleaning And Disinfecting The Lancing Device
Meter and Lancing Device Cleaning and Disinfecting Cleaning and Disinfecting the Lancing Device To clean and disinfect without damaging the lancing device, follow these procedures carefully. When to Clean and Disinfect the Lancing Device • Clean the lancing device to remove visible dirt or other material prior to disinfecting. •... - Page 102 Meter and Lancing Device Cleaning and Disinfecting How to Clean and Disinfect the Lancing Device WARNING Failure to follow these instructions may damage the lancing device and stop it from working properly. • DO NOT get any moisture into any openings. •...
- Page 103 Meter and Lancing Device Cleaning and Disinfecting Wash hands thoroughly with soap and water.
- Page 104 Meter and Lancing Device Cleaning and Disinfecting...
-
Page 105: Chapter 9: Meter Maintenance And Troubleshooting
Meter Maintenance and Troubleshooting Meter Maintenance The meter automatically tests its own systems every time you turn it on and lets you know if something is wrong. See the Error Messages section of this chapter. If you have problems with the meter or think the results are not accurate, perform a control test with an unexpired test strip and control solution. -
Page 106: Error Messages
Meter Maintenance and Troubleshooting Error Messages w WARNING • Never make therapy decisions based on an error message. • If you have any concerns or see any other error message, contact the Accu‑Chek Customer Care Service Center at 1‑800‑858‑8072. Error Messages The meter will not turn on or The meter is connected to a PC The connection between the... - Page 107 Meter Maintenance and Troubleshooting There is no connection Blood glucose results were not Data could not be transferred between the meter and PC. transferred to a paired device. from the meter to the PC. Connect the USB cable and Make sure the paired device is Check the PC or USB cable.
- Page 108 Meter Maintenance and Troubleshooting One or more blood glucose The date entered is not valid. A meter setting was changed results are excluded from the while in Flight Mode. Enter the correct date. selected low/high data because The setting change will not the test results are invalid.
- Page 109 Meter Maintenance and Troubleshooting The test strip may be damaged, A meter or test strip error has occurred. not properly inserted, or was Repeat the blood glucose test. previously used. If a second E‑3 code appears, perform a control test with the control solution and a new test strip.
- Page 110 Meter Maintenance and Troubleshooting Not enough blood or control Blood or control solution was An electronic error occurred. solution was drawn into the applied to the test strip before Remove the batteries, press Apply drop appeared. test strip for measurement or and hold the Power/Set/OK was applied after the test had Discard the test strip and...
- Page 111 Meter Maintenance and Troubleshooting The time and date setting may The test strip may be damaged. Your blood sample may contain be incorrect. a high level of ascorbate. Retest with a new test strip. Make sure the time and date Contact your healthcare are correct and adjust, if professional.
- Page 112 Meter Maintenance and Troubleshooting The meter time and date have There are no results in the been changed to match the Logbook. paired device. There is an invalid result in the There are no test results in range for the selected Logbook.
- Page 113 Meter Maintenance and Troubleshooting Target Ranges is Off and there Target Ranges is Off and there are no results for the Target % are no results for the low/high data stored in the meter. data stored in the meter. There are no results stored in the meter for the selected data.
- Page 114 Meter Maintenance and Troubleshooting Patterns is On but there are no Patterns is Off. active patterns stored in the meter. Blood glucose may be higher Blood glucose may be lower than the measurement range of than the measurement range of the system.
-
Page 115: Chapter 10: Technical Information
Weight Approx. 40 g (with batteries) Construction Hand‑held Protection class Meter type The Accu‑Chek Guide meter is suitable for continuous operation. Control solution storage conditions Refer to the control solution package insert. Interfaces USB: micro‑B connector; Bluetooth Low Energy; Continua Certified to a Continua Certified manager. -
Page 116: Technical Information
Technical Information Wireless Technology –The meter uses Bluetooth Low Energy wireless technology to Bluetooth ® communicate and transfer information. Bluetooth wireless technology is a form or radio frequency (RF) technology that operates in the unlicensed industrial, scientific and medical band at 2.4 to 2.485 GHz. The RF channel utilized for communication between the meter and other devices, such as a smartphone, is not an open channel. - Page 117 Technical Information Electromagnetic Compatibility – This meter meets the electromagnetic immunity requirements as per ISO 15197. The chosen basis for electrostatic discharge immunity testing was basic standard IEC 61000‑4‑2. In addition, the meter meets the electromagnetic emissions requirements as per EN 61326. The meter’s electromagnetic emission is thus low. Interference from the meter to other electrically‑driven equipment is not anticipated.
- Page 118 Technical Information Performance Analysis – Refer to the test strip package insert. Test Principle – Refer to the test strip package insert.
-
Page 119: Product Safety Information
Technical Information Product Safety Information WARNING • This meter meets IEC 61010‑1, IEC 61010‑2‑101 and IEC 60950‑1 safety standards. • Strong electromagnetic fields may interfere with the proper operation of the meter. Do not use the meter close to sources of strong electromagnetic radiation. •... - Page 120 Technical Information Discarding the Meter, Test Strips, Lancing Devices, Lancets, and Batteries WARNING • Any product coming in contact with blood is considered contaminated (potentially infectious).* • During normal testing, any blood glucose meter may come in contact with blood. •...
-
Page 121: Explanation Of Symbols
Global Trade Item Number Serial number 3‑volt coin cell type CR2032 Additional Supplies Test Strips: Accu‑Chek Guide test strips Control Solutions: Accu‑Chek Guide control solutions Lancets: Accu‑Chek FastClix 102‑ct. lancet drums (17‑6 ct. drums) References FDA Public Health Notification: “Use of Fingerstick Devices on More than One Person Poses Risk for Transmitting Bloodborne Pathogens: Initial Communication, (2010). - Page 122 Technical Information...
-
Page 123: Chapter 11: License And Warranty
Accu‑Chek Guide Meter Limited 3‑Year Warranty Roche warrants to the original purchaser of the meter that your Accu‑Chek Guide meter will be free from defects in materials and workmanship for three years from the date of purchase. If, during this 3‑year period, the meter does not work properly because of a defect in materials or workmanship, Roche will replace it with a new Accu‑Chek Guide meter or equivalent product free of charge. - Page 124 Warranty and Service Instructions All requests for return of Accu‑Chek Guide meters under the above warranty or service policy must be made to the Accu‑Chek Customer Care Service Center. You will be mailed a return authorization label, which must be affixed to your carton for shipping the system to Roche. Cartons received without this label will be returned to you at your expense.
-
Page 125: Limited License
Using the Accu‑Chek Guide system indicates your acceptance of the restricted license to use the Accu‑Chek Guide system only with Accu‑Chek Guide test strips. If you do not agree to the terms and conditions of the restricted license, you may return, at the place of purchase, the unused Accu‑Chek Guide system for a full refund. - Page 126 License and Warranty WARNING A RESTRICTED LICENSE LIMITS USE OF THE ACCU‑CHEK FASTCLIX SYSTEM (lancing device and lancet drums) IN THE UNITED STATES. READ CAREFULLY THE LIMITATIONS RECITED BELOW. The Accu‑Chek FastClix system (device and lancet drums) and its use are protected by U.S. Patent Nos. 7,322,998 (expires 3‑March‑2020);...
-
Page 127: Index
Index alternate site testing 33 safety information 3 averages 66 settings, meter 43 beeper 46 language 61 battery, changing 103 last result 59 battery type 113 patterns 50 blood glucose results, unusual 34 post meal 56 blood glucose test, performing 25 reminders 53 blood glucose, warnings 29 target ranges 47... - Page 128 Notes...
- Page 129 Notes...
- Page 130 Notes...
- Page 132 9115 Hague Road Indianapolis, IN 46256 www.accu‑chek.com ACCU‑CHEK, ACCU‑CHEK GUIDE, and FASTCLIX are trademarks of Roche. CONTINUA, the CONTINUA logos and CONTINUA CERTIFIED are trademarks, service marks, or certification marks of the Continua Health Alliance. CONTINUA is a registered trademark in some, but not all countries in which this product is distributed.