Table of Contents
Advertisement
Advertisement
Chapters
Table of Contents
Troubleshooting

Related Manuals for Janome QUILT MAKER PRO


Summary of Contents for Janome QUILT MAKER PRO
- Page 1 18” Quilting Machine Instruction Manual...
-
Page 2: Package Contents
Congratulations on your purchase of a Janome Quilt Maker Pro 18 from Janome! Congratulations on your purchase of the Janome Quilt As a leader in the sewing industry, we keep striving to Maker Pro and welcome to the Janome family. -
Page 3: Table Of Contents
Maintenance (Oiling and Lubricating) ..............................19 Touch Screen Displays ....................................20 System Information ......................................27 Diagnostics Tests ......................................28 Janome Stitch Regulator Operation ...............................31 Getting Started Quilting .....................................32 Quilt Maker Pro 18 Troubleshooting ...............................33 Bobbin Winder .......................................39 Warranty Information ....................................52 janome.com Page 3... -
Page 4: Safety
(1) This device may not cause harmful interference, and electrical, or mechanical adjustment. (2) this device must accept any interference received, • It is not recommended that the Janome Quilt Maker including interference that may cause undesired Pro 18 ®... -
Page 5: General Specifications
Janome and its Representatives are in no way legally responsible or liable for damage to the Janome Quilt Maker Pro 18 when used improperly or not in accordance with the guidelines stated in this manual or when used on Machine Quilting Frames not recommended by Janome. - Page 6 If the machine breaks down or needs adjustment, first check the troubleshooting chart in the appendix to inspect and adjust the machine yourself. For more product information and updates, visit our website at www.janome.com/qmp18. The contents of this manual and product specifications are subject to change without prior notice.
-
Page 7: Components (Front Side View)
Janome Quilt Maker Pro 18 Components Front Side View Figure 1 1. Thread Mast 2. Thread Guide A 3. Three Hole Thread Guide B 4. Thread Guide C 5. Tension Assembly 6. Stirrup Thread Guide D 7. Thread Guide E 8. -
Page 8: Components (Back Side, Rear And Front Views)
35. Power Cord Connector 36. On/Off Switches 37. Spool Pin 2 38. Bobbin Assembly Figure 2.1 * Horizontal Spool Pin is an optional accessory. Please contact your local Janome dealer to purchase. Page 8 Quilt Maker Pro 18 User Manual 201704... -
Page 9: Installation (Frames)
Figure 3 Installing Front Handlebars Caution: Unplug the Janome Quilt Maker Pro 18 from the electrical outlet. All power to the machine must be turned off when installing the front handles. Failure to do so can result in damage to the machine. -
Page 10: Installation (Power Cord)
Installing Rear Handlebars Installing the Power Cord Check that the Janome Quilt Maker Pro 18 is unplugged Insert the cord into power connector on the rear of the from the electrical outlet. All power to the machine must machine. Plug the three-prong end into a power source be turned off when installing the back handlebar. -
Page 11: Inserting Needle
CAUTION: Your Janome machine stitches at a much faster speed than your home sewing machine. Therefore it is essential that the needle is firmly seated in the needle bar and fully tightened (but not over tightened). -
Page 12: Changing The Feet
2. Slide the desired foot onto the mount (figure 8). Note that the opening on the side of the foot is lined up with the screw hole. Push the Foot up as far as it will Figure 9 Figure 8 Page 12 Quilt Maker Pro 18 User Manual 201704... -
Page 13: Laser Stylus
There is not a separate on/off switch for the laser. Power is supplied to the laser when it is plugged into the Janome Quilt Maker Pro 18. Be sure the laser is attached to the Janome Quilt Maker Pro 18 and pointed downward toward the table before connecting it to the port. -
Page 14: Installation (Thread Mast)
Secure the thread mast by placing the removed screw through the underside of the thread stand and into the bottom of the thread Figure 12 mast. Page 14 Quilt Maker Pro 18 User Manual 201704... -
Page 15: Threading The Machine
An exception to this rule is when working with very delicate threads, such as holographic or threads that are prone to breakage, in which case you may try skipping one or two holes on thread guide B. janome.com Page 15... - Page 16 Figure 15 between the tension discs. This is not the case with the Janome Quilt Maker Pro 18 quilting machine where the top tension is always tight and the tension discs are never open. Therefore, the thread must be pulled up or “flossed”...
-
Page 17: Horizontal Spool Pin
(Figure 17). Figure 18 Figure 17 2. Slide the thread through the slot (Figure 18) and under the tension spring leaving 5 to 6 inches of TENSION thread hanging loose (Figure 19). SPRING Figure 19 janome.com Page 17... -
Page 18: Bobbin Tension
3. Pull the machine three to four inches away while holding the needle thread. 4. Bobbin thread will pull up and through to the top, allowing you to grasp the loop and pull it to the desired length. Page 18 Quilt Maker Pro 18 User Manual 201704... -
Page 19: Easy-Set Tension™ Adjustment
This could cause significant tension or nesting problems on the bottom side of the quilt. It is easy to set the top tension with the Janome Quilt Maker Pro 18 Easy-Set Tension. To adjust the top tension tighter, turn the tension knob clockwise. To loosen the tension, turn the tension knob counterclockwise. -
Page 20: Touch Screen Displays
Using the Touch Screen Displays on the Handlebars Machine and Handlebar Menus The Janome Quilt Maker Pro 18 has touch-screen displays on the front and rear handlebars. Settings may be changed at either of these locations. Main Screen Manual Mode Screen Button Functions: Pressing the “Regulated”... - Page 21 (SPI) setting. The setting is reflected in the white indicator box at the top right portion of the screen. This value can be adjusted between 4 and 18 stitches per inch. (Figure 29) Figure 29 janome.com Page 21...
- Page 22 “Precision” regulation mode or in “Cruise” regulation mode. (Figure Precision If “Precision” mode is selected, the Janome Quilt Maker Pro 18 will not start stitching until you begin pushing the Figure 31 machine. (Figure 31)
- Page 23 In “Cruise” mode, the machine will stop stitching after about three seconds if no movement has occurred. Tools Menu The Tools screen provides access to other functions available on the Janome Quilt Maker Pro 18 (Figure 34). Figure 34 janome.com Page 23...
- Page 24 Low Bobbin The Janome Quilt Maker Pro 18 includes a low bobbin capability so you can estimate how soon your bobbin thread will run out. This Low Bobbin Capacity is based on an estimate of how much of a particular thread can fit...
- Page 25 “More” menu screen. Figure 39 Calculator A basic calculator is provided. (Figure 40) Press the “Main” button to return to the “Regulated” or “Manual” menu screen or the “Back” button to return to the “More” menu screen. Figure 40 janome.com Page 25...
- Page 26 Lights The Janome Quilt Maker Pro 18 comes equipped with a light ring around the needle bar, two high intensity LED modules on each side of the display. These lights are directed towards the quilting area. (Figure 41) Turn lights on or off by touching the light bulb icons. Use the slider to adjust the light brightness from low to high.
-
Page 27: System Information
“Manual” menu screen or the “Back” button to return to the “More” menu screen. Set Language The Janome Quilt Maker Pro 18 screens can appear in English, French, German, or Spanish. On the More Screen, press the lower-left button to cycle between English, Français, Deutsch, and Español. -
Page 28: Diagnostics Tests
Motor Sensor Test The “Motor” Sensor test can help you determine whether there may be a problem with the Janome Quilt Maker Pro 18 motor. Slowly rotating the handwheel should result in a pulsing audible “beep.” If you get a constant solid “beep”... - Page 29 Motor Speed Sensor Test The “Speed” Sensor test can help you determine whether or not there is a problem with the Janome Quilt Maker Pro 18 speed sensor. Before performing this test, remove the bobbin case and the top thread. Press the “Start” button and the machine will begin slowly rotating.
- Page 30 Calibrate Tension The Tension button enables you to calibrate the tension device (Figure 51). You should only calibrate the tension device under the direction of Janome technical support. While calibrating the tension, you will be asked to do the following: 1.
-
Page 31: Janome Stitch Regulator Operation
Needle Up or Down position. quilt or your hands! Cruise Regulation Mode If you leave the Janome Quilt Maker Pro 18 in Precision When in Cruise Regulation mode, the start indicator box Regulation mode with the start indicator box green and in the top center of the “Regulated”... -
Page 32: Getting Started Quilting
The Janome Quilt Maker Pro 18, combined with understand the basics of free motion quilting. The the Quilt Maker Pro 18 Frame system will give you a Janome Quilt Maker Pro 18 does not have feed dogs smooth even glide. -
Page 33: Quilt Maker Pro 18 Troubleshooting
Troubleshooting You can correct many problems on your own. If you need additional help, contact your local, authorized Janome retailer. You can also contact Janome Monday through Friday 8:30AM - 5:00PM EST, 1-800-631-0183 option 3 . First check the following: The AC power cord is properly connected and the power switch is turned on. - Page 34 Loose Display Housing Corrective Measure(s) Loose display housing Loosen handle bar clamp bolts, rotate handlebars to desired position and push together, tighten clamp bolts. Page 34 Quilt Maker Pro 18 User Manual 201704...
- Page 35 • Check that the power connector is securely plugged into the back of the machine and the three-prong end is plugged into the power source. * If the troubleshooting above does not eliminate the problem, please consult an authorized Janome Quilt Maker Pro 18 representative.
- Page 36 Check that poles are inserted completely together with the push pins engaged so bowing won’t occur. Leaders are stretched or worn • If fabric is beginning to stretch or fray, contact Janome to purchase replacement leaders. Do not wash the leaders. Thread Breaks...
- Page 37 • Locate the black cables that plug into the touch-screen display and connect to the side of the machine. Make sure both ends are plugged in securely. NOTE: If the troubleshooting tips do not eliminate the problem, please consult an authorized Janome Quilt Maker Pro 18 representative. janome.com...
- Page 38 Page 38 Quilt Maker Pro 18 User Manual 201704...
-
Page 39: Bobbin Winder
BOBBIN WINDER USER MANUAL Revision 2.0, Part number 001QMPROBW... - Page 40 Troubleshooting the Bobbin Winder ............. . .48 Page 40 Quilt Maker Pro 18 User Manual 201704...
-
Page 41: Important Information
U.S. Federal Communications Commission (FCC) rules, Canadian ICES-003 and RSS-210. Operation is subject to the following two conditions: (1) this device may not cause interference, and (2) this device must accept any interference received, including interference that may cause undesired operation. janome.com Page 41... -
Page 42: General Safety Considerations
General Safety Considerations Environmental Considerations WARNING Recycling Information Janome recommends customers dispose of any used electronic products in an environmentally sound manner by reusing parts or whole products and recycling To protect against risk of fire, bodily injury, electrical products, components and/or materials. -
Page 43: Bobbin Winder Components
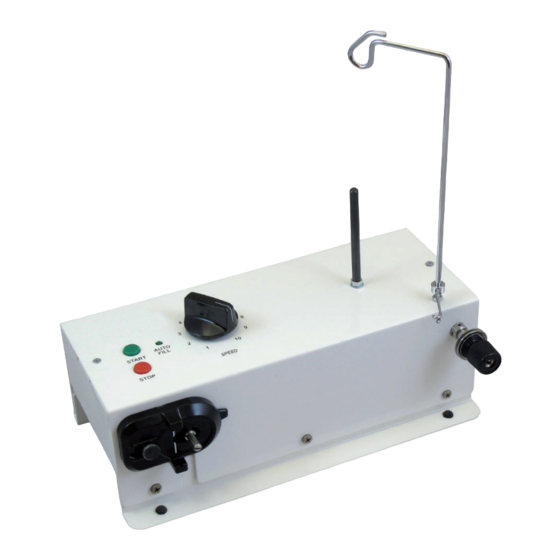
Bobbin Winder Components Thread Tracking Adjustment Thread Mast Thread Post Speed Selector Thread Guide Base Thread Tensioner Bobbin Post Adjustment Screw Bobbin Stop Sensor Power Adapter AC Power Cord janome.com Page 43... -
Page 44: Assembly Instructions
Figure 1 and Figure 1 Detail collar of the thread guide. Loop Thread Mast Pigtail Thread Guide Assembly Assembly Figure 2 Detail Figure 2 Page 44 Quilt Maker Pro 18 User Manual 201704... - Page 45 Contact your local Janome Dealer to obtain the appropriate power cord. Figure 3...
-
Page 46: Bobbin Winder Controls
Using the Bobbin Winder The Bobbin Winder is designed to wind bobbins for your Janome Quilt Maker Pro 18 machine and will wind all M-class bobbins. The bobbin winder includes a winding speed control that allows winding bobbins at up to 3500 RPM. - Page 47 Hold thread end as you begin to wind. Optional Accessory If using a spool of thread rather than a thread cone, use an optional horizontal spool pin (available from Janome Dealers) attached to the thead post (Figure 9). See your Janome Dealer to order.
-
Page 48: Adjusting The Bobbin Sensor Assembly
5. You have the flexibility of resetting the sensor for different bobbins and thread types by following Steps 1-4 above. Page 48 Quilt Maker Pro 18 User Manual 201704... -
Page 49: Adjusting The Thread Tension
2. Adjust the tension by turning the knob, using one- quarter turn increments for best results. 3. Turn the tension knob clockwise to tighten the tension. 4. Turn the tension knob counter-clockwise to loosen the tension. Figure 12 Figure 11 janome.com Page 49... -
Page 50: Troubleshooting The Bobbin Winder
If after checking the four items above the bobbin winder still has no power, take it to an authorized Janome Dealer for service. Bobbin winder doesn’t automatically If the bobbin winder receives too much sunlight, it is possible for the... - Page 51 (to move the tension assembly away from the bobbin-winder base) until the bobbin winds evenly. NOTE: Although the thread tracking knob was set at the factory, it can require adjustment if bobbins aren’t consistently pushed on to the bobbin post. janome.com Page 51...
-
Page 52: Warranty Information
Warranty We thank you for purchasing this Quilt Maker Pro 18 (the “Product”) and hope you will enjoy it for years to come. In the event that your Product needs service covered by this warranty, please contact the authorized Janome dealer from whom you purchased it. - Page 53 The warranty does not cover and the user assumes the risk of and there is hereby excluded any liability to Janome for failure, defects, loss, deterioration, personal injury or damage which are due to: (1) ordinary wear and tear or exposure, (2) abuse, misuse, negligence, or (3) use of parts not authorized by Janome.
- Page 54 Page 54 Quilt Maker Pro 18 User Manual 201704...
- Page 55 Page 55...
- Page 56 Page 56 Quilt Maker Pro 18 User Manual 201704...