Table of Contents
Advertisement
Available languages
Available languages
Advertisement
Chapters
Table of Contents

Related Manuals for ReliOn 7100REL


Summary of Contents for ReliOn 7100REL
- Page 1 INSTRUCTION MANUAL Automatic Blood Pressure Monitor 7100REL Model...
-
Page 2: Table Of Contents
TABLE OF CONTENTS Before Using the Unit Introduction ..........3 Safety Information . -
Page 3: Before Using The Unit
Thank you for purchasing the ReliOn® 7100REL Automatic Blood Pressure Monitor. Fill in for future reference. DATE PURCHASED: _______________ SERIAL NUMBER: _________________ Staple your purchase receipt here Your new digital blood pressure monitor uses the oscillometric method of blood pressure measurement. This means the monitor detects your blood’s movement through your brachial artery and converts the... -
Page 4: Safety Information
SAFETY INFORMATION To assure the correct use of the product basic safety measures should always be followed including the warnings and cautions listed in this instruction manual. SAFETY SYMBOLS USED IN THIS INSTRUCTION MANUAL WARNING CAUTION OPERATING THE DEVICE Contact your physician for specific information about your blood pressure. - Page 5 SAFETY INFORMATION OPERATING THE DEVICE (continued) Read carefully “Taking a Measurement” No.3 of the instruction manual if your systolic pressure is known to be higher. Inflating to a higher pressure than necessary may result in bruising where the cuff is applied. Operate the device only as intended.
-
Page 6: Care And Maintenance
SAFETY INFORMATION CARE AND MAINTENANCE Do not subject the monitor to strong shocks, such as dropping the unit on the floor. Do not submerge the device or any of the components in water. Store the device and the components in a clean, safe location. Changes or modification not approved by the manufacturer will void the user warranty. -
Page 7: Before Taking A Measurement
BEFORE TAKING A MEASUREMENT To ensure a reliable reading follow these recommendations: 1. Avoid eating, drinking alcohol, smoking, exercising, and bathing for 30 minutes before taking a measurement. Rest for at least 15 minutes before taking the measurement. 2. Stress raises blood pressure. Avoid taking measurements during stressful times. -
Page 8: Operating Instructions
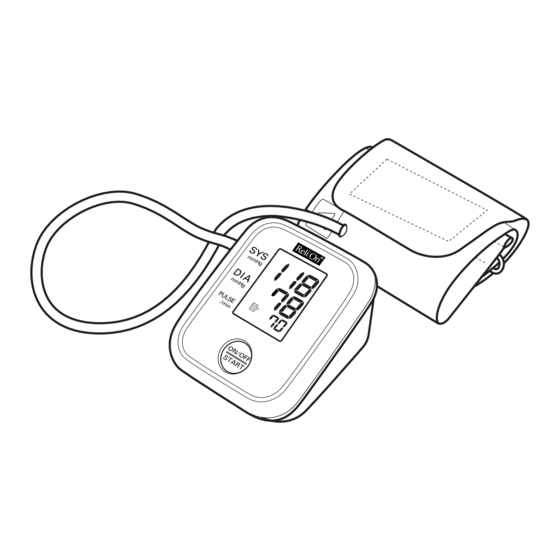
KNOW YOUR UNIT Main Unit: On/Off Start Button Components: Air Tube Air Plug (Connects to Air Jack) Arm Cuff Display Air Jack Four “AAA” Alkaline Instruction Manual Battery Compartment (LR03) Batteries INSTRUCTION MANUAL Automatic Blood Pressure Monitor 7100REL Model... -
Page 9: Unit Display
UNIT DISPLAY Systolic Blood Pressure Diastolic Blood Pressure Heartbeat Symbol Memory Symbol Pulse Display Low Battery Indicator Deflation Symbol... -
Page 10: Display Symbols
DISPLAY SYMBOLS The American Heart Association (AHA) recommends the following guideline for upper limit of normal for home blood pressure readings: AHA Home Guideline for Upper Limit of Normal BP Systolic Blood Pressure Diastolic Blood Pressure This is a general guideline because blood pressure depends on age and morbidity. -
Page 11: Battery Installation
BATTERY INSTALLATION 1. Turn the main unit upside down. 2. Press the indicator on the battery cover and slide the cover off in the direction of the arrow. 3. Install 4 “AAA” size batteries so the + (positive) and - (negative) polarities match the polarities of the battery compartment as indicated. - Page 12 BATTERY INSTALLATION BATTERY REPLACEMENT When the Low Battery Indicator appears on the display screen turn the monitor off and remove all the batteries. Replace with four new batteries at the same time. WARNING If battery fluid should get in your eyes, immediately rinse with plenty of clean water.
-
Page 13: Applying The Arm Cuff
APPLYING THE ARM CUFF CAUTION Read all of the information in the instruction manual and any other literature in the box before operating the unit. CAUTION This device is intended for use in measuring blood pressure and pulse rate in the adult population. Do not use this device on infants or persons who cannot express their intentions. - Page 14 APPLYING THE ARM CUFF 3. Apply the cuff to your left upper arm so the blue arrow is centered on the inside of your arm and aligned with your middle finger. The air tube runs down the inside of your arm. The bottom of the cuff should be approximately 1/2"...
- Page 15 APPLYING THE ARM CUFF APPLYING THE CUFF ON THE RIGHT ARM When taking a measurement using the right arm use this instruction for Step 4 on page 14. Apply the cuff to your right upper arm so the blue arrow and the air tube runs along the side of your arm.
-
Page 16: Taking A Measurement
TAKING A MEASUREMENT CAUTION Operate the device only as intended. Do not use the device for any other purpose. 1. Sit on a chair with your feet flat on the floor. Place your left arm on a table so the cuff is level with your heart. Remain still and do not move your arm until the entire measurement is complete. - Page 17 TAKING A MEASUREMENT 3. The cuff starts to inflate. The unit automatically inflates to 170mmHg. The cuff needs to inflate 30 to 40 mmHg higher than your expected systolic pressure. NOTES: • Do not apply more pressure than necessary. • The monitor will not inflate above 299 mmHg. •...
-
Page 18: Using The Memory Function
USING THE MEMORY FUNCTION The monitor automatically stores the last measurement values in the memory. TO DISPLAY THE MEASUREMENT VALUES 1. Press and hold the ON/OFF START button until the last measurement values are displayed along with the Memory Symbol ( ). 2. -
Page 19: Care And Maintenance
CARE AND MAINTENANCE To keep your digital blood pressure monitor in the best condition and protect the unit from damage, follow the directions listed below: Do not forcefully bend the arm cuff or air tube. Do not fold tightly. Clean the monitor with a soft dry cloth. Do not use any abrasive or volatile cleaners. -
Page 20: Error Indicators And Troubleshooting Tips
ERROR INDICATORS AND TROUBLESHOOTING TIPS ERROR INDICATORS SYMBOL Monitor could not detect pulse wave. Air plug is not connected. Cuff under-inflated. Cuff not applied correctly. Cuff over-inflated Batteries are worn CAUSE Take another measurement and remain still until the measurement is complete. Remove the arm cuff. - Page 21 ERROR INDICATORS AND TROUBLESHOOTING TIPS TROUBLESHOOTING TIPS PROBLEM No power. No display appears on the unit. Measurement values appear too high or too low. CAUSES AND SOLUTIONS Replace all four batteries with new ones. Check the battery installation for proper placement of the battery polarities.
-
Page 22: Fcc Statement
FCC STATEMENT Note: POTENTIAL FOR RADIO/TELEVISION INTERFERENCE (for U.S.A. only) This product has been tested and found to comply with the limits for a Class B digital device, pursuant to part 15 of the FCC rules. These limits are designed to provide reasonable protection against harmful interference in a residential installation. -
Page 23: Warranty
WARRANTY Your ReliOn ® 7100REL Automatic Blood Pressure is warranted to be free from defects in materials and workmanship appearing within one year from the date of purchase, when used in accordance with the instructions provided with the monitor. The above warranty extend only to the original retail purchaser. -
Page 24: Specifications
Main Unit Dimensions: Approximately 4 1/8" (l) Cuff Size: Cuff Circumference: Contents: NOTE: These specifications are subject to change without notice. SPECIFICATIONS 7100REL (HEM-7102-WM) LCD Digital Display Pressure: 0 to 299 mmHg, Pulse: 40 to 180/min. Pulse: ±5% of reading Automatic by electric pump... -
Page 25: Notes
NOTES... - Page 26 Manufactured by OMRON HEALTHCARE Made in China Distributed by: OMRON HEALTHCARE, INC. 1200 Lakeside Drive Bannockburn, Illinois 60015 www.omronhealthcare.com Copyright © 2008 Omron Healthcare, Inc. ReliOn ® is a registered trademark used under license by Omron Healthcare, Inc.
- Page 27 MANUAL DE INSTRUCCIONES Monitor de presión sanguínea automático 7100REL Model...
- Page 28 Antes de usar el monitor Introducción ..........E3 Información de seguridad .
-
Page 29: Introducción
Esto significa que el monitor detecta el movimiento de su sangre mediante su arteria braquial y convierte los movimientos en una lectura digital. El 7100REL incluye los siguientes componentes: • Monitor • Brazalete estándar para brazo adulto “AAA”... -
Page 30: Información De Seguridad
INFORMACIÓN DE SEGURIDAD A fin de garantizar el uso adecuado del producto, se deben aplicar siempre medidas de seguridad básicas, incluyendo las precauciones que se enumeran en este manual de instrucciones. SÍMBOLOS DE SEGURIDAD UTILIZADOS EN EL PRESENTE ADVERTENCIA PRECAUCIÓN OPERACIÓN DEL DISPOSITIVO Consulte a su médico para obtener información específica acerca de su presión arterial. - Page 31 INFORMACIÓN DE SEGURIDAD OPERACIÓN DEL DISPOSITIVO (continuación) Lea cuidadosamente el n.º 3, “Cómo tomar una medición”, en el manual de instrucciones si su presión sistólica suele ser más alta. Inflar el dispositivo a una presión más alta que la necesaria puede provocar magulladuras en el lugar donde se aplica la banda.
-
Page 32: Cuidado Y Mantenimiento
INFORMACIÓN DE SEGURIDAD CUIDADO Y MANTENIMIENTO No someta el monitor a golpes fuertes, como por ejemplo, dejar caer la unidad al suelo. No sumerja el dispositivo ni ninguno de sus componentes en agua. Guarde el dispositivo y los componentes en un lugar limpio y seguro. Los cambios o las modificaciones que no hayan sido aprobados por el fabricante, dejarán sin efecto la garantía del usuario. -
Page 33: Antes De Tomar Una Medición
ANTES DE TOMAR UNA MEDICIÓN A fin de garantizar una lectura confiable, siga las recomendaciones que se enumeran a continuación: 1. Evite comer, tomar bebidas alcohólicas, fumar, hacer ejercicio y bañarse durante 30 minutos antes de tomar una medición. Descanse durante al menos 15 minutos antes de tomar la medición. -
Page 34: Conozca La Unidad
Enchufe macho del aire (Se conecta al enchufe hembra del aire) Brazalete para el brazo Pantalla Enchufe hembra del aire Dos pilas alcalinas Manual de instrucciones Compartimiento de las pilas “AAA” (LR03) INSTRUCTION MANUAL Automatic Blood Pressure Monitor 7100REL Model... -
Page 35: Pantalla De La Unidad
PANTALLA DE LA UNIDAD Presión arterial sistólica Presión arterial diastólica Símbolo de latidos de corazón Símbolo de memoria Pantalla de visualización Indicador de batería baja del pulso Símbolo de desinflado... -
Page 36: Símbolos De La Pantalla
SÍMBOLOS DE LA PANTALLA La Asociación Estadounidense del Corazón (The American Heart Association - AHA) recomienda los siguientes valores como límite máximo de una lectura normal de presión arterial tomada en el hogar: Pautas de la AHA para la medición de la presión sanguínea normal máxima en el hogar Presión arterial sistólica Presión arterial diastólica... -
Page 37: Colocación De Las Pilas
COLOCACIÓN DE LAS PILAS 1. Dar vuelta la unidad principal. 2. Presione el indicador cubierta de las pilas y deslice la cubierta en la dirección que indica la flecha. 3. Coloque 4 pilas “AAA” de modo que las polaridades + (positiva) y - (negativa) concuerden con las polaridades que se indican en el compartimiento de las pilas. - Page 38 COLOCACIÓN DE LAS PILAS CAMBIO DE LAS PILAS Cuando el Indicador de Batería Baja aparezca en la pantalla, apague el monitor y retire todas las pilas. Coloque las cuatro pilas nuevas al mismo tiempo. ADVERTENCIA En caso de que el fluido de las pilas entre en contacto con los ojos, enjuague de inmediato con abundante agua limpia.
-
Page 39: Colocación Del Brazalete Para El Brazo
COLOCACIÓN DEL BRAZALETE PARA EL BRAZO PRECAUCIÓN Lea toda la información del manual de instrucciones y cualquier otro material impreso incluido en la caja antes de comenzar a usar la unidad. PRECAUCIÓN Este dispositivo está diseñado para realizar tomas de presión arterial y ritmo cardíaco en adultos. - Page 40 COLOCACIÓN DEL BRAZALETE PARA EL BRAZO 3. Coloque el brazalete en la parte superior del brazo izquierdo de modo que la flecha azul quede centrada en la parte interna del brazo y alineada con el dedo medio. El tubo de aire baja por la parte interna del brazo.
- Page 41 COLOCACIÓN DE LA BANDA PARA EL BRAZO COLOCACIÓN DEL BRAZALETE PARA EL BRAZO EN EL BRAZO DERECHO Cuando se toma una medición en el brazo derecho, use estas instrucciones para el paso 4 de la página 14. Coloque el brazalete en la parte superior de su brazo derecho de modo que la flecha azul y el tubo de aire corran por la parte interna del brazo.
-
Page 42: Cómo Tomar Una Medición
CÓMO TOMAR UNA MEDICIÓN PRECAUCIÓN Sólo opere el dispositivo para el uso para el que fue diseñado. No use el dispositivo para ningún otro fin. 1. Siéntese en una silla con los pies apoyados sobre el piso. Coloque el brazo en una mesa de modo que el brazalete quede al mismo nivel que el corazón. - Page 43 CÓMO TOMAR UNA MEDICIÓN 3. El brazalete comienza a inflarse. La unidad se infla en forma automática hasta 170mmHg. El brazalete necesita estar inflado 30 ó 40 mmHg por encima de su presión sistólica prevista. NOTAS: • No aplique más presión de la que sea necesaria. •...
-
Page 44: Uso De La Función De Memoria
USO DE LA FUNCIÓN DE MEMORIA El monitor almacena en la memoria en forma automática los valores de la última medición. PARA MOSTRAR LOS VALORES DE MEDICIÓN 1. Presione y mantenga presionado el botón ON/OFF hasta que los últimos valores de la medición aparezcan junto con el botón de memoria ( ). -
Page 45: Cuidado Y Mantenimiento
CUIDADO Y MANTENIMIENTO Siga estas instrucciones a fin de mantener el monitor de presión sanguínea digital en buenas condiciones y proteger la unidad de daños: No doble por la fuerza el brazalete ni el tubo de aire. No doble los elementos de modo que queden demasiado apretados. -
Page 46: Indicadores De Error Y Solución De Problemas
INDICADORES DE ERROR Y SOLUCIÓN DE PROBLEMAS INDICADORES DE ERROR SÍMBOLO El monitor no pudo detectar el pulso. El enchufe macho del aire no está conectado. El brazalete no está lo suficientemente inflada. El brazalete no está colocada correctamente. El brazalete está inflado en exceso Las pilas están agotadas CAUSA... - Page 47 INDICADORES DE ERROR Y SOLUCIÓN DE PROBLEMAS RECOMENDACIONES PARA LA RESOLUCIÓN DE PROBLEMAS PROBLEMA No hay alimentación eléctrica. No aparece ningún símbolo en la pantalla de la unidad. Los valores de medición parecen ser demasiado altos o demasiado bajos. CAUSAS Y SOLUCIONES Cambie las cuatro pilas por pilas nuevas.
-
Page 48: Declaración De Fcc
DECLARACIÓN DE FCC Nota: POTENCIAL DE INTERFERENCIA DE RADIO/TELEVISÓN (para EE.UU. solamente) Este producto ha sido probado y cumple con los límites de un dispositivo digital de Clase B, de acuerdo con la sección 15 de las normas de la FCC. Estos límites fueron diseñados para proporcionar una protección razonable contra interferencias perjudiciales cuando se utilice el equipo en una instalación residencial. -
Page 49: Garantía
GARANTÍA El monitor de presión arterial automático ReliOn ® 7100REL está garantizado como libre de defectos en materiales y mano de obra que se presenten dentro de un plazo de 1 año a partir de la fecha de compra, si se usa de acuerdo con las instrucciones que se suministran con el monitor. -
Page 50: Especificaciones
Dimensiones de la unidad principal: Aproximadamente 4 1/8" (largo) 4 7/8" (ancho) Tamaño del brazalete: Circunferencia del brazalete: Contenidos: NOTA: Estas especificaciones están sujetas a modificaciones sin previo aviso. 7100REL (HEM-7102-WM) Pantalla digital LCD Presión: 0 a 299 mmHg, Pulso: 40 a 180/min. Presión: ±3mmHg o 2% de lectura Pulso: ±5% de lectura... -
Page 51: Notas
NOTAS... - Page 52 Fabricado por OMRON HEALTHCARE Hecho en China Distribuido por: OMRON HEALTHCARE, INC. 1200 Lakeside Drive Bannockburn, Illinois 60015 www.omronhealthcare.com Copyright © 2008 Omron Healthcare, Inc. ReliOn ® es una marca comercial registrada utilizada según licencia por Omron Healthcare, Inc. 5322687-0A...