Table of Contents
Advertisement
Advertisement
Table of Contents

Related Manuals for Midland Atlantic


Summary of Contents for Midland Atlantic
- Page 1 Atlantic VHF Marine Transceiver...
-
Page 2: Table Of Contents
VHF Marine Transceiver ATLANTIC - TABLE OF CONTENTS INTRODUCTION ........................3 ABOVE ALL… SAFETY!......................4 Symbols used ............................4 Warnings ..............................4 Service............................... 4 IDENTIFYING THE PARTS ....................5 Display............................... 5 Radio: ................................ 6 PREPARING THE TRANSCEIVER ..................7 Installing and removing the belt clip ......................7 Installing and removing batteries ...................... -
Page 3: Introduction
It offers security for all navigational requirements thanks also to a dedicated button that gives instant access the emergency channel N.16. ATLANTIC, which boasts 56 channels and outputs 5W transmission power, is made up of components specifically designed for this type of equipment. Its water resistant protection enables safe use also in wet conditions. -
Page 4: Above All
2. ABOVE ALL… SAFETY! 2.1 Symbols used For ease and convenience of use, this manual uses symbols to highlight urgent situations, practical advice, and general information. Exclamation marks such as this one indicate a crucial description regarding technical repairs, dangerous conditions, safety warnings, advice, and/or other important information. Ignoring these symbols may result in serious problems and/or damage and/or personal injury. -
Page 5: Identifying The Parts
3. IDENTIFYING THE PARTS 3.1 Display Your marine transceiver keeps you constantly updated about its operational status through a Liquid Crystal Display (LCD). The symbols and their corresponding parameters that may appear, according to the operational status of the device, are described as follows: 1. -
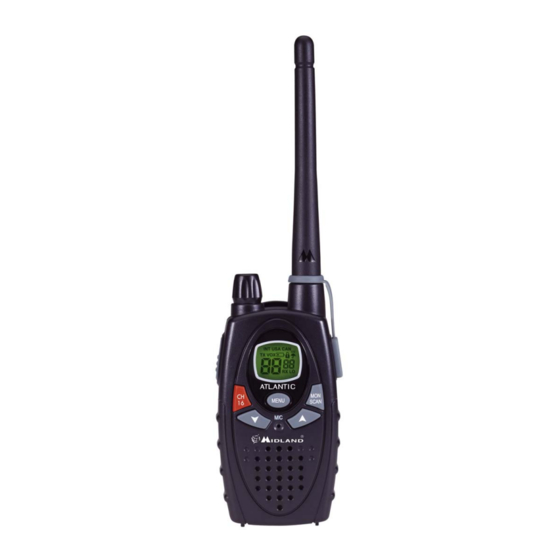
Page 6: Radio
3.2 Radio: Refer to the following images to identify the various parts of the device: 10. VOLUME control – On/off switch for the device and adjusts volume of reception. 11. Button PTT (press to talk) / CALL (CALL function, see par.6.5) – Press this button to switch to transmission 12. -
Page 7: Preparing The Transceiver
4. PREPARING THE TRANSCEIVER Make sure the following items are supplied in the package before you start using your transceiver: • transceiver; • desk/wall support; • belt clip holder; • waterproof case with neck collar • operational manual; If any of the above is missing or damaged contact your supplier immediately. 4.1 Installing and removing the belt clip With the belt clip you can easily attach the transceiver to your belt. -
Page 8: Recharging Batteries
4) Replace the cover on the batteries compartment. 5) Replace the belt clip . Be careful to insert the batteries according to their polarity as illustrated inside the compartment Be careful to snap close the battery cover. 4.2.b Removal 1) Follow steps 1 and 2 of par. 4.2.a 2) Remove the batteries from the device;... -
Page 9: Memory Effect Of Rechargeable Batteries
Do not throw batteries into fire or place them near heat as this may cause explosions or personal injuries. Dispose of the batteries according to procedures set out by local regulations. Do not mix old and new batteries or batteries of different types or batteries which have been used in different manners. -
Page 10: Volume Control
5.3 Volume control Turn the knob VOLUME[10] to about half way and adjust it to a comfortable level as soon as you receive a signal. If you do not receive a signal you can use the button MON/SCAN[18] described at par. 5.5. Ensure the channel you’ve selected is not a reception-only channel (if it is, the transmission will be disabled) and that no one else is talking (this will appear on your display as the B icon). -
Page 11: Power Saving Feature
16[12]. No matter what mode the device is operating, channel 16 will be selected immediately. To go back to the previously selected channel press again the button CH 16[12]. Power saving feature The battery power saving feature enables a reduction in the consumption of up to 50%; Power saving comes on automatically when the transceiver does not receive any signal for more than seven seconds. -
Page 12: Advanced Functions
Once you are tuned in the communication you were looking for, press PTT[11] to talk on the selected channel. Atlantic will however remain in scanning mode (which is indicated by the flashing of the channel on the display) and it is possible to start scanning again by pressing on the scroll buttons [19]. -
Page 13: Roger Beep (End-Of-Message Tone)
6.4 Roger Beep (End-of-message tone): When you release the PTT[11], that is every time you end transmission, Atlantic gives out a sound that indicate to the other party that s/he can start talking. This function is factory set. To disable the function: 1) Press five times the MENU[17] button;... -
Page 15: Troubleshooting
7. TROUBLESHOOTING Your Atlantic is designed to provide you with years of optimal performance. If for some reason problems arise, refer to this chapter before contacting a service centre in your region. 7.1 Reset If your transceiver experiences a logical malfunction (improper symbols on the display, blocking of functions, etc.), it may not be experiencing a true failure, but rather a problem caused by external factors. -
Page 16: Technical Specifications
8. TECHNICAL SPECIFICATIONS Channel bands ..............................56 International Frequency generation ............................PLL synthesizer Frequency range (International band) ........... TX 156,025 - 157,425 MHz /RX 156,300 - 162,000 MHz Antenna Impedance ................................50 Ohm Power Supply................................ 6 VDC +/- 10% Operating Temperature Range........................ -
Page 17: Frequency Table
9. FREQUENCY TABLE INTERNATIONAL CHANNELS Frequency Channel 156,050 MHz 160,650 MHz 156,100 MHz 160,700 MHz 156,150 MHz 160,750 MHz 156,200 MHz 160,800 MHz 156,250 MHz 160,850 MHz 156,300 MHz 156,300 MHz 156,350 MHz 160,950 MHz 156,400 MHz 156,400 MHz 156,450 MHz 156,450 MHz 156,500 MHz 156,500 MHz... - Page 18 156,925 MHz 161,525 MHz 156,975 MHz 161,575 MHz 157,025 MHz 161,625 MHz 157,075 MHz 161,675 MHz 157,125 MHz 161,725 MHz 157,175 MHz 161,775 MHz 157,225 MHz 161,825 MHz 157,275 MHz 161,875 MHz 157,325 MHz 161,925 MHz 157,375 MHz 157,375 MHz 157,425 MHz 157,425 MHz...