Table of Contents
Advertisement
Quick Links
See also:
Manual
Advertisement
Chapters
Table of Contents
Troubleshooting

Related Manuals for Lexus GX460


Summary of Contents for Lexus GX460
- Page 1 TABLE OF CONTENTS QUICK GUIDE BASIC FUNCTION NAVIGATION SYSTEM AUDIO/VISUAL SYSTEM VOICE COMMAND SYSTEM INFORMATION PHONE LEXUS ENFORM INDEX GX460_Navi_OM60M79U_(U) 15.05.21 18:34...
-
Page 2: Voice Command System Operation
Introduction NAVIGATION SYSTEM OWNER’S MANUAL This manual explains the operation of the Navigation System. Please read this manual carefully to ensure proper use. Keep this manual in your vehicle at all times. The screen shots in this document and the actual screens of the navigation system dif- fer depending on whether the functions and/or a contract existed and the map data was available at the time of producing this document. - Page 3 IMPORTANT INFORMATION ABOUT THIS MANUAL For safety reasons, this manual indicates items requiring particular attention with the following marks. CAUTION This is a warning against anything which may cause injury to people if the warning is ● ignored. You are informed about what you must or must not do in order to reduce the risk of injury to yourself and others.
- Page 4 HOW TO READ THIS MANUAL Name Description Operational An outline of the operation is explained. Outlines Main Operations The steps of an operation are explained. Related Operations A main operation’s supplementary operations are described. Information Useful information for the user is described. GX460_Navi_OM60M79U_(U) 15.05.21 18:34...
- Page 5 SAFETY INSTRUCTION CAUTION To use this system in the safest possible For safety, the driver should not operate ● manner, follow all the safety tips shown be- the navigation system while he/she is low. driving. Insufficient attention to the road and traffic may cause an accident.
-
Page 6: Table Of Contents
TABLE OF CONTENTS QUICK GUIDE NAVIGATION SYSTEM 1. BASIC FUNCTION......... 10 1. BASIC OPERATION........72 BUTTONS OVERVIEW........10 QUICK REFERENCE..........72 HOME SCREEN ............ 12 MAP SCREEN OPERATION ......75 MAP SCREEN INFORMATION....83 2. QUICK REFERENCE........16 TRAFFIC INFORMATION ......90 “Setup” SCREEN............. 16 2. - Page 7 AUDIO/VISUAL SYSTEM VOICE COMMAND SYSTEM 1. BASIC OPERATION ........158 1. VOICE COMMAND SYSTEM OPERATION..........280 QUICK REFERENCE ........158 VOICE COMMAND SYSTEM....280 SOME BASICS.............160 CASUAL SPEECH 2. RADIO OPERATION ........168 RECOGNIZATION ........288 AM/FM RADIO ...........168 COMMAND LIST ..........289 XM Satellite Radio ..........180 2.
- Page 8 TYPE B: FUNCTION ACHIEVED BY USING DCM AND THE NAVIGATION SYSTEM......352 TYPE C: FUNCTION ACHIEVED BY USING DCM........... 355 2. LEXUS ENFORM OPERATION..356 LEXUS Enform Remote ........356 LEXUS App Suite ..........357 LEXUS Enform Destinations......367 Lexus Insider............372 3. SETUP............. 375 LEXUS App Suite SETTINGS.......375...
-
Page 9: Quick Guide
QUICK GUIDE BASIC FUNCTION 1. BUTTONS OVERVIEW......10 2. HOME SCREEN ......... 12 STATUS DISPLAY............14 QUICK REFERENCE 1. “Setup” SCREEN ......... 16 2. “Information” SCREEN......18 NAVIGATION OPERATION 1. REGISTERING HOME......19 2. REGISTERING PRESET DESTINATIONS........21 3. OPERATION FLOW: GUIDING THE ROUTE.......... -
Page 10: Basic Function
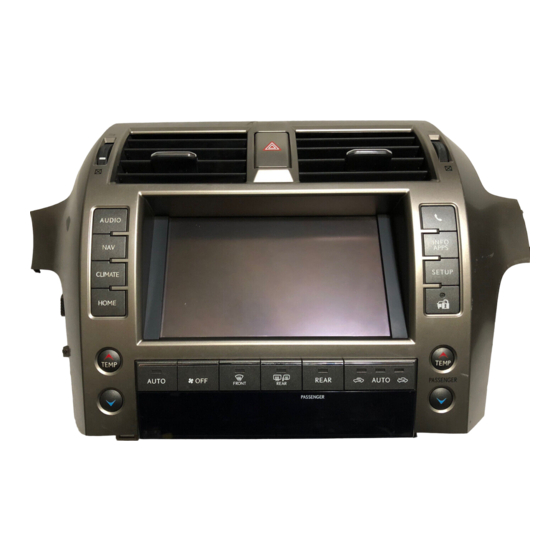
1. BASIC FUNCTION 1. BUTTONS OVERVIEW GX460_Navi_OM60M79U_(U) 15.05.21 18:34... - Page 11 1. BASIC FUNCTION Function Page Press to display the hands-free operation screen. Press to display the “Information” screen. Press to display the “Setup” screen. Press to display the home screen. “Owner’ s Press to display the air conditioning control screen. Manual”...
-
Page 12: Home Screen
1. BASIC FUNCTION 2. HOME SCREEN Press the “HOME” button to display the home screen. The home screen can display multiple information screens, such as the navigation sys- tem screen, audio system screen and fuel consumption screen, simultaneously. When a screen is selected, the selected screen is switched to a full-screen display. The home screen can be set to either a three-way split screen or a two-way split screen. - Page 13 1. BASIC FUNCTION Two-way split screen Function Page ® Displays the condition of the Bluetooth connection Select to change the display items/area and the home screen layout. GX460_Navi_OM60M79U_(U) 15.05.21 18:34...
-
Page 14: Status Display
1. BASIC FUNCTION STATUS DISPLAY ® The condition of the Bluetooth connection, as well as the level of reception and the amount of cellular phone battery charge left, are displayed on the status bar. This status bar is always shown on all modes. Indicators Conditions (Gray) - Page 15 1. BASIC FUNCTION Indicators Conditions Poor Excellent The level of reception does not always correspond with the level displayed on the cellular phone. The level of reception may not be displayed depending on the phone you have. The level of re- When the cellular phone is out of the service area or in a place ception inaccessible by radio waves, “No Service”...
-
Page 16: Quick Reference
2. QUICK REFERENCE 1. “Setup” SCREEN The items shown on the “Setup” screen can be set. Press the “SETUP” button to dis- play the “Setup” screen. GX460_Navi_OM60M79U_(U) 15.05.21 18:34... - Page 17 129, 141 tions. Select to set vehicle information such as maintenance information. Select to set the phone sound, contacts, message settings, etc. Select to set LEXUS App Suite settings. Select to set data services settings. GX460_Navi_OM60M79U_(U) 15.05.21 18:34...
-
Page 18: Information" Screen
This screen can be used to display traffic information, fuel consumption, etc. Press the “INFO/APPS” button to display the “Information” screen. Function Page Select to display the “LEXUS App Suite” screen. “Owner’ s Select to display the fuel consumption screen. Manual”... -
Page 19: Navigation Operation
3. NAVIGATION OPERATION 1. REGISTERING HOME Press the “NAV” button. Select “Go Home”. Select “Yes”. Select “Dest.”. There are different kinds of meth- ods to search for your home. (P.95) GX460_Navi_OM60M79U_(U) 15.05.21 18:34... - Page 20 3. NAVIGATION OPERATION Select “Enter”. Select “OK”. Registration of home is complete. Registering home in a different way P.130 Editing the name, location, phone num- ber and icon P.131 Setting home as the destination P.98 GX460_Navi_OM60M79U_(U) 15.05.21 18:34...
-
Page 21: Registering Preset Destinations
3. NAVIGATION OPERATION 2. REGISTERING PRESET DESTINATIONS Press the “NAV” button. Select one of the preset destination buttons. Select “Yes”. Select “Dest.”. There are different kinds of meth- ods to search for a destination. (P.95) GX460_Navi_OM60M79U_(U) 15.05.21 18:34... - Page 22 3. NAVIGATION OPERATION Select “Enter”. Select “OK”. Registration of preset destinations is com- plete. Registering preset destinations in a dif- ferent way P.132 Editing the name, location, phone num- ber and icon P.133 Setting preset destinations as the desti- nation P.99 GX460_Navi_OM60M79U_(U) 15.05.21 18:34...
-
Page 23: Operation Flow: Guiding The Route
3. NAVIGATION OPERATION 3. OPERATION FLOW: GUIDING THE ROUTE Press the “NAV” button. Select “Go”. Select “OK”. Select “Dest.”. Selecting routes other than the one recom- mended (P.110) Guidance to the destination is displayed There are different kinds of meth- on the screen and can be heard via voice ods to search for a destination. -
Page 24: Setting Home As The Destination
3. NAVIGATION OPERATION 4. SETTING HOME AS THE DESTINATION Press the “NAV” button. Select “OK”. Selecting routes other than the one recom- mended (P.110) Guidance to the destination is displayed Select “Dest.”. on the screen and can be heard via voice guidance. -
Page 25: Function Index
4. FUNCTION INDEX 1. FUNCTION INDEX Map Displaying maps Page Viewing the map screen Displaying the current position Viewing the current position vicinity map Changing the scale Changing the map orientation Displaying map Information Displaying the estimated travel/arrival time to the destination Selecting the map mode Displaying traffic information Searching for destinations... - Page 26 4. FUNCTION INDEX Useful functions Address book Page Registering address book entries Marking icons on the map Information Page Displaying vehicle maintenance Hands-free system (for cellular phone) Page ® Registering/connecting a Bluetooth phone ® Making a call on a Bluetooth phone ®...
-
Page 27: Basic Function
BASIC FUNCTION ® BASIC INFORMATION BEFORE Bluetooth SETTINGS OPERATION 1. REGISTERING/CONNECTING ® 1. INITIAL SCREEN ........28 Bluetooth DEVICE....... 40 ® REGISTERING A Bluetooth PHONE 2. TOUCH SCREEN GESTURES..... 30 FOR THE FIRST TIME ......... 40 ® REGISTERING A Bluetooth AUDIO 3. -
Page 28: Basic Information Before Operation
1. BASIC INFORMATION BEFORE OPERATION 1. INITIAL SCREEN When the engine switch is in MAINTENANCE ACCESSORY or IGNITION ON INFORMATION mode, the initial screen will be displayed and the system will begin operating. This system reminds users when to re- place certain parts or components and shows dealer information (if registered) on the screen. - Page 29 1. BASIC INFORMATION BEFORE OPERATION RESTARTING THE SYSTEM When system response is extremely slow, the system can be restarted. Press and hold the “PWR/VOL” knob for 3 seconds or more. GX460_Navi_OM60M79U_(U) 15.05.21 18:35...
-
Page 30: Touch Screen Gestures
1. BASIC INFORMATION BEFORE OPERATION 2. TOUCH SCREEN GESTURES Operations are performed by touching the touch screen directly with your finger. Operation method Outline Main use Touch Changing and selecting various set- Quickly touch and release tings. once. Drag* Touch the screen with your finger, and move the Scrolling the lists screen to the desired posi-... -
Page 31: Touch Screen Operation
1. BASIC INFORMATION BEFORE OPERATION 3. TOUCH SCREEN OPERATION This system is operated mainly by the INFORMATION buttons on the screen. (Referred to as If the system does not respond to touch- ● screen buttons in this manual.) ing a screen button, move your finger away from the screen and then touch it again. -
Page 32: Home Screen Operation
1. BASIC INFORMATION BEFORE OPERATION 4. HOME SCREEN OPERATION The home screen can display multiple CUSTOMIZING THE HOME information screens, such as the naviga- SCREEN tion system screen, audio system screen and fuel consumption screen, simulta- The display items/area on the home neously. - Page 33 1. BASIC INFORMATION BEFORE OPERATION ■ ■ CHANGING DISPLAY CHANGING THE HOME SCREEN ITEMS/AREA LAYOUT Select the desired item. Select “Change Layout”. Select the desired area. Select the desired screen layout. INFORMATION When the selected item is already being ● displayed and another area is selected for that item, the item that it is replacing will be displayed in the original item’...
-
Page 34: Entering Letters And Numbers/List Screen Operation
1. BASIC INFORMATION BEFORE OPERATION 5. ENTERING LETTERS AND NUMBERS/LIST SCREEN OPERATION On certain letter entry screens, letters can When searching by an address, name, be entered in upper or lower case. etc., or entering data, letters and num- bers can be entered via the screen. -
Page 35: List Screen
1. BASIC INFORMATION BEFORE OPERATION ■ SELECTING ALL ITEMS LIST SCREEN Some lists contain “Select All”. If “Select All” is selected, it is possible to DISPLAYING THE LIST select all items. The list screen may be displayed after Select “Select All”. entering characters. - Page 36 1. BASIC INFORMATION BEFORE OPERATION LIST SCREEN OPERATION SORTING When a list is displayed, use the appro- The order of a list displayed on the priate screen button to scroll through screen can be sorted in the order of dis- the list.
- Page 37 1. BASIC INFORMATION BEFORE OPERATION CHARACTER JUMP BUTTONS IN LISTS Some lists contain character screen but- tons, “ABC”, “DEF” etc., which allow a direct jump to list entries that begin with the same letter as the character screen button. Select the desired character jump but- tons.
-
Page 38: Screen Adjustment
1. BASIC INFORMATION BEFORE OPERATION 6. SCREEN ADJUSTMENT Select the items to be set. The contrast and brightness of the screen display and the image of the camera display can be adjusted. The screen can also be turned off, and/or changed to either day or night mode. - Page 39 1. BASIC INFORMATION BEFORE OPERATION CHANGING BETWEEN DAY ADJUSTING THE CONTRAST/ AND NIGHT MODE BRIGHTNESS Depending on the position of the head- The contrast and brightness of the light switch, the screen changes to day screen can be adjusted according to the or night mode.
-
Page 40: Bluetooth ® Settings
® 2. Bluetooth SETTINGS ® 1. REGISTERING/CONNECTING Bluetooth DEVICE Select “Yes” to register a phone. ® REGISTERING A Bluetooth PHONE FOR THE FIRST TIME To use the hands-free system, it is neces- ® sary to register a Bluetooth phone with the system. -
Page 41: Registering A Bluetooth
® 2. Bluetooth SETTINGS ® Select “OK” when the connection sta- Register the Bluetooth device using tus changes from “Connecting...” to ® your Bluetooth device. “Connected”. A PIN-code is not required for SSP (Secure Simple Pairing) compatible ® Bluetooth devices. - Page 42 ® 2. Bluetooth SETTINGS ® Select “Bluetooth*”. Turn the Bluetooth connection setting of your audio player on. This function is not available when the ® Bluetooth connection setting of your audio player is set to off. Press the “AUDIO” button. Select “Connect”.
-
Page 43: Profiles
Ver. 1.0 Ver. 1.1 Profile) Phone ® Bluetooth MAP (Message Access Profile) Ver. 1.0 phone message “LEXUS App SPP (Serial Port Profile) Ver. 1.1 Suite” function A2DP (Advanced Audio Distri- Ver. 1.0 Ver. 1.2 ® Bluetooth bution Profile) ®... - Page 44 ● the Bluetooth ® device function may not work properly. ® Refer to http://www.lexus.com/MobileLink to find approved Bluetooth phones for this ● system. Bluetooth is a registered trademark of Bluetooth SIG, Inc. GX460_Navi_OM60M79U_(U)
-
Page 45: Details
® 2. Bluetooth SETTINGS ® 2. SETTING Bluetooth DETAILS Press the “SETUP” button. “Bluetooth* Setup” SCREEN Function Page Select “Bluetooth*”. ® Registering a Bluetooth device ® Deleting a Bluetooth device ® Connecting a Bluetooth device ® Editing the Bluetooth device in- formation ®... -
Page 46: Registering A Bluetooth
® 2. Bluetooth SETTINGS ® DISPLAYING THE “Bluetooth* REGISTERING A Bluetooth Setup” SCREEN IN A DEVICE DIFFERENT WAY ® Up to 5 Bluetooth devices can be reg- Press the “SETUP” button istered. Select “Phone”. ® Bluetooth compatible phones (HFP) Select “Connect Phone”. and audio players (AVP) can be regis- tered simultaneously. - Page 47 ® 2. Bluetooth SETTINGS When this screen is displayed, search Check that the following screen is dis- for the device name displayed on this played when registration is complete. screen on the screen of your ® Bluetooth device. The system waits for connection requests coming from the registered device.
-
Page 48: Deleting A Bluetooth
: Audio player : Phone/“LEXUS App Suite” service The profile icon for a currently connected device will be displayed in color. Selecting a profile icon which is not cur- rently connected will switch the connection to the function. - Page 49 ® 2. Bluetooth SETTINGS ■ AUTO CONNECTION MODE Select the desired connection. To turn auto connection mode on, set “Bluetooth* Power” to on. (P.53) ® Leave the Bluetooth device in a loca- tion where the connection can be estab- lished. ...
-
Page 50: Editing The Bluetooth
® 2. Bluetooth SETTINGS ® ® ■ RECONNECTING THE Bluetooth EDITING THE Bluetooth PHONE DEVICE INFORMATION ® If a Bluetooth phone is disconnected ® The Bluetooth device’s information due to poor reception from the can be displayed on the screen. The dis- ®... - Page 51 ® 2. Bluetooth SETTINGS ® Confirm and change the Bluetooth Information device information. ® The name of the Bluetooth device can be changed to a desired name. (P.52) ® Select to set the Bluetooth audio player connection method. (P.52) Device address is unique to the de- vice and cannot be changed.
- Page 52 ® 2. Bluetooth SETTINGS CHANGING A DEVICE NAME SETTING AUDIO PLAYER CONNECTION METHOD Select “Device Name”. Select “Connect Audio Player from”. Enter the name and select “OK”. Select the desired connection method. INFORMATION Even if the device name is changed, the ●...
-
Page 53: System Settings" Screen
® 2. Bluetooth SETTINGS “System Settings” SCREEN Information Page ® Select to set Bluetooth ® The Bluetooth settings can be con- connection on/off. firmed and changed. Displays system name can be changed to a desired Display the “Bluetooth* Setup” screen. name. - Page 54 ® 2. Bluetooth SETTINGS CHANGING “Bluetooth* EDITING THE SYSTEM NAME Power” Select “Bluetooth* Name”. Select “Bluetooth* Power”. Enter a name and select “OK”. When “Bluetooth* Power” is on: ® The Bluetooth device is automatically EDITING THE PIN-CODE connected when the engine switch is in AC- CESSORY or IGNITION ON mode.
-
Page 55: Other Settings
3. OTHER SETTINGS 1. GENERAL SETTINGS Settings are available for auto screen GENERAL SETTINGS SCREEN change, operation sounds, etc. Press the “SETUP” button. Select “General”. Select the items to be set. Function Select to change the time zone and set the daylight saving time and auto- matic adjustment of the clock by GPS on/off. - Page 56 Select to delete personal data. (P.61) Function Select to update software versions. Select to change the time zone. For details, contact your Lexus deal- (P.57) Select to set daylight saving time on/ Select to update “Gracenote” data- off. base versions. For details, contact your Lexus dealer.
- Page 57 3. OTHER SETTINGS ■ ■ SETTING THE TIME ZONE MANUAL CLOCK SETTING Select “Time Zone”. When “Auto Adjust by GPS” is turned “Off”, the clock can be manually adjust- Select the desired time zone. Display the “Clock” screen. ( P.56) Select the items to be set.
- Page 58 3. OTHER SETTINGS Display the “General Settings” screen. CUSTOMIZING THE STARTUP (P.55) AND SCREEN OFF IMAGES Select “Customize Images”. An image can be copied from a USB Select the items to be set. memory and used as the startup and screen off Images.
- Page 59 3. OTHER SETTINGS ■ TRANSFERRING IMAGES Select the desired images from the list and then select “Copy”. Slide the auxiliary box lid. The selected image is displayed on the right side of the screen. If the selected image file is broken or incompatible, Open the cover and connect a USB will be displayed.
- Page 60 3. OTHER SETTINGS ■ SETTING THE STARTUP AND INFORMATION SCREEN OFF IMAGES When saving image files to a USB mem- ● ory to be transferred to the navigation Select “Set Images”. system, save the images in a folder Select the desired image. named “Image”...
- Page 61 Select “Yes” when the confirmation screen appears. Registered or changed personal settings will be deleted or returned to their default conditions. For example: • General settings • Navigation settings • Audio settings • Phone settings • Lexus Enform settings GX460_Navi_OM60M79U_(U) 15.05.21 18:35...
-
Page 62: Voice Settings
3. OTHER SETTINGS 2. VOICE SETTINGS Voice guidance etc. can be set. VOICE SETTINGS SCREEN Press the “SETUP” button. Select “Voice”. Select the items to be set. INFORMATION “Voice Settings” screen can also be dis- ● played from the voice recognition top screen. - Page 63 3. OTHER SETTINGS Function Select to adjust the volume of voice guidance. Select to set the voice guidance dur- ing route guidance on/off. Select to set the voice guidance dur- ing audio/visual and/or air condi- tioning system use on/off. Select to set the voice recognition prompts on/off.
-
Page 64: Vehicle Settings
3. OTHER SETTINGS 3. VEHICLE SETTINGS Select the desired item to be set. Settings are available for maintenance, vehicle customization and intuitive park- ing assist-sensor. Press the “SETUP” button. Function Page Select to set mainte- nance. Select to set vehicle cus- Owner’... -
Page 65: Maintenance
3. OTHER SETTINGS MAINTENANCE Function Select to set the condition of parts or When the navigation system is turned components. on, the “Maintenance Reminder” screen Select to add new information items displays when it is time to replace a part separately from provided ones. - Page 66 3. OTHER SETTINGS MAINTENANCE INFORMATION INFORMATION SETTING For scheduled maintenance information, ● refer to “Warranty and Services Guide/ Select the desired part or component Owner’ s Manual Supplement/Scheduled screen button. Maintenance”. Depending on driving or road conditions, ● Set the conditions. the actual date and distance that mainte- nance should be performed may differ from the stored date and distance in the...
- Page 67 3. OTHER SETTINGS Select the items to be edited. DEALER SETTING Dealer information can be registered in the system. With dealer information reg- istered, route guidance to the dealer is available. Select “Set Dealer”. Select the desired item to search for the location.
- Page 68 3. OTHER SETTINGS ■ EDITING DEALER OR CONTACT NAME Select “Edit” next to “Dealer” or “Contact”. Enter the name and select “OK”. ■ EDITING THE LOCATION Select “Edit” next to “Location”. Scroll the map to the desired point (P.82) and select “OK”. ■...
-
Page 69: Navigation System
NAVIGATION SYSTEM BASIC OPERATION 1. QUICK REFERENCE ......72 MAP SCREEN............. 72 NAVIGATION OPTIONS SCREEN ....74 2. MAP SCREEN OPERATION ....75 CURRENT POSITION DISPLAY...... 75 MAP SCALE..............75 ORIENTATION OF THE MAP......77 SWITCHING THE MAP MODE......78 SCREEN SCROLL OPERATION...... - Page 70 DESTINATION SEARCH ROUTE GUIDANCE 1. DESTINATION SEARCH 1. ROUTE GUIDANCE SCREEN ... 115 SCREEN............. 95 SCREEN FOR ROUTE GUIDANCE..... 115 ROUTE OVERVIEW ..........117 2. SEARCH OPERATION ......97 DURING FREEWAY DRIVING ....... 118 SELECTING SEARCH AREA......98 WHEN APPROACHING SETTING HOME AS DESTINATION ...
- Page 71 MEMORY POINTS TIPS FOR THE NAVIGATION SYSTEM 1. MEMORY POINTS SETTINGS..129 1. GPS (GLOBAL POSITIONING SETTING UP HOME ..........130 SYSTEM) ..........149 SETTING UP PRESET DESTINATIONS..132 LIMITATIONS OF THE NAVIGATION SETTING UP ADDRESS BOOK ..... 134 SYSTEM ..............149 SETTING UP AREAS TO AVOID ....
-
Page 72: Basic Operation
1. BASIC OPERATION 1. QUICK REFERENCE MAP SCREEN To display this screen, press the “NAV” button. Name Function Page Indicates whether the map orientation is set to 2D north up, 2D north-up or heading-up. The letter(s) beside this heading up or 3D symbol indicate the vehicle’s heading direction heading up sym- (e.g. - Page 73 1. BASIC OPERATION Name Function Page Shows that traffic information is received. Select to start voice guidance for traffic information. Traffic indicator When traffic information is received via HD, HD mark is displayed on the right. Scale indicator This figure indicates the map scale. Select to magnify or reduce the map scale.
-
Page 74: Navigation Options Screen
1. BASIC OPERATION NAVIGATION OPTIONS SCREEN The navigation options allow you to change map configurations, display/hide POI icons, and edit the navigation routes. To display the “Navigation Options” screen, press the “NAV” button, then select “Options” on the map screen. Function Page Select to display the desired map configuration. -
Page 75: Map Screen Operation
1. BASIC OPERATION 2. MAP SCREEN OPERATION CURRENT POSITION DISPLAY MAP SCALE Press the “NAV” button. Select to change the scale of the map screen. The scale indicator bar appears at the bot- Check that the current position map is tom of the screen. - Page 76 1. BASIC OPERATION FOOTPRINT MAP 3D CITY MODEL MAP For areas covered by the footprint map A 3D city model map can be displayed (some major cities), a footprint map on a for some areas in major cities when the scale of 75 ft.
-
Page 77: Orientation Of The Map
1. BASIC OPERATION ROTATING 3D MAP ORIENTATION OF THE MAP 3D map and 3D city model map can be The orientation of the map can be rotated when arrows appear around the changed between 2D north-up, 2D cursor while scrolling. heading-up and 3D heading-up by se- lecting the orientation symbol displayed Select an arrow to rotate. -
Page 78: Switching The Map Mode
1. BASIC OPERATION : North-up symbol SWITCHING THE MAP MODE Regardless of the direction of vehicle travel, Select “Options” on the map screen. north is always up. : Heading-up symbol Select “Map Mode”. The direction of vehicle travel is always up. : 3D Heading-up symbol The direction of vehicle travel is always up. - Page 79 1. BASIC OPERATION ■ MAP ONLY Function Page Select to display the single map screen. Select to display the dual map screen. Select to display the com- pass mode screen. ■ DUAL MAP Select to display the turn list screen. Select to display the freeway exit list screen.
- Page 80 1. BASIC OPERATION ■ Editing right map COMPASS The right side map can be edited. Information about the destination, cur- rent position and a compass is displayed Select any point on the right side map. on the screen. Select the desired item. INFORMATION Function Page...
-
Page 81: Screen Scroll Operation
1. BASIC OPERATION To scroll over the map screen, touch the SCREEN SCROLL screen with your finger, and move the OPERATION screen to the desired position or quickly move the screen by flicking with your finger. (P.30) Use the scroll feature to move the de- ... -
Page 82: Adjusting Location In Small Increments
1. BASIC OPERATION ADJUSTING LOCATION IN SMALL INCREMENTS The cursor location can be adjusted in small increments when “Adjust Location” is selected on the setting map screen. Also, when changing the location of memory points on the editing screen (P.136) and adjusting the current po- sition mark manually on the “Calibra- tion”... -
Page 83: Map Screen Information
1. BASIC OPERATION 3. MAP SCREEN INFORMATION DISPLAYING MAP Function Page INFORMATION Select to display the select- ed POI icons. Information such as POI icons, route Select to select or change trace, speed limit, etc. can be displayed POI icons. on the map screen. - Page 84 1. BASIC OPERATION Select the desired POI category and se- SELECTING THE POI ICONS lect “OK”. Display the “Map Information” screen. (P.83) Select “Select POI”. Information/Function Page Displays up to 5 selected POI icons on the map When the POI icons to be displayed on the screen.
- Page 85 1. BASIC OPERATION ■ ■ SELECTING OTHER POI ICONS DISPLAYING THE LOCAL POI TO BE DISPLAYED LIST Select “Other POIs”. POIs that are within 20 miles (32 km) of the current position will be listed from Select the desired POI categories and among the selected categories.
- Page 86 1. BASIC OPERATION When “Near...” is selected ROUTE TRACE Select the desired item. The traveled route can be stored and re- traced on the map screen. This feature is available when the map scale is 30 miles (50 km) or less. Display the “Map Information”...
-
Page 87: Displaying Information About The Icon Where The Cursor Is Set
1. BASIC OPERATION ■ STOP RECORDING THE ROUTE DISPLAYING INFORMATION TRACE ABOUT THE ICON WHERE Select “Route Trace” again. THE CURSOR IS SET A confirmation screen will be displayed. When the cursor is placed over an icon “Yes”: Select to keep the recorded on the map screen, the name bar is dis- route trace. - Page 88 1. BASIC OPERATION Destination information Function Select to register as a memory point. To change the icon, name, etc.: P.134 Select to set as a destination. Select to call the registered number. Traffic information Select to delete destination or memo- ry point.
-
Page 89: Standard Map Icons
1. BASIC OPERATION STANDARD MAP ICONS Icon Name Island Park Industry Business facility Airport Military University Hospital Stadium Shopping mall Golf GX460_Navi_OM60M79U_(U) 15.05.21 18:35... -
Page 90: Traffic Information
1. BASIC OPERATION 4. TRAFFIC INFORMATION Select the desired item. Traffic data can be received via HD or LEXUS App Suite to display traffic infor- mation on the map screen. Press the “INFO/APPS” button. Function Page Select to display a list of current traffic information. - Page 91 1. BASIC OPERATION Check that the traffic information is dis- DISPLAYING TRAFFIC played. INFORMATION A list of current traffic information can be displayed along with information on the incident’s distance and position rela- tive to the vehicle. Display the “Traffic” screen. (P.90) Select “Traffic Event List”.
- Page 92 1. BASIC OPERATION Check that the traffic information is dis- DISPLAYING PREDICTIVE played. TRAFFIC INFORMATION A map with predictive traffic data can be displayed. Display the “Traffic” screen. (P.90) Select “Predictive Traffic Map”. Scroll the map to the desired point and set the time of predictive traffic informa- “Detail”: Select to display detailed traffic in- tion.
-
Page 93: Displaying Traffic Information On The Map
1. BASIC OPERATION Check that the traffic information is dis- DISPLAYING TRAFFIC played. INFORMATION ON THE MAP On the map screen Select “Options” on the map screen. Select “Map Information”. On the freeway information screen Select “Traffic information”. When set to on, the indicator will illuminate. GX460_Navi_OM60M79U_(U) 15.05.21 18:35... - Page 94 1. BASIC OPERATION Information/Function The icons show traffic incident, road repair, traffic obstacles, etc. Select to display traffic information and start voice guidance for the traffic infor- mation. The color of the arrow changes de- pending on the traffic information re- ceived.
-
Page 95: Destination Search
2. DESTINATION SEARCH 1. DESTINATION SEARCH SCREEN The “Destination” screen enables to search for a destination. To display the “Destina- tion” screen, press the “NAV” button, then select “Dest.” on the map screen. GX460_Navi_OM60M79U_(U) 15.05.21 18:35... - Page 96 Select to search for a destination by point of interest. Select to search for a destination by online database. Select to search for a destination via the Lexus response center. Select to search for a destination from previously set destinations.
-
Page 97: Search Operation
2. DESTINATION SEARCH 2. SEARCH OPERATION Press the “NAV” button. Select “Go” when the confirm destina- tion screen is displayed. Function Select “Dest.”. Select to adjust the position in small- er increments. (P.82) Select to register as a memory point. Select to search for the route. -
Page 98: Selecting Search Area
2. DESTINATION SEARCH SELECTING SEARCH AREA SETTING HOME AS DESTINATION The selected state (province) can be changed to set a destination from a To use this function, it is necessary to different state (province) by using register a home address. (P.130) “Address”, “Point of Interest”... -
Page 99: Setting Preset Destinations As Destination
2. DESTINATION SEARCH SETTING PRESET SEARCHING BY ADDRESS DESTINATIONS AS There are 2 methods to search for a des- DESTINATION tination by address. To use this function, it is necessary to Display the “Destination” screen. register preset destinations to the preset (P.97) screen buttons (1-5). - Page 100 2. DESTINATION SEARCH SEARCHING BY CITY SEARCHING BY STREET ADDRESS Select “City”. Select “Street Address”. Enter a city name and select “OK”. Enter a house number and select “OK”. “Last 5 Cities”: Select the city name from the list of the last 5 cities. Enter a street name and select “OK”.
-
Page 101: Searching By Point Of Interest
2. DESTINATION SEARCH SEARCHING BY NAME SEARCHING BY POINT OF INTEREST Select “Name”. Enter a POI name and select “OK”. There are 4 methods to search for a des- tination by Points of Interest. Select the desired POI. Display the “Destination” screen. (P.97) Select “Point of Interest”. - Page 102 2. DESTINATION SEARCH ■ ■ SELECTING A CITY TO SEARCH SEARCHING FOR POI USING WEB SEARCH Select “City”. Select “” next to “Web Search” to se- Enter a city name and select “OK”. lect a search engine. “Any City”: Select to cancel the city setting. Select the desired search engine icon.
- Page 103 For the procedure on how to conduct a search via a search engine, go to “SETTING A DESTINATION USING Function LEXUS App Suite” (P.363), and fol- low the steps from 3 onward. Select to set the search point from near the current position.
- Page 104 2. DESTINATION SEARCH When “Near a City Center in XX*” is se- Select the desired POI category. lected Select “Near a City Center in XX”. Enter a city name and select “OK”. “Last 5 Cities”: Select the city name from the list of the last 5 cities.
-
Page 105: Destination Search By Destination Assist
2. DESTINATION SEARCH SEARCHING BY PHONE DESTINATION SEARCH BY NUMBER DESTINATION ASSIST Select “Phone #”. The destination can be searched by call- Enter a phone number and select “OK”. ing an operator of Destination Assist. You can request either a specific busi- ... -
Page 106: Searching From Previous Destinations
2. DESTINATION SEARCH SEARCHING FROM SEARCHING BY ADDRESS PREVIOUS DESTINATIONS BOOK Display the “Destination” screen. To use this function, it is necessary to (P.97) register an address book entry. (P.134) Select “Previous Destinations”. Display the “Destination” screen. Select the desired destination. (P.97) Select “Address Book”. -
Page 107: Searching By Emergency
2. DESTINATION SEARCH SEARCHING BY SEARCHING BY EMERGENCY INTERSECTION AND FREEWAY Display the “Destination” screen. (P.97) There are 2 methods to search for a des- tination by Intersection & Freeway. Select “Emergency”. Select the desired emergency category. Display the “Destination” screen. (P.97) Select “Intersection &... - Page 108 2. DESTINATION SEARCH SEARCHING BY SEARCHING BY FREEWAY INTERSECTION ENTRANCE/EXIT Select “Intersection”. Select “Freeway Entrance / Exit”. Enter a freeway name and select “OK”. Enter the name of the first intersecting street which is located near the destina- Select the desired freeway. tion and select “OK”.
-
Page 109: Searching By Map
2. DESTINATION SEARCH SEARCHING BY MAP SEARCHING BY COORDINATES By selecting “Map” the last displayed lo- cation is displayed again on the map Display the “Destination” screen. screen. You can search for a destination (P.97) from this map. Select “Coordinates”. Display the “Destination”... -
Page 110: Starting Route Guidance
2. DESTINATION SEARCH 3. STARTING ROUTE GUIDANCE When the destination is set, the entire Information/Function route map from the current position to Select to start guidance. the destination is displayed. If “OK” is selected and held until a beep sounds, demo mode will start. Press the “HOME”... - Page 111 2. DESTINATION SEARCH ■ DISPLAYING 3 ROUTES INFOR- 3 ROUTES SELECTION MATION Select “Three Routes”. Select “Info”. Select the desired route. Check that the “Information for Three Routes” screen is displayed. Function Information Select to display the quickest route. Time necessary for the entire trip Select to display the alternative route.
- Page 112 2. DESTINATION SEARCH DISPLAYING TURN LIST INFORMATION However, not all road names on the route ● A list of turn information from the cur- may appear on the list. If a road changes rent position to the destination can be its name without requiring a turn (such as displayed.
- Page 113 2. DESTINATION SEARCH EDITING ROUTE INFORMATION Even if the “Freeways” indicator is ● Destinations can be added, reordered dimmed, the route cannot avoid including or deleted, and conditions for the route a freeway in some cases. (P.125) to the destination can be changed. If the calculated route includes a trip by ●...
-
Page 114: Pausing Guidance
2. DESTINATION SEARCH PAUSING GUIDANCE Select “Options” on the map screen. Select “Pause Guidance”. RESUMING GUIDANCE Select “Resume Guidance”. GX460_Navi_OM60M79U_(U) 15.05.21 18:35... -
Page 115: Route Guidance
3. ROUTE GUIDANCE 1. ROUTE GUIDANCE SCREEN During the route guidance, various INFORMATION types of guidance screens can be dis- If the vehicle goes off the guidance route, ● played depending on conditions. the route is searched again. For some areas, the roads have not been ●... - Page 116 3. ROUTE GUIDANCE CHANGING ROUTE INFORMATION INFORMATION BAR When the vehicle is on the guidance ● route, the distance measured along the When the vehicle is on the guidance route is displayed. Travel time and arrival route, the route information bar displays time are calculated based on the average speed for the specified speed limit.
-
Page 117: Route Overview
3. ROUTE GUIDANCE DISTANCE AND TIME TO ROUTE OVERVIEW DESTINATION The entire route from the current posi- When driving on the guidance route tion to the destination can be displayed with more than 1 destination set, a list of during the route guidance. the distance with estimated travel/arriv- al time from the current position to each Select “Options”... -
Page 118: During Freeway Driving
3. ROUTE GUIDANCE WHEN APPROACHING DURING FREEWAY DRIVING FREEWAY EXIT OR JUNCTION During freeway driving, the freeway exit information screen will be displayed. When the vehicle approaches an exit or junction, the freeway guidance screen will be displayed. No./ Information/Function Icon Distance and time from the current Information/Function... - Page 119 3. ROUTE GUIDANCE TOLLGATE GUIDANCE REAL FREEWAY JUNCTION VIEW When the vehicle approaches a tollgate, the tollgate view will be displayed. When the vehicle approaches a junc- tion, the junction view with signage will be displayed. Information/Function Distance from the current position to Information/Function the tollgate Next junction or street name...
-
Page 120: When Approaching Intersection
3. ROUTE GUIDANCE WHEN APPROACHING TURN LIST SCREEN INTERSECTION Select “Turn List” on the “Map Mode” screen. (P.78) When the vehicle approaches an inter- section, the intersection guidance Check that the turn list screen is dis- screen will be displayed. played. -
Page 121: Turn-By-Turn Arrow Screen
3. ROUTE GUIDANCE TURN-BY-TURN ARROW SCREEN On this screen, information about the next turn on the guidance route can be displayed. Select “Turn-by-Turn Arrow” on the “Map Mode” screen. (P.78) Check that the turn-by-turn arrow screen is displayed. Information Exit number or street name Turn direction Distance to the next turn GX460_Navi_OM60M79U_(U) -
Page 122: Typical Voice Guidance Prompts
3. ROUTE GUIDANCE 2. TYPICAL VOICE GUIDANCE PROMPTS As the vehicle approaches an intersec- tion, or point, where maneuvering the vehicle is necessary, the system’s voice guidance will provide various messages. CAUTION Be sure to obey the traffic regulations and ●... -
Page 123: Editing Route
3. ROUTE GUIDANCE 3. EDITING ROUTE Press the “NAV” button. Select the item to be set. Function Page Select “Options”. Select to add destinations. Select to delete destina- tions. Select to reorder destina- tions. Select to set route prefer- ences. Select to change route Select “Edit Route”. -
Page 124: Adding Destinations
3. ROUTE GUIDANCE ADDING DESTINATIONS REORDERING DESTINATIONS Display the “Route” screen. (P.123) When more than 1 destination has been Select “Add”. set, the arrival order of the destinations Search for an additional destination in can be changed. the same way as a destination search. (... -
Page 125: Deleting Destinations
3. ROUTE GUIDANCE DELETING DESTINATIONS SETTING ROUTE PREFERENCES Display the “Route” screen. (P.123) The conditions to determine the route Select “Delete”. can be selected from various choices Select “Yes” when the confirmation such as freeways, toll roads, ferries, etc. screen appears. Display the “Route”... -
Page 126: Selecting Route Type
3. ROUTE GUIDANCE SELECTING ROUTE TYPE DETOUR SETTING Display the “Route” screen. (P.123) During the route guidance, the route can be changed to detour around a sec- Select “Route Type”. tion of the route where a delay is caused Select the desired route type and select by road repairs, an accident, etc. - Page 127 3. ROUTE GUIDANCE Function INFORMATION Select to detour within 1 mile of the current position. Select to detour within 3 miles of the current position. Select to detour within 5 miles of the current position. Select to detour on the entire route. This picture shows an example of how the ●...
-
Page 128: Starting From Adjacent Road
3. ROUTE GUIDANCE STARTING FROM ADJACENT ROAD When a freeway and a surface road run in parallel, the system may show the guidance route going on the freeway while driving on the surface road, or vice versa. If this happens, you can instantly choose the adjacent road for the route guid- ance. -
Page 129: Memory Points
4. MEMORY POINTS 1. MEMORY POINTS SETTINGS Select the desired item to be set. Home, preset destinations, address book entries, areas to avoid can be set as memory points. The registered points can be used as the destinations. (P.95) Registered areas to avoid, will be avoid- ed when the system searches for a route. -
Page 130: Memory Points
4. MEMORY POINTS REGISTERING HOME SETTING UP HOME Select “Set Home Location”. If home has been registered, that infor- mation can be recalled by selecting “Go Select the desired item to search for the Home” on the “Destination” screen. location. (P.95) (P.98) Select “OK”... - Page 131 4. MEMORY POINTS EDITING HOME DELETING HOME Select “Edit”. Select “Delete”. Select the desired item to be edited. Select “Yes” when the confirmation screen appears. Function Page Select to edit the home name. Select to set display of the home name on/off.
-
Page 132: Setting Up Preset Destinations
4. MEMORY POINTS REGISTERING PRESET SETTING UP PRESET DESTINATIONS DESTINATIONS Select “Set”. If a preset destination has been regis- Select the desired item to search for the tered, that information can be recalled location. (P.95) by using preset destinations on the “Destination”... - Page 133 4. MEMORY POINTS EDITING PRESET DELETING PRESET DESTINATIONS DESTINATIONS Select “Edit”. Select “Delete”. Select the desired preset destination. Select the preset destination to be de- leted and select “Delete”. Select the item to be edited. Select “Yes” when the confirmation Function Page screen appears.
-
Page 134: Setting Up Address Book
4. MEMORY POINTS REGISTERING ADDRESS SETTING UP ADDRESS BOOK BOOK ENTRIES Points on the map can be registered. Select “New”. Display the “Navigation Settings” Select the desired item to search for the screen. (P.129) location. (P.95) Select “Address Book”. Select “OK” when the editing address book entry screen appears. - Page 135 4. MEMORY POINTS ■ CHANGING THE ICON EDITING ADDRESS BOOK ENTRIES Select “Edit” next to the “Icon”. Select the desired icon. The icon, name, location and/or phone number of a registered address book entry can be edited. Select “Edit”. Select the desired address book entry. Select the item to be edited.
- Page 136 4. MEMORY POINTS ■ When the “With Sound” tab is selected CHANGING THE NAME Select “Edit” next to “Name”. A sound for some address book entries can be set. When the vehicle approach- Enter a name and select “OK”. es the location of the address book en- try, the selected sound will be heard.
-
Page 137: Setting Up Areas To Avoid
4. MEMORY POINTS DELETING ADDRESS BOOK SETTING UP AREAS TO ENTRIES AVOID Select “Delete”. Areas to be avoided because of traffic Select the item to be deleted and select jams, construction work or other rea- “Delete”. sons can be registered as “Areas to Avoid”. - Page 138 4. MEMORY POINTS REGISTERING AREAS TO EDITING AREAS TO AVOID AVOID The name, location and/or area size of a Select “New”. registered area can be edited. Select the desired item to search for the Select “Edit”. location. (P.95) Select the area and select “OK”. Select either change the size of the area to be avoid- ed and select “OK”.
- Page 139 4. MEMORY POINTS ■ CHANGING THE NAME Select the item to be edited. Select “Edit” next to “Name”. Enter a name and select “OK”. ■ CHANGING THE LOCATION Select “Edit” next to “Location”. Scroll the map to the desired point (P.82) and select “OK”.
-
Page 140: Deleting Previous Destinations
4. MEMORY POINTS DELETING AREAS TO AVOID DELETING PREVIOUS DESTINATIONS Select “Delete”. Select the area to be deleted and select Previous destinations can be deleted. “Delete”. Display the “Navigation Settings” screen. (P.129) Select “Delete Previous Dest.”. Select the previous destination to be de- leted and select “Delete”. -
Page 141: Setup
5. SETUP 1. DETAILED NAVIGATION SETTINGS Select “Detailed Navi. Settings”. Settings are available for pop-up infor- mation, favorite POI categories, low fuel warning, etc. Press the “SETUP” button. Select the items to be set. Select “Navigation”. GX460_Navi_OM60M79U_(U) 15.05.21 18:35... -
Page 142: Screens For Navigation Settings
5. SETUP SCREENS FOR NAVIGATION Function Page SETTINGS Select to set display of pop- up information on/off. Select to set favorite POI categories that are used for POI selection to display on the map screen. Select to set display of low fuel warning on/off. - Page 143 5. SETUP FAVORITE POI CATEGORIES LOW FUEL WARNING (SELECT POI ICONS) When the fuel level is low, a warning Up to 6 POI icons, which are used for message will pop up on the screen. selecting POIs on the map screen, can Display the “Detailed Navi.
- Page 144 5. SETUP ■ SEARCHING GAS STATION IN CHANGING VIEWING LOW FUEL WARNING ANGLE OF 3D MAP A nearby gas station can be selected as Display the “Detailed Navi. Settings” a destination. screen. (P.141) Select “3D Map Viewing Angle”. Select “Yes” when the low fuel warning appears.
- Page 145 5. SETUP ■ POSITION/DIRECTION CALI- CURRENT POSITION/TIRE BRATION CHANGE CALIBRATION When driving, the current position mark The current position mark can be adjust- will be automatically corrected by GPS ed manually. Miscalculation of the dis- signals. If GPS reception is poor due to tance caused by tire replacement can location, the current position mark can also be adjusted.
- Page 146 5. SETUP ■ TIRE CHANGE CALIBRATION The tire change calibration function will be used when replacing the tires. This function will adjust miscalculation caused by the circumference difference between the old and new tires. Select “Tire Change”. The message appears and the quick dis- tance calibration starts automatically.
-
Page 147: Traffic Settings
5. SETUP 2. TRAFFIC SETTINGS Traffic information such as traffic con- SCREEN FOR TRAFFIC gestion or traffic incident warnings can SETTINGS be made available. Press the “SETUP” button. Function Select to set the avoid traffic function auto/manual. (P.148) Select “Traffic”. Select to set the usage of traffic infor- mation for the estimated arrival time on/off. -
Page 148: Auto Avoid Traffic
5. SETUP ■ CHANGING THE ROUTE MANU- AUTO AVOID TRAFFIC ALLY Display the “Traffic Settings” screen. When the navigation system calculates (P.147) a new route, the following screen will be displayed. Select “Avoid Traffic”. Select the desired item. Select the desired item. Function Function Select to automatically change... -
Page 149: Tips For The Navigation System
6. TIPS FOR THE NAVIGATION SYSTEM 1. GPS (GLOBAL POSITIONING SYSTEM) When the vehicle is receiving signals from LIMITATIONS OF THE satellites, the “GPS” mark appears at the NAVIGATION SYSTEM top left of the screen. The GPS signal may be physically obstruct- This navigation system calculates the ed, leading to inaccurate vehicle position on current position using satellite signals,... - Page 150 6. TIPS FOR THE NAVIGATION SYSTEM Accurate current position may not be Inappropriate route guidance may occur in shown in the following cases: the following cases: • When driving on a small angled Y-shaped • When turning at an intersection off the road.
- Page 151 6. TIPS FOR THE NAVIGATION SYSTEM After replacing a tire: P.146 INFORMATION This navigation system uses tire turning ● data and is designed to work with factory- specified tires for the vehicle. Installing tires that are larger or smaller than the originally equipped diameter may cause inaccurate display of the current position.
-
Page 152: Map Database Version And Covered Area
Select “Options”. Function Map version Select to update map. Select to display map coverage ar- eas. Select to display legal information. INFORMATION Map data updates are available for a fee. ● Contact your Lexus dealer for further information. GX460_Navi_OM60M79U_(U) 15.05.21 18:35... -
Page 153: About The Map Data
6. TIPS FOR THE NAVIGATION SYSTEM ABOUT THE MAP DATA Map data for the navigation system is contained in a SD card that is inserted in the SD card slot located at the bottom of the audio control panel. Do not eject the SD card, as doing so may deactivate the navigation system. - Page 154 6. TIPS FOR THE NAVIGATION SYSTEM GX460_Navi_OM60M79U_(U) 15.05.21 18:35...
-
Page 155: Audio/Visual System
AUDIO/VISUAL SYSTEM BASIC OPERATION 1. QUICK REFERENCE ......158 2. SOME BASICS ......... 160 TURNING THE SYSTEM ON AND OFF................160 SELECTING AN AUDIO SOURCE....161 DISC SLOT..............162 USB/AUX PORT ............. 163 SOUND SETTINGS ..........164 AUDIO SCREEN ADJUSTMENT....166 VOICE COMMAND SYSTEM...... - Page 156 RADIO OPERATION MEDIA OPERATION 1. AM/FM RADIO ........168 1. CD ..............189 OVERVIEW..............168 OVERVIEW..............189 PRESETTING A STATION ........171 PLAYING AN AUDIO CD ........ 193 SELECTING A STATION FROM THE PLAYING AN MP3/WMA/AAC DISC ..194 LIST................171 2.
- Page 157 ® PLAYING Bluetooth AUDIO....... 248 REAR SEAT ENTERTAINMENT USING THE AUX MODE......... 249 SYSTEM OPERATION USING THE VIDEO MODE......249 CHANGING SETTINGS........251 1. REAR SEAT ENTERTAINMENT SYSTEM FEATURES ......227 IF THE REAR SEAT ENTERTAINMENT SYSTEM MALFUNCTIONS......254 DISPLAY ..............228 REAR SEAT ENTERTAINMENT SYSTEM CONTROLLER ......
-
Page 158: Basic Operation
1. BASIC OPERATION 1. QUICK REFERENCE Operations such as selecting a preset station and adjusting the sound balance are car- ried out on the screen. Press the “AUDIO” button to display the audio/visual screen. ■ CONTROL SCREEN GX460_Navi_OM60M79U_(U) 15.05.21 18:35... - Page 159 1. BASIC OPERATION ■ CONTROL PANEL Function Page Using the radio Playing an audio CD or MP3/WMA/AAC disc Playing a DVD Playing a USB memory Playing an iPod ® Playing a Bluetooth device Using the AUX port Playing the VTR Using the rear seat entertainment system* Using the steering wheel audio switches Audio system settings...
-
Page 160: Some Basics
1. BASIC OPERATION 2. SOME BASICS This section describes some of the basic TURNING THE SYSTEM ON features of the audio/visual system. AND OFF Some information may not pertain to your system. Your audio/visual system works when the engine switch is turned to ACCES- SORY or IGNITION ON mode. -
Page 161: Selecting An Audio Source
1. BASIC OPERATION REORDERING THE AUDIO SELECTING AN AUDIO SOURCE SOURCE Select “Source”. Press the “AUDIO” button. Select “Reorder”. Select “Source”. Select the desired audio source then “<<” or “>>” to reorder. Select the desired source. INFORMATION Dimmed screen buttons cannot be oper- ●... -
Page 162: Disc Slot
1. BASIC OPERATION EJECTING A DISC DISC SLOT Press the “ ” button and remove the INSERTING A DISC disc. Insert a disc into the disc slot. NOTICE After insertion, the disc is automatically Never try to disassemble or oil any part of ●... -
Page 163: Usb/Aux Port
1. BASIC OPERATION USING A 4-POLE AUX CABLE USB/AUX PORT To view a video on an iPod video or There are 2 USB ports and an AUX port VTR, it is necessary to use a 4-pole in the auxiliary box. AUX cable to connect the portable au- dio device. -
Page 164: Sound Settings
1. BASIC OPERATION Select the “DSP” tab. SOUND SETTINGS Type A DSP CONTROL Select Type B Function The system adjusts to the optimum volume and tone quality according to vehicle speed to compensate for in- creased vehicle noise. This function creates a surrounded by sound effect. - Page 165 1. BASIC OPERATION TONE AND BALANCE Select TONE: How good an audio program sounds is largely determined by the mix of the tre- ble, mid and bass levels. In fact, different kinds of music and vocal programs usu- ally sound better with different mixes of treble, mid and bass.
-
Page 166: Audio Screen Adjustment
1. BASIC OPERATION CONTRAST, BRIGHTNESS, AUDIO SCREEN COLOR AND TONE ADJUSTMENT ADJUSTMENT SCREEN SIZE SETTINGS The brightness, contrast, color and tone of the screen can be adjusted. The screen size can be selected for each DVD video/iPod video/VTR type of media. Select “Options”... -
Page 167: Voice Command System
1. BASIC OPERATION VOICE COMMAND SYSTEM Screen button Function Select to strengthen the “Color” “R” Press this switch to operate the voice red color of the screen. command system. Select to strengthen the “Color” “G” green color of the screen. Select to strengthen the “Tone”... -
Page 168: Radio Operation
2. RADIO OPERATION 1. AM/FM RADIO OVERVIEW The radio operation screen can be reached by the following methods: Press the “AUDIO” button to display the audio control screen. Select “Source” and select “AM” or “FM” to change the radio mode. ■... - Page 169 2. RADIO OPERATION ■ CONTROL PANEL Function Select to display the audio source selection screen. Select to display the multicast channel selection screen. Select to display the cache radio operation buttons. Select to display the audio setting screen. Select to display the sound setting screen. Select to display the option screen.
- Page 170 2. RADIO OPERATION Function Select to scan for receivable stations. Select to tune to preset stations/channels. Select to change the page of preset buttons. Select to display text messages. Select to display a list of receivable stations. Select to seek a receivable station of the selected category. Select to select a program type/channel category.
-
Page 171: Presetting A Station
2. RADIO OPERATION PRESETTING A STATION SELECTING A STATION FROM THE LIST Radio mode has a mix preset function, which can store up to 36 stations (6 sta- A station list can be displayed. tions per page x 6 pages) from any of the AM, FM or SAT bands. - Page 172 2. RADIO OPERATION ■ REFRESHING THE STATION LIST FM radio only: Select the desired pro- gram type. Select “Refresh” on the “Station List” screen and the following screen will be displayed. Select the desired station and select “OK”. “Cancel Refresh”: Select to cancel the re- fresh.
-
Page 173: Caching A Radio Program
2. RADIO OPERATION Select the desired cache radio opera- CACHING A RADIO tion button. PROGRAM A radio program can be cached and played back in a time-shifted manner. PLAYING BACK THE CACHE MANUALLY The broadcast cached in the program Function cache can be played back manually. -
Page 174: Radio Broadcast Data System
2. RADIO OPERATION AUTOMATIC PLAYBACK OF RADIO BROADCAST DATA THE CACHE SYSTEM If the radio broadcast is interrupted by This audio system is equipped with Ra- another audio output, such as an dio Broadcast Data Systems (RBDS). incoming phone call, the system will RBDS mode allows text messages to be automatically cache the interrupted received from radio stations that utilize... - Page 175 2. RADIO OPERATION Once a program type has been set, “TYPE SELECTING A DESIRED SEEK” will appear on the screen. PROGRAM TYPE The program list is in the following order: • “Classical” Select “Options”. • “Country” • “EasyLis” (Easy Listening) •...
-
Page 176: Traffic Announcement
2. RADIO OPERATION USING HD Radio ™ TRAFFIC ANNOUNCEMENT (FM RADIO) TECHNOLOGY A station that regularly broadcasts traf- HD Radio ™ Technology is the digital fic information is automatically located. evolution of analog AM/FM radio. Your radio product has a special receiver Select “Options”. -
Page 177: Available Hd Radio™ Technology
2. RADIO OPERATION AVAILABLE HD Radio ™ SAVING MUSIC INFORMATION TECHNOLOGY Tag information in the music broadcast- MULTICAST ing is preserved in the system and trans- mits to an iPod. On the FM radio frequency most digital Select “Tag” to bookmark the music in- stations have “multiple”... - Page 178 2. RADIO OPERATION INFORMATION The tag information can not be preserved ● while scanning or caching the radio sta- tion. If tagging the music information fails, ● “Saving the HD Radio tag failed.” will be displayed on the screen. If this occurs, tag the information again.
-
Page 179: Troubleshooting Guide
2. RADIO OPERATION TROUBLESHOOTING GUIDE Experience Cause Action Mismatch of time align- The radio stations analog ment- a user may hear a and digital volume is not None, radio broadcast issue. A short period of program- properly aligned or the sta- user can contact the radio station. -
Page 180: Xm Satellite Radio
2. RADIO OPERATION 2. XM Satellite Radio OVERVIEW The radio operation screen can be reached by the following methods: Press the “AUDIO” button to display the audio control screen. Select “Source” and select “SAT”. ■ CONTROL SCREEN GX460_Navi_OM60M79U_(U) 15.05.21 18:35... - Page 181 2. RADIO OPERATION ■ CONTROL PANEL GX460_Navi_OM60M79U_(U) 15.05.21 18:35...
- Page 182 2. RADIO OPERATION Function Select to display the audio source selection screen. Select to display a receivable channel list. Select to display the sound setting screen. Select to display text messages. Select to select a program type/channel category. Select to scan for receivable channels. Select to tune to preset stations/channels.
-
Page 183: How To Subscribe To Xm Satellite Radio
2. RADIO OPERATION HOW TO SUBSCRIBE TO XM NOTICE Satellite Radio XM Radio ServicesLegal Disclaimers ● and Warnings To listen to a satellite radio broadcast in • Fees and TaxesSubscription fee, the vehicle, a subscription to the XM taxes, one time activation fee, and other Satellite Radio service is necessary. - Page 184 2. RADIO OPERATION NOTICE INFORMATION Radio ServicesSubscription ● It is prohibited to copy, decompile, disas- ● Instructions semble, reverse engineer, hack, manipu- • For XM Services requiring a subscrip- late, or otherwise make available any tion (such as XM Radio, and some Info- technology or software incorporated in tainment &...
-
Page 185: Displaying The Radio Id
ID and the specific radio code. are subject to change. SATELLITE TUNER TECHNOLOGY NOTICE Lexus’s satellite radio tuners are award- ed Type Approval Certificates from XM Satellite Radio Inc. as proof of compati- bility with the services offered by XM Satellite Radio. -
Page 186: Presetting A Channel
2. RADIO OPERATION PRESETTING A CHANNEL SELECTING A CHANNEL FROM THE LIST Tune in the desired channel. Select “Channel List”. Select “add new”. Select the desired program type. To change the preset channel to a different one, select and hold the preset station/ channel. -
Page 187: If The Satellite Radio Tuner Malfunctions
“SAT Ck Antenna” A short circuit occurs in the antenna or the surrounding antenna ca- ble. See a Lexus certified dealer for assistance. You have not subscribed to XM Satellite Radio. The radio is being updated with the latest encryption code. Contact XM Satellite Radio for subscription information. -
Page 188: Internet Radio
Other applications can be activated ● while listening to internet radio. An iPhone cannot be connected via ● One of LEXUS App Suite’s features is ® Bluetooth and USB connection at the the ability to listen to internet radio. In or- same time. -
Page 189: Media Operation
3. MEDIA OPERATION 1. CD OVERVIEW The CD operation screen can be reached by the following methods: Inserting a disc (P.162) Press the “AUDIO” button to display the audio control screen. Select “Source” and select “DISC”. ■ CONTROL SCREEN Audio CD MP3/WMA/AAC disc GX460_Navi_OM60M79U_(U) 15.05.21 18:35... -
Page 190: Media Operation
3. MEDIA OPERATION ■ CONTROL PANEL GX460_Navi_OM60M79U_(U) 15.05.21 18:35... - Page 191 3. MEDIA OPERATION Function Select to display the audio source selection screen. Displays cover art Select to display a track/file list. Audio CD: Select to display a track list. MP3/WMA/AAC disc: Select to display a folder list. To return to the top screen, select “Now Playing”...
- Page 192 3. MEDIA OPERATION INFORMATION If a disc contains CD-DA files and MP3/WMA/AAC files, only the CD-DA files can be ● played back. If a CD-TEXT disc is inserted, the title of the disc and track will be displayed. Up to 32 char- ●...
-
Page 193: Playing An Audio Cd
3. MEDIA OPERATION RANDOM ORDER PLAYING AN AUDIO CD Tracks can be automatically and ran- REPEATING domly selected. The track currently being listened to can Select be repeated. Select Each time is selected, the mode changes as follows: • random (1 disc random) ... -
Page 194: Playing An Mp3/Wma/Aac Disc
3. MEDIA OPERATION RANDOM ORDER PLAYING AN MP3/WMA/ AAC DISC Files or folders can be automatically and randomly selected. REPEATING Select The file or folder currently being listened to can be repeated. Select Each time is selected, the mode changes as follows: •... -
Page 195: Dvd
3. MEDIA OPERATION 2. DVD For safety reasons, the DVD video discs can only be viewed when the following con- ditions are met: (a) The vehicle is completely stopped. (b) The engine switch is in ACCESSORY or IGNITION ON mode. (c) The parking brake is applied. - Page 196 3. MEDIA OPERATION ■ CONTROL SCREEN ■ CONTROL PANEL GX460_Navi_OM60M79U_(U) 15.05.21 18:35...
- Page 197 3. MEDIA OPERATION Function Select to display the audio source selection screen. Select to display the password input screen. Select to display the menu screen. Select to display the option screen. (P.199) Select to display the sound setting screen. Select to display the DVD setting screen. Shows progress ...
- Page 198 3. MEDIA OPERATION CAUTION Conversational speech on some DVDs is recorded at a low volume to emphasize the ● impact of sound effects. If you adjust the volume assuming that the conversations represent the maximum volume level that the DVD will play, you may be startled by louder sound effects or when you change to a different audio source.
-
Page 199: Dvd Options
3. MEDIA OPERATION DVD OPTIONS Function Page Select to display the title Select “Options”. search screen. Select to display the prede- termined scene on the screen and start playing. Select to display the audio selection screen. Select to display the subtitle selection screen. - Page 200 3. MEDIA OPERATION SEARCHING BY TITLE CHANGING THE SUBTITLE LANGUAGE Select “Search”. Select “Subtitle”. Enter the title number and select “OK”. Each time “Change” is selected, the lan- guage the subtitles are displayed in is changed. The player starts playing video for that title number.
- Page 201 3. MEDIA OPERATION SETUP OPERATION FROM THE REAR SEAT Vehicles with rear seat entertainment system This screen appears when a rear pas- senger selects the setup menu. Front passengers can cancel this setup operation by touching “Play”. The player will resume normal play.
-
Page 202: Usb Memory
3. MEDIA OPERATION 3. USB MEMORY OVERVIEW The USB memory operation screen can be reached by the following methods: Connecting a USB memory (P.163) Press the “AUDIO” button to display the audio control screen. Select “Source” and select “USB”. ■ CONTROL SCREEN GX460_Navi_OM60M79U_(U) 15.05.21 18:35... - Page 203 3. MEDIA OPERATION ■ CONTROL PANEL GX460_Navi_OM60M79U_(U) 15.05.21 18:35...
- Page 204 3. MEDIA OPERATION Function Select to select a folder/album. Select to display the audio source selection screen. Displays cover art Select to display a file/track list. To return to the top screen, select “Now Playing” on the list screen. Select to display the play mode selection screen.
- Page 205 3. MEDIA OPERATION CAUTION Do not operate the player’ s controls or connect the USB memory while driving. ● NOTICE Depending on the size and shape of the USB memory that is connected to the system, the ● lid may not close fully. In this case, do not forcibly close the lid as this may damage the USB memory or the terminal, etc.
-
Page 206: Usb Audio
3. MEDIA OPERATION RANDOM ORDER USB AUDIO Files/tracks or folders/albums can be REPEATING automatically and randomly selected. The file/track or folder/album currently Select being listened to can be repeated. Select Each time is selected, the mode changes as follows: •... -
Page 207: Ipod
3. MEDIA OPERATION 4. iPod OVERVIEW The iPod operation screen can be reached by the following methods: Connecting an iPod (P.163) Press the “AUDIO” button to display the audio control screen. Select “Source” and select “iPod (DEVICE NAME)”. ■ CONTROL SCREEN iPod audio iPod video GX460_Navi_OM60M79U_(U) - Page 208 3. MEDIA OPERATION ■ CONTROL PANEL GX460_Navi_OM60M79U_(U) 15.05.21 18:35...
- Page 209 3. MEDIA OPERATION Function Audio Video Select to display the audio source selection Select to display the audio source selection screen. screen. Displays cover art Select to display a track list. To return to the top screen, select “Now Playing”...
- Page 210 3. MEDIA OPERATION Function Audio Video Turn to select a track. Turn to select a file. Turn to move the cursor up/down on the Turn to move the cursor up/down on the list. list. Press to select the list. ...
- Page 211 For viewing videos from an iPod, it is necessary to set “Video Sound Input” to “A/V”. ● (P.259) ® If an iPhone is connected via Bluetooth and USB at the same time, system operation may ● become unstable. For known phone compatibility information, refer to http://www.lexus.com/enform/. GX460_Navi_OM60M79U_(U) 15.05.21 18:35...
-
Page 212: Ipod Audio
3. MEDIA OPERATION RANDOM ORDER iPod AUDIO Tracks or albums can be automatically REPEATING and randomly selected. The track currently being listened to can Select be repeated. Select Each time is selected, the mode changes as follows: • track shuffle ... -
Page 213: Ipod Video
3. MEDIA OPERATION Select the desired settings to change. iPod VIDEO To change to iPod video mode, select “Browse” on the iPod audio screen, then select the “Videos” tab and select the desired video file. iPod VIDEO OPTIONS Function Page Select “Options”. -
Page 214: Bluetooth ® Audio
3. MEDIA OPERATION ® 5. Bluetooth AUDIO ® The Bluetooth audio system enables users to enjoy listening to music that is played on a portable player on the vehicle speakers via wireless communication. ® This audio system supports Bluetooth , a wireless data system capable of playing por- ®... - Page 215 3. MEDIA OPERATION ■ CONTROL SCREEN ■ CONTROL PANEL GX460_Navi_OM60M79U_(U) 15.05.21 18:35...
- Page 216 3. MEDIA OPERATION Function Select to select an album. ® Displays Bluetooth device condition Select to display the audio source selection screen. Select to display the portable device connection screen. Displays cover art Select to display a track list. To return to the top screen, select “Now Playing”...
- Page 217 3. MEDIA OPERATION CAUTION ® Do not operate the player’ s controls or connect to the Bluetooth audio system while driv- ● ing. ® Your audio unit is fitted with Bluetooth antennas. People with implantable cardiac pace- ● makers, cardiac resynchronization therapy-pacemakers or implantable cardioverter defibrillators should maintain a reasonable distance between themselves and the ®...
- Page 218 3. MEDIA OPERATION INFORMATION ® Depending on the Bluetooth device that is connected to the system, the music may start ● playing when selecting while it is paused. Conversely, the music may pause when selecting while it is playing. In the following conditions, the system may not function: ●...
-
Page 219: Connecting A Bluetooth ® Device
3. MEDIA OPERATION ® ® CONNECTING A Bluetooth LISTENING TO Bluetooth DEVICE AUDIO ® To use the Bluetooth audio system, it is REPEATING ® necessary to register a Bluetooth The track or album currently being lis- vice with the system. tened to can be repeated. - Page 220 3. MEDIA OPERATION RANDOM ORDER Tracks or albums can be automatically and randomly selected. Select Each time is selected, the mode changes as follows: • album random all track random off INFORMATION Each time is selected, “RAND”/ ●...
-
Page 221: Aux
3. MEDIA OPERATION 6. AUX OVERVIEW The AUX operation screen can be reached by the following methods: Connecting a device to the AUX port (P.163) Press the “AUDIO” button to display the audio control screen. Select “Source” and select “AUX”. ■... - Page 222 3. MEDIA OPERATION ■ CONTROL PANEL Function Select to display the audio source selection screen. Select to display the sound setting screen. Turn to adjust volume. Press to turn the audio system on/off. Press and hold to restart the audio system. GX460_Navi_OM60M79U_(U) 15.05.21 18:35...
- Page 223 3. MEDIA OPERATION CAUTION Do not connect portable audio device or operate the controls while driving. ● NOTICE Depending on the size and shape of the portable audio device that is connected to the sys- ● tem, the lid may not close fully. In this case, do not forcibly close the lid as this may damage the portable audio device or the terminal, etc.
-
Page 224: Vtr
3. MEDIA OPERATION 7. VTR OVERVIEW The VTR operation screen can be reached by the following methods: Connecting a device to the AUX port (P.163) Press the “AUDIO” button to display the audio control screen. Select “Source” and select “A/V”. ■... - Page 225 3. MEDIA OPERATION ■ CONTROL PANEL Function Select to display the audio source selection screen. Select to display the sound setting screen. Select to display the audio setting screen. Select to display the option screen. (P.226) Select to display full screen video. ...
-
Page 226: Vtr Options
3. MEDIA OPERATION VTR OPTIONS Select “Options”. Select the desired settings to change. Function Page Select to change the screen size. Select to display the image quality adjustment screen. GX460_Navi_OM60M79U_(U) 15.05.21 18:35... -
Page 227: Rear Seat Entertainment System Operation
4. REAR SEAT ENTERTAINMENT SYSTEM OPERATION 1. REAR SEAT ENTERTAINMENT SYSTEM FEATURES* The rear seat entertainment system is designed for the rear passengers to enjoy audio and DVD video separately from the front audio/visual system. The rear seat entertain- ment system can be used when the engine switch is in ACCESSORY or IGNITION ON mode. -
Page 228: Display
4. REAR SEAT ENTERTAINMENT SYSTEM OPERATION DISPLAY INFORMATION An insulating sheet is set to prevent the ● A display is installed in the back of each batteries from being discharged. front seat. When audio-video equip- ment is connected to the A/V input port REPLACING THE or HDMI port, rear passengers can en- CONTROLLER BATTERIES... -
Page 229: Headphone Jacks
• Batteries can be purchased at your Lexus dealer, electric appliance shop, or camera stores. • Replace only with the same or equiva- lent type recommended by your Lexus dealer. • Dispose of used batteries according to Function the local laws. -
Page 230: Headphones
Press the button. With some headphones generally avail- able in the market, it may be difficult to catch signals properly. Lexus recommends the use of Lexus genuine wireless head- phones. Contact your Lexus dealer for further details. CAUTION SCREEN ... -
Page 231: Turning The Rear Display Off Using The Remote Controller
4. REAR SEAT ENTERTAINMENT SYSTEM OPERATION TURNING THE REAR DISPLAY CHANGING THE SOURCE OFF USING THE REMOTE Press the “SOURCE” button to display CONTROLLER the audio source selection screen. Press the button. Function While the display is off, some remote con- Press to display the audio source se- trol buttons can be operated. -
Page 232: Changing The Speaker Output
4. REAR SEAT ENTERTAINMENT SYSTEM OPERATION Select the desired source. CHANGING THE SPEAKER OUTPUT When the is turned on, the rear seat entertainment system can be oper- ated in link with front audio/visual sys- tem. Select The indicator is highlighted. ... - Page 233 4. REAR SEAT ENTERTAINMENT SYSTEM OPERATION CAUTION NOTICE While driving Cleaning the display ● ● • Do not use headphones. Doing so • Wipe the display with a dry soft cloth. may cause an accident, resulting in • If the screen is wiped with a rough death or serious injury.
-
Page 234: Operation From The Front Seats
4. REAR SEAT ENTERTAINMENT SYSTEM OPERATION Select the desired button. OPERATION FROM THE FRONT SEATS The rear seat display can be operated from the front seats. Press the “AUDIO” button. Function Turns the rear screen on or off. Locks the system so passengers in the rear seats cannot operate the rear entertainment system. -
Page 235: Using The Radio
4. REAR SEAT ENTERTAINMENT SYSTEM OPERATION CHANGING THE SPEAKER USING THE RADIO OUTPUT When a different audio source is select- Select “Speaker Output”. ed at the front seats, radio mode cannot be selected at the rear seats. Select “Right” or “Left”. Display the audio source selection screen. - Page 236 4. REAR SEAT ENTERTAINMENT SYSTEM OPERATION ■CONTROLLER CACHING A RADIO PROGRAM Select “ ” on the radio control screen. Select the desired cache radio opera- tion button. Function Press to select a preset station/ channel. Function Press to select a station/channel. ...
-
Page 237: Using The Radio (Internet Radio Broadcast)
4. REAR SEAT ENTERTAINMENT SYSTEM OPERATION ■CONTROLLER USING THE RADIO (INTERNET RADIO BROADCAST) One of Apps’s features is the ability to listen to internet radio. In order to use this service, an Apps compatible phone and the navigation system needs to be set. -
Page 238: Playing Mp3/Wma/Aac Discs
4. REAR SEAT ENTERTAINMENT SYSTEM OPERATION ■CONTROL SCREEN PLAYING MP3/WMA/AAC DISCS Display the audio source selection screen. (P.231) Select “DISC”. Even the “DISC” button is pressed, the mode can be changed to the DISC mode. Function ■CONTROL SCREEN Select to set repeat playback. Select to set random playback. -
Page 239: Playing Dvd Video
4. REAR SEAT ENTERTAINMENT SYSTEM OPERATION ■CONTROLLER PLAYING DVD VIDEO Display the audio source selection screen. (P.231) Select “DISC”. Even the “DISC” button is pressed, the mode can be changed to the DISC mode. ■CONTROLLER Function Press to select a folder. Press to play/pause. - Page 240 4. REAR SEAT ENTERTAINMENT SYSTEM OPERATION OPTION SCREEN Function Press to select an Icon. Press the “OPTION” button if no icons are shown while watching a DVD video Press to select a DISC mode. and this screen appears. Press to input the selected icon. Press to play/pause.
- Page 241 4. REAR SEAT ENTERTAINMENT SYSTEM OPERATION ■SEARCHING BY TITLE Function Page Select “Title Search”. Press and hold to rewind during playback. Enter the title number and select “OK”. Select to stop the video. Select to pause/resume the video screen. Press and hold to fast for- ward during playback ...
- Page 242 4. REAR SEAT ENTERTAINMENT SYSTEM OPERATION ■CHANGING THE AUDIO LAN- SETUP MENU GUAGE The initial setting can be changed. There Select “Audio”. are initial setting buttons on the “Setup Each time “Audio” is selected, the audio Menu 1” and “Setup Menu 2” screens. language is changed.
- Page 243 4. REAR SEAT ENTERTAINMENT SYSTEM OPERATION ■AUDIO LANGUAGE ■MENU LANGUAGE The audio language can be changed. The language on the DVD video menu can be changed. Select “Audio Language”. Select “Menu Language”. Select the desired language to be heard Select the desired language to be read on the “Audio Language”...
- Page 244 4. REAR SEAT ENTERTAINMENT SYSTEM OPERATION ■PARENTAL LOCK ■ENTER AUDIO/SUBTITLE/DVD LANGUAGE CODE The level of viewer restrictions can be changed. If “Other” on the “Audio Language” screen, “Subtitle Language” screen or Select “Parental Lock” on the “Setup “Menu Language” screen is selected, Menu 1”...
-
Page 245: Playing A Usb Memory
4. REAR SEAT ENTERTAINMENT SYSTEM OPERATION ■SETUP OPERATION FROM THE PLAYING A USB MEMORY FRONT SEAT When a different audio source is select- This screen appears when a front pas- ed at the front seats, USB mode cannot senger selects the setup menu. be selected at the rear seats. -
Page 246: Playing Ipod
4. REAR SEAT ENTERTAINMENT SYSTEM OPERATION ■CONTROLLER PLAYING iPod When a different audio source is select- ed at the front seats, iPod mode cannot be selected at the rear seats. Connect iPod. (P.163) Display the audio source selection screen. (P.231) Select “iPod (DEVICE NAME)”. - Page 247 4. REAR SEAT ENTERTAINMENT SYSTEM OPERATION ■CONTROLLER ■CONTROL SCREEN Function Select to display the iPod audio con- Function trol screen. Press to play/pause. Select “iPod (DEVICE NAME)” to display full screen video. Press to fast forward/rewind. Press the “SOURCE” button and the sys- ...
-
Page 248: Playing Bluetooth ® Audio
4. REAR SEAT ENTERTAINMENT SYSTEM OPERATION ■CONTROLLER ® PLAYING Bluetooth AUDIO When a different audio source is select- ed at the front seats, Bluetooth ® audio mode cannot be selected at the rear seats. Display the audio source selection screen. (P.231) Select “Bluetooth*”. -
Page 249: Using The Aux Mode
4. REAR SEAT ENTERTAINMENT SYSTEM OPERATION ■CONTROLLER USING THE AUX MODE When a different audio source is select- ed at the front seats, AUX mode cannot be selected at the rear seats. Connecting a device to the AUX port. (P.163) Display the audio source selection screen. - Page 250 4. REAR SEAT ENTERTAINMENT SYSTEM OPERATION USING THE A/V INPUT PORT USING THE HDMI PORT Press and release the lid, connecting an About the HDMI terminal, the interface audio/visual device. that is connected video and audio to sys- tem and audio/visual device. You can enjoy the high-definition video and au- dio by connecting the single cable to the HDMI terminal and the system.
-
Page 251: Changing Settings
4. REAR SEAT ENTERTAINMENT SYSTEM OPERATION ■COMPATIBLE FORMAT CHANGING SETTINGS Compatible video signal 480p,576p, V GA CONTRAST, BRIGHTNESS, Compatible sound signal COLOR AND TONE LPCM 2ch ADJUSTMENT Press the “SETTING” button. The terms HDMI and HDMI High-Defi- nition Multimedia Interface, and the HDMI Logo are trademarks or regis- tered trademarks of HDMI Licensing LLC in the United States and other... - Page 252 4. REAR SEAT ENTERTAINMENT SYSTEM OPERATION Select the desired item to be adjusted. CHANGING TO PAL FORMAT Turn “PAL Video” on when PAL format equipment is connected to the A/V in- put port. Press the “SETTING” button. Screen button Function Select to brighten the “Brightness”...
- Page 253 4. REAR SEAT ENTERTAINMENT SYSTEM OPERATION SETTING LCD AI SCREEN SIZE SETTINGS Press the “SETTING” button. Automatically determines the tone of the video image and sets the contrast to an optimum level, displaying a sharp im- age. Press the “SETTING” button. Select the “Screen Size”...
-
Page 254: If The Rear Seat Entertainment System Malfunctions
If a disc which is not play- able is inserted, “No supported data.” will also appear on the screen. For appropriate discs for the player: P.268 If the malfunction is not rectified: Take your vehicle to your Lexus dealer. GX460_Navi_OM60M79U_(U) 15.05.21 18:35... -
Page 255: Audio/Visual Remote Controls
5. AUDIO/VISUAL REMOTE CONTROLS 1. STEERING SWITCHES Some parts of the audio/visual system can be adjusted using the switches on the steer- ing wheel. Switch Volume control switch “ ” switch “MODE” switch Volume control switch Mode Operation Function Press Volume up/down Press and hold Volume up/down continuously... - Page 256 5. AUDIO/VISUAL REMOTE CONTROLS switch Mode Operation Function Press Preset station up/down AM/FM Press and hold Seek up/down continuously while the switch is being Radio (0.8 sec. or more) pressed Press Preset channel up/down Press and hold Type seek up/down (0.8 sec.
- Page 257 5. AUDIO/VISUAL REMOTE CONTROLS “MODE” switch Mode Operation Function Press Change audio modes AM, FM, SAT, AUX, Press and hold Mute (0.8 sec. or more) CD/MP3/ Press Change audio modes WMA/AAC disc, DVD, Press and hold USB, iPod, Pause (0.8 sec. or more) BT audio, APPS INFORMATION...
-
Page 258: Setup
6. SETUP 1. AUDIO SETTINGS Detailed audio settings can be pro- AUDIO SETTINGS SCREEN grammed. Press the “SETUP” button. Function Page Select to set the iPod audio signal input settings. Select “Audio”. Select to set the video signal format settings. Select to change the number of preset radio stations dis- played on the screen. - Page 259 6. SETUP iPod SETTINGS EXTERNAL VIDEO SETTINGS Display the audio setting screen. Display the audio setting screen. (P.258) (P.258) Select “iPod Settings”. Select “External Video Settings”. Select “Video Sound Input”. Select “Video Signal Switch”. Select a screen button for the desired Select a screen button for the desired setting.
- Page 260 6. SETUP SETTING THE NUMBER OF COVER ART SETTINGS RADIO PRESETS Display the audio setting screen. Display the audio setting screen. (P.258) (P.258) Select “Cover Art Settings”. Select “Number of Radio Presets”. Select the desired button to be set. Select the button with the desired num- ber to be displayed.
- Page 261 6. SETUP ■ AUDIO LANGUAGE DVD SETTINGS The audio language can be changed. Display the audio setting screen. (P.258) Select “Audio Language”. Select “DVD Settings”. Select the desired language to be heard Selecting “DVD Settings” on the DVD top on the “Audio Language”...
- Page 262 6. SETUP ■ ■ ANGLE MARK ENTER AUDIO/SUBTITLE/MENU LANGUAGE CODE The multi-angle mark can be turned on or off on the screen while discs that are If “Other” on the “Audio Language” multi-angle compatible are being screen, “Subtitle Language” screen or played.
- Page 263 6. SETUP Code Language Code Language 0514 English 0214 Bengali, Bangla 1001 Japanese 0215 Tibetan 0618 French 0218 Breton 0405 German 0301 Catalan 0920 Italian 0315 Corsican 0519 Spanish 0319 Czech 2608 Chinese 0325 Welsh 1412 Dutch 0401 Danish 1620 Portuguese 0426 Bhutani...
- Page 264 6. SETUP Code Language Code Language 0825 Armenian 1314 Mongolian 0901 Interlingua 1315 Moldavian 0905 Interlingue 1318 Marathi 0911 Inupiak 1319 Malay 0914 Indonesian 1320 Maltese 0919 Icelandic 1325 Burmese 0923 Hebrew 1401 Nauru 1009 Yiddish 1405 Nepali 1023 Javanese 1415 Norwegian 1101...
- Page 265 6. SETUP Code Language Code Language 1912 Slovenian 2209 Vietnamese 1913 Samoan 2215 Volapük 1914 Shona 2315 Wolof 1915 Somali 2408 Xhosa 1917 Albanian 2515 Yoruba 1918 Serbian 2621 Zulu 1919 Siswati 1920 Sesotho 1921 Sundanese 1923 Swahili 2001 Tamil 2005 Telugu 2007...
-
Page 266: Tips For Operating The Audio/Visual System
7. TIPS FOR OPERATING THE AUDIO/VISUAL SYSTEM 1. OPERATING INFORMATION RADIO NOTICE To avoid damage to the audio/visual sys- ● Usually, a problem with radio reception tem: does not mean there is a problem with • Be careful not to spill beverages over the radio —... - Page 267 7. TIPS FOR OPERATING THE AUDIO/VISUAL SYSTEM Fading and drifting stations: Generally, the Fading: AM broadcasts are reflected by the effective range of FM is about 25 miles (40 upper atmosphere — especially at night. km). Once outside this range, you may no- These reflected signals can interfere with tice fading and drifting, which increase with those received directly from the radio sta-...
-
Page 268: Dvd Player And Disc
7. TIPS FOR OPERATING THE AUDIO/VISUAL SYSTEM DVD PLAYER Cargo loaded on the roof luggage carrier, especially metal objects, may adversely affect the reception of XM Satellite Radio. Audio CDs Alternation or modifications carried out without appropriate authorization may invalidate the user’... - Page 269 7. TIPS FOR OPERATING THE AUDIO/VISUAL SYSTEM Special shaped discs Labeled discs Transparent/translucent discs NOTICE Do not use special shaped, transparent/ ● translucent, low quality or labeled discs such as those shown in the illustrations. The use of such discs may damage the player, or it may be impossible to eject the disc.
- Page 270 7. TIPS FOR OPERATING THE AUDIO/VISUAL SYSTEM CD-R/RW AND DVD-R/RW DISCS CD-R/CD-RW discs that have not been subject to the “finalizing process” (a pro- cess that allows discs to be played on a conventional CD player) cannot be played. ...
- Page 271 7. TIPS FOR OPERATING THE AUDIO/VISUAL SYSTEM ■ MARKS SHOWN ON DVD VIDEO DVD VIDEO DISCS DISCS This DVD player conforms to NTSC/ Indicates NTSC/PAL PAL color TV formats. DVD video discs NTSC/PAL format of color TV. conforming to another format such as SECAM cannot be used.
- Page 272 7. TIPS FOR OPERATING THE AUDIO/VISUAL SYSTEM Multi-angle feature: The same scene can DVD VIDEO DISC GLOSSARY be enjoyed from different angles. DVD video discs: Digital Versatile Disc that Multi-language feature: The subtitle and holds video. DVD video discs have adopted audio language can be selected.
-
Page 273: Ipod
7. TIPS FOR OPERATING THE AUDIO/VISUAL SYSTEM COMPATIBLE MODELS iPod ® ® The following iPod , iPod nano , iPod ® ® ® classic , iPod touch and iPhone devic- es can be used with this system. Made for • iPod touch (5th generation)* •... -
Page 274: File Information
7. TIPS FOR OPERATING THE AUDIO/VISUAL SYSTEM ■ CORRESPONDING SAMPLING FILE INFORMATION FREQUENCY ■ COMPATIBLE USB DEVICES Frequency File type (kHz) communication (480 Mbps) and MP3 files: formats 32/44.1/48 FS (12 Mbps) MPEG 1 LAYER 3 File formats FAT 16/32 MP3 files: 16/22.05/24 MPEG 2 LSF LAYER 3... - Page 275 7. TIPS FOR OPERATING THE AUDIO/VISUAL SYSTEM MP3 (MPEG Audio Layer 3), WMA The sound quality of MP3/WMA files gen- (Windows Media Audio) and AAC erally improves with higher bit rates. In (Advanced Audio Coding) are audio com- order to achieve a reasonable level of pression standards.
-
Page 276: Terms
7. TIPS FOR OPERATING THE AUDIO/VISUAL SYSTEM TERMS 001.mp3 PACKET WRITE 002.wma Folder 1 003.mp3 This is a general term that describes the Folder 2 process of writing data on-demand to CD- 004.mp3 R, etc., in the same way that data is written 005.wma Folder 3 to floppy or hard discs. - Page 277 7. TIPS FOR OPERATING THE AUDIO/VISUAL SYSTEM ISO 9660 FORMAT This is the international standard for the for- WMA (Windows Media Audio) is an audio matting of CD-ROM folders and files. For compression format developed the ISO 9660 format, there are 2 levels of ®...
-
Page 278: Error Messages
“Music tracks not support- ® ® This indicates a problem in the Bluetooth Bluetooth ed. Please check your por- vice. Audio table player.” INFORMATION If the malfunction is not rectified: Take your vehicle to your Lexus dealer. ● GX460_Navi_OM60M79U_(U) 15.05.21 18:35... -
Page 279: Voice Command System
VOICE COMMAND SYSTEM VOICE COMMAND SYSTEM OPERATION 1. VOICE COMMAND SYSTEM ..280 USING THE VOICE COMMAND SYSTEM ..............280 VOICE COMMAND SYSTEM OPERATION ............281 EXPANDED VOICE COMMANDS ..287 2. CASUAL SPEECH RECOGNIZATION ..288 3. COMMAND LIST........289 MOBILE ASSISTANT OPERATION 1. -
Page 280: Voice Command System Operation
1. VOICE COMMAND SYSTEM OPERATION 1. VOICE COMMAND SYSTEM The voice command system enables the MICROPHONE navigation, audio/visual, hands-free and air conditioning systems to be operated using voice commands. Refer to the command list for samples of voice commands. (P.289) USING THE VOICE COMMAND SYSTEM STEERING SWITCH... -
Page 281: Voice Command System Operation
1. VOICE COMMAND SYSTEM OPERATION Say the desired command. VOICE COMMAND SYSTEM OPERATION The voice commands of multifunction can be confirmed by selecting a tab. The tabs are found on the upper part of the screen. All commands that are not displayed on the screen can be recognized on any ... - Page 282 1. VOICE COMMAND SYSTEM OPERATION ■ DISPLAYING THE “Voice Settings” INFORMATION SCREENS If the navigation system does not respond ● or the confirmation screen does not dis- appear, press the talk switch and try again. If a voice command cannot be recog- ●...
- Page 283 Say “Launch <application name>”. Say “Enter an address”. Say “<house number, street name, city name, State>” continuously. LEXUS App Suite application screen is dis- played. A confirmation screen will be displayed showing the recognition results. If multiple matching items are found, a selection screen will be displayed.
- Page 284 1. VOICE COMMAND SYSTEM OPERATION Say “Go directly”. The house number voice recognition ● conditions are outlined below: • Numerals: 10 digits or less • Numerals and cardinal direction or a hyphen and numerals: A total of 9 dig- its or less (Do not say “and”.) •...
- Page 285 1. VOICE COMMAND SYSTEM OPERATION VOICE COMMAND INFORMATION EXAMPLE: SEARCH FOR A The Gracenote database is only compati- ● SONG ble with the USB or iPod mode. The list screens can be operated by ● Press the talk switch. selecting a screen button as well as by recognizing the voice commands.
- Page 286 1. VOICE COMMAND SYSTEM OPERATION VOICE COMMAND INFORMATION EXAMPLE: CALL NAME In the same manner as it is displayed on ● the screen, “Call <contacts> <phone Press the talk switch. types>”, after saying “Call a contact” say the name, or the name and type of phone, Say “Call <contacts>...
-
Page 287: Expanded Voice Commands
1. VOICE COMMAND SYSTEM OPERATION VOICE COMMAND When the system recognizes multiple EXAMPLE: DIAL NUMBER phone numbers, a phone number candi- date list will be displayed on the screen. Press the talk switch. Pressing the switch on the steering wheel makes a call to the top entry on the Say the phone number. -
Page 288: Casual Speech Recognization
1. VOICE COMMAND SYSTEM OPERATION 2. CASUAL SPEECH RECOGNIZATION Due to natural language speech recog- EXPRESSION EXAMPLES FOR nition technology, this system enables EACH FUNCTION recognition of a command when spoken naturally. However, the system cannot Command Expression examples recognize every variation of each com- Navigate to my house. -
Page 289: Command List
Displays the command list of the selected tab “More Hints” Displays more commonly used commands “Cancel” Cancels the voice command system Apps When the voice recognition language is set to English. Command Action “Launch <apps>” Activates the LEXUS App Suite application GX460_Navi_OM60M79U_(U) 15.11.06 08:47... - Page 290 “Previous Destination” Displays previous destinations : For example; “Gas stations”, “Restaurants”, etc. : Depending on the search results, a POI list may be provided by a relevant POI application of the LEXUS App suite. (P.357) Phone Command Action Places a call to the phone number of the latest outgoing “Redial”...
- Page 291 Plays the selected track “Play Album <albums>” Plays tracks from the selected album Info Command Action “Destination Assist” Connects the system to the Lexus response center “Show Forecast” Displays weather information “Show Traffic” Displays traffic information “Lexus Insider” Displays the Lexus insider list GX460_Navi_OM60M79U_(U) 15.11.06 08:47...
- Page 292 1. VOICE COMMAND SYSTEM OPERATION Other When “Expanded Voice Commands” is turned “On”. (P.62) Command Action “Turn Climate Control On” Turns air conditioning system on “Turn Climate Control Off” Turns air conditioning system off “Warmer” Increases the temperature of the air conditioning system “Cooler”...
-
Page 293: Mobile Assistant Operation
2. MOBILE ASSISTANT OPERATION 1. MOBILE ASSISTANT • After some phone and music commands, The Mobile Assistant feature will the Mobile Assistant feature will automat- ® activate Apple’s Siri Eyes Free mode ically end to complete the requested via the steering wheel switches. To action. - Page 294 2. MOBILE ASSISTANT OPERATION MICROPHONE It is not necessary to speak directly into the microphone when using the Mobile Assistant. (Microphone location: P.280) INFORMATION Wait for the listening beeps before using ● the Mobile Assistant. The Mobile Assistant may not recognize ●...
-
Page 295: Information
INFORMATION INFORMATION DISPLAY 1. RECEIVING DOPPLER WEATHER INFORMATION... 296 DISPLAYING DOPPLER WEATHER INFORMATION..........296 2. DATA SERVICES SETTINGS ..... 298 SETTING DOWNLOAD METHODS ..298 GX460_Navi_OM60M79U_(U) 15.05.21 18:35... -
Page 296: Information Display
Check that the “Weather” screen is dis- Doppler weather radar information can played. be received via the HD radio or by the LEXUS App Suite application on a ® Bluetooth phone. For details about the LEXUS App Suite application: P.351... - Page 297 1. INFORMATION DISPLAY When the “6/12 Hour” tab is selected DISPLAYING THE WEATHER OF THE CURRENT LOCATION Display “Weather” screen. (P.296) Select “Current Weather”. Select the desired tab to be displayed. INFORMATION If weather is set to the home screen, the ●...
-
Page 298: Data Services Settings
METHODS Data service information, which is com- prised of traffic information and weather information, can be received via the HD radio and by the LEXUS App Suite ap- ® plication on a Bluetooth phone. The receiving method can be set to both or ... -
Page 299: Phone
PHONE ® 4. RECEIVING ON THE Bluetooth PHONE OPERATION PHONE............311 (HANDS-FREE SYSTEM INCOMING CALLS..........311 FOR CELLULAR PHONES) ® 5. TALKING ON THE Bluetooth 1. QUICK REFERENCE ......300 PHONE............. 312 INCOMING CALL WAITING......314 2. SOME BASICS ......... 301 ®... -
Page 300: Phone Operation
1. PHONE OPERATION (HANDS-FREE SYSTEM FOR CELLULAR PHONES) 1. QUICK REFERENCE The phone top screen can be used to make a phone call. To display the hands-free op- eration screen, press the button, or the switch on the steering wheel. Several functions are available to operate on each screen that is displayed by selecting the 4 tabs. -
Page 301: Some Basics
1. PHONE OPERATION (HANDS-FREE SYSTEM FOR CELLULAR PHONES) 2. SOME BASICS The hands-free system enables calls to INFORMATION be made and received without having to If your cellular phone does not support ● take your hands off the steering wheel. ®... -
Page 302: Registering/ Connecting A Bluetooth Phone
1. PHONE OPERATION (HANDS-FREE SYSTEM FOR CELLULAR PHONES) REGISTERING/ USING THE PHONE SWITCH/ ® CONNECTING A Bluetooth MICROPHONE PHONE Steering switch To use the hands-free system for cellular By pressing the phone switch, a call can phones, it is necessary to register a cel- be received or ended without taking lular phone with the system. -
Page 303: Voice Command System
1. PHONE OPERATION (HANDS-FREE SYSTEM FOR CELLULAR PHONES) Microphone INFORMATION The microphone is used when talking on The other party’ s voice will be heard from ● the front speakers. The audio/visual sys- the phone. tem will be muted during phone calls or when hands-free voice commands are used. -
Page 304: About The Contacts In The Contact List
1. PHONE OPERATION (HANDS-FREE SYSTEM FOR CELLULAR PHONES) ABOUT THE CONTACTS IN WHEN SELLING OR THE CONTACT LIST DISPOSING OF THE VEHICLE The following data is stored for every regis- A lot of personal data is registered when tered phone. When another phone is con- the hands-free system is used. -
Page 305: Phone
By favorites list By call history By contacts list* By dial pad* By e-mail/SMS/MMS By POI call By off hook switch By LEXUS App Suite* By voice command system *: The operation cannot be performed while driving. GX460_Navi_OM60M79U_(U) 15.05.21 18:35... -
Page 306: By Favorites List
1. PHONE OPERATION (HANDS-FREE SYSTEM FOR CELLULAR PHONES) BY FAVORITES LIST BY CALL HISTORY Calls can be made using registered con- Up to 30 of the latest call history items tacts which can be selected from a con- (missed, incoming and outgoing) can be tact list. -
Page 307: By Contacts List
1. PHONE OPERATION (HANDS-FREE SYSTEM FOR CELLULAR PHONES) BY CONTACTS LIST When is selected Check that the “Call” screen is dis- Calls can be made by using contact data played. which is transferred from a registered When the desired contact is selected cellular phone. - Page 308 1. PHONE OPERATION (HANDS-FREE SYSTEM FOR CELLULAR PHONES) When “Automatic Contact/History WHEN THE CONTACT IS Transfer” is set to off (P.324) EMPTY Select the “Contacts” tab. ■ PBAP COMPATIBLE Select the desired item. ® Bluetooth PHONES When “Automatic Contact/History Transfer” is set to on (P.324) Select the “Contacts”...
- Page 309 1. PHONE OPERATION (HANDS-FREE SYSTEM FOR CELLULAR PHONES) ■ FOR PBAP INCOMPATIBLE BUT When “Transfer” is selected ® OPP COMPATIBLE Bluetooth Follow the steps in “FOR PBAP PHONES INCOMPATIBLE COMPATIBLE Bluetooth ® PHONES” Select the “Contacts” tab. from “STEP 3”. (P.326) Select the desired item.
-
Page 310: By Dial Pad
1. PHONE OPERATION (HANDS-FREE SYSTEM FOR CELLULAR PHONES) BY DIAL PAD BY OFF HOOK SWITCH Display phone screen. Calls can be made using the latest call (P.305) history item. Select the “Dial Pad” tab and enter the Press the switch on the steering phone number. -
Page 311: Receiving On The Bluetooth Phone
1. PHONE OPERATION (HANDS-FREE SYSTEM FOR CELLULAR PHONES) ® 4. RECEIVING ON THE Bluetooth PHONE INCOMING CALLS When a call is received, this screen is displayed with a sound. Select or press the switch on the steering wheel to talk on the phone. To refuse to receive the call: Select or press the switch on the steering... -
Page 312: Talking On The Bluetooth
1. PHONE OPERATION (HANDS-FREE SYSTEM FOR CELLULAR PHONES) ® 5. TALKING ON THE Bluetooth PHONE While talking on the phone, this screen is INFORMATION displayed. The operations outlined be- Changing from hands-free call to cellular ● low can be performed on this screen. phone call is not possible while driving. - Page 313 1. PHONE OPERATION (HANDS-FREE SYSTEM FOR CELLULAR PHONES) SENDING TONES INFORMATION A continuous tone signal is a character ● ■ BY DIAL PAD string that consists of numbers and the characters (e.g. This operation cannot be performed 056133w0123p#1) while driving. When the “p”...
-
Page 314: Incoming Call Waiting
1. PHONE OPERATION (HANDS-FREE SYSTEM FOR CELLULAR PHONES) TRANSMIT VOLUME SETTING INCOMING CALL WAITING Select “Transmit Volume”. When a call is interrupted by a third par- ty while talking, this screen is displayed. Select the desired level for the transmit volume. -
Page 315: Bluetooth Phone Message Function
1. PHONE OPERATION (HANDS-FREE SYSTEM FOR CELLULAR PHONES) ® 6. Bluetooth PHONE MESSAGE FUNCTION Received messages can be forwarded Select ® from the connected Bluetooth phone, enabling checking and replying using the navigation system. ® Depending on the type of Bluetooth phone connected, received messages may not be transferred to the message inbox. -
Page 316: Receiving A Message
1. PHONE OPERATION (HANDS-FREE SYSTEM FOR CELLULAR PHONES) RECEIVING A MESSAGE INFORMATION Depending on the cellular phone used for ● When an e-mail/SMS/MMS is re- receiving messages, or its registration status with the navigation system, some ceived, the incoming message screen information may not be displayed. -
Page 317: Checking Messages
1. PHONE OPERATION (HANDS-FREE SYSTEM FOR CELLULAR PHONES) CHECKING MESSAGES INFORMATION Reading a text message is not available ● Display the message inbox screen. while driving. (P.315) ® Depending on the type of Bluetooth ● phone being connected, it may be Select the desired message from the list. -
Page 318: Replying To A Message (Quick Reply)
1. PHONE OPERATION (HANDS-FREE SYSTEM FOR CELLULAR PHONES) Select “Send”. REPLYING TO A MESSAGE (QUICK REPLY) 15 messages have already been stored. Display the message inbox screen. (P.315) Select the desired message from the list. While the message is being sent, a sending Select “Quick Msg”. - Page 319 1. PHONE OPERATION (HANDS-FREE SYSTEM FOR CELLULAR PHONES) ■ EDITING QUICK REPLY MESSAG- INFORMATION To reset the edited quick reply messages, ● select “Default”. This operation cannot be performed “Quick Message 1” (“I am driving and ● while driving. will arrive in approximately [ETA] minutes.”): Select “Quick Msg”.
-
Page 320: Calling The Message Sender
1. PHONE OPERATION (HANDS-FREE SYSTEM FOR CELLULAR PHONES) ■ CALLING FROM A NUMBER CALLING THE MESSAGE WITHIN A MESSAGE SENDER Calls can be made to a number identi- Calls can be made to an e-mail/SMS/ fied in a message’s text area. MMS message sender’s phone number. - Page 321 1. PHONE OPERATION (HANDS-FREE SYSTEM FOR CELLULAR PHONES) Check that the “Call” screen is dis- played. INFORMATION A series of numbers may be recognized ● as a phone number. Additionally, some phone numbers may not be recognized, such as those for other countries. ■...
-
Page 322: Setup
2. SETUP 1. PHONE/MESSAGE SETTINGS Press the “SETUP” button on the PHONE/MESSAGE SETTINGS Remote Touch. SCREEN Information Page Select “Phone”. Registering/connecting a phone Sound settings Contact/call history set- tings Messaging settings Select the item to be set. Phone display settings GX460_Navi_OM60M79U_(U) 15.05.21 18:35... -
Page 323: Sound Settings" Screen
2. SETUP DISPLAYING THE PHONE/ “Sound Settings” SCREEN MESSAGE SETTINGS SCREEN IN A DIFFERENT WAY The call and ringtone volume can be ad- justed. A ringtone can be selected. Display phone screen. (P.305) Display the “Phone/Message Settings” screen. (P.322) Select “Settings”. Select “Sound Settings”. -
Page 324: Contact/Call History Settings" Screen
2. SETUP “Contact/Call History Settings” Function SCREEN Select to set the desired ringtone. The contact can be transferred from a Select “-” or “+” to adjust the ring- tone volume. ® Bluetooth phone to the system. The contact also can be added, edited and Select “-”... - Page 325 2. SETUP Depending on the type of phone, certain Function Page functions may not be available. Contact data is managed independently PBAP compatible ® for every registered phone. When one Bluetooth phones, select to set automatic contact/ phone is connected, another phone’ s regis- ...
- Page 326 2. SETUP ■ FOR PBAP INCOMPATIBLE BUT UPDATE CONTACTS FROM ® PHONE OPP COMPATIBLE Bluetooth PHONES Operation methods differ between This operation cannot be performed PBAP compatible and PBAP incompat- while driving. ® ible but OPP compatible Bluetooth phones. Select “Update Contacts from Phone”. If your cellular phone is neither PBAP Select “Replace Contacts”...
- Page 327 2. SETUP ■ UPDATING THE CONTACTS IN A Transfer the contact data to the system DIFFERENT WAY (FROM THE “Call ® using a Bluetooth phone. History” SCREEN) This operation may be unnecessary depending on the type of cellular phone. ®...
- Page 328 2. SETUP Select the desired contact. REGISTERING A NEW CONTACT TO THE CONTACT LIST New contact data can be registered. Up to 4 numbers per person can be reg- istered. PBAP compatible ® Bluetooth phones, this function is available when “Automatic Contact/ Select a phone type for the phone num- History Transfer”...
- Page 329 2. SETUP ■ REGISTERING A NEW CONTACT EDITING THE CONTACT IN A DIFFERENT WAY (FROM THE DATA “Call History” SCREEN) ® For PBAP compatible Bluetooth Display phone screen. phones, this function is available when (P.305) “Automatic Contact/History Transfer” Select the “Call History” tab and select is set to off.
- Page 330 2. SETUP ■ For editing the name EDITING THE CONTACT IN A DIFFERENT WAY (FROM THE Follow the steps in “REGISTERING A “Contact Details” SCREEN) CONTACT CONTACT LIST” from “STEP 2”. Display phone screen. (P.328) (P.305) For editing the number Select the “Contacts”, “Call History”...
- Page 331 2. SETUP ■ DELETING THE CONTACT IN A DELETING THE CONTACT DIFFERENT WAY (FROM THE DATA “Contact Details” SCREEN) ® For PBAP compatible Bluetooth Display phone screen. phones, this function is available when (P.305) “Automatic Contact/History Transfer” Select the “Contacts”, “Call History” is set to off.
- Page 332 2. SETUP When 15 contacts have already been FAVORITES LIST SETTING registered to the favorites list Up to 15 contacts (maximum of 4 num- When 15 contacts have already been bers per contact) can be registered in registered to the favorites list, a regis- the favorites list.
- Page 333 2. SETUP Registering contacts in the favorites list in Registering contacts in the favorites list in a different way (from the “Contacts” a different way (from the “Contact De- screen) tails” screen) Display phone screen. Display phone screen. (P.305) (P.305) Select the “Contacts”...
- Page 334 2. SETUP ■ DELETING THE CONTACTS IN Deleting contacts in the favorites list in a different way (from the “Contacts” THE FAVORITES LIST screen) Select “Remove Favorite”. Display phone screen. Select the desired contacts and select (P.305) “Remove”. Select the “Contacts” tab. Select at the beginning of the (yellow)
-
Page 335: Messaging Settings" Screen
2. SETUP Deleting contacts in the favorites list in a “Messaging Settings” SCREEN different way (from the “Contact Details” screen) Display the “Phone/Message Settings” Display phone screen. screen. (P.322) (P.305) Select “Messaging Settings”. Select the “Contacts”, “Call History” Select the desired item to be set. tab or the “Favorites”... - Page 336 2. SETUP Function INFORMATION Depending on the phone, these functions ● Select to set automatic message may not be available. transfer on/off. Select to set automatic message read- out on/off. Select to set the SMS/MMS notifica- tion popup on/off. Select to set the e-mail notification popup on/off.
-
Page 337: Phone Display Settings" Screen
2. SETUP DISPLAYING THE “Messaging “Phone Display Settings” Settings” SCREEN IN A SCREEN DIFFERENT WAY Display the “Phone/Message Settings” Display phone screen. screen. (P.322) (P.305) Select “Phone Display Settings”. Select Select the desired item to be set. Select “Settings”. Function Select to change the incoming call display. -
Page 338: What To Do If
The connected de- confirmed on this vice may not be a system, check with compatible your Lexus dealer or ® Bluetooth cellular The hands-free sys- following phone. ® website: http:// tem or Bluetooth www.lexus.com/... - Page 339 3. WHAT TO DO IF... When registering/connecting a cellular phone Page Symptom Likely cause Solution Cellular This phone system An incorrect pass- Enter the correct code was entered on passcode on the cel- the cellular phone. lular phone. Complete the regis- The registration op- tration operation on...
- Page 340 3. WHAT TO DO IF... Page Symptom Likely cause Solution Cellular This phone system Manually connect ® Another Bluetooth the cellular phone device is already you wish to use to this connected. system. Enable ® Bluetooth function ® ...
- Page 341 3. WHAT TO DO IF... When making/receiving a call Page Symptom Likely cause Solution Cellular This phone system Move to where “No A call cannot be Your vehicle is in a Service” no longer made/received. “No Service” area. appears on the dis- play.
- Page 342 The profile version of operation has been the connected cellu- confirmed on this lar phone may not be system, check with compatible with your Lexus dealer or transferring phone- following book data. website: http:// www.lexus.com/ MobileLink Phonebook data...
- Page 343 3. WHAT TO DO IF... ® When using the Bluetooth message function Page Symptom Likely cause Solution Cellular This phone system Enable message Message transfer is transfer on the cellu- not enabled on the lar phone (approve cellular phone. message transfer on Messages cannot be the phone).
- Page 344 3. WHAT TO DO IF... Page Symptom Likely cause Solution Cellular This phone system The cellular phone is Bring the cellular not close enough to phone closer to this this system. system. Turn cellular phone off, remove and reinstall the bat- ...
-
Page 345: Lexus Enform
SETUP 1. LEXUS App Suite SETTINGS....375 SCREEN FOR LEXUS App Suite SETTINGS.............. 375 LEXUS Enform connected services consists of five products: LEXUS Enform Safety Connect LEXUS Enform Service Connect LEXUS Enform Remote LEXUS Enform Destinations ... -
Page 346: Lexus Enform-Overview
Lexus Enform is a service that includes Safety Connect, Remote, Destinations, Insider and App Suite. The functions included in Lexus Enform are classified into the following three types. Type A: Function achieved by using a cellular phone Type B: Function achieved by using an embedded cellular device in the vehicle... -
Page 347: Lexus Enform Remote
1. LEXUS ENFORM-OVERVIEW LEXUS Enform Remote LEXUS Enform Remote is a cellular phone application that lets you view and remotely control certain aspects of your vehicle. For details about the functions and services of this application, refer to http://www.lexus.com/enform/. Function of the LEXUS Enform Remote is achieved by using an embedded cellular device in the vehicle (DCM: Data Communication Module). -
Page 348: Type A: Function Achieved By Using A Cellular Phone
1. LEXUS ENFORM-OVERVIEW 2. TYPE A: FUNCTION ACHIEVED BY USING A CELLULAR PHONE Of the functions included with Lexus Enform, the App Suite relies on the use of a cel- lular phone. App Suite enables applicable apps installed on a cellular phone to be displayed on and ®... - Page 349 Content received, via a cellular phone, from content provider servers is displayed on the navigation screen. The navigation Navigation system system is equipped with an application player to run applica- tions. *: For known compatible phones, refer to http://www.lexus.com/MobileLink. GX460_Navi_OM60M79U_(U) 15.05.21 18:35...
-
Page 350: Before Using The Function
Once initialized, data will be erased. Pay http://www.lexus.com/enform/ or call ● close attention when initializing data. 1-800-255-3987. AVAILABILITY OF FUNCTION LEXUS App Suite is available in the contig- uous United States, Washington D.C. and Alaska. INFORMATION Data usage fees may apply while using ●... -
Page 351: Preparation Before Using Lexus App Suite
1. LEXUS ENFORM-OVERVIEW REGISTERING THE LEXUS App PREPARATION BEFORE Suite APPLICATION USING LEXUS App Suite Download the App Suite application to your cellular phone. SETTINGS REQUIRED TO USE LEXUS App Suite Run the App Suite application on your cellular phone. -
Page 352: Type B: Function Achieved By Using Dcm And The Navigation System
3. TYPE B: FUNCTION ACHIEVED BY USING DCM AND THE NAVIGATION SYSTEM The functionality of Lexus Enform Safety Connect, Lexus Enform Destinations, and Lexus Insider is made possible through the shared work of the DCM and the naviga- tion system. -
Page 353: Before Using The Function
20cm or more away from person’s body areas of Alaska for vehicles that contain the (excluding extremities: hands, wrists, feet appropriate map data. and ankles). Lexus Insider is available in the contiguous United States, Washington D.C. and Alaska. GX460_Navi_OM60M79U_(U) 15.05.21 18:35... - Page 354 ● scientists, engineers, and physicians from tact your Lexus dealer. universities, government health agen- Lexus Enform functions are not subject to ● cies, and industry reviewed the available section 255 of the Telecommunications body of research to develop the ANSI Act and the system is not TTY compati- Standard (C95.1).
-
Page 355: Type C: Function Achieved By Using Dcm
1. LEXUS ENFORM-OVERVIEW 4. TYPE C: FUNCTION ACHIEVED BY USING DCM The functionality of Lexus Enform Safety Connect is made possible by the use of a DCM. For details, refer to “Owner’s Manual”. GX460_Navi_OM60M79U_(U) 15.05.21 18:35... -
Page 356: Lexus Enform Operation
● operating Lexus Enform Remote. In some states, use of Lexus Enform Remote may violate state or local laws. Before using Lexus Enform Remote, check your state and local laws. Any malfunction of the Lexus should be repaired by your Lexus dealer. -
Page 357: Lexus App Suite
2. LEXUS ENFORM OPERATION 2. LEXUS App Suite Select the desired application screen USING LEXUS App Suite button. App Suite is a function that enables ap- plicable apps installed on a cellular phone to be displayed on and operated from the navigation screen. Before App Suite can be used, a few settings need to be performed. - Page 358 2. LEXUS ENFORM OPERATION Check that downloading is complete. UPDATING AN APPLICATION From the “Update” screen When App Suite is activated, an applica- tion may need to be updated. By updat- ing the application, it can be kept to the latest version.
- Page 359 2. LEXUS ENFORM OPERATION ■ INSTALLING THE UPDATE DATA Check that installing is started. After the downloading is complete, “Update” will be changed to “Install”. Select “Install”. “Install in Background”: Select to operate other function while installing. Select “OK” after the installing is com- plete.
- Page 360 2. LEXUS ENFORM OPERATION REORDERING THE APPLICATIONS Order of the applications can be changed. Display the “LEXUS App Suite” screen. (P.357) Select “Reorder”. Select the desired application to be moved. Select “<<” or “>>” to move the applica- tion, and select “OK”.
- Page 361 The cellular phone cannot be www.lexus.com/enform/ bleshooting assistance, connected. confirm if the phone is com- please visit the Lexus website patible or not. or contact your dealer.” “This feature is unavailable A hands-free call is in After the hands-free call is fin- during a handsfree call.”...
-
Page 362: Linking Lexus App Suite And Navigation System Local Function
2. LEXUS ENFORM OPERATION Select “Web Search”. LINKING LEXUS App Suite AND NAVIGATION SYSTEM LOCAL FUNCTION The setting a destination and making a hands-free call functions of the naviga- tion system can be performed via App Suite. For details about the functions and services provided by each application, Check that the “Web Search”... - Page 363 2. LEXUS ENFORM OPERATION Select “Go to ”. SETTING A DESTINATION USING LEXUS App Suite Locations that were searched for using the App Suite can be set as a destination. Display the “Web Search” screen. (P.362) Select the desired application screen Select “OK”...
- Page 364 2. LEXUS ENFORM OPERATION Select “Yes”. MAKING A PHONE CALL USING LEXUS App Suite Phone calls can be made to locations which were searched for using App Suite. Display the “Web Search” screen. (P.362) “Cancel”: Select to cancel making a phone Select the desired application screen call.
-
Page 365: Entering Keyword Operation
The keyboard layout can be changed. the character entering space. ( P.55 ) ENTERING A KEYWORD USING THE SOFTWARE KEYBOARD Display the “LEXUS App Suite” screen. (P.357) For details on operating the keyboard: Select the desired application screen P.34 button. - Page 366 Search results will be displayed on the ENTERING A KEYWORD screen. USING THE VOICE RECOGNITION FUNCTION Display the “LEXUS App Suite” screen. (P.357) Select the desired application screen button. Voice recognition can also be used by using the talk switch on the steering wheel.
-
Page 367: Lexus Enform Destinations
Select “Dest.”. Destination Assist Destinations provide you with live assis- tance for finding destinations via the Lexus response center. You can request either a specific business, address, or ask for help locating your desired desti- nation by category, such as restaurants, gas stations, shopping centers or other Select “Destination Assist”. -
Page 368: Edestination
POI or service. With the eDestination feature, you can go online, and via the Lexus.com own- er’s Web site, select and organize desti- nations of your choice and then wirelessly send them to your vehicle’s navigation system. - Page 369 2. LEXUS ENFORM OPERATION Select “eDestination”. DOWNLOADING eDestinations After updating eDestination folders on- line, it is necessary to download the up- dated data to the vehicle. Press the “NAV” button. Select “Download”. Select “Dest.”. Select “Yes” when the confirmation screen appears.
- Page 370 2. LEXUS ENFORM OPERATION Select “Point of Interest”. SEARCHING eDestinations Press the “NAV” button. Select “eDestination”. Select “Dest.”. Select the desired eDestination catego- GX460_Navi_OM60M79U_(U) 15.05.21 18:35...
- Page 371 2. LEXUS ENFORM OPERATION Select the desired location. DISPLAYING eDestination ICONS Select “Options”. Select the button of the desired action. Select “Map Information”. “Mark”: Select to mark the POI on the map screen. “Go”: Select to set the POI as a destina- Select “eDestination”.
-
Page 372: Lexus Insider
Lexus Insider broadcasts. when the engine switch is turned to AC- To disrupt the audio read of Lexus Insider, CESSORY or IGNITION ON mode. press the “MODE” switch on the steering wheel, or press the “AUDIO” button on the audio system. - Page 373 2. LEXUS ENFORM OPERATION MESSAGE ICONS LISTENING TO ANOTHER ARTICLE Icons appear at the left of the Lexus Display the “LEXUS Insider” screen. Insider story titles and indicate the fol- (P.372) lowing. Select the desired article. Icon Article Unread article...
- Page 374 2. LEXUS ENFORM OPERATION DOWNLOADING A POI DELETING Lexus Insider ARTICLE Some Lexus Insider articles will contain Display the “LEXUS Insider” screen. a downloadable POI relevant to the (P.372) content. Select “Delete”. Display the “LEXUS Insider” screen. (P.372) Select the desired article.
-
Page 375: Setup
3. SETUP 1. LEXUS App Suite SETTINGS The settings of App Suite can be SCREEN FOR LEXUS App Suite changed. SETTINGS Press the “SETUP” button. Information Page Select to set the voice guid- Select “LEXUS App Suite”. ance volume. Select to set the pop up re- minder for cellular phone data usage. - Page 376 The voice guidance volume can be ad- justed. The phone data plan pop-up can be set when a paid application is downloaded. Display the “LEXUS App Suite Set- Display the “LEXUS App Suite Set- tings” screen. (P.375) tings” screen. (P.375) Select the desired level by selecting the Select “Phone Data Plan Pop-Up”.
- Page 377 Display the “LEXUS App Suite Set- tings” screen. (P.375) Select “LEXUS Insider”. Select the items to be set. Function Select to set the receiving of Lexus In- sider articles yes/no. Select to set the new message notifi- cation on/off. Select to reset all setup items.
- Page 378 3. SETUP GX460_Navi_OM60M79U_(U) 15.05.21 18:35...
-
Page 379: Index
INDEX GX460_Navi_OM60M79U_(U) 15.05.21 18:35... -
Page 380: Alphabetical Index
ALPHABETICAL INDEX ALPHABETICAL INDEX ® AM/FM radio ............168 Calling on the Bluetooth phone....305 Available HD radio™ technology....177 By call history............306 Caching a radio program ........ 173 By contacts list.............307 Overview ..............168 By dial pad..............310 Presetting a station ..........171 By favorites list.............306 Radio broadcast data system ...... - Page 381 Entering letters and numbers ......34 List screen..............35 Lexus App Suite............357 Entering keyword operation......365 Function index............. 25 Linking Lexus App Suite and navigation Functional overview..........346 system local function........362 Lexus Enform Remote........347 Using Lexus App Suite........357 Lexus App Suite settings........375 Screen for Lexus App Suite settings..375...
- Page 382 ALPHABETICAL INDEX Map database information and updates..386 Operating information..........266 Map database version and covered area ..152 DVD player and disc ........268 About the map data..........153 Error messages...........278 Map information ..........152 File information ........... 274 Map screen information ......... 83 iPod................
- Page 383 Receiving doppler weather information..296 Displaying doppler weather Radio operation............168 information............296 Rear seat entertainment system ® Receiving on the Bluetooth phone....311 Caution screen ...........230 Incoming calls ............311 Changing settings..........251 Registering home ............19 Changing the display to be operated..230 Registering preset destinations......
- Page 384 ALPHABETICAL INDEX Some basics............160, 301 About the contacts in the contact list ..304 Screen adjustment ............ 38 Audio screen adjustment......... 166 Search operation............97 Disc slot..............162 Destination search by Destination ® Registering/connecting a Bluetooth Assist..............105 phone ..............302 Searching by address ..........99 Selecting an audio source .........161 Searching by address book......106 Sound settings ............
- Page 385 Type A: Function achieved by using a What to do if............. 338 cellular phone............348 Before using the function .......350 Preparation before using Lexus App XM satellite radio.............180 Suite..............351 Displaying the radio ID ........185 Type B: Function achieved by using DCM and the navigation system....
-
Page 386: Map Database Information And Updates
Map database information and updates GX460_Navi_OM60M79U_(U) 15.05.21 18:35... - Page 387 GX460_Navi_OM60M79U_(U) 15.05.21 18:35...
- Page 388 GX460_Navi_OM60M79U_(U) 15.05.21 18:35...
- Page 389 GX460_Navi_OM60M79U_(U) 15.05.21 18:35...
- Page 390 GX460_Navi_OM60M79U_(U) 15.05.21 18:35...
- Page 391 GX460_Navi_OM60M79U_(U) 15.05.21 18:35...
- Page 392 GX460_Navi_OM60M79U_(U) 15.05.21 18:35...
- Page 393 GX460_Navi_OM60M79U_(U) 15.05.21 18:35...
- Page 394 GX460_Navi_OM60M79U_(U) 15.05.21 18:35...
- Page 395 Certification Gracenote, the Gracenote logo and logotype, “Powered by Gracenote”, MusicID, Playlist Plus and MediaVOCS are either registered trademarks or trademarks of Gracenote, Inc. in the United States and/or other countries GX460_Navi_OM60M79U_(U) 15.05.21 18:35...
- Page 396 GX460_Navi_OM60M79U_(U) 15.05.21 18:35...
- Page 397 For U.S. owners GX460_Navi_OM60M79U_(U) 15.05.21 18:35...
- Page 398 This device complies with part 15 of the FCC Rules. Operation is subject to the follow- ing two conditions: (1) This device may not cause harmful interference, and (2) this de- vice must accept any interference received, including interference that may cause undesired operation.
- Page 399 Canada IC: 2024B-FT0048A This device complies with Industry Canada licence-exempt RSS standard(s). Operation is subject to the following two conditions: (1) this device may not cause interference, and (2) this device must accept any interference, including interference that may cause undesired operation of the device.