Advertisement
Table of Contents
Model No. PCTL55811
Serial No.
Find the serial number in the location
shown below. Write the serial number
in the space above for reference.
Serial
Number
Decal
QUESTIONS?
As a manufacturer, we are com-
mitted to providing complete
customer satisfaction. If you
have questions, or if there are
missing parts, please call:
1-888-936-4266
Mon.–Fri. 8h00 until 18h30 EST
(excluding holidays).
CAUTION
Read all precautions and instruc-
tions in this manual before using
this equipment. Save this manual
for future reference.
USER'S MANUAL
Visit our website at
www.proform.com
Advertisement
Table of Contents

Related Manuals for ProForm CR 610


Summary of Contents for ProForm CR 610
- Page 1 1-888-936-4266 Mon.–Fri. 8h00 until 18h30 EST (excluding holidays). CAUTION Read all precautions and instruc- tions in this manual before using this equipment. Save this manual for future reference. USER'S MANUAL Visit our website at www.proform.com...
-
Page 2: Table Of Contents
HOW TO FOLD AND MOVE THE TREADMILL ........ -
Page 3: Important Precautions
2. Use the treadmill only as described. 3. Place the treadmill on a level surface, with at least eight feet of clearance behind it and two feet on each side. Do not place the treadmill on any surface that blocks air openings. - Page 4 SAVE THESE INSTRUCTIONS The decals shown below have been placed on your treadmill. If a decal is missing, or if it is not legible, please call our Customer Service Department, toll-free, to order a free replacement decal (see ORDERING REPLACEMENT PARTS on page 23).
-
Page 5: Before You Begin
And when you’re not exercising, the unique CR 610 can be folded up, requir- ing less than half the floor space of other treadmills. -
Page 6: Assembly
This is a normal condition and does not affect treadmill performance. If there is lubricant on top of the walking belt, simply wipe off the lubricant with a soft cloth and a mild, non-abrasive cleaner. - Page 7 3. With the help of a second person, carefully tip the Uprights (82) back to the vertical position. Attach the Latch Assembly (9) and the Latch Spacer (56) to the left Upright (82) with two Screws (101) as shown. 4. Insert a Handrail Extension (85) into the post on the left Upright (82).
- Page 8 Catch. 7. Make sure that all parts are properly tightened before you use the treadmill. Keep the included allen wrench in a secure place. The allen wrench is used to adjust the walking belt (see page 18). To protect the floor or carpet from damage, place a mat under the treadmill.
-
Page 9: Operation And Adjustment
OPERATION AND ADJUSTMENT THE PERFORMANT LUBE WALKING BELT Your treadmill features a walking belt coated with PERFORMANT LUBE , a high-performance lubricant. IMPORTANT: Never apply silicone spray or other substances to the walking belt or the walking plat- form. Such substances will deteriorate the walking belt and cause excessive wear. -
Page 10: Console Overview
You can even measure your heart rate using the built-in pulse sensor. Six certified personal trainer programs are also offered. Each program automatically controls the speed and in- cline of the treadmill as it guides you through an effec- tive workout. Displays LED Track To use the manual mode of the console, follow the steps beginning on page 11. - Page 11 When a personal trainer program is selected, the display will show the time remaining in the program, the incline level of the treadmill, and the time remaining in the current segment of the program.
- Page 12 When you are finished exercising, remove the key. Step onto the foot rails, press the STOP button, and adjust the incline of the treadmill to the lowest level. The incline must be at the lowest level when the treadmill is raised to the storage po- sition or the treadmill will be damaged.
- Page 13 The profiles on the console show how the speed and incline of the treadmill will change during the personal trainer programs. The numbers beside the profiles show the maximum speed and incline settings for the programs.
- Page 14 INFORMATION MODE/DEMO MODE The console features an information mode that keeps track of the total number of hours that the treadmill has been operated and the total number of miles that the walking belt has moved. The information mode also allows you to switch the console from miles per hour to kilometers per hour.
-
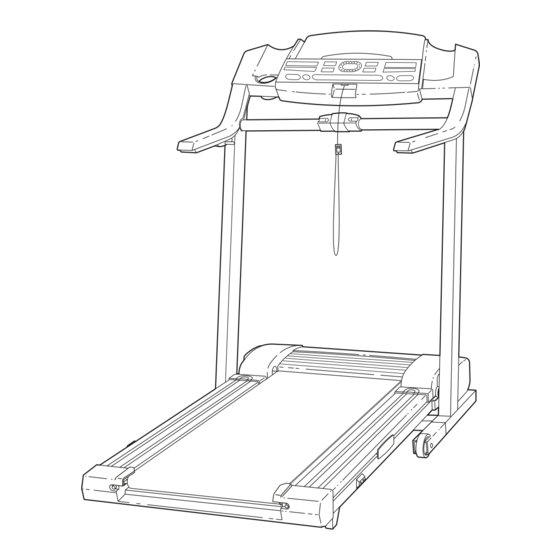
Page 15: How To Fold And Move The Treadmill
2. Move your right hand to the position shown and hold the treadmill firmly. Using your left hand, pull the latch knob to the left and hold it. Raise the treadmill until the latch pin is aligned with the hole in the catch. Insert the latch pin into the catch. - Page 16 HOW TO LOWER THE TREADMILL FOR USE 1. Hold the upper end of the treadmill with your right hand as shown. Using your left hand, pull the latch knob to the left and hold it. Pivot the treadmill down until the frame is past the pin.
-
Page 17: Troubleshooting
PROBLEM: The power turns off during use SOLUTION: a. Check the circuit breaker located on the treadmill frame near the power cord (see c. above). If the circuit breaker has tripped, wait for five minutes and then press the switch back in. - Page 18 SOLUTION: a. With the key inserted in the console, press one of the INCLINE buttons. While the incline is changing, remove the key. After a few seconds, re-insert the key. The treadmill will automati- cally rise to the maximum incline level and then return to the minimum level. This will recalibrate the incline.
-
Page 19: Conditioning Guidelines
For maximum fat burning, adjust the speed and incline of the treadmill until your heart rate is near the middle number in your training zone. Aerobic Exercise If your goal is to strengthen your cardiovascular sys- tem, your exercise must be “aerobic.”... - Page 20 SUGGESTED STRETCHES The correct form for several basic stretches is shown at the right. Move slowly as you stretch—never bounce. 1. Toe Touch Stretch Stand with your knees bent slightly and slowly bend forward from your hips. Allow your back and shoulders to relax as you reach down toward your toes as far as possible.
-
Page 21: Part List
PART LIST—Model No. PCTL55811 To locate the parts listed below, refer to the EXPLODED DRAWING attached in the center of this manual. Key No. Qty. Description Motor Belt Pulley/Flywheel/Fan Motor Nut Motor/Pulley/Flywheel/Fan Incline Motor Bolt Small Nut Incline Motor Stop Bracket Latch Assembly Hood Bracket Plate Rear Foot Spacer... - Page 22 Key No. Qty. Description Base Endcap Shock Choke Pulse Bar Bolt Pulse Bar Washer Pulse Bar Foam Grip (Left) Trim Guard Shield Small Bolt 114* Extension Leg Assembly Incline Motor Spacer Console Base Bottom Upright Endcap Key No. Qty. Description Isolator Spacer Base Pad Hand Pulse Wire Harness...
-
Page 23: Ordering Replacement Parts
(excluding holidays). When ordering parts, please be prepared to give the following information: • The MODEL NUMBER OF THE PRODUCT (PCTL55811) • The NAME OF THE PRODUCT (PROFORM • The SERIAL NUMBER OF THE PRODUCT (see the front cover of this manual) •... -
Page 24: Limited Warranty
Business 12) Do you wish to be sent further bulletins about ICON products? Colour Price Printed in Canada © 2003 ICON Health & Fitness, Inc. PURCHASE No Opinion Exercise Cycle Treadmill Weight Bench Stepper Other Fitness Motoring Computer General THANK YOU FOR YOUR TIME... - Page 25 EXPLODED DRAWING—Model No. PCTL55811 R0303A...
- Page 26 EXPLODED DRAWING—Model No. PCTL55811 R0303A...