Table of Contents
Advertisement
12" DOVETAIL JOINT FIXTURE
Model 34102
ASSEMBLY AND OPERATING INSTRUCTIONS
(Wood stock not included.)
®
3491 Mission Oaks Blvd., Camarillo, CA 93011
Visit our Web site at: http://www.harborfreight.com
®
Copyright
2002 by Harbor Freight Tools
. All rights reserved. No portion of this
manual or any artwork contained herein may be reproduced in any shape or form
without the express written consent of Harbor Freight Tools.
For technical questions, please call 1-800-444-3353.
Rev 12/02
Advertisement
Table of Contents

Summary of Contents for Central Machinery 34102
- Page 1 12” DOVETAIL JOINT FIXTURE Model 34102 ASSEMBLY AND OPERATING INSTRUCTIONS (Wood stock not included.) ® 3491 Mission Oaks Blvd., Camarillo, CA 93011 Visit our Web site at: http://www.harborfreight.com ® Copyright 2002 by Harbor Freight Tools . All rights reserved. No portion of this manual or any artwork contained herein may be reproduced in any shape or form without the express written consent of Harbor Freight Tools.
-
Page 2: Product Specifications
USE EYE AND BREATHING PROTECTION. Wear ANSI approved safety impact eye goggles and an ANSI approved dust mask or respirator when using this product. ANSI approved safety impact eye goggles, dust masks, and respirators are available from Harbor Freight Tools. SKU 34102 PAGE 2 REV 02/05... -
Page 3: Specific Product Warnings And Precautions
Bit larger than 1/2”, or damage to the Comb Table (part #18) will result. Adjust the Bit so that it will not come in contact with the Comb Table or Working Table (part #1). SKU 34102 PAGE 3... -
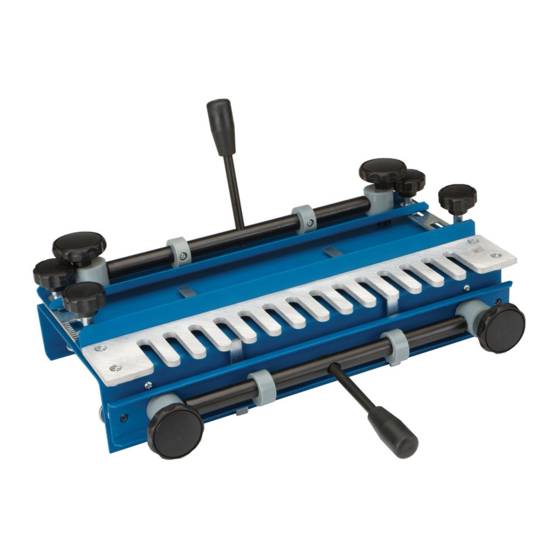
Page 4: Product Overview
PRODUCT OVERVIEW The Model 34102 Dovetail Joint Fixture allows you to create strong, precision cut, “Half-Blind” dovetails. Half-Blind dovetails are visible only from one side, and commonly used for drawer joinery when you do not want the end grain of the tails to show in the drawer front. - Page 5 Mark and drill four 3/16” holes in the workbench, using the two mounting holes at each end of the Dovetail Joint Fixture as a template. Then secure the Dovetail Joint Fixture to the workbench, using four wood screws (not included). (See Figure B.) SKU 34102 PAGE 5...
-
Page 6: End View
Bracket Frame (part #16), Comb Table (part #18), and Working Table (part #1). (See Figure C.) Adjust the horizontal wood stock so that its forward edge is flush with the forward vertical edge of the Working Table. (See Figure C.) SKU 34102 PAGE 6... -
Page 7: Fixing Screw "A
Comb Table inward or outward until it is properly positioned. Then, retighten the Fixing Screws “A”. (See Figure D.) Adjust the width of the four Stop Pins (part #19) so that they touch the two pieces SKU 34102 PAGE 7... -
Page 8: Fixing Screw "B
This Dovetail Joint Fixture is designed to be used with 1/4” shank, 1/2”, 14 degree dovetail bits only. The bit should protrude approximately 1/2” below the Router base plate, but may need minor adjustment. SKU 34102 PAGE 8 REV 02/05... - Page 9 #18). Make sure to cut the two pieces of wood stock to the full depth, but do not cut into the Comb Table or the Working Table (part #1). (See Figure D.) When the dovetails have been completely cut, turn off and remove the Router. SKU 34102 PAGE 9 REV 10/13...
-
Page 10: Bracket Frame
Comb as you move across. Without lifting the Router, completely rout the test wood stocks. SKU 34102 PAGE 10 REV 10/04... -
Page 11: Screw
Remove both test wood stocks from the Dovetail Joint Fixture to test for proper fit. If the dovetail joint fits properly, no further adjustment is necessary. If the joint is too loose, increase the distance from the base plate on the Router to the bottom of the Router Bit 1/64”. -
Page 12: Inspection, Maintenance, And Cleaning
AND NOT BY THE BUYER. THE BUYER ASSUMES ALL RISK AND LIABILITY ARIS- ING OUT OF HIS OR HER REPAIRS TO THE ORIGINAL PRODUCT OR REPLACE- MENT PARTS THERETO, OR ARISING OUT OF HIS OR HER INSTALLATION OF REPLACEMENT PARTS THERETO. SKU 34102 PAGE 12... -
Page 13: Parts List
Spacing Screw Adjusting Nut Bar Fixing Stand Support Eccentric Wheel Screw Rotary Rod Rod Fixer Knob ASSEMBLY DIAGRAM NOTE: Some parts are listed and shown for illustration purposes only, and are not available individually as replacement parts. SKU 34102 PAGE 13...