Table of Contents
Advertisement
Advertisement
Table of Contents

Related Manuals for Midland SpeakEasy Ultra


Summary of Contents for Midland SpeakEasy Ultra
-
Page 2: Table Of Contents
TABLE OF CONTENTS TIPS FOR GETTING THE MOST FROM YOUR 75-517........... 3 A NOTE ABOUT THE CTCSS or DCS CODES............. 4 PREPARATION......................4 BATTERIES......................4 CHARGING THE BATTERIES................5 BELT CLIP....................... 5 QUICK USE INSTRUCTIONS: ................... 5 POWER SAVE CIRCUIT..................... 5 RANGE OF FRS RADIOS................... -
Page 3: Tips For Getting The Most From Your 75-517
SUBJECT TO THE CONDITION THAT THIS DEVICE DOES NOT CAUSE HARMFUL INTERFERENCE. Your Midland model 75-517 brings the new FRS (Family Radio Service) to your fingertips. The Family Radio Service is provided for by the FCC and is totally license free. -
Page 4: A Note About The Ctcss Or Dcs Codes
with gaskets for water resistance and ruggedness it is a precision piece of electronic equipment that should not be exposed to water or handled carelessly. Normal care should result in years of trouble free operation. Do not leave batteries installed over a long period of time as leakage may occur, that can destroy the radio. -
Page 5: Charging The Batteries
Your 75-517 may not include rechargeable batteries and a charger. Install the batteries observing their polarity. If you are using rechargeable batteries and the Midland standard charger (model 18-396), plug the charger into a 115 volt wall socket and the charger plug into the charge jack marked “CHG”... -
Page 6: Features And Location Of Contols
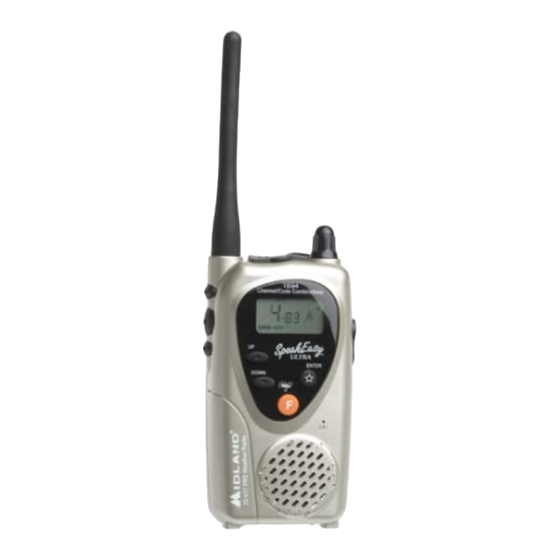
FEATURES AND LOCATION OF CONTOLS AUX. SPKR/MIC CHARGE JACK 1-Up/Down Buttons 2-Monitor Button 3-Push to Talk Button 4-Call Button 5-Accessory jacks 6-On/Off Volume Control 7-Charge Jack 8-Enter Button 9-Function Button 10-Auxillary Speaker/Mic jack THE RADIO MUST NOT BE SCANNING AND THE CONTOLS NOT LOCKED BEFORE THE CONTROLS WILL WORK PROPERLY. -
Page 7: Adjusting The Volume
ADJUSTING THE VOLUME Rotate the ON/OFF Volume control (6) clockwise to increase the volume. Rotate the ON/OFF Volume control counter clockwise to decrease the volume. ADJUSTING THE SQUELCH Squelch is preset, no adjustment is available. USING THE CALL FUNCTION Press and release the “CALL” button (4) on the side of the radio. This will cause the radio to transmit a tone to alert the other people in your group to listen for a message. -
Page 8: Listening To Weather Broadcasts
display will show “FF” or ”on” depending on the previous setting, and below in smaller letters “BEEP” Press and release repeatedly the “F” button (usually twice). An icon of a musical note will be displayed in the upper right corner of the display. Press and release the “UP”... -
Page 9: Activating Dual Watch
Press and release the ”UP” or “DOWN” channel button to activate scan. The radio will begin to scan for OPEN channels. Scanning will stop on the first available open channel for about 5 seconds then move to the next channel. Press the “PTT”... -
Page 10: Activating "Privacy" Codes
ACTIVATING “PRIVACY” CODES To activate “CTCSS” codes Press the “F” button repeatedly (usually 4 times) to cause the icon “CTCSS” to be displayed in the upper left of the display to flash. Press and release the “UP” or “DOWN” buttons to select the “CTCSS” code you desire. -
Page 11: Dcs Codes
DCS CODES There are 83 “DCS” codes. These are used in the same manor as the “CTCSS” codes. To activate the DCS Codes Press the “F” button repeatedly until the “DCS” icon flashes (usually 5 times). Press the “UP” or “Down” button to select the “DCS” code you desire. Press the “ENTER”... -
Page 12: Operating The Hands Free Vox (Voice Operated Transmit)
OPERATING THE HANDS FREE VOX (VOICE OPERATED TRANSMIT) Slide the switch on the side of the radio to “VOX”. Now you only have to talk into the microphone of an optional headset pluged into jack (5) to make the unit transmit. (PTT switch is inactive) The ”VOX”... -
Page 13: Setting Baby Sitter Mode
SETTING BABY SITTER MODE Choose a channel to be used, set BOTH radios to that channel. With the radio off, press and hold the “ENTER” button and turn the radio on. Release the “ENTER” button when the radio powers up. Press and release the “F”... -
Page 14: Setting Memory Channels
SETTING MEMORY CHANNELS There are 9 memory channels available. To set Memory Channels Press the “F” button repeatedly until the “M” is displayed above the flashing memory channel number in the lower right of the display. 2. Select a memory channel by pressing and releasing the “UP” or “DOWN” channel buttons. -
Page 15: Display Symbols
DISPLAY SYMBOLS CAUTION: DON’T EXPOSE THE DISPLAY TO EXTREME HOT OR COLD TEMPERATURE 1. Channel number: Displays FRS channel number 1-14 or Weather channel 00-09. 2. CTCSS Code Symbol: Indicates “CTCSS” are active 3. DCS Symbol: Indicates that Digital Coded Squelch mode is on. 4. -
Page 16: Troubleshooting
TROUBLESHOOTING PROBLEM SOLUTION No Power 1. Check battery installation and/or replace batteries Cannot Receive Messages 1. Make sure the volume is set high enough. 2. Confirm the radios have the same channel and or CTCSS/DCS code settings. 3. Change your location, you may be out of range. 4. -
Page 17: Care Of Rechargeable Ni-Cad Batteries
CARE OF RECHARGEABLE NI-CAD BATTERIES ALWAYS DISPOSE OF BATTERIES PROPERLY Always follow the battery manufactures recommendations for Charging and disposing of Ni-cad batteries. The following is meant as general information regarding Ni-cad batteries. 1. Occasionally allow the batteries to fully discharge before recharging. The battery indicator showing less than two segments will indicate full discharge. -
Page 18: Service
SERVICE: If you have a problem which you believe requires service, please call first and speak with a service technician. Many problems can be remedied over the phone without returning the unit for service. If it ever becomes necessary to return your unit for service: Pack the unit in its original box and packing. -
Page 19: Technical Specifications
TECHNICAL SPECIFICATIONS* GENERAL Frequency range..................462/467 MHz Channels.......................14 Modulation type....................FM Antenna impedance ..................50 Ohm Loud-speaker..………..............8 Ohm 0.5W Microphone...................…electronic type Power supply..........3 AA Ni-cads or Alkaline(3.6/4.5VDC) RECEIVER Sensitivity at 12dB Sinad................0.35µV Selectivity......................50 dB Squelch range...................…...Automatic Audio output power...........0.25W @ 8 Ohm (10% distortion) Distortion at 500 mV..................7% Audio frequency response..............400-2400 Hz TRANSMITTER... -
Page 20: Limited Warranty
LIMITED WARRANTY Midland Consumer Radio Inc. will repair or replace, at its option without charge, any Midland FRS transceiver which fails due to a defect in material or workmanship within ONE YEAR following the initial consumer purchase. This warranty does not include any carrying cases, earphones, or antennas, which may be a part of or included with the warranted product.